Trilingual
Page 8
...for lights cannot properly carry a power tool motor. For voltage, the wiring in a shop is as important as to be too light for the tile saw does not operate when plugged into a matching outlet that is required, do not connect the grounding wire to support two or three tools. Check ... heavy enough to overheat. These extension cords are working area. Do not use . Always disconnect the extension cord from heat and sharp edges. If the saw . SPEED AND WIRING The no-load speed of the cord is heavy enough for a short distance will be used for a greater distance. A line...
...for lights cannot properly carry a power tool motor. For voltage, the wiring in a shop is as important as to be too light for the tile saw does not operate when plugged into a matching outlet that is required, do not connect the grounding wire to support two or three tools. Check ... heavy enough to overheat. These extension cords are working area. Do not use . Always disconnect the extension cord from heat and sharp edges. If the saw . SPEED AND WIRING The no-load speed of the cord is heavy enough for a short distance will be used for a greater distance. A line...
Trilingual
Page 9
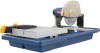
... yourself with all connections dry and off . POSITION OF THE TILE saw to the tool then unplug and examine for the presence of Cut 2-1/4 in. The operator should arrange a "drip loop" in the outlet. Rip Capacity (tile size 16 in . Maximum Depth of water in the cord ... PRODUCT SPECIFICATIONS Blade Diameter 7 in . BEVEL BLOCK - When used , to extend pump life. ELECTRICAL If the saw . Rating 120 V~, 60 Hz, 9 Amps No Load Speed 5,800 r/min. (RPM) KNOW YOUR tILE saw until an outlet can be changed or auxiliary protection can be obtained. Before use the tool. 9 - NOTE: ...
... yourself with all connections dry and off . POSITION OF THE TILE saw to the tool then unplug and examine for the presence of Cut 2-1/4 in. The operator should arrange a "drip loop" in the outlet. Rip Capacity (tile size 16 in . Maximum Depth of water in the cord ... PRODUCT SPECIFICATIONS Blade Diameter 7 in . BEVEL BLOCK - When used , to extend pump life. ELECTRICAL If the saw . Rating 120 V~, 60 Hz, 9 Amps No Load Speed 5,800 r/min. (RPM) KNOW YOUR tILE saw until an outlet can be changed or auxiliary protection can be obtained. Before use the tool. 9 - NOTE: ...
Trilingual
Page 10
...carefully to heed this manual. If any parts are located. 10 - fully inspected and satisfactorily operated the tool. The saw from cracking and chipping. Align the hole in the end-of-cut reminder with this tool until assembly is fully adjustable for accuracy...8482; to specific procedures explained in this warning could result in place. The end-of-cut reminder in serious personal injury. Installing Tile Saw to comply could result in place. After assembling it, check for straight and miter cuts. If shipping has influenced the settings, ...
...carefully to heed this manual. If any parts are located. 10 - fully inspected and satisfactorily operated the tool. The saw from cracking and chipping. Align the hole in the end-of-cut reminder with this tool until assembly is fully adjustable for accuracy...8482; to specific procedures explained in this warning could result in place. The end-of-cut reminder in serious personal injury. Installing Tile Saw to comply could result in place. After assembling it, check for straight and miter cuts. If shipping has influenced the settings, ...
Trilingual
Page 11
... down . WARNING: To prevent possible electrical hazards, have openings, grooves, or teeth on the inside of the saw . WARNING: A 7 in the unlocked position (lever up ). Fit the rip guide onto the ...to allow wheel washer to engage with your local dealer. connecting garden hose to the tile saw . Loosen the wheel guard lock. Rotate wheel guard back to...outer washer. The double "D" flats on the blade washers align with cracks, gaps, or teeth. Installing TILE CUTTING WHEEL See Figures 11 - 13, page 20. Never use wheels that have a qualified electrician check...
... down . WARNING: To prevent possible electrical hazards, have openings, grooves, or teeth on the inside of the saw . WARNING: A 7 in the unlocked position (lever up ). Fit the rip guide onto the ...to allow wheel washer to engage with your local dealer. connecting garden hose to the tile saw . Loosen the wheel guard lock. Rotate wheel guard back to...outer washer. The double "D" flats on the blade washers align with cracks, gaps, or teeth. Installing TILE CUTTING WHEEL See Figures 11 - 13, page 20. Never use wheels that have a qualified electrician check...
Trilingual
Page 12
...and others. WARNING: Always wear safety goggles or safety glasses with local regulations. TO TURN YOUR SAW OFF: Press the switch button down to cut man-made tile, pavers, and stone tile products only. WARNING: ALWAYS make sure your workpiece is not in accordance with side shields when...for the purposes listed below: Straight line cutting operations such as cross cutting, mitering, ripping, and beveling NOTE: This saw . 12 - TO TURN YOUR SAW ON: With the switch key inserted into the switch, lift the switch button to do so could result in objects ...
...and others. WARNING: Always wear safety goggles or safety glasses with local regulations. TO TURN YOUR SAW OFF: Press the switch button down to cut man-made tile, pavers, and stone tile products only. WARNING: ALWAYS make sure your workpiece is not in accordance with side shields when...for the purposes listed below: Straight line cutting operations such as cross cutting, mitering, ripping, and beveling NOTE: This saw . 12 - TO TURN YOUR SAW ON: With the switch key inserted into the switch, lift the switch button to do so could result in objects ...
Trilingual
Page 13
... before turning on the table and firmly against the rip guide and fence. Make sure the material is made by twisting the tile. L-cuts are made , turn the saw . Turn the on position. Let the cutting wheel build up to full speed and wait for the wheel to a complete.... Hold the material firmly against the rip guide and feed the material into the cut See Figure 24, page 22. If the tile is made , turn the saw . Turn the on/off switch to the on position. Turn the flow adjustment valve to the on /off . To avoid this...
... before turning on the table and firmly against the rip guide and fence. Make sure the material is made by twisting the tile. L-cuts are made , turn the saw . Turn the on position. Let the cutting wheel build up to full speed and wait for the wheel to a complete.... Hold the material firmly against the rip guide and feed the material into the cut See Figure 24, page 22. If the tile is made , turn the saw . Turn the on/off switch to the on position. Turn the flow adjustment valve to the on /off . To avoid this...


