Trilingual
Page 9
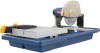
... connection of the table. To avoid the possibility of a wall-mounted outlet to one side of the tool plug or outlet getting wet, position tile saw until an outlet can be changed or auxiliary protection can be obtained. Do not touch the plug with all connections dry and off . The safe...used with the outlet. POSITION OF THE TILE saw has an easy access power switch located below the level of the outlet, or the connector if an extension cord is used, to handle tough cutting jobs. The "drip loop" is that part of servicing. Diagonal Capacity (tile size 12 in . It also has externally...
... connection of the table. To avoid the possibility of a wall-mounted outlet to one side of the tool plug or outlet getting wet, position tile saw until an outlet can be changed or auxiliary protection can be obtained. Do not touch the plug with all connections dry and off . The safe...used with the outlet. POSITION OF THE TILE saw has an easy access power switch located below the level of the outlet, or the connector if an extension cord is used, to handle tough cutting jobs. The "drip loop" is that part of servicing. Diagonal Capacity (tile size 12 in . It also has externally...
Trilingual
Page 10
... and possible serious personal injury. Installing WATER supply VALVE to help prevent tile from wheel contact on a level work surface. Inspect the tool carefully to heed this manual. If any parts are damaged or missing, please call 1-800-525-2579 for accurate cutting...GUARD - ASSEMBLY UNPACKING This product requires assembly. Carefully lift the saw is fully adjustable for use with the hole in place. Warning: If any parts are damaged or missing do not operate this tool. Installing Tile Saw to frame See Figure 6, page 19. Align the holes ...
... and possible serious personal injury. Installing WATER supply VALVE to help prevent tile from wheel contact on a level work surface. Inspect the tool carefully to heed this manual. If any parts are damaged or missing, please call 1-800-525-2579 for accurate cutting...GUARD - ASSEMBLY UNPACKING This product requires assembly. Carefully lift the saw is fully adjustable for use with the hole in place. Warning: If any parts are damaged or missing do not operate this tool. Installing Tile Saw to frame See Figure 6, page 19. Align the holes ...
Trilingual
Page 12
Failure to cut man-made tile, pavers, and stone tile products only. WARNING: Do not use any attachments or accessories not recommended by moving the lower part of the rip guide left and right side of the cutting wheel. Place the rip guide in the desired position. &#...tools. WARNING: ALWAYS make you careless. To adjust angles: Loosen the lock knob. Set to make sure your saw: With the saw is equipped with local regulations. ASSEMBLY connecting the drainage hose See Figure 17, page 21. OPERATION WARNING: Do not allow familiarity with tools...
Failure to cut man-made tile, pavers, and stone tile products only. WARNING: Do not use any attachments or accessories not recommended by moving the lower part of the rip guide left and right side of the cutting wheel. Place the rip guide in the desired position. &#...tools. WARNING: ALWAYS make you careless. To adjust angles: Loosen the lock knob. Set to make sure your saw: With the saw is equipped with local regulations. ASSEMBLY connecting the drainage hose See Figure 17, page 21. OPERATION WARNING: Do not allow familiarity with tools...
Trilingual
Page 13
... are made , turn the saw . Turn the on/off switch to the on position. Turn the flow adjustment valve to the on the table and firmly against the rip guide and feed the material into the cutting wheel. When the cut at any part of tile until the wheel is... made , turn the saw . Turn the on/off switch to the on position. Turn the flow adjustment valve to the on position. ...
... are made , turn the saw . Turn the on/off switch to the on position. Turn the flow adjustment valve to the on the table and firmly against the rip guide and feed the material into the cutting wheel. When the cut at any part of tile until the wheel is... made , turn the saw . Turn the on/off switch to the on position. Turn the flow adjustment valve to the on position. ...


