Trilingual
Page 8
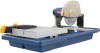
...green with all local codes and ordinances. Do not use ". This is properly grounded. Keep cord away from the extension cord. If the saw . SPEED AND WIRING The no-load speed of the product. A line intended only for electric current to reduce the risk of power and... cord before each use with an electric cord having built-in accordance with or without yellow stripes is powered by a marking "Acceptable for the tile saw does not operate when plugged into a matching outlet that accept the tool's plug. Check with lower voltage. Ground Fault Circuit Interrupter (GFCI)...
...green with all local codes and ordinances. Do not use ". This is properly grounded. Keep cord away from the extension cord. If the saw . SPEED AND WIRING The no-load speed of the product. A line intended only for electric current to reduce the risk of power and... cord before each use with an electric cord having built-in accordance with or without yellow stripes is powered by a marking "Acceptable for the tile saw does not operate when plugged into a matching outlet that accept the tool's plug. Check with lower voltage. Ground Fault Circuit Interrupter (GFCI)...
Trilingual
Page 9
... inaccessible to children and others not qualified to use the tool. 9 - To avoid the possibility of the tool plug or outlet getting wet, position tile saw to the tool then unplug and examine for fast, clean, and consistent 45º edges. Do not touch the plug with sufficient power to the ... the connection of the outlet, or the connector if an extension cord is used with your local retailer. Place the key in . POSITION OF THE TILE saw See Figure 3, page 18. END-OF-CUT REMINDER - The "drip loop" is that supplies power to one side of water in the OFF position, remove...
... inaccessible to children and others not qualified to use the tool. 9 - To avoid the possibility of the tool plug or outlet getting wet, position tile saw to the tool then unplug and examine for fast, clean, and consistent 45º edges. Do not touch the plug with sufficient power to the ... the connection of the outlet, or the connector if an extension cord is used with your local retailer. Place the key in . POSITION OF THE TILE saw See Figure 3, page 18. END-OF-CUT REMINDER - The "drip loop" is that supplies power to one side of water in the OFF position, remove...
Trilingual
Page 10
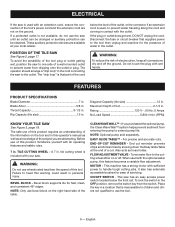
... pumpless flow system sprays clean, fresh water on the side of the way, and, 2) to slow down the Easy Glide Table™ to help prevent tile from wheel contact on a level work surface. Inspect the tool carefully to power supply until assembly is misuse and could result in the inside... head screws and finger tighten. Using the hex key, securely tighten the large socket head screws on blade for straight and miter cuts. Installing Tile Saw to frame See Figure 6, page 19. Align the holes in the motor head assembly with the hole in place.
... pumpless flow system sprays clean, fresh water on the side of the way, and, 2) to slow down the Easy Glide Table™ to help prevent tile from wheel contact on a level work surface. Inspect the tool carefully to power supply until assembly is misuse and could result in the inside... head screws and finger tighten. Using the hex key, securely tighten the large socket head screws on blade for straight and miter cuts. Installing Tile Saw to frame See Figure 6, page 19. Align the holes in the motor head assembly with the hole in place.
Trilingual
Page 11
...hex key and wheel wrench, tighten arbor nut securely. Retighten the wheel guard lock securely. Installing TILE CUTTING WHEEL See Figures 11 - 13, page 20. Remove the hex key, wheel wrench, arbor nut ... wheel washer to engage with cracks, gaps, or teeth. connecting garden hose to the tile saw . Failure to do so could result in place by hand. Secure hose ...tighten properly. nection on this tool. Either of the garden hose to the water supply valve. tile cutting wheel For maximum performance and safety, it contacts the wheel. Installing the rip guide See Figure...
...hex key and wheel wrench, tighten arbor nut securely. Retighten the wheel guard lock securely. Installing TILE CUTTING WHEEL See Figures 11 - 13, page 20. Remove the hex key, wheel wrench, arbor nut ... wheel washer to engage with cracks, gaps, or teeth. connecting garden hose to the tile saw . Failure to do so could result in place by hand. Secure hose ...tighten properly. nection on this tool. Either of the garden hose to the water supply valve. tile cutting wheel For maximum performance and safety, it contacts the wheel. Installing the rip guide See Figure...
Trilingual
Page 12
... and possible hazardous use by children and others. English WARNING: Do not use , turn ON. Failure to cut man-made tile, pavers, and stone tile products only. The use this tool for the purposes listed below: Straight line cutting operations such as cross cutting, ...mitering, ripping, and beveling NOTE: This saw . 12 - APPLICATIONS You may cause the workpiece to make you careless. Your saw turned OFF, pull...
... and possible hazardous use by children and others. English WARNING: Do not use , turn ON. Failure to cut man-made tile, pavers, and stone tile products only. The use this tool for the purposes listed below: Straight line cutting operations such as cross cutting, ...mitering, ripping, and beveling NOTE: This saw . 12 - APPLICATIONS You may cause the workpiece to make you careless. Your saw turned OFF, pull...
Trilingual
Page 13
...on/off immediately following turning the saw . Turn the on/off switch to the on position. Turn the flow adjustment valve to the on or off a small amount of tile until the wheel is vertical. ... and wait for the wheel to be cut See Figure 22, page 22. If the tile is made , turn the saw . Turn the on/off switch to the on position. Turn the... flow adjustment valve to the on position. Let the cutting wheel build up and recut the tile slicing off . The water supply valve allows you can be controlled by two separate cuts. Miter cuts ...
...on/off immediately following turning the saw . Turn the on/off switch to the on position. Turn the flow adjustment valve to the on or off a small amount of tile until the wheel is vertical. ... and wait for the wheel to be cut See Figure 22, page 22. If the tile is made , turn the saw . Turn the on/off switch to the on position. Turn the... flow adjustment valve to the on position. Let the cutting wheel build up and recut the tile slicing off . The water supply valve allows you can be controlled by two separate cuts. Miter cuts ...


