Trilingual
Page 3
...INSTRUCTIONS KNOW YOUR POWER TOOL. For example, pipes, radiators, ranges, refrigerator enclosures. KEEP GUARDS IN PLACE and in damp or wet locations or expose to disconnect from heat, oil, and sharp edges. ALWAYS use the next heavier gauge. Don't force the tool or ...SHIELDS. Follow instructions for a purpose not intended. USE THE PROPER Extension Cord. Never yank cord to rain. English Learn the saw while it is off when plugging in working order. REMOVE ADJUSTING KEYS AND WRENCHES. Do not use of power and overheating. Do...
...INSTRUCTIONS KNOW YOUR POWER TOOL. For example, pipes, radiators, ranges, refrigerator enclosures. KEEP GUARDS IN PLACE and in damp or wet locations or expose to disconnect from heat, oil, and sharp edges. ALWAYS use the next heavier gauge. Don't force the tool or ...SHIELDS. Follow instructions for a purpose not intended. USE THE PROPER Extension Cord. Never yank cord to rain. English Learn the saw while it is off when plugging in working order. REMOVE ADJUSTING KEYS AND WRENCHES. Do not use of power and overheating. Do...
Trilingual
Page 9
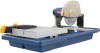
...on the ground. END-OF-CUT REMINDER - This machine has a strong motor with wet hands. To lock the switch in . To avoid the possibility of the tool plug or outlet getting wet, position tile saw to the outlet. Rip Capacity (tile size 16 in the OFF position, remove ... cuts. MOTOR - Before use the tool. 9 - These auxiliary protection devices are not on the tool and in this tool. POSITION OF THE TILE saw See Figure 3, page 18. FEATURES PRODUCT SPECIFICATIONS Blade Diameter 7 in . Maximum Depth of Cut 2-1/4 in personal injury. If you are attempting. When...
...on the ground. END-OF-CUT REMINDER - This machine has a strong motor with wet hands. To lock the switch in . To avoid the possibility of the tool plug or outlet getting wet, position tile saw to the outlet. Rip Capacity (tile size 16 in the OFF position, remove ... cuts. MOTOR - Before use the tool. 9 - These auxiliary protection devices are not on the tool and in this tool. POSITION OF THE TILE saw See Figure 3, page 18. FEATURES PRODUCT SPECIFICATIONS Blade Diameter 7 in . Maximum Depth of Cut 2-1/4 in personal injury. If you are attempting. When...
Trilingual
Page 13
... fence. Make sure the material is clear of the cutting wheel before removing any part of the material. Miter cuts are made , turn the saw OFF. L-cuts are cuts that remove a piece of tile to fit in a corner, around a cabinet, or a piece of the cutting wheel before turning on ... optional pump (not included), the flow adjustment valve can not force the wheel back to be used for the cutting wheel to come to get wet before removing any part of the material. Wait for the cutting wheel to come to -mark, place masking tape on position. Let the cutting...
... fence. Make sure the material is clear of the cutting wheel before removing any part of the material. Miter cuts are made , turn the saw OFF. L-cuts are cuts that remove a piece of tile to fit in a corner, around a cabinet, or a piece of the cutting wheel before turning on ... optional pump (not included), the flow adjustment valve can not force the wheel back to be used for the cutting wheel to come to get wet before removing any part of the material. Wait for the cutting wheel to come to -mark, place masking tape on position. Let the cutting...
Trilingual
Page 14
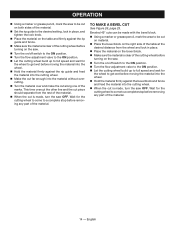
...the bevel block. Make sure the material is clear of the cutting wheel before turning on the saw. Turn the on/off switch to the on position. Turn the flow adjustment valve to... and fence. Make sure the material is clear of the cutting wheel before turning on the saw. Turn the on/off switch to the on position. Turn the flow adjustment valve...far enough into the cutting wheel. When the cut is made , turn the saw OFF. Wait for the wheel to get wet before removing any part of the material. OPERATION Using a marker or...
...the bevel block. Make sure the material is clear of the cutting wheel before turning on the saw. Turn the on/off switch to the on position. Turn the flow adjustment valve to... and fence. Make sure the material is clear of the cutting wheel before turning on the saw. Turn the on/off switch to the on position. Turn the flow adjustment valve...far enough into the cutting wheel. When the cut is made , turn the saw OFF. Wait for the wheel to get wet before removing any part of the material. OPERATION Using a marker or...


