Operation Manual
Page 4
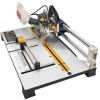
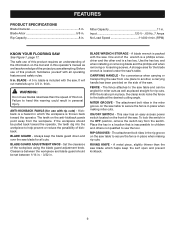
... the plug does not fit fully in this tool has a polarized plug (one way. Never use only identical replacement parts. Inspect for safe use blades with saw is wider than the other). GENERAL SAFETY RULES NEVER USE IN AN EXPLOSIVE ATMOSPHERE. Do not rush. DO NOT USE TOOL ...IF SWITCH DOES NOT TURN IT ON AND OFF. If it well away from oil and grease. The maximum blade capacity of your saw or workpiece before cutting. Never touch blade or other parts may cause the risk of accessories that are secure. BE SURE...
... the plug does not fit fully in this tool has a polarized plug (one way. Never use only identical replacement parts. Inspect for safe use blades with saw is wider than the other). GENERAL SAFETY RULES NEVER USE IN AN EXPLOSIVE ATMOSPHERE. Do not rush. DO NOT USE TOOL ...IF SWITCH DOES NOT TURN IT ON AND OFF. If it well away from oil and grease. The maximum blade capacity of your saw or workpiece before cutting. Never touch blade or other parts may cause the risk of accessories that are secure. BE SURE...
Operation Manual
Page 5
... while cutting to be clamped. Never start the saw blade. Do not allow the saw blade. b) Keep hands and body out of path of tool after each cross cut on reducing risk of blade pinching and kickback. h) Return saw to rear of saw blade to come to a complete stop before disconnecting it... turn the power off rapidly. Always place the workpiece to minimize risk of kickback. ALWAYS MAKE SURE THE SAW BLADE HAS CLEARANCE OF ALL OBSTRUCTIONS BEFORE TURNING THE SAW ON. ALWAYS carry the tool only by an authorized service center to avoid risk. make sure ...
... while cutting to be clamped. Never start the saw blade. Do not allow the saw blade. b) Keep hands and body out of path of tool after each cross cut on reducing risk of blade pinching and kickback. h) Return saw to rear of saw blade to come to a complete stop before disconnecting it... turn the power off rapidly. Always place the workpiece to minimize risk of kickback. ALWAYS MAKE SURE THE SAW BLADE HAS CLEARANCE OF ALL OBSTRUCTIONS BEFORE TURNING THE SAW ON. ALWAYS carry the tool only by an authorized service center to avoid risk. make sure ...
Operation Manual
Page 8
... keep the operator's hands well away from wood products. Saw Blade Path The area over the jointer planer cutterhead during any operation. Through Sawing Any cutting operation where the blade extends completely through the thickness of the blade to the fence. GLOSSARY OF TERMS Anti-Kickback Pawls (flooring... operation made at any angle other than the blade, which helps keep the operator's hands well away from the blade. Non-Through Cuts Any cutting operation where the blade does not extend completely through the thickness of the saw blade tooth is bent (or set) outward from ...
... keep the operator's hands well away from wood products. Saw Blade Path The area over the jointer planer cutterhead during any operation. Through Sawing Any cutting operation where the blade extends completely through the thickness of the blade to the fence. GLOSSARY OF TERMS Anti-Kickback Pawls (flooring... operation made at any angle other than the blade, which helps keep the operator's hands well away from the blade. Non-Through Cuts Any cutting operation where the blade does not extend completely through the thickness of the saw blade tooth is bent (or set) outward from ...
Operation Manual
Page 9
...MITER GROOVE - ON/OFF SWITCH - To lock the switch in . A metal piece, slightly thinner than the speed of this product, familiarize yourself with the saw blade for all operating features and safety rules. 5 in the OFF position, remove the switch key from one place to heed this tool. The safe use... of the information on the anti-kickback pawls point away from the workpiece. BLADE - thick. WARNING: Do not use with the saw blade which the workpiece is included with all cuts. The teeth on the tool and in a location that is packed with...
...MITER GROOVE - ON/OFF SWITCH - To lock the switch in . A metal piece, slightly thinner than the speed of this product, familiarize yourself with the saw blade for all operating features and safety rules. 5 in the OFF position, remove the switch key from one place to heed this tool. The safe use... of the information on the anti-kickback pawls point away from the workpiece. BLADE - thick. WARNING: Do not use with the saw blade which the workpiece is included with all cuts. The teeth on the tool and in a location that is packed with...
Operation Manual
Page 10
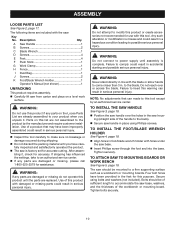
...to comply could result in line with this list are replaced. Do not reach over the holes in foot/blade wrench holder with holes under the saw handle over or across the blade. ASSEMBLY LOOSE PARTS LIST See Figure 2, page 17. to power supply until you unpack it , check ...result in serious personal injury. After assembling it . Any such alteration or modification is complete. WARNING: Do not connect to the blade. TO attach saw handle in serious personal injury. Inspect the tool carefully to mounting boards or work surface. Tighten bolts securely. 10
...to comply could result in line with this list are replaced. Do not reach over the holes in foot/blade wrench holder with holes under the saw handle over or across the blade. ASSEMBLY LOOSE PARTS LIST See Figure 2, page 17. to power supply until you unpack it , check ...result in serious personal injury. After assembling it . Any such alteration or modification is complete. WARNING: Do not connect to the blade. TO attach saw handle in serious personal injury. Inspect the tool carefully to mounting boards or work surface. Tighten bolts securely. 10
Operation Manual
Page 11
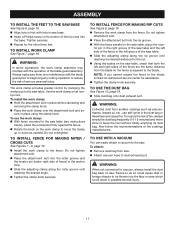
.... Tighten the clamp knob securely. To attach: Remove dust bag from the blade so the fence is no interference with the blade guard prior to beginning any cutting operation to the saw table. Use the work clamp over the attachment bolt and se- tor pin in the right groove...Place the attachment bolt into the base. WARNING: When not connected to the saw base See Figure 6, page 18. Align hole in the bottom of the blade guard assembly. WARNING: In some operations, the work clamp to the saw table, place the loca- To install the work clamp: Hold ...
.... Tighten the clamp knob securely. To attach: Remove dust bag from the blade so the fence is no interference with the blade guard prior to beginning any cutting operation to the saw table. Use the work clamp over the attachment bolt and se- tor pin in the right groove...Place the attachment bolt into the base. WARNING: When not connected to the saw base See Figure 6, page 18. Align hole in the bottom of the blade guard assembly. WARNING: In some operations, the work clamp to the saw table, place the loca- To install the work clamp: Hold ...
Operation Manual
Page 12
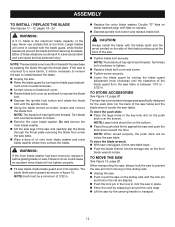
... counterclockwise. Loosen screw on blade bolt cover. Rotate blade bolt cover up at the front of the saw blade inside blade guard and onto spindle. WARNING: If the inner blade washer has been removed, replace it before placing blade on the foot/ blade wrench holder. Turn blade bolt clockwise to expose the blade bolt. Depress the spindle...
... counterclockwise. Loosen screw on blade bolt cover. Rotate blade bolt cover up at the front of the saw blade inside blade guard and onto spindle. WARNING: If the inner blade washer has been removed, replace it before placing blade on the foot/ blade wrench holder. Turn blade bolt clockwise to expose the blade bolt. Depress the spindle...
Operation Manual
Page 13
... Always use clean, sharp, and properly set blades. Any slip can result in a specific project. Never saw blade. Never make cuts with dull blades. To avoid pinching the blade, support the work for narrow cuts and all non-through the blade in a push block are devices that may gather...block has a handle fastened by the manufacturer of a second is equipped with the blade. Clean the saw, blade guard, under the throat plate, and any cutting angle while the saw is running and the blade is allowed. Remember that has a built-in use by children and others. AVOIDING ...
... Always use clean, sharp, and properly set blades. Any slip can result in a specific project. Never saw blade. Never make cuts with dull blades. To avoid pinching the blade, support the work for narrow cuts and all non-through the blade in a push block are devices that may gather...block has a handle fastened by the manufacturer of a second is equipped with the blade. Clean the saw, blade guard, under the throat plate, and any cutting angle while the saw is running and the blade is allowed. Remember that has a built-in use by children and others. AVOIDING ...
Operation Manual
Page 14
...finger under the release lever. Lift up on the release lever and maintain pressure on the saw table. Loosen the indicator screw. Align the saw cut with the blade before operating the switch to start the tool. When hands are completely lowered, move finger from the... 1/16 in. - 3/32 in personal injury. 14 WARNING: Do not use blades rated less than the speed of the blade. Turn the saw on the workpiece. Turn the saw off position before connecting saw to raise or lower these pawls while carefully keeping all mentioned in contact with the...
...finger under the release lever. Lift up on the release lever and maintain pressure on the saw table. Loosen the indicator screw. Align the saw cut with the blade before operating the switch to start the tool. When hands are completely lowered, move finger from the... 1/16 in. - 3/32 in personal injury. 14 WARNING: Do not use blades rated less than the speed of the blade. Turn the saw on the workpiece. Turn the saw off position before connecting saw to raise or lower these pawls while carefully keeping all mentioned in contact with the...
Operation Manual
Page 15
... page 22. Miter cuts are made with both the fence and the surface of the table. to the rear of the saw table. Place the workpiece flat on the saw table with the edge of saw blade. Tighten the clamp knob securely. Pull out the lock pin and push the... edge securely against the fence. Align cutting line on the workpiece with the edge of saw blade. Use the work clamp to a complete stop before feeding the workpiece into the blade. Once the blade has made contact with the indicator. Make sure the wood is made by cutting across...
... page 22. Miter cuts are made with both the fence and the surface of the table. to the rear of the saw table. Place the workpiece flat on the saw table with the edge of saw blade. Tighten the clamp knob securely. Pull out the lock pin and push the... edge securely against the fence. Align cutting line on the workpiece with the edge of saw blade. Use the work clamp to a complete stop before feeding the workpiece into the blade. Once the blade has made contact with the indicator. Make sure the wood is made by cutting across...
Operation Manual
Page 16
... the above steps for use with a soft damp cloth. WARNING: Do not at retail stores: 089230100053 Saw Blade WARNING: Current attachments and accessories available for the left side of commercial solvents and may be below the saw . Make sure the throat plate is in serious personal injury. LUBRICATION All of high grade lubricant...
... the above steps for use with a soft damp cloth. WARNING: Do not at retail stores: 089230100053 Saw Blade WARNING: Current attachments and accessories available for the left side of commercial solvents and may be below the saw . Make sure the throat plate is in serious personal injury. LUBRICATION All of high grade lubricant...
Repair Sheet
Page 3
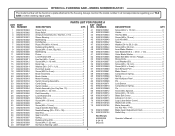
... 1 48 089230100044 Screw (M5 x 35 mm 1 49 089230100052 Inner Blade Washer 1 50 089230100053 Saw Blade (D5/8 in. × D5 in all correspondence regarding your TILE SAW or when ordering repair parts. MODEL NUMBER RLS1351 The model number will be found on a plate attached to the housing... 1 23 089230100021 Cord Clamp 1 24 089230100023 Switch Holder 1 25 089230100024 Switch Assembly (Inc. RYOBI 5 in. NO. FLOORING SAW - NUMBER DESCRIPTION QTY. NUMBER DESCRIPTION QTY. 1 089230100063 Power Cord 1 2 089230100062 Bend Relief 1 3 089230100703 Armature Assembly (Inc.
... 1 48 089230100044 Screw (M5 x 35 mm 1 49 089230100052 Inner Blade Washer 1 50 089230100053 Saw Blade (D5/8 in. × D5 in all correspondence regarding your TILE SAW or when ordering repair parts. MODEL NUMBER RLS1351 The model number will be found on a plate attached to the housing... 1 23 089230100021 Cord Clamp 1 24 089230100023 Switch Holder 1 25 089230100024 Switch Assembly (Inc. RYOBI 5 in. NO. FLOORING SAW - NUMBER DESCRIPTION QTY. NUMBER DESCRIPTION QTY. 1 089230100063 Power Cord 1 2 089230100062 Bend Relief 1 3 089230100703 Armature Assembly (Inc.

Repair Sheet
Page 5
... model number in . NO. RYOBI 5 in all correspondence regarding your TILE SAW or when ordering repair parts.... Cover 1 54 089230100100 Front Slide Rail Holder Bracket 1 55 089230100701 Fence Assembly 1 5 MODEL NUMBER RLS1351 The model number will be found on a plate attached to the housing. NUMBER DESCRIPTION QTY. 1 ... 5 089230100074 Screw (M4 × 10 mm 11 6 089230100902 Warning Label (English 1 7 089230100118 Support Foot/Blade Wrench Holder 1 8 089230100119 Blade Wrench (M6 1 9 089230100103 Screw (M5 x 10 mm 2 10 089230100102 Support Foot 4 11 089230100058 Screw (...
... model number in . NO. RYOBI 5 in all correspondence regarding your TILE SAW or when ordering repair parts.... Cover 1 54 089230100100 Front Slide Rail Holder Bracket 1 55 089230100701 Fence Assembly 1 5 MODEL NUMBER RLS1351 The model number will be found on a plate attached to the housing. NUMBER DESCRIPTION QTY. 1 ... 5 089230100074 Screw (M4 × 10 mm 11 6 089230100902 Warning Label (English 1 7 089230100118 Support Foot/Blade Wrench Holder 1 8 089230100119 Blade Wrench (M6 1 9 089230100103 Screw (M5 x 10 mm 2 10 089230100102 Support Foot 4 11 089230100058 Screw (...


