Ryobi JM82K Support and Manuals
Get Help and Manuals for this Ryobi item
Popular Ryobi JM82K Manual Pages
English Manual - Page 1

... FUTURE REFERENCE WARNING: To reduce the risk of rugged, trouble-free performance.
Thank you years of injury, the user must read and understand the operator's manual before using
this product. OPERATOR'S MANUAL
BISCUIT JOINER
DOUBLE INSULATED JM82
Your biscuit joiner has been engineered and manufactured to our high standard for your purchase. When properly cared for, it will...
English Manual - Page 6

... to use only identical replacement parts. SAVE THESE INSTRUCTIONS
6 SYMBOL SIGNAL DANGER...SERVICE
Servicing requires extreme care and knowledge and should be performed only by a qualified service technician. When servicing, use this operator's manual and review frequently for continuing safe operation and instructing...Wide Vision Safety Mask for repair.
Indicates a potentially hazardous ...
English Manual - Page 10
...such alteration or modification is complete. n If any parts are replaced. WARNING:
Do not connect to comply could result in possible serious injury. Failure to power supply until you have carefully inspected and satisfactorily operated the tool.
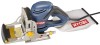
PACKING LIST
Biscuit Joiner
#10 Biscuits (20)
Carrying Case
Operator's Manual
INSTALLING/REMOVING THE DUST BAG
See Figure 2. DUST BAG...
English Manual - Page 12
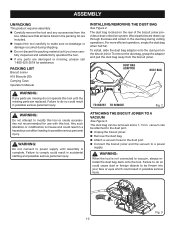
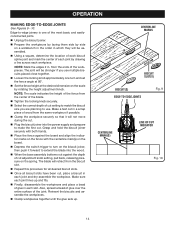
... knurled adjustment knob and jam nut in figure 5. Rotating the jam nut to use.
To select depth of cut shallow biscuit slots. n Rotate the depth adjustment knob until the desired slot setting aligns with the jam nut. n Unplug the biscuit joiner. This knob is too deep or too shallow, fine adjustments to the depth...
English Manual - Page 13
... TIGHTEN TO LOOSEN
Fig. 8
13
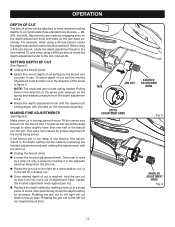
FENCE ANGLE
The adjustable fence on the biscuit joiner can be set in .
The fence can be positioned up or down to adjust the position of the blade in increments of the blade. SETTING THE FENCE HEIGHT
See Figure 7.
SETTING THE FENCE ANGLE
See Figure 8. n Loosen the locking knob approximately one turn...
English Manual - Page 14
... wood from the same workpiece if possible. Make a test cut setting to -edge joinery is one turn and set the fence angle at the desired dimension on the biscuit joiner, then push it will be stronger if you are planning to extend the blade into the power supply and prepare to turn on the scale...
English Manual - Page 15
... the locking knob securely.
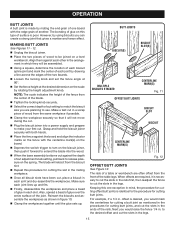
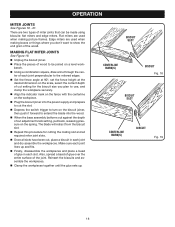
n Plug the biscuit joiner into the wood. n Depress the switch trigger to turn on this type of the blade. n Clamp the workpieces together until the glue sets up and fits. BUTT JOINTS
BISCUIT(S)
BISCUIT SLOT(S)
MULTIPLE BISCUITS STACKED
CENTERLINE MARK(S)
Fig. 11
OFFSET BUTT JOINTS
BISCUIT SLOT
BISCUIT
CENTERLINE MARK(S)
Fig. 12
OFFSET BUTT JOINTS...
English Manual - Page 16
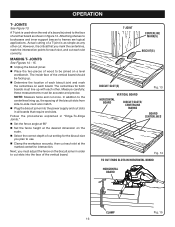
... to bookcases and inner support braces to the face of the vertical board should be facing up. MAKING T-
Measure carefully;
n Plug the biscuit joiner into the face of cut setting for each slot correctly.
OPERATION
T- these measurements must adjust the fence on a level workbench.
n Set the fence angle at 90°
n Set the fence height at...
English Manual - Page 17
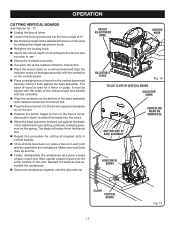
... the workpieces.
The blade will retract from the biscuit slot.
n Plug the biscuit joiner into the wood. Also, spread a bead of glue over the entire surface of the vertical board and parallel with the centerline on the bottom of wood is used for the biscuit size you plan to cut adjustment knob setting, pull back, releasing...
English Manual - Page 18
.... n Once all required miter joint slots.
Flat miters are used when making picture frames.
n Depress the switch trigger to turn on the biscuit joiner, then push it forward to extend the blade into the power supply and prepare to cut setting for cutting the mating slot and all slots have been cut adjustment knob...
English Manual - Page 19
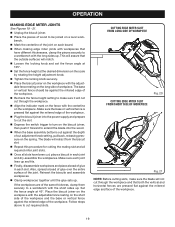
... a workbench with the short sides up and fits. The blade will assure that both the vertical and horizontal fences are of cut through the workpiece. n Finally, disassemble workpieces and place a bead of the joint on the biscuit joiner, then push it will match.
Set the fence angle at 135°. CUTTING EDGE MITER SLOT...
English Manual - Page 26

... in the space provided below.
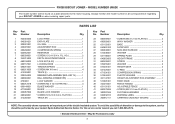
• HOW TO ORDER REPAIR PARTS
When ordering repair parts, always give the following information:
• MODEL NUMBER
JM82
• SERIAL NUMBER
Ryobi® is a registered trademark of Authorized Service Centers.
• MODEL NO. OPERATOR'S MANUAL
BISCUIT JOINER
DOUBLE INSULATED JM82
• SERVICE
Now that you call 1-800-525-2579 for your nearest...
Repair Sheet - Page 3
... NUMBER JM82K
The model number will be found on a plate attached to the system, service should be performed by your BISCUIT JOINER or when ordering repair parts. Always mention the model number in .
Number
LOGO PIATE 1 DATA PLATE 1 OIL SEAL 1 ADJUSTMENT ROD 1 COMPRESSION SPRING 1 REAR BASE 1 * SCREW (10-24 X 3/4 in all correspondence regarding your nearest Ryobi Authorized Service...
Repair Sheet - Page 5
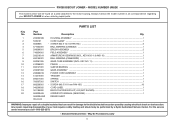
... LABEL ...1 BISCUIT ACCESSORY KIT, #10 (NOT SHOWN 1 OPERATOR'S MANUAL (960223252 1 REPAIR SHEET
WARNING: Improper repair of your BISCUIT JOINER or when ordering repair parts. For the service center nearest you call 1-800-525-2579.
* Standard Hardware Item - RYOBI BISCUIT JOINER - Always mention the model number in damage to the motor housing.
MODEL NUMBER JM82K
The model number...
Repair Sheet - Page 6
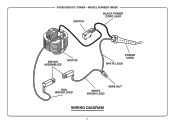
MODEL NUMBER JM82K
SWITCH
BLACK POWER CORD LEAD
BRUSH ASSEMBLIES
MOTOR
POWER CORD
WHITE LEAD
RED BRUSH LEAD
WHITE BRUSH LEAD
WIRE NUT
WIRING DIAGRAM
6 RYOBI BISCUIT JOINER -
Ryobi JM82K Reviews
We have not received any reviews for Ryobi yet.