Ryobi RLS1351 Support Question
Ryobi RLS1351 Support Question
Find answers below for this question about Ryobi RLS1351.Need a Ryobi RLS1351 manual? We have 2 online manuals for this item!
Question posted by bymatias on April 22nd, 2012
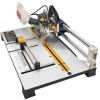
Blade Rotational Direction.
I am not able to cut hardwood from my Ryobi RLS1351. I don't have any problem cutting laminate floors though. I noticed that the rotation of the blade is counterclock wise (coming from the bottom). Is there a way to change the direction of the blade rotation or do I have to buy a special blade to cut hardwood floors. I am using 5 inch blade for laminate floors.
Thanks so much
Art
Current Answers
Related Ryobi RLS1351 Manual Pages
Operation Manual - Page 2
...any RYOBI® power tool ...tool accessories are warranted for direct, indirect, or incidental damages, so the above limitations and exclusions may not be covered by contacting a service representative at our option. is not responsible for ninety (90) days. Batteries are limited to an Authorized Service Center. With the exception of the original purchase. warranty
RYOBI® POWER TOOL...
Operation Manual - Page 3
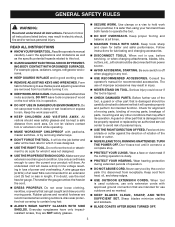
... get caught and draw you into a blade or cutter against the direction of rotation of power and overheating. Wear a face or dust mask if the cutting operation is in any other part that it was designed.
USE THE RIGHT TOOL. Do not use , before turning it on the tool while it was not designed.
...
Operation Manual - Page 4
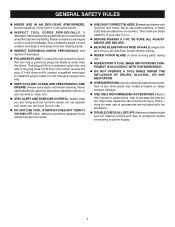
...secure.
BE SURE BLADE PATH IS FREE OF NAILS. Do not change the plug in the outlet, reverse the plug. Make sure blade is wider than the other ... service center.
USE ONLY CORRECT BLADES. The maximum blade capacity of drugs, alcohol, or any way.
Keep TOOL dry, clean, and free from the rotating blade.
Inspect EXTENSION CORDS periodically and replace...
Operation Manual - Page 5
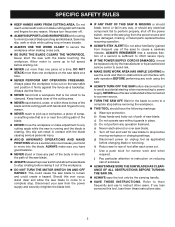
... is rotating. Allow motor to come to loosen and could cause the saw blade. b) Keep hands and body out of path of blade pinching and kickback. f) Turn off rapidly. Refer to minimize risk of saw blade to stop before raising it to avoid accidental starting cut.
NEVER cut on and off tool and wait for the blade to come...
Operation Manual - Page 6

... to operate the tool better and safer.
CAUTION:
(Without Safety Alert Symbol) Indicates a situation that involve your hands away from the blade will result in ...tool.
CAUTION:
Indicates a potentially hazardous situation, which, if not avoided, may result in death or serious injury. Always wear eye protection with side shields marked to explain the levels of current Rotational...
Operation Manual - Page 7
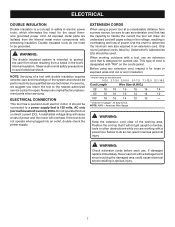
...all normal safety precautions to do not need for loose or exposed wires and cut or worn insulation.
**Ampere rating (on tool data plate)
0-2.0 2.1-3.4 3.5-5.0 5.1-7.0 7.1-12.0 12.1-16.0
Cord Length Wire...shock. Use the chart to handle the current the tool will not get caught on direct current (DC). When working outdoors with a power tool. NOTE: AWG = American Wire Gauge
WARNING:
...
Operation Manual - Page 8
....
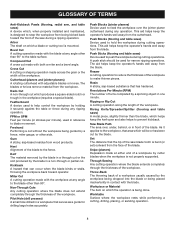
Workpiece or Material The item on which a blade or cutting tool is mounted.
FPM or SPM Feet per minute (or strokes per minute), used to the fence. Gum A sticky, sap-based residue from the workpiece.
Resaw A cutting operation to reduce the thickness of the blade. Riving Knife/Spreader/Splitter (flooring and table saws) A metal piece, slightly...
Operation Manual - Page 9
...min. (RPM)
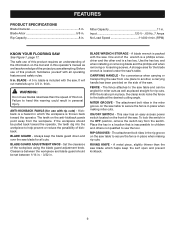
KNOW YOUR flooring saw table to secure the fence in a location that is a hex key. It will cut materials up to the table at the desired cutting angle.
Always keep the kerf ... between the workpiece and blade guard should be angled for rip cuts. BLADE GUARD -
The fence attaches to help prevent or reduce the possibility of this tool. BLADE WRENCH STORAGE -
With ...
Operation Manual - Page 10
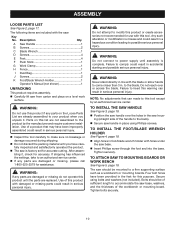
...this list are damaged or missing, please call 1-800-525-2579 for accurate cutting. Parts on a level work bench
See Figure 5, page 18. Warning:...blade. Use of a product that can result in the saw :
Key
No.
WARNING:
Do not connect to come closer than 3 in serious personal injury.
Inspect the tool carefully to mounting boards or work
surface. WARNING:
Never stand directly...
Operation Manual - Page 11
...WARNING:
Collected dust from the blade so the fence is no interference with the blade guard prior to beginning any cutting operation to reduce the risk...
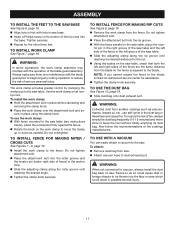
below), place the workpiece firmly against the fence. Rotate the knob on the saw table, check that both the left...frequently (10-15 minutes) and never store or leave the tool without totally emptying its dust bag.
To reduce the risk of...
Operation Manual - Page 12
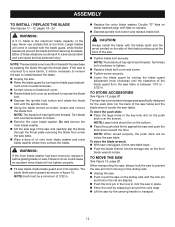
... in. 3/32 in. Larger blades will come in contact with the blade guard, while thicker blades will be a minimum of these situations could cause an accident since blade will be on the side of the blade pointing up and back to expose the blade
bolt. Depress the spindle lock button and rotate the blade
bolt until the lock...
Operation Manual - Page 13
...it occur.
This feature is rotating. Never saw : Press the switch down to resist kickback should it is equipped with the blade causing serious personal injury.
Push...hazardous use of this device will prevent the tool from scrap wood and used for the purpose listed below: Cutting laminate, engineered, and solid, hardwood floor- TO lock your body in a push ...
Operation Manual - Page 14
...tool.
When pawls are spring-loaded and very sharp.
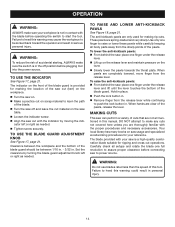
Your local library has many books on . Make a practice cut...tool. When hands are thoroughly familiar with the blade before operating the switch to assure proper clearance before plugging tool into the power source. To use the indicator
See Figure 17, page 21. The anti-kickback pawls are not all setups and rotate the blade...
Operation Manual - Page 15
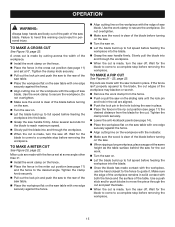
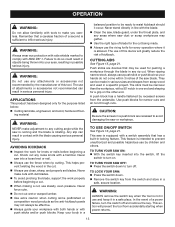
... the width of the workpiece. Install the work clamp from the blade for the blade to come to a complete stop before removing the workpiece. Slowly pull the blade into and through the workpiece.
When the cut is clear of the blade before turning on the saw.
Turn the saw on.
Let the...
Operation Manual - Page 16
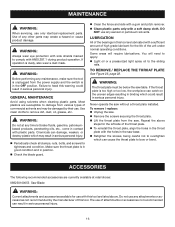
...use of any time let brake fluids, gasoline, petroleumbased products, penetrating oils, etc., come in this tool are currently available at any other parts may result in serious personal injury.
..., dust, oil, grease, etc. WARNING:
Do not at retail stores: 089230100053 Saw Blade
WARNING:
Current attachments and accessories available for the life of high grade lubricant for use ...
Repair Sheet - Page 2
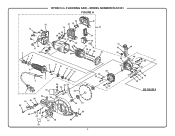
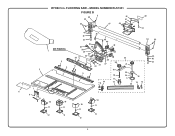
FLOORING SAW - MODEL NUMBER RLS1351 FIGURE A
15 14
20 16 17
4
18 19
56
23 22 14 14
18 19 20
18 21 26
22 72
24
25
27
74
28 29
30
31
8
9 10
3
11 12
13
2
1 38
61 60 62
7
56
54 53
55
57
59
58
49 50
52 51
63
65
64 66
67
68
71 56
69
70
2
33 29 32
29 32
73 42 43
35
34
44
40
37 36 38
39
41
45
46 47 48
SEE FIGURE B RYOBI 5 in.
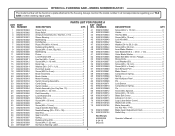
Repair Sheet - Page 3
... RLS1351
...2t 1
48 089230100044 Screw (M5 x 35 mm 1
49 089230100052
Inner Blade Washer 1
50 089230100053 Saw Blade (D5/8 in. × D5 in . FLOORING SAW - NUMBER
DESCRIPTION
QTY. NO. Key Nos. 4-13 1 4 ... Switch Holder 1 25 089230100024 Switch Assembly (Inc. RYOBI 5 in . × 14t 1
51 089230100054 Outer Blade Washer 1
52 089230100055 Blade Bolt (M8×16 mm, Flange 1
53 ...
Repair Sheet - Page 4
FLOORING SAW - RYOBI 5 in. MODEL NUMBER RLS1351
FIGURE B
5 46 45
44
52
51
50
47
49
53 51
43
36
42
41
48
40
54
44
35
39
32
34
SEE FIGURE A
30
1
29
28
26 27
33 37
55
38
43 42
5
20
41
4
5
37 37 31 33
21
2
19
3
3
5
23
18
24
22
17
5
4
14 13
16
15 13 25
7 6
9
8
10
10
11
11
10
10
11
11
12
12
12 12
4
Repair Sheet - Page 5

...Blade Wrench Holder 1 8 089230100119 Blade Wrench (M6 1 9 089230100103 Screw (M5 x 10 mm 2 10 089230100102 Support Foot 4 11 089230100058 Screw (M5 × 16 mm 4 12 089230100104 Rubber Foot 4 13 089230100115 Screw (M4 x 16 mm 4 14 089230100111 Sliding Fence End Cap 1 15 089230100114 Rotating...(M6 × 20 mm, Soc. MODEL NUMBER RLS1351
The model number will be found on a plate ...
Repair Sheet - Page 6
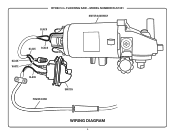
RYOBI 5 in. MODEL NUMBER RLS1351 MOTOR ASSEMBLY
BLACK
BLACK BLACK
BLACK WHITE
BLACK
POWER CORD
SWITCH
WIRING DIAGRAM
6 FLOORING SAW -
Similar Questions

Ryobi Battries
Charges to 19 volts and wont change to 20.5 then wont use all the charge
Charges to 19 volts and wont change to 20.5 then wont use all the charge
(Posted by tddaley 1 year ago)

Ryobi P320 Battery Nailer
hi, can anyone help to identify the values of the 2 shunt resistors surrounding the thermal cut out ...
hi, can anyone help to identify the values of the 2 shunt resistors surrounding the thermal cut out ...
(Posted by smhjpdj 5 years ago)

What Other Blade Will Interchange
I have a BS-903. What other company blade will interchange?
I have a BS-903. What other company blade will interchange?
(Posted by torch123 5 years ago)

Hello. My Ryobi Nail Gun Won't Drive The Pins Home. Tried Everything. Can You He
the noise coming from the gun is quieter compared to when I first started using it. I've only used i...
the noise coming from the gun is quieter compared to when I first started using it. I've only used i...
(Posted by Christophertruelove 7 years ago)