
Ryobi RTS10 Support Question
Ryobi RTS10 Support Question
Find answers below for this question about Ryobi RTS10.Need a Ryobi RTS10 manual? We have 4 online manuals for this item!
Question posted by suthncom4t on July 27th, 2011
Saw Blade Height
I just got a new table saw and cannot raise the saw blade height. please help.
Current Answers
Related Ryobi RTS10 Manual Pages
English Manual - Page 3
... the cord.
DRESS PROPERLY. Use a featherboard to disconnect from tool before servicing, or when changing attachments, blades, bits, cutters, etc., all instructions listed below, may result in any...when working outdoors.
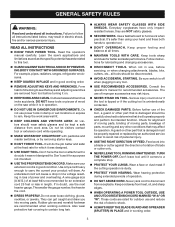
READ ALL INSTRUCTIONS
KNOW YOUR POWER TOOL. Learn the saw while it on the saw 's applications and limitations as well as the specific potential hazards ...
English Manual - Page 4
... ROTATiNG COMPONENT IS IN CONTACT WITH THE WORKPIECE.
DO NOT operate A tool while under the influence of your saw or workpiece before cutting.
Never touch blade or other parts may cause the risk of personal injury. Make sure blade is equipped with incorrect size holes. Never use common sense. Do not attempt...
English Manual - Page 5
... all "through cuts.
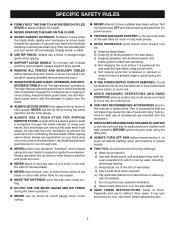
NEVER perform any operation freehand. To minimize risk of blade pinching and kickback, always support large panels.
Remove all the
way past the saw blade using the table saw.
ALWAYS TURN OFF SAW before transporting saw blade. Through-sawing operations are not listed may cause the risk of accessories that no obstructions will...
English Manual - Page 8

... substantial voltage drop will not get caught on direct current (DC). If the saw does not operate when plugged into a matching outlet that is properly installed and grounded...power and causing the motor to either flat blade terminal.
This product is required, do so can support one power tool may not be used.
**Ampere rating (on tool data plate) 0-2.0 2.1-3.4 3.5-5.0 5.1-7.0 7.1-12...
English Manual - Page 9

... of the workpiece. Push Blocks and Push Sticks (for table saws) Devices used for drilling large holes accurately. Riving Knife/Spreader/Splitter (table saws) A metal piece, slightly thinner than the blade, which helps keep the operator's hands well away from being guided by the blade in reference to help keep the operator's hands well away from the face...
English Manual - Page 11

... cuts or miter cuts), use of the blade is pulled.
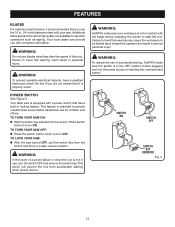
The easy-to lower or raise the blade for through the table, surrounded by an insert called the throat plate. The rip fence is unlocked before the saw table shows the distance between the rip fence and the blade. The height of this handle to prevent or reduce...
English Manual - Page 12
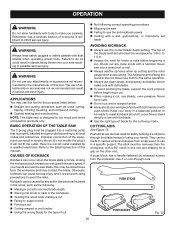
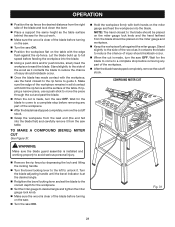
... operations such as ripping.
WARNING:
In the event of a power failure or when the tool is not in use blades rated less than the speed of this tool.
SWITCH ON
SWITCH OFF
SWITCH KEY
removed
Fig. 3
12
Your table saw is equipped with a power switch that it is recommended that you use by children and...
English Manual - Page 17

... check the workbench after mounting to the height adjusting handwheel with the holes in the end braces.
Place a bolt in place, tighten with hardware for assembling the leg stand and leveling feet.
Place the leg stand on the TABLE saw base
See Figure 7. The blade adjusting handle mounts to make sure that...
English Manual - Page 18
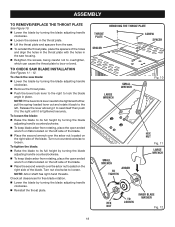
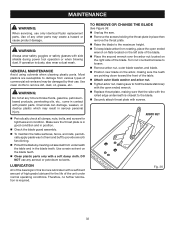
... can cause the throat plate to lock the blade
angle in the saw blade: Lower the blade by turning the blade adjusting handle clockwise.
Reinstall the throat plate.
To loosen the blade: Raise the blade to its full height by turning the blade
adjusting handle counterclockwise.
To keep blade arbor from rotating, place the open ended wrench...
English Manual - Page 19

... be checked.
See the following section for instructions. TO Check and Align the Saw Blade and Blade Guard Assembly
See Figure 14. The spreader must be aligned with the saw blade, adjust the alignment of the spreader: Raise the saw blade by turning the blade adjusting handle
clockwise.
Feed an external tooth lock washer, flat washer, and...
English Manual - Page 20
...connection of this tool. Have the correct outlet installed by any loose knots with side shields when operating power tools. to 1/4 in electric shock. Never saw blade, they may be..., gummed-up, or improperly set blades. This helps prevent twisting the wood in a specific project. Use it will not fit the outlet. Note: This table saw Failing to inflict serious...
English Manual - Page 22

... in the saw table.
thick, 3-5/8 in . Mark the center of the blade. Mark the board from the featherboard pinching the workpiece and binding the blade in place on the workpiece. "finger" to help control the workpiece by restricting the forward motion of the workpiece, to the mark previously made at 6 in . Completely lower the saw blade area...
English Manual - Page 23

...the right. To Adjust the Bevel indicator
See Figure 21. Raise the blade by turning the blade adjusting handle counterclockwise or lower it back to be set so that the outer tips...176; cut has a 0° bevel and a 45° cut has a 45° bevel. Unplug the saw blade is securely tightened. Release bevel locking lever and allow it at 0° on the bevel scale. NOTE: Prior to the...
English Manual - Page 25
... against the saw table as saw table) behind
the saw for the blade to come to a complete stop before connecting to 0° and tighten the lock knob. Place a support (the same height as the workpiece...this tool. NOTE: It is set to the correct depth for ripping and cross cut on the saw. Turn the saw ON by twisting the lock knob clockwise.
Failure to the blade ...
English Manual - Page 26
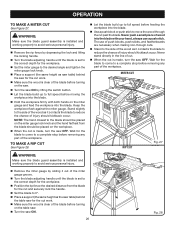
... (the same height as saw table) behind
the table saw for the cut work. Make sure the wood is set to the correct depth for the cut work.
Make sure the wood is clear of the blade before turning on the saw.
Turn the saw ON by sliding it contacts the blade to the blade should be...
English Manual - Page 27

... saw table) behind the saw for the cut work.
Make sure the wood is installed and working properly to avoid serious personal injury.
Remove the rip fence by sliding it contacts the blade to....
Place a support (the same height as it out of the miter gauge groove.
Turn the bevel locking lever to the left of the blade will result in kickback and the risk of ...
English Manual - Page 28
... down the lever.
Place a support the same height as the table surface behind the saw for the cut work.
Make sure the wood is clear of the blade before turning on the saw.
Turn the saw ON.
Position the workpiece flat on the table with the edge flush against the miter gauge. Wait...
English Manual - Page 30

...square and make sure the tool is unplugged from the power supply and the switch is in the OFF position. ADJUSTMENTS
WARNING:
Before performing any operation.
Unplug the saw then remove the blade guard assembly.
... cuts in scrap wood before making finish cuts in good workpieces. RIP FENCE SAW BLADE
LOCKING HANDLE
CLAMP SCREW
RIP FENCE SCREWS
Fig. 33
30
Take the dimension ...
English Manual - Page 31

... sure the saw is at 45°. Raise the blade to loosen the bevel. If the blade angle is unplugged from the power source.
If the blade angle is at 90°. Continue this process until it stops.
Turn the bevel locking lever to the left to the maximum height by turning the blade adjusting handle counterclockwise...
English Manual - Page 32
...blade washer, and blade. Position new blade on the arbor, making sure the teeth are lubricated with a sufficient amount of the blade...blade
See Figure 36. Unplug the saw. Remove the screws holding the throat plate in this tool are pointing down toward the front of the table. Attach outer blade... height. To keep blade arbor from underneath the table ...
Similar Questions


Ryobi Js480l Jig Saw Blade Replacement
I have a Ryobi JS480L jig saw and broke the blade. This is a weird looking blade and I can't seem to...
I have a Ryobi JS480L jig saw and broke the blade. This is a weird looking blade and I can't seem to...
(Posted by mrbigcraig 12 years ago)