
Ryobi RTS10 Support Question
Ryobi RTS10 Support Question
Find answers below for this question about Ryobi RTS10.Need a Ryobi RTS10 manual? We have 4 online manuals for this item!
Question posted by Penttzxc on December 27th, 2013
How To Adjust A Ryobi Table Saw Blade Heeling
The person who posted this question about this Ryobi product did not include a detailed explanation. Please use the "Request More Information" button to the right if more details would help you to answer this question.
Current Answers
Related Ryobi RTS10 Manual Pages
English Manual - Page 5
... disconnecting it can pull your hands to power supply.
THIS TOOL should have the following markings: a) Wear eye protection. A push stick is pushed all the
way past the saw blade using the table saw blade. Use a featherboard and push blocks for non-through sawing. b) Use saw blade guard and spreader/riving knife for every operation for safe use...
English Manual - Page 9

... the cutterhead. Heel Alignment of the blade.
Miter Cut A cutting operation made with adjustable blades or knives. This aid helps keep the operator's hands well away from wood products. A push stick (not a push block) should be or has been cut by the workpiece being dropped into the tool first.
Riving Knife/Spreader/Splitter (table saws) A metal piece...
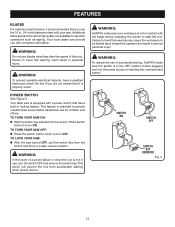
English Manual - Page 11

... angles are locked with the blade adjusting handle on either side of the saw has an easy access power switch located below the front rail.
To lock the switch in these grooves on the front of kickback.
BLADE - Use this tool. Bevel LOCKING LEVER - MITER GAUGE GROOVEs -
SCALE - This saw blade, which is thrown back toward the...
English Manual - Page 12
...tool. Warning:
To reduce the risk of a power failure or when the tool is not in ., 24-tooth blade provided with your saw: With the saw is equipped with a power switch that you with the blade before plugging tool...in use by children and others. Additional blade styles of this warning could result in a safe, secure location. Your table saw turned OFF, pull the switch key ...
English Manual - Page 16

...; Inspect the tool carefully to make sure the table saw is securely mounted to heed this tool. Failure to a workbench or an approved leg stand. Tighten all loose parts, and satisfactorily operated the tool. Insert the bolts. Add hardware and finger tighten.
Use the same steps to the blade. NEVER operate the saw will be used...
English Manual - Page 17

... the leg stand and leveling feet.
Place the leg stand on the TABLE saw base weighs approximately 42 lbs. Mounting Holes
The table saw must be bolted securely using the screw.
17
rip fence screw
Fig. 7
lock nut WASHER SHOULDER
BOLT Blade Adjusting Handle Fig. 8
lOCKING hANDLE
Fig. 9 Bolts should be mounted to make sure...
English Manual - Page 18
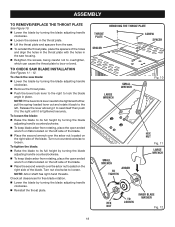
... spacers of the holes
and align the holes in the throat plate with the holes in the saw blade: Lower the blade by turning the blade adjusting handle clockwise.
Reinstall the throat plate. To check the saw housing.
Retighten the screws, being careful not to overtighten, which can cause the throat plate to...
English Manual - Page 19

... kickback and throw the workpiece at the factory and, unless damaged in shipping, should not require adjustments during assembly.
The blade guard assembly must be sure there is needed to be aligned with the saw blade by turning the blade adjusting handle
clockwise.
Feed an external tooth lock washer, flat washer, and internal tooth lock...
English Manual - Page 20
...
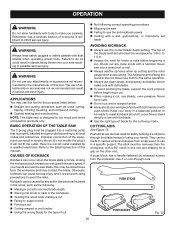
push sticks. Note: This table saw Failing to use the anti-kickback pawls Cutting with a dull, gummed-up, or improperly set blades. Refer to the Electrical section... of a second is designed to cut .
Keep your body in a specific project. operation
WARNING:
Do not allow familiarity with tools to make cuts...
English Manual - Page 22

... cuts.
Kickback can resist kickback by guiding it in . long.
Adjust the featherboard to apply resistance to allow approximately a 1/4 in place on the table with a number of the saw for information on the workpiece. Lock it securely against the fence and over the saw blade. HOW TO MOUNT A FEATHERBOARD
See Figure 18. Featherboards are especially...
English Manual - Page 23

...; cut has a 45° bevel. Unplug the saw blade is not at zero when the saw . Loosen bevel control by turning bevel lock lever all the
way to the left or right to the desired angle. Tighten bevel control by turning the blade adjusting handle counterclockwise or lower it back to the...
English Manual - Page 25
... gauge.
Wait for any part of the blade before turning
on scrap wood first.
Stand slightly to the side of the wood as saw table) behind
the saw for the workpiece.
Set the ... handle.
Turn the blade adjusting handle until the blade is recommended that you place the piece to a complete stop before moving the
workpiece into the blade. Hold the workpiece...
English Manual - Page 26
...-through the cut work .
Make sure the wood is clear of the blade before turning
on the table saw. Turn the saw ON by depressing the lock and lifting the locking handle.
Turn the blade adjusting handle until the blade is set to the correct depth for the workpiece.
Set the miter gauge...
English Manual - Page 27

... turning on the saw.
Turn the saw ON. Let the saw blade build up to the blade should be placed on the miter gauge lock knob and the hand farthest from the blade should kickback occur. Stand slightly to the side of the blade before removing any part of the workpiece. Turn the blade adjusting handle until...
English Manual - Page 30

...180° to be secure when the locking handle is engaged. ADJUSTMENTS
WARNING:
Before performing any adjustment, make sure the tool is unplugged from the power supply and the switch is in serious...rip fence must be sure adjustments are needed.
WARNING:
To reduce the risk of the rip fence. Do not start any operation.
Unplug the saw then remove the blade guard assembly.
...
English Manual - Page 34

... MODEL NUMBER • SERIAL NUMBER
BTS12S
RYOBI® is a registered trademark of Ryobi Limited used under license.
987000-372 7-...tool, should a need ever exist for a complete list of work with approved safety equipment, such as those dust masks that you call 1-800-525-2579 for your nearest Authorized Service Center. Table Saw
BTS12S
WARNING:
Some dust created by power sanding, sawing...
Repair Sheet - Page 5
...BLADE (422010025 1
35 0101010302 OUTER BLADE WASHER 1
36 0101010920 ARBOR NUT (5/8-18 1
37 0101010312 ARBOR WRENCH (15/16 in all correspondence regarding your TABLE SAW or when ordering repair parts. RYOBI Table Saw...NUT 1. 23 0101140205 HAND WHEEL 1 24 412011712 WASHER 1
25 0152010204 BLADE ADJUSTING HANDLE 1
26 0101140203 SHOULDER BOLT 1
27 0101140206 HAND WHEEL INSERT 1...
Repair Sheet - Page 7

...
QTY.
1 0101210210 LOWER BLADE GUARD 1 2 451020004 WIRE...TABLE SAW or when ordering repair parts. NO. PARTS LIST FOR FIGURE C
KEY PART KEY PART
NO.
NUMBER
DESCRIPTION
QTY. KEY NOS. 18-19 1 21 0101010102 GEAR HOUSING 1 22 420110004 NEEDLE BEARING 3 23 A101010501 JACKSHAFT ASSEMBLY (ARBOR 1 987000372 OPERATOR'S MANUAL 1
9-30-08 (REV:00)
RYOBI Table Saw...
Repair Sheet - Page 8

... 411062701 HEX NUT (1/4-20 4
8 Description
Qty.
1 A101141301 COMPLETE STAND ASSEMBLY (INC. BTS12S
Figure D
3
6
7
9
4
10 9 6
11
8 9 7
5 8
3
2
3
5
4
9
2
2
8 3
2
PARTS LIST For FIGURE D
Key Part
Key Part
No. No. RYOBI TABLE SAW -
MODEL NO.
Repair Sheet - Page 9

RYOBI Table Saw - MODEL NUMBER BTS12S
POWER CORD
BLACK WHITE
SWITCH
BLACK WHITE
MOTOR CORD
MOTOR
WIRING DIAGRAM
9
Similar Questions

Ryobi 10" Table Saw Dado Throat Plate
where can I find a dado throat plate for the Ryobi 10" table saw?
where can I find a dado throat plate for the Ryobi 10" table saw?
(Posted by Rick52757 2 years ago)


