
AirPrint Guide
Page 4
... illustrations on the screen vary depending on resolving user errors. [ ] Indicates the names of data. Indicates supplementary explanations of the machine's functions, and instructions on models or options. 2 Documents or data might be liable for taking protective measures against computer viruses, worms, and other harmful software. Be sure to originals, or loss of keys on the machine's display or control panels.
... illustrations on the screen vary depending on resolving user errors. [ ] Indicates the names of data. Indicates supplementary explanations of the machine's functions, and instructions on models or options. 2 Documents or data might be liable for taking protective measures against computer viruses, worms, and other harmful software. Be sure to originals, or loss of keys on the machine's display or control panels.
AirPrint Guide
Page 5
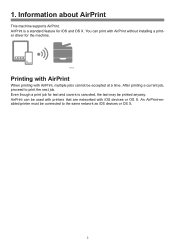
... AirPrint-enabled printer must be used with printers that are networked with AirPrint, multiple jobs cannot be printed anyway. DTN753 Printing with AirPrint When printing with iOS devices or OS X. AirPrint is canceled, the text may be accepted at a time. After printing a current job, proceed to the same network as iOS devices or OS X. 3 Information about AirPrint This machine supports AirPrint. 1. Even though a print job for text and covers is a standard feature...
... AirPrint-enabled printer must be used with printers that are networked with AirPrint, multiple jobs cannot be printed anyway. DTN753 Printing with AirPrint When printing with iOS devices or OS X. AirPrint is canceled, the text may be accepted at a time. After printing a current job, proceed to the same network as iOS devices or OS X. 3 Information about AirPrint This machine supports AirPrint. 1. Even though a print job for text and covers is a standard feature...

AirPrint Guide
Page 6
...;• Procedures for opening the printing preferences dialog box vary depending on the back of the machine. •• Confirm that wireless settings are configured. Printing •• Before turning on the machine, insert the wireless LAN option into the USB port on the application. Printing Files Using OS X 111 Open the file you want to print. 222 Click [Print...] on the [File] menu. 333 Select the machine in the [Printer:] list. 2.
...;• Procedures for opening the printing preferences dialog box vary depending on the back of the machine. •• Confirm that wireless settings are configured. Printing •• Before turning on the machine, insert the wireless LAN option into the USB port on the application. Printing Files Using OS X 111 Open the file you want to print. 222 Click [Print...] on the [File] menu. 333 Select the machine in the [Printer:] list. 2.

AirPrint Guide
Page 7
... machine". DYG653 5 The top page of AirPrint using a web browser. 111 Start your web browser. 222 Enter "http://(the machine's IP address or host name)/" in the address bar. The settings is not the latest. The firmware version is enabled by default. If the version is disabled. Appendix Troubleshooting Connection Problems Cause AirPrint settings is not the latest, update it . 333 Click [Network Settings]. If the machine's host...
... machine". DYG653 5 The top page of AirPrint using a web browser. 111 Start your web browser. 222 Enter "http://(the machine's IP address or host name)/" in the address bar. The settings is not the latest. The firmware version is enabled by default. If the version is disabled. Appendix Troubleshooting Connection Problems Cause AirPrint settings is not the latest, update it . 333 Click [Network Settings]. If the machine's host...

AirPrint Guide
Page 9
.../Region (Optional): Enter the name of the country or region that your machine is used in the address bar. DYG651 7 333 Click [Network Settings]. DYG651 444 Click the [Certificate] tab. 555 Select [Create New Self-Signed Certificate], and then click [Next]. 666 Configure the following settings displayed on the window: •• Common Name (Required): Enter the name of Web Image Monitor...
.../Region (Optional): Enter the name of the country or region that your machine is used in the address bar. DYG651 7 333 Click [Network Settings]. DYG651 444 Click the [Certificate] tab. 555 Select [Create New Self-Signed Certificate], and then click [Next]. 666 Configure the following settings displayed on the window: •• Common Name (Required): Enter the name of Web Image Monitor...

Google Cloud Print Guide
Page 4
... or function, losses of your documents, data or registered contents, or the use or non-use of this machine or function. Displayed contents and illustrations on the screen vary depending on the machine's display or control panels. Make sure that , to your operational errors or malfunctions of this product, function, and operation manuals provided with it. How to Read the...
... or function, losses of your documents, data or registered contents, or the use or non-use of this machine or function. Displayed contents and illustrations on the screen vary depending on the machine's display or control panels. Make sure that , to your operational errors or malfunctions of this product, function, and operation manuals provided with it. How to Read the...
Google Cloud Print Guide
Page 5
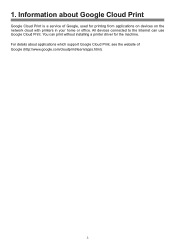
1. For details about Google Cloud Print Google Cloud Print is a service of Google (http://www.google.com/cloudprint/learn/apps.html). 3 Information about applications which support Google Cloud Print, see the website of Google, used for the machine. You can use Google Cloud Print. All devices connected to the Internet can print without installing a printer driver for printing from applications on devices on the network cloud with printers in your home or office.
1. For details about Google Cloud Print Google Cloud Print is a service of Google (http://www.google.com/cloudprint/learn/apps.html). 3 Information about applications which support Google Cloud Print, see the website of Google, used for the machine. You can use Google Cloud Print. All devices connected to the Internet can print without installing a printer driver for printing from applications on devices on the network cloud with printers in your home or office.

Google Cloud Print Guide
Page 11
...'s IP address or host name)/" in your web browser's URL bar. Solution Check whether the Google Cloud Print settings is enabled by default. The settings is enabled or not. Check whether the firmware version is not the latest. If the version is disabled. DYG617 9 The firmware version is the latest or not. Appendix Troubleshooting Connection Problems Cause Google Cloud Print settings is not the latest, update it . 333 Click [Network Settings].
...'s IP address or host name)/" in your web browser's URL bar. Solution Check whether the Google Cloud Print settings is enabled by default. The settings is enabled or not. Check whether the firmware version is not the latest. If the version is disabled. DYG617 9 The firmware version is the latest or not. Appendix Troubleshooting Connection Problems Cause Google Cloud Print settings is not the latest, update it . 333 Click [Network Settings].

Setup Guide
Page 7
For OS X, see User's Guide in the provided CD-ROM or our website. 5 Installing the Software". ™™Ethernet/USB DYG044 Network Wizard Wired (Ethernet) Wireless (Wi-Fi) 12 DYG081 Network Wizard Do not auto display Menu from the next time Yes No DYG077 P.5 Language English German French 1 22 DYG182 Network Wizard 14 IPv4 Configuration IPv6 Configuration Quit Setup DYG076 Install the software to page 6 "2. Go to use the machine.
For OS X, see User's Guide in the provided CD-ROM or our website. 5 Installing the Software". ™™Ethernet/USB DYG044 Network Wizard Wired (Ethernet) Wireless (Wi-Fi) 12 DYG081 Network Wizard Do not auto display Menu from the next time Yes No DYG077 P.5 Language English German French 1 22 DYG182 Network Wizard 14 IPv4 Configuration IPv6 Configuration Quit Setup DYG076 Install the software to page 6 "2. Go to use the machine.
Setup Guide
Page 8
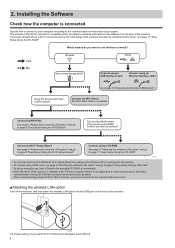
... communication among Wi-Fi Direct-compliant devices becomes possible. DYG161 • You can use (wireless or wired)? Yes No Which method do you have a WPS button? DYG340 If a screen asking you to page 9 "Easy Setup Using a PIN Code". • To set up manually, see page 6 "Attaching the wireless LAN option" and go to page 12 "Connecting the Machine (USB/Network)". Installing the Software Check how the computer is available when...
... communication among Wi-Fi Direct-compliant devices becomes possible. DYG161 • You can use (wireless or wired)? Yes No Which method do you have a WPS button? DYG340 If a screen asking you to page 9 "Easy Setup Using a PIN Code". • To set up manually, see page 6 "Attaching the wireless LAN option" and go to page 12 "Connecting the Machine (USB/Network)". Installing the Software Check how the computer is available when...

Setup Guide
Page 9
... using the application. 4. Perform printing by touching the NFC from the site that appears. ■■How to use the NFC (Android smart devices only) 1. For details, see page 8 "Connecting the Machine via Wireless (Wi-Fi)". 2. Android iOS 7 Start the application corresponding to the machine, and write the machine's network information on a smart device After scanning the following QR code...
... using the application. 4. Perform printing by touching the NFC from the site that appears. ■■How to use the NFC (Android smart devices only) 1. For details, see page 8 "Connecting the Machine via Wireless (Wi-Fi)". 2. Android iOS 7 Start the application corresponding to the machine, and write the machine's network information on a smart device After scanning the following QR code...
Setup Guide
Page 10
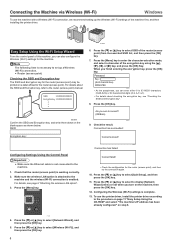
... connection again. 10. Connecting the Machine via Wireless (Wi-Fi) Windows To use the printer driver, install the printer driver according to the procedure on page 11 "Easy Setup Using the CD-ROM" and select "The machine's IP address has been already configured." Configuring Settings Using the Control Panel ●● Make sure the Ethernet cable is working correctly. 2. Easy Setup Using the Wi-Fi Setup Wizard From the control panel of the machine first, and then installing the printer driver...
... connection again. 10. Connecting the Machine via Wireless (Wi-Fi) Windows To use the printer driver, install the printer driver according to the procedure on page 11 "Easy Setup Using the CD-ROM" and select "The machine's IP address has been already configured." Configuring Settings Using the Control Panel ●● Make sure the Ethernet cable is working correctly. 2. Easy Setup Using the Wi-Fi Setup Wizard From the control panel of the machine first, and then installing the printer driver...

Setup Guide
Page 11
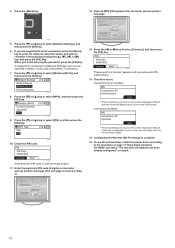
... address has been already configured." WPS Type 12 PBC PIN DSG092 9. Easy Setup Using the WPS Button ●● Make sure the Ethernet cable is not connected to the machine. ●● In Steps 9 to the machine and the wireless (Wi-Fi) connection is enabled. DYG052 4. Check that the router (access point) is working correctly. 2. Make sure the wireless LAN option is working correctly. 2. Check the result. For details, see page...
... address has been already configured." WPS Type 12 PBC PIN DSG092 9. Easy Setup Using the WPS Button ●● Make sure the Ethernet cable is not connected to the machine. ●● In Steps 9 to the machine and the wireless (Wi-Fi) connection is enabled. DYG052 4. Check that the router (access point) is working correctly. 2. Make sure the wireless LAN option is working correctly. 2. Check the result. For details, see page...
Setup Guide
Page 12
... router (access point)'s web page. DYG052 5. When you might forget it. 11. WPS Type 22 PBC PIN DSG096 10. Enter the machine's PIN code (8 digits) on step 6. 10 Check the result. Connection has succeeded: PIN Connection to AP has Succeeded EXIT DYG059 •• Press the [OK] key to return to the screen displayed in [Admin. To use the printer driver, install the printer driver according...
... router (access point)'s web page. DYG052 5. When you might forget it. 11. WPS Type 22 PBC PIN DSG096 10. Enter the machine's PIN code (8 digits) on step 6. 10 Check the result. Connection has succeeded: PIN Connection to AP has Succeeded EXIT DYG059 •• Press the [OK] key to return to the screen displayed in [Admin. To use the printer driver, install the printer driver according...
Setup Guide
Page 13
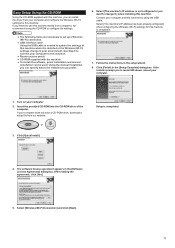
Turn on your computer does not have a CD-ROM drive, download a setup file from our website. Setup is completed. 7. Click [Finish] in the setup wizard. 8. Using the manual installation, you can specify data to be used. Select [The machine's IP address is installed or the Wireless (Wi-Fi) settings change in the [Software License Agreement] dialog box. Insert the provided CD-ROM into the CD-ROM drive of this machine...
Turn on your computer does not have a CD-ROM drive, download a setup file from our website. Setup is completed. 7. Click [Finish] in the setup wizard. 8. Using the manual installation, you can specify data to be used. Select [The machine's IP address is installed or the Wireless (Wi-Fi) settings change in the [Software License Agreement] dialog box. Insert the provided CD-ROM into the CD-ROM drive of this machine...

Setup Guide
Page 14
... to set up a wired connection. ●● USB interface cable or Ethernet interface cable ●● CD-ROM supplied with the machine ●● To install the software for network connection, quick installation and manual installation can specify data to be used. Setup is completed. ●● If you connect the computer by a USB cable, do not connect the cable until you to communication environment or your device, and then click [Next]. 6. Select [USB Connection] or...
... to set up a wired connection. ●● USB interface cable or Ethernet interface cable ●● CD-ROM supplied with the machine ●● To install the software for network connection, quick installation and manual installation can specify data to be used. Setup is completed. ●● If you connect the computer by a USB cable, do not connect the cable until you to communication environment or your device, and then click [Next]. 6. Select [USB Connection] or...

Wi-Fi Direct Guide
Page 5
... turning on the machine, insert the wireless LAN option into the USB port on the back of Wi-Fi Direct shown on your computer. Connecting Using Windows SP 330SFN/3710SF •• Before doing the following procedure, enable the Wi-Fi Direct function on the configuration page. A password for accessing the [Network Settings] menu can be specified in [Admin. Tools Lock] under [Administrator Tools] menu. 1. For details about printing the configuration page...
... turning on the machine, insert the wireless LAN option into the USB port on the back of Wi-Fi Direct shown on your computer. Connecting Using Windows SP 330SFN/3710SF •• Before doing the following procedure, enable the Wi-Fi Direct function on the configuration page. A password for accessing the [Network Settings] menu can be specified in [Admin. Tools Lock] under [Administrator Tools] menu. 1. For details about printing the configuration page...

Wi-Fi Direct Guide
Page 8
... details about changing the encryption key, see page 15 "How to "Connected". On the Control Panel 111 Press the wireless LAN icon. If you are requested to 10, configure each setting within two minutes. 333 Enter the encryption key for accessing the [Network Settings] menu can be specified in [Admin. Connecting Using OS X SP 330SFN/3710SF •• In Steps 4 to enter a password, enter the password using the number keys...
... details about changing the encryption key, see page 15 "How to "Connected". On the Control Panel 111 Press the wireless LAN icon. If you are requested to 10, configure each setting within two minutes. 333 Enter the encryption key for accessing the [Network Settings] menu can be specified in [Admin. Connecting Using OS X SP 330SFN/3710SF •• In Steps 4 to enter a password, enter the password using the number keys...

Wi-Fi Direct Guide
Page 10
... the password using the number keys, and then press [OK]. On the Control Panel 111 Press the wireless LAN icon. Configuring the Wi-Fi settings is displayed. 8 For details about changing the encryption key, see page 15 "How to Change the Encryption Key of the selected SSID changes to "Connected". The LED of the [Wi-Fi Direct] key stops flashing and it lights up. 777 Confirm the status...
... the password using the number keys, and then press [OK]. On the Control Panel 111 Press the wireless LAN icon. Configuring the Wi-Fi settings is displayed. 8 For details about changing the encryption key, see page 15 "How to Change the Encryption Key of the selected SSID changes to "Connected". The LED of the [Wi-Fi Direct] key stops flashing and it lights up. 777 Confirm the status...
Wi-Fi Direct Guide
Page 19
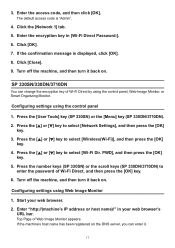
...-Fi Direct Password:]. 666 Click [OK]. 777 If the confirmation message is "Admin". 444 Click the [Network 1] tab. 555 Enter the encryption key in your web browser's URL bar. Top Page of Wi-Fi Direct by using the control panel 111 Press the [User Tools] key (SP 330SN) or the [Menu] key (SP 330DN/3710DN). 222 Press the [ ] or [ ] key to select [Network Settings], and then...
...-Fi Direct Password:]. 666 Click [OK]. 777 If the confirmation message is "Admin". 444 Click the [Network 1] tab. 555 Enter the encryption key in your web browser's URL bar. Top Page of Wi-Fi Direct by using the control panel 111 Press the [User Tools] key (SP 330SN) or the [Menu] key (SP 330DN/3710DN). 222 Press the [ ] or [ ] key to select [Network Settings], and then...


