Setup Guide
Page 7
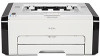
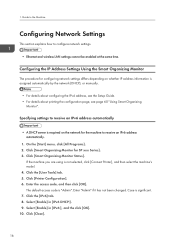
... Settings Guide. • To automatically obtain the IP address, a router with a built-in DHCP server is required. • Ethernet and wireless LAN settings cannot be enabled at the same time. • If WPS cannot be used with a built-in DHCP server is required. • Ethernet and wireless LAN settings cannot be enabled at the same time. • Wi-Fi • To connect to the network, and then install the printer driver...
... Settings Guide. • To automatically obtain the IP address, a router with a built-in DHCP server is required. • Ethernet and wireless LAN settings cannot be enabled at the same time. • If WPS cannot be used with a built-in DHCP server is required. • Ethernet and wireless LAN settings cannot be enabled at the same time. • Wi-Fi • To connect to the network, and then install the printer driver...
Setup Guide
Page 8
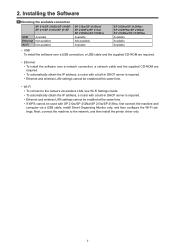
... page 10) Network Connection (IPv4 Environment) DCT076 Connecting the Machine via Network (See page 12) Selecting the Type and Method of IP Address Configuration (See page 13) Connecting the Computer and Machine (See page 14) Printing a Configuration Page (See page 15) Changing the IP Address Settings (See page 16) Quick Install for Network (See page 16) If WPS cannot be used with SP 212w/SP 212Nw/SP 213w/SP 213Nw USB Connection Configuring Wireless LAN Settings (See "3. Configure the Wireless LAN (SP 212w/SP 212Nw/SP 213w/SP 213Nw)", Wi-Fi Settings Guide) Network Connection...
... page 10) Network Connection (IPv4 Environment) DCT076 Connecting the Machine via Network (See page 12) Selecting the Type and Method of IP Address Configuration (See page 13) Connecting the Computer and Machine (See page 14) Printing a Configuration Page (See page 15) Changing the IP Address Settings (See page 16) Quick Install for Network (See page 16) If WPS cannot be used with SP 212w/SP 212Nw/SP 213w/SP 213Nw USB Connection Configuring Wireless LAN Settings (See "3. Configure the Wireless LAN (SP 212w/SP 212Nw/SP 213w/SP 213Nw)", Wi-Fi Settings Guide) Network Connection...
Setup Guide
Page 12
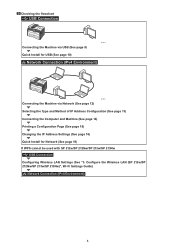
... Install The software to install the driver, see "Installing the Driver and Software", User Guide . SP 212w/SP 212Nw SP 213w/SP 213Nw • Printer driver • Smart Organizing Monitor SP 212SUw/SP 212SNw SP 213SUw/SP 213SNw • Printer driver • TWAIN/WIA driver SP 212SFw/SP 212SFNw SP 213SFw/SP 213SFNw • Printer driver • TWAIN/WIA driver 12 For details about how to be used to use the PC FAX driver for Network". • "Network Quick Install" cannot be installed differs depending on the model...
... Install The software to install the driver, see "Installing the Driver and Software", User Guide . SP 212w/SP 212Nw SP 213w/SP 213Nw • Printer driver • Smart Organizing Monitor SP 212SUw/SP 212SNw SP 213SUw/SP 213SNw • Printer driver • TWAIN/WIA driver SP 212SFw/SP 212SFNw SP 213SFw/SP 213SFNw • Printer driver • TWAIN/WIA driver 12 For details about how to be used to use the PC FAX driver for Network". • "Network Quick Install" cannot be installed differs depending on the model...
Setup Guide
Page 16
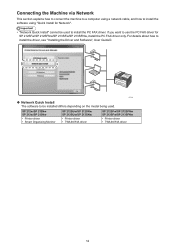
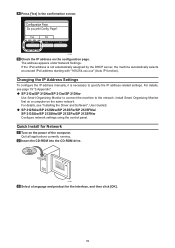
... under Network Settings. Install Smart Organizing Monitor first on a computer on the configuration page. DCT059 Check the IP address on the same network. For details, see "Installing the Driver and Software", User Guide . ‹‹ SP 212SUw/SP 212SNw/SP 212SFw/SP 212SFNw/ SP 213SUw/SP 213SNw/SP 213SFw/SP 213SFNw Configure network settings using the control panel. If the IPv4 address is necessary to the network. Changing the IP Address Settings To configure the IP address manually, it is not automatically assigned by the DHCP server...
... under Network Settings. Install Smart Organizing Monitor first on a computer on the configuration page. DCT059 Check the IP address on the same network. For details, see "Installing the Driver and Software", User Guide . ‹‹ SP 212SUw/SP 212SNw/SP 212SFw/SP 212SFNw/ SP 213SUw/SP 213SNw/SP 213SFw/SP 213SFNw Configure network settings using the control panel. If the IPv4 address is necessary to the network. Changing the IP Address Settings To configure the IP address manually, it is not automatically assigned by the DHCP server...

Setup Guide
Page 21
... address in accordance with its variable part modified. • IPv6 Address Enter the IP address shown in [IP Address]. DCT060 • For details about configuring the IPv6 address, see the User Guide . DCT061 Specify the IP address in "Link-local Address" on the configuration page. Set [DHCP] to [Inactive]. Use a computer using the IP address shown on the configuration page. Configuring the Machine's IPv4 Address Automatically Launch Web Image Monitor. Click [Network Status]. Click [Network Status]. In the address...
... address in accordance with its variable part modified. • IPv6 Address Enter the IP address shown in [IP Address]. DCT060 • For details about configuring the IPv6 address, see the User Guide . DCT061 Specify the IP address in "Link-local Address" on the configuration page. Set [DHCP] to [Inactive]. Use a computer using the IP address shown on the configuration page. Configuring the Machine's IPv4 Address Automatically Launch Web Image Monitor. Click [Network Status]. Click [Network Status]. In the address...
Setup Guide
Page 22
... check on the configuration page varies. ‹‹ For Ethernet connection Interface Information ‹‹ For wireless connection Wireless Status Enter the IP address you need to change. Specify the subnet mask and default gateway address as required in the IP address modified. If this happens, repeat the procedure from Step 6. The computer's IP address can be ascertained using Command Prompt. If the configuration fails, the message "Setting IP Address...
... check on the configuration page varies. ‹‹ For Ethernet connection Interface Information ‹‹ For wireless connection Wireless Status Enter the IP address you need to change. Specify the subnet mask and default gateway address as required in the IP address modified. If this happens, repeat the procedure from Step 6. The computer's IP address can be ascertained using Command Prompt. If the configuration fails, the message "Setting IP Address...
User Guide
Page 7
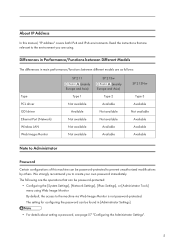
... Administrator Password Certain configurations of this manual, "IP address" covers both IPv4 and IPv6 environments. The setting for configuring the password can be password-protected: • Configuring the [System Settings], [Network Settings], [IPsec Settings], or [Administrator Tools] menu using . The following are the operations that are using Web Image Monitor By default, the access to prevent unauthorized modifications by others. Read the instructions that can be password-protected to the machine via Web Image Monitor...
... Administrator Password Certain configurations of this manual, "IP address" covers both IPv4 and IPv6 environments. The setting for configuring the password can be password-protected: • Configuring the [System Settings], [Network Settings], [IPsec Settings], or [Administrator Tools] menu using . The following are the operations that are using Web Image Monitor By default, the access to prevent unauthorized modifications by others. Read the instructions that can be password-protected to the machine via Web Image Monitor...

User Guide
Page 10
... you use it. Duplex printing (if applicable) Duplex printing enables both sides of a sheet of paper to be accepted free of time passes, the device switches to print again, it prints the last page. Note for the Battery and/or Accumulator Symbol (For EU countries only) In accordance with the Battery Directive 2006/66/EC Article 20 Information for not only used . This symbol means that the default setting...
... you use it. Duplex printing (if applicable) Duplex printing enables both sides of a sheet of paper to be accepted free of time passes, the device switches to print again, it prints the last page. Note for the Battery and/or Accumulator Symbol (For EU countries only) In accordance with the Battery Directive 2006/66/EC Article 20 Information for not only used . This symbol means that the default setting...

User Guide
Page 14
... indicator flashes red when the toner is nearly empty, and it lights up when the machine runs out of plain paper. 11. Tray 1 This tray can also print the configuration page or maintenance page by switching the power on . Stop Fences Raise this cover to a network using a USB cable. 15. Insert the other end of plain paper. 10. Ethernet Port Use this port to connect the machine to replace consumables or clear a paper jam. 9. Power Indicator This indicator lights up or remove jammed paper...
... indicator flashes red when the toner is nearly empty, and it lights up when the machine runs out of plain paper. 11. Tray 1 This tray can also print the configuration page or maintenance page by switching the power on . Stop Fences Raise this cover to a network using a USB cable. 15. Insert the other end of plain paper. 10. Ethernet Port Use this port to connect the machine to replace consumables or clear a paper jam. 9. Power Indicator This indicator lights up or remove jammed paper...
User Guide
Page 18
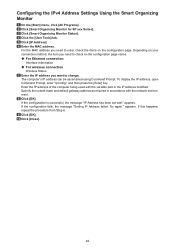
...; A DHCP server is required on the network for configuring network settings differs depending on whether IP address information is "Admin". Click [Smart Organizing Monitor for SP xxx Series]. 3. On the [Start] menu, click [All Programs]. 2. The default access code is assigned automatically by the network (DHCP), or manually. • For details about configuring the IPv4 address, see the Setup Guide. • For details about printing the configuration page, see page 60 "Using Smart Organizing Monitor". Select [Enable...
...; A DHCP server is required on the network for configuring network settings differs depending on whether IP address information is "Admin". Click [Smart Organizing Monitor for SP xxx Series]. 3. On the [Start] menu, click [All Programs]. 2. The default access code is assigned automatically by the network (DHCP), or manually. • For details about configuring the IPv4 address, see the Setup Guide. • For details about printing the configuration page, see page 60 "Using Smart Organizing Monitor". Select [Enable...

User Guide
Page 19
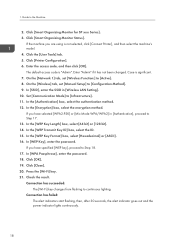
...-Fi Settings Guide. • If DHCP is significant. 7. The default access code is not selected, click [Connect Printer], and then select the machine's model. 4. Click [Smart Organizing Monitor for SP xxx Series]. 3. Select [Disable] in [Manual address:], [Prefix length:], and [Gateway:], and then click [OK]. 11. On the [Start] menu, click [All Programs]. 17 If the machine you are using is "Admin". Select [Enable] in advance. 1. Configuring the Infrastructure mode using...
...-Fi Settings Guide. • If DHCP is significant. 7. The default access code is not selected, click [Connect Printer], and then select the machine's model. 4. Click [Smart Organizing Monitor for SP xxx Series]. 3. Select [Disable] in [Manual address:], [Prefix length:], and [Gateway:], and then click [OK]. 11. On the [Start] menu, click [All Programs]. 17 If the machine you are using is "Admin". Select [Enable] in advance. 1. Configuring the Infrastructure mode using...
User Guide
Page 20
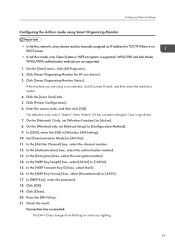
.... 21. Click [Smart Organizing Monitor Status]. On the [Network 1] tab, set [Manual Setup] to continuous lighting. Set [Communication Mode] to [Active]. 8. The default access code is significant. 7. Case is "Admin". In the [Encryption] box, select the encryption method. Check the result. 1. Enter the access code, and then click [OK]. On the [Wireless] tab, set [Wireless Function:] to [Infrastructure]. 11. In [WEP Key], enter the password. In [WPA Passphrase], enter...
.... 21. Click [Smart Organizing Monitor Status]. On the [Network 1] tab, set [Manual Setup] to continuous lighting. Set [Communication Mode] to [Active]. 8. The default access code is significant. 7. Case is "Admin". In the [Encryption] box, select the encryption method. Check the result. 1. Enter the access code, and then click [OK]. On the [Wireless] tab, set [Wireless Function:] to [Infrastructure]. 11. In [WEP Key], enter the password. In [WPA Passphrase], enter...
User Guide
Page 21
...-Fi] key. 21. On the [Start] menu, click [All Programs]. 2. On the [Network 1] tab, set [Manual Setup] to [Active]. 8. On the [Wireless] tab, set [Wireless Function:] to [Configuration Method]. 9. Set [Communication Mode] to continuous lighting. 19 In [WEP Key], enter the password. 18. Click the [User Tools] tab. 5. The default access code is significant. 7. Case is "Admin". If the machine you are not supported. 1. In the [Authentication] box, select...
...-Fi] key. 21. On the [Start] menu, click [All Programs]. 2. On the [Network 1] tab, set [Manual Setup] to [Active]. 8. On the [Wireless] tab, set [Wireless Function:] to [Configuration Method]. 9. Set [Communication Mode] to continuous lighting. 19 In [WEP Key], enter the password. 18. Click the [User Tools] tab. 5. The default access code is significant. 7. Case is "Admin". If the machine you are not supported. 1. In the [Authentication] box, select...

User Guide
Page 28
2. DCT031 When loading A4 or letter size paper, align the paper guide to match the standard size. Load the new paper stack print side down. Pinch the end paper guide and slide it in the tray. 5. Make sure paper is not stacked higher than the upper limit marked inside the tray. 26 DCT032 Fan the paper before loading it inward to the following position: DCT871 4. Loading Paper 3.
2. DCT031 When loading A4 or letter size paper, align the paper guide to match the standard size. Load the new paper stack print side down. Pinch the end paper guide and slide it in the tray. 5. Make sure paper is not stacked higher than the upper limit marked inside the tray. 26 DCT032 Fan the paper before loading it inward to the following position: DCT871 4. Loading Paper 3.

User Guide
Page 45
... a new device upon USB connection. 43 Interface Tab Interface Item Fixed USB Port Configuring the System Settings Description Specifies whether the same printer can be used with any machine other than the one originally used for installation, if the machine is enabled, the same printer driver you must install the printer driver separately for individual machines, because the machine other than the original will be used for multiple machines or not under USB connection. If...
... a new device upon USB connection. 43 Interface Tab Interface Item Fixed USB Port Configuring the System Settings Description Specifies whether the same printer can be used with any machine other than the one originally used for installation, if the machine is enabled, the same printer driver you must install the printer driver separately for individual machines, because the machine other than the original will be used for multiple machines or not under USB connection. If...

User Guide
Page 63
... [Printer Configuration] dialog box are using is "Admin". 6. Click [Close]. On the [Start] menu, click [All Programs]. 2. Click [OK]. 8. Message area Displays the status of the display. The default access code is not selected, click [Connect Printer], and then select the machine's model. 4. Using Smart Organizing Monitor • Counter Displays information about error messages, see page 81 "Error and Status Messages Appear on the authority of the access code you are available. • General users Only the [Paper...
... [Printer Configuration] dialog box are using is "Admin". 6. Click [Close]. On the [Start] menu, click [All Programs]. 2. Click [OK]. 8. Message area Displays the status of the display. The default access code is not selected, click [Connect Printer], and then select the machine's model. 4. Using Smart Organizing Monitor • Counter Displays information about error messages, see page 81 "Error and Status Messages Appear on the authority of the access code you are available. • General users Only the [Paper...
User Guide
Page 80
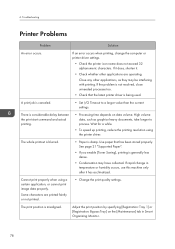
... applications are printed faintly or not printed. • Change the print quality settings. If rapid change the computer or printer driver settings. • Check the printer icon name does not exceed 32 alphanumeric characters. See page 21 "Supported Paper". • If you enable [Toner Saving], printing is considerable delay between the print start command and actual printing. • Processing time depends on the [Maintenance] tab in temperature or humidity occurs, use this machine...
... applications are printed faintly or not printed. • Change the print quality settings. If rapid change the computer or printer driver settings. • Check the printer icon name does not exceed 32 alphanumeric characters. See page 21 "Supported Paper". • If you enable [Toner Saving], printing is considerable delay between the print start command and actual printing. • Processing time depends on the [Maintenance] tab in temperature or humidity occurs, use this machine...

User Guide
Page 81
Possible Cause Solution Page layout settings are properly configured in the application. 79 Check that the page layout settings are not configured properly. Printer Problems Print Positions Do Not Match Display Positions If the position of items on the printed page differs from the position displayed on the computer screen, the cause may be one of the following.
Possible Cause Solution Page layout settings are properly configured in the application. 79 Check that the page layout settings are not configured properly. Printer Problems Print Positions Do Not Match Display Positions If the position of items on the printed page differs from the position displayed on the computer screen, the cause may be one of the following.

User Guide
Page 82
... LED Toner/ Paper End Alarm Power Status - - Flashing On A paper jam has occurred in the machine. - On On Another type of paper. - Use Web Image Monitor or Smart Organizing Monitor to check the error, and then take appropriate measures. See page 37 "Using Web Image Monitor" or page 60 "Using Smart Organizing Monitor". On The print cartridge is empty. • Set the print cartridge again correctly. • Load paper into the tray. Solution The status is open. - See page 70 "Paper Feed Problems". On...
... LED Toner/ Paper End Alarm Power Status - - Flashing On A paper jam has occurred in the machine. - On On Another type of paper. - Use Web Image Monitor or Smart Organizing Monitor to check the error, and then take appropriate measures. See page 37 "Using Web Image Monitor" or page 60 "Using Smart Organizing Monitor". On The print cartridge is empty. • Set the print cartridge again correctly. • Load paper into the tray. Solution The status is open. - See page 70 "Paper Feed Problems". On...
User Guide
Page 93
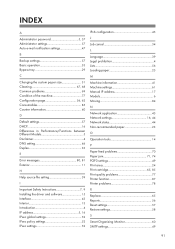
... policy settings 52 IPsec settings 52 IPv6 configuration 45 J Job cancel 34 L Language 39 Legal prohibition 4 Lists 56 Loading paper 25 M Machine information 41 Machine settings 61 Manual IP address 17 Models 6 Moving 84 N Network application 45 Network settings 16, 44 Network status 44 Non-recommended paper 23 O Operation tools 14 P Paper feed problems 70 Paper jam 71, 74 POP3 settings 49 Print area 24 Print cartridge 65, 85 Print quality problems 77 Printer function 87 Printer problems 78 R Replace 65 Reports 56 Reset settings 57 Restore settings...
... policy settings 52 IPsec settings 52 IPv6 configuration 45 J Job cancel 34 L Language 39 Legal prohibition 4 Lists 56 Loading paper 25 M Machine information 41 Machine settings 61 Manual IP address 17 Models 6 Moving 84 N Network application 45 Network settings 16, 44 Network status 44 Non-recommended paper 23 O Operation tools 14 P Paper feed problems 70 Paper jam 71, 74 POP3 settings 49 Print area 24 Print cartridge 65, 85 Print quality problems 77 Printer function 87 Printer problems 78 R Replace 65 Reports 56 Reset settings 57 Restore settings...


