User Guide
Page 4
... of Option Installation...17 Attaching the Paper Feed Unit...18 Installing the Wireless LAN Interface Board 21 Installing the IEEE 1284 Interface Board...23 Installing the Device Server Option...25 Installing SD Card Options...28 Guide to Read the Manuals...1 Symbols Used in the Manuals...1 1. Print Installing the Printer Driver by Using Device Software Manager Installer 35 Installing Device Software Manager from the CD-ROM 35 Installing Device Software Manager from the Downloaded File 37 Installing the Printer Driver for Network Connection (Windows 41 Installing the PCL 6 Printer Driver...
... of Option Installation...17 Attaching the Paper Feed Unit...18 Installing the Wireless LAN Interface Board 21 Installing the IEEE 1284 Interface Board...23 Installing the Device Server Option...25 Installing SD Card Options...28 Guide to Read the Manuals...1 Symbols Used in the Manuals...1 1. Print Installing the Printer Driver by Using Device Software Manager Installer 35 Installing Device Software Manager from the CD-ROM 35 Installing Device Software Manager from the Downloaded File 37 Installing the Printer Driver for Network Connection (Windows 41 Installing the PCL 6 Printer Driver...
User Guide
Page 5
... Tray...77 Loading Paper into Tray 1 to 5...77 Loading Paper into the Bypass Tray...81 Specifying Regular Sizes Using the Control Panel 83 Specifying a Custom Size Paper Using the Control Panel 83 Specifying Paper Type and Thickness Settings 84 Recommended Paper Sizes and Types...85 Tray 1...85 Paper Feed Unit...86 3 Installing the Printer Driver for Network Connection (OS X/macOS 51 Installing the PPD file...51 Registering the Machine in [Print & Scan] or [Printers & Scanners 52 Specifying the Option Settings...55 Basic Procedure for Printing Documents...57 Printing a Document in Windows...
... Tray...77 Loading Paper into Tray 1 to 5...77 Loading Paper into the Bypass Tray...81 Specifying Regular Sizes Using the Control Panel 83 Specifying a Custom Size Paper Using the Control Panel 83 Specifying Paper Type and Thickness Settings 84 Recommended Paper Sizes and Types...85 Tray 1...85 Paper Feed Unit...86 3 Installing the Printer Driver for Network Connection (OS X/macOS 51 Installing the PPD file...51 Registering the Machine in [Print & Scan] or [Printers & Scanners 52 Specifying the Option Settings...55 Basic Procedure for Printing Documents...57 Printing a Document in Windows...
User Guide
Page 11
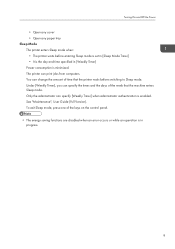
... enabled. See "Maintenance", User Guide (Full Version). Only the administrator can change the amount of the week that the printer waits before entering Sleep mode is set in [Sleep Mode Timer] • It is the day and time specified in progress. 9 The printer can specify the times and the days of time that the machine enters Sleep mode. Turning On and Off the Power • Open any cover • Open any paper tray Sleep Mode The printer...
... enabled. See "Maintenance", User Guide (Full Version). Only the administrator can change the amount of the week that the printer waits before entering Sleep mode is set in [Sleep Mode Timer] • It is the day and time specified in progress. 9 The printer can specify the times and the days of time that the machine enters Sleep mode. Turning On and Off the Power • Open any cover • Open any paper tray Sleep Mode The printer...
User Guide
Page 13
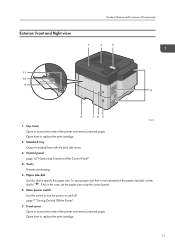
... print side down. 3. Standard tray Output is not indicated on and off. Open here to access the inside of the printer and remove jammed paper. Top cover Open to replace the print cartridge. 11 Main power switch Use this dial to turn the power on the paper size dial, set the paper size using the control panel. 6. Open here to access the inside of the printer and remove jammed paper. Control panel page 14 "Names and Functions of Components 1 2 3 11 10 9 4 8 76 5 EBS242 1. Paper size dial Use this switch to specify the paper size...
... print side down. 3. Standard tray Output is not indicated on and off. Open here to access the inside of the printer and remove jammed paper. Top cover Open to replace the print cartridge. 11 Main power switch Use this dial to turn the power on the paper size dial, set the paper size using the control panel. 6. Open here to access the inside of the printer and remove jammed paper. Control panel page 14 "Names and Functions of Components 1 2 3 11 10 9 4 8 76 5 EBS242 1. Paper size dial Use this switch to specify the paper size...
User Guide
Page 17
... or flashes when a printer error occurs. Flashes when the printer is possible but print quality cannot be printed. 10. [Escape] key Press this key to cancel an operation or return to the previous display. 11. [OK] key Use this key to confirm settings or setting values, or move the cursor. 15 Data in energy saver mode. 8. See "Maintenance", User Guide (Full Version). 7. The suspended job will soon require maintenance or a replacement...
... or flashes when a printer error occurs. Flashes when the printer is possible but print quality cannot be printed. 10. [Escape] key Press this key to cancel an operation or return to the previous display. 11. [OK] key Use this key to confirm settings or setting values, or move the cursor. 15 Data in energy saver mode. 8. See "Maintenance", User Guide (Full Version). 7. The suspended job will soon require maintenance or a replacement...
User Guide
Page 33
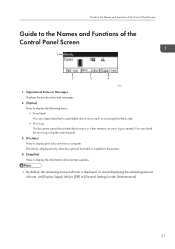
... error log is displayed. Operational Status or Messages Displays the printer status and messages. 2. [Option] Press to display the following items: • Form Feed You can check the error log using the control panel. 3. [Prt.Jobs] Press to the Names and Functions of the Control Panel Screen CYN901 1. Guide to the Names and Functions of the Control Panel Screen Guide to display print jobs sent from a computer. [Prt.Jobs] is displayed only when the optional hard disk is installed in [General Settings] under [Maintenance...
... error log is displayed. Operational Status or Messages Displays the printer status and messages. 2. [Option] Press to display the following items: • Form Feed You can check the error log using the control panel. 3. [Prt.Jobs] Press to the Names and Functions of the Control Panel Screen CYN901 1. Guide to the Names and Functions of the Control Panel Screen Guide to display print jobs sent from a computer. [Prt.Jobs] is displayed only when the optional hard disk is installed in [General Settings] under [Maintenance...
User Guide
Page 37
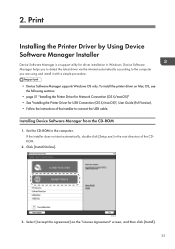
... according to connect the USB cable. Select [I accept the agreement] on Mac OS, see the following sections: • page 51 "Installing the Printer Driver for Network Connection (OS X/macOS)" • See "Installing the Printer Driver for driver installation in Windows. Device Software Manager helps you are using and install it with a simple procedure. • Device Software Manager supports Windows OS only. 2. If the installer does not start automatically, double-click [Setup.exe] in the computer. Click [Install Online]. Installing Device Software Manager...
... according to connect the USB cable. Select [I accept the agreement] on Mac OS, see the following sections: • page 51 "Installing the Printer Driver for Network Connection (OS X/macOS)" • See "Installing the Printer Driver for driver installation in Windows. Device Software Manager helps you are using and install it with a simple procedure. • Device Software Manager supports Windows OS only. 2. If the installer does not start automatically, double-click [Setup.exe] in the computer. Click [Install Online]. Installing Device Software Manager...
User Guide
Page 39
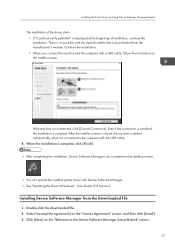
Installing the Printer Driver by Using Device Software Manager Installer The installation of the driver starts. • If "Could not verify publisher" is downloaded from the Downloaded File 1. There is no problem with a USB cable, follow the instructions on the "License Agreement" screen, and then click [Install]. 3. Even if the connection is canceled, the installation is not detected, click [Cancel Connection]. Continue the installation. • When you connect the machine and the computer with the...
Installing the Printer Driver by Using Device Software Manager Installer The installation of the driver starts. • If "Could not verify publisher" is downloaded from the Downloaded File 1. There is no problem with a USB cable, follow the instructions on the "License Agreement" screen, and then click [Install]. 3. Even if the connection is canceled, the installation is not detected, click [Cancel Connection]. Continue the installation. • When you connect the machine and the computer with the...
User Guide
Page 40
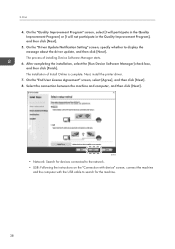
... Quality Improvement Program], and then click [Next]. 5. The installation of installing Device Software Manager starts. 6. The process of Install Online is complete. 2. DZX730 • Network: Search for devices connected to the network. • USB: Following the instructions on the "Connection with device" screen, connect the machine and the computer with the USB cable to display the message about the driver update, and then click [Next]. After completing the installation, select the [Run Device Software Manager] check...
... Quality Improvement Program], and then click [Next]. 5. The installation of installing Device Software Manager starts. 6. The process of Install Online is complete. 2. DZX730 • Network: Search for devices connected to the network. • USB: Following the instructions on the "Connection with device" screen, connect the machine and the computer with the USB cable to display the message about the driver update, and then click [Next]. After completing the installation, select the [Run Device Software Manager] check...
User Guide
Page 41
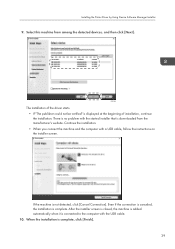
...; If "The publisher could not be verified" is complete. Installing the Printer Driver by Using Device Software Manager Installer 9. After the installer screen is closed, the machine is added automatically when it is downloaded from among the detected devices, and then click [Next]. There is no problem with the started installer that is connected to the computer with a USB cable, follow the instructions on the installer screen.
...; If "The publisher could not be verified" is complete. Installing the Printer Driver by Using Device Software Manager Installer 9. After the installer screen is closed, the machine is added automatically when it is downloaded from among the detected devices, and then click [Next]. There is no problem with the started installer that is connected to the computer with a USB cable, follow the instructions on the installer screen.
User Guide
Page 43
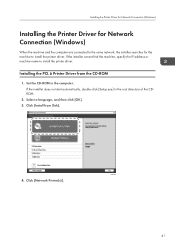
... same network, the installer searches for the machine to install the printer driver. If the installer cannot find the machine, specify the IP address or machine name to install the printer driver. Set the CD-ROM in the root directory of the CDROM. 2. Select a language, and then click [OK]. 3. Click [Network Printer(s)]. 41 DZC992 4. Installing the PCL 6 Printer Driver from Disk]. If the installer does not start automatically, double-click [Setup.exe...
... same network, the installer searches for the machine to install the printer driver. If the installer cannot find the machine, specify the IP address or machine name to install the printer driver. Set the CD-ROM in the root directory of the CDROM. 2. Select a language, and then click [OK]. 3. Click [Network Printer(s)]. 41 DZC992 4. Installing the PCL 6 Printer Driver from Disk]. If the installer does not start automatically, double-click [Setup.exe...
User Guide
Page 45
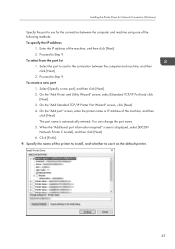
... port list 1. Specify the name of the following methods: To specify the IP address 1. The port name is displayed, select [RICOH Network Printer C model], and then click [Next]. 6. Click [Finish]. 9. Proceed to Step 9. To create a new port 1. Select [Specify a new port], and then click [Next]. 2. Proceed to Step 9. On the "Add Standard TCP/IP Printer Port Wizard" screen, click [Next]. 4. Installing the Printer Driver for Network Connection (Windows) Specify the port to use for the connection...
... port list 1. Specify the name of the following methods: To specify the IP address 1. The port name is displayed, select [RICOH Network Printer C model], and then click [Next]. 6. Click [Finish]. 9. Proceed to Step 9. To create a new port 1. Select [Specify a new port], and then click [Next]. 2. Proceed to Step 9. On the "Add Standard TCP/IP Printer Port Wizard" screen, click [Next]. 4. Installing the Printer Driver for Network Connection (Windows) Specify the port to use for the connection...
User Guide
Page 61
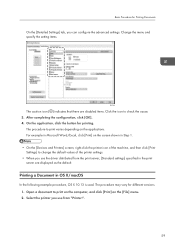
... use from the print server, [Standard settings] specified in the print server are disabled items. Click the icon to print on the computer, and click [Print] on the [File] menu. 2. Open a document to check the cause. 3. Basic Procedure for Printing Documents On the [Detailed Settings] tab, you use the driver distributed from "Printer:". 59 Change the menu and specify the setting items. EBS345 The caution icon ( ) indicates that there are displayed as the default...
... use from the print server, [Standard settings] specified in the print server are disabled items. Click the icon to print on the computer, and click [Print] on the [File] menu. 2. Open a document to check the cause. 3. Basic Procedure for Printing Documents On the [Detailed Settings] tab, you use the driver distributed from "Printer:". 59 Change the menu and specify the setting items. EBS345 The caution icon ( ) indicates that there are displayed as the default...
User Guide
Page 83
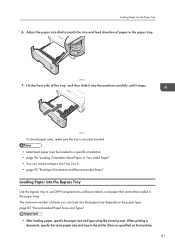
... the front side of sheets you can load envelopes into Tray 2 to match the size and feed direction of paper in the printer driver as specified on the paper type. The maximum number of the tray, and then slide it stops. When printing a document, specify the same paper size and type in the paper tray. Adjust the paper size dial to 5. • page 92 "Envelope Orientation and Recommended Status" Loading Paper into the Paper Tray 6. EAT062 To avoid paper jams, make sure the tray is...
... the front side of sheets you can load envelopes into Tray 2 to match the size and feed direction of paper in the printer driver as specified on the paper type. The maximum number of the tray, and then slide it stops. When printing a document, specify the same paper size and type in the paper tray. Adjust the paper size dial to 5. • page 92 "Envelope Orientation and Recommended Status" Loading Paper into the Paper Tray 6. EAT062 To avoid paper jams, make sure the tray is...
User Guide
Page 98
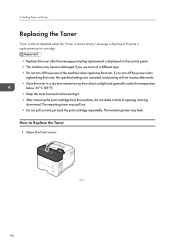
... you use toner of a different type. • Do not turn off the power of the machine when replacing the toner. 4. EBS027 96 How to Replace the Toner 1. Prepare a replacement print cartridge. • Replace the toner after the message prompting replacement is facing downward. The remaining toner may become damaged if you turn off the power when replenishing the toner, the specified settings are canceled, and printing will not resume afterwards. • Store the toner...
... you use toner of a different type. • Do not turn off the power of the machine when replacing the toner. 4. EBS027 96 How to Replace the Toner 1. Prepare a replacement print cartridge. • Replace the toner after the message prompting replacement is facing downward. The remaining toner may become damaged if you turn off the power when replenishing the toner, the specified settings are canceled, and printing will not resume afterwards. • Store the toner...
User Guide
Page 115
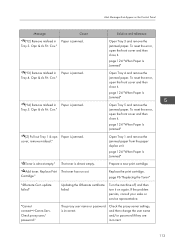
..., and then turn it . Opn & cls Frt. To reset the error, open the front cover and then close it . To reset the error, open the front cover and then close it . " Add toner. The proxy user name or password is jammed. Prepare a new print cartridge. Check proxy user/ password." Tray 5. Open Tray 1 and remove the jammed paper from the paper duplex unit. Opn & cls Frt. Cartridge." update failed" Updating the @Remote certificate failed. Opn & cls Frt. page 96 "Replacing the Toner" "@Remote Cert. Open Tray 3 and remove the jammed paper.
..., and then turn it . Opn & cls Frt. To reset the error, open the front cover and then close it . To reset the error, open the front cover and then close it . " Add toner. The proxy user name or password is jammed. Prepare a new print cartridge. Check proxy user/ password." Tray 5. Open Tray 1 and remove the jammed paper from the paper duplex unit. Opn & cls Frt. Cartridge." update failed" Updating the @Remote certificate failed. Opn & cls Frt. page 96 "Replacing the Toner" "@Remote Cert. Open Tray 3 and remove the jammed paper.
User Guide
Page 116
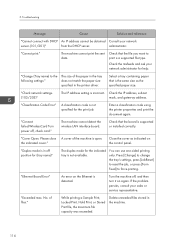
... then turn it on the Ethernet is open. Troubleshooting Message Cause Solution and reference "Cannot connect with DHCP An IP address cannot be obtained Consult your network administrator for the print job. administrator. Check that the board is a supported file type. No. The machine cannot detect the wireless LAN interface board. Select a tray containing paper that is incorrect. "Duplex mode is in the machine. 114 Enter a classification code using the printer properties and print...
... then turn it on the Ethernet is open. Troubleshooting Message Cause Solution and reference "Cannot connect with DHCP An IP address cannot be obtained Consult your network administrator for the print job. administrator. Check that the board is a supported file type. No. The machine cannot detect the wireless LAN interface board. Select a tray containing paper that is incorrect. "Duplex mode is in the machine. 114 Enter a classification code using the printer properties and print...
User Guide
Page 118
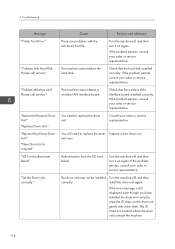
... hard disk. unit soon. Turn the machine off , and then turn it on the drum unit gently with a dry cloth. The drum unit may not be installed correctly. "Problem with the machine's font file. You need to replace the drum unit. If the problem persists, consult your sales or service representative. Turn the machine off, and then install the drum unit again. 5. Troubleshooting Message "Printer Font Error." The machine cannot detect a wireless LAN interface board. Check that the wireless LAN interface board installed...
... hard disk. unit soon. Turn the machine off , and then turn it on the drum unit gently with a dry cloth. The drum unit may not be installed correctly. "Problem with the machine's font file. You need to replace the drum unit. If the problem persists, consult your sales or service representative. Turn the machine off, and then install the drum unit again. 5. Troubleshooting Message "Printer Font Error." The machine cannot detect a wireless LAN interface board. Check that the wireless LAN interface board installed...
User Guide
Page 119
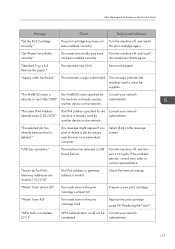
... is full. The message indicates the machine tried to order the supplies. The machine has detected a USB board failure. Check the network settings. administrator. 117 Turn the machine off , and install not been installed correctly. "Waste Toner almost full" The waste toner in the print cartridge is already used by using a web browser on the network. Replace the print cartridge. "Set Waste Toner Bottle correctly." the waste toner bottle again. "Supply order has failed." The standard tray is full. incomplete...
... is full. The message indicates the machine tried to order the supplies. The machine has detected a USB board failure. Check the network settings. administrator. 117 Turn the machine off , and install not been installed correctly. "Waste Toner almost full" The waste toner in the print cartridge is already used by using a web browser on the network. Replace the print cartridge. "Set Waste Toner Bottle correctly." the waste toner bottle again. "Supply order has failed." The standard tray is full. incomplete...
User Guide
Page 122
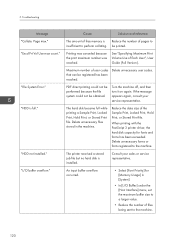
... Interface] menu, set the maximum buffer size to the machine. 120 Printing was canceled because the print maximum number was reached. PDF direct printing could not be performed because the file system could not be printed. The printer received a stored job file but no hard disk is full." "File System Error." Consult your service representative. "HDD is installed. Maximum number of files being sent to a larger value. • Reduce the number of user codes Delete unnecessary user codes. Turn...
... Interface] menu, set the maximum buffer size to the machine. 120 Printing was canceled because the print maximum number was reached. PDF direct printing could not be performed because the file system could not be printed. The printer received a stored job file but no hard disk is full." "File System Error." Consult your service representative. "HDD is installed. Maximum number of files being sent to a larger value. • Reduce the number of user codes Delete unnecessary user codes. Turn...


