
Operating Instructions
Page 14
... to access the Web Image Monitor. G Change settings. A Start your network administrator. Top page of a Web browser. D Enter a login user name and password, and then click [Login]. F Click the menu. B Enter "http://(machine's address)/" in the address bar of Web Image Monitor appears. When setting SSL,... server, you can also change the settings of this machine using Web Image Monitor. For details about the login user name and password, consult your Web browser. You can enter it. Changing Default Settings Using Web Image Monitor This section describes how to use Web...
... to access the Web Image Monitor. G Change settings. A Start your network administrator. Top page of a Web browser. D Enter a login user name and password, and then click [Login]. F Click the menu. B Enter "http://(machine's address)/" in the address bar of Web Image Monitor appears. When setting SSL,... server, you can also change the settings of this machine using Web Image Monitor. For details about the login user name and password, consult your Web browser. You can enter it. Changing Default Settings Using Web Image Monitor This section describes how to use Web...
Operating Instructions
Page 55
Do not set an encryption password for the machine. 47 Use uppercase letters for alphabets. ❖ SMB Work Group Specify the SMB work group. 2 Enter the group name using given IPv4 ...
Do not set an encryption password for the machine. 47 Use uppercase letters for alphabets. ❖ SMB Work Group Specify the SMB work group. 2 Enter the group name using given IPv4 ...

Operating Instructions
Page 59
...or scanned documents via an SMTP server, you will have to 127 characters. When sending e-mail via the ScanRouter 2 delivery server. Enter [Password] using up to 63 characters. Default settings are shown in the ScanRouter delivery software. ❖ SMTP Server Specify the SMTP server name. is... Off. Enter the user name and password to be set [SMTP Authentication] to be entered. E-mail Address] when using DNS, enter the SMTP server IPv4 address. Depending on the...
...or scanned documents via an SMTP server, you will have to 127 characters. When sending e-mail via the ScanRouter 2 delivery server. Enter [Password] using up to 63 characters. Default settings are shown in the ScanRouter delivery software. ❖ SMTP Server Specify the SMTP server name. is... Off. Enter the user name and password to be set [SMTP Authentication] to be entered. E-mail Address] when using DNS, enter the SMTP server IPv4 address. Depending on the...

Operating Instructions
Page 60
...; POP before SMTP Specify POP authentication (POP before SMTP] to [On]. Spaces cannot be entered. • E-mail Address • Password Enter the password using up to 63 characters. The specified POP3/IMAP4 server name is used for receiving Internet faxes. The default setting is set [POP ...before SMTP). Spaces cannot be entered. • Encrypt • Auto Password encryption is POP3. ❖ POP3/IMAP4 Settings Specify the POP3/IMAP4 server name for [POP before SMTP]. • Server Name If DNS...
...; POP before SMTP Specify POP authentication (POP before SMTP] to [On]. Spaces cannot be entered. • E-mail Address • Password Enter the password using up to 63 characters. The specified POP3/IMAP4 server name is used for receiving Internet faxes. The default setting is set [POP ...before SMTP). Spaces cannot be entered. • Encrypt • Auto Password encryption is POP3. ❖ POP3/IMAP4 Settings Specify the POP3/IMAP4 server name for [POP before SMTP]. • Server Name If DNS...
Operating Instructions
Page 62
... box and you cannot send e-mail if the specified e-mail address is Off. ❖ Fax E-mail Account Specify e-mail address, user name and password for receiving Internet faxes. • E-mail Address Enter an e-mail address using up to 128 characters. • User Name Enter a user name ...using up to 191 characters. • Password Enter a password using the fax function, you will appear in the "From:" box instead. System Settings ❖ Default User Name/PW(Send) To send a scan...
... box and you cannot send e-mail if the specified e-mail address is Off. ❖ Fax E-mail Account Specify e-mail address, user name and password for receiving Internet faxes. • E-mail Address Enter an e-mail address using up to 128 characters. • User Name Enter a user name ...using up to 191 characters. • Password Enter a password using the fax function, you will appear in the "From:" box instead. System Settings ❖ Default User Name/PW(Send) To send a scan...
Operating Instructions
Page 63
Administrator Tools are shown in bold type. You can register up to 150 names. You can also register user names and passwords to each user code. Default settings are used when sending e-mail, sending files to folders, or accessing an LDAP server. • Protection You can register a ...
Administrator Tools are shown in bold type. You can register up to 150 names. You can also register user names and passwords to each user code. Default settings are used when sending e-mail, sending files to folders, or accessing an LDAP server. • Protection You can register a ...

Operating Instructions
Page 66
...use the LDAP server, set "Authentication" to specify, "Server Name", "Search Base", "Port No.", "Search Criteria", "Authentication", "User Name", and "Password". Version 2 and 3 LDAP servers are supported. System Settings ❖ Key Counter Management Specify that functions that you want to manage with the key counter....fax functions. • Name • Server Name • Search Base • Port No. • SSL • Authentication • User Name • Password • Search Criteria • Search Options To execute LDAP Search, be sure to "High Security", "On", or "Off".
...use the LDAP server, set "Authentication" to specify, "Server Name", "Search Base", "Port No.", "Search Criteria", "Authentication", "User Name", and "Password". Version 2 and 3 LDAP servers are supported. System Settings ❖ Key Counter Management Specify that functions that you want to manage with the key counter....fax functions. • Name • Server Name • Search Base • Port No. • SSL • Authentication • User Name • Password • Search Criteria • Search Options To execute LDAP Search, be sure to "High Security", "On", or "Off".

Operating Instructions
Page 72
... machine. [High Security] can be enabled on Version 3.0 LDAP servers only. When [High Security] is selected, the administrator password is sent to communicate with your network administrator. When [On] is selected, the password is set to [On], the port number automatically changes to the LDAP server, use SSL, the LDAP server must...
... machine. [High Security] can be enabled on Version 3.0 LDAP servers only. When [High Security] is selected, the administrator password is sent to communicate with your network administrator. When [On] is selected, the password is set to [On], the port number automatically changes to the LDAP server, use SSL, the LDAP server must...

Operating Instructions
Page 73
...user name differ depending on server environ- Check your server environment before making the setting. Do not enter the administrator account name and password when using authentication for individual users or each search. 2 Procedures for the authentication setting, use . 65 The user name and... Domain Name\User Name, User Name@Domain Name CN=Name, OU=Department Name, DC=Server Name B Enter the password, and then press the {OK} key. Administrator Tools Entering the user name and password A Enter the user name, and then press the {OK} key. You can also specify the user name and...
...user name differ depending on server environ- Check your server environment before making the setting. Do not enter the administrator account name and password when using authentication for individual users or each search. 2 Procedures for the authentication setting, use . 65 The user name and... Domain Name\User Name, User Name@Domain Name CN=Name, OU=Department Name, DC=Server Name B Enter the password, and then press the {OK} key. Administrator Tools Entering the user name and password A Enter the user name, and then press the {OK} key. You can also specify the user name and...

Operating Instructions
Page 133
... the user tools in this menu from the control panel. ❖ PDF Group Password Set the group password already specified with DeskTopBinder. 5 • Current Password • New Password • Confirm New Password A password can be set using on the Web Image Monitor, but in dots per inch.... Default settings are shown in bold type. ❖ Change PDF Password Set the password for the PDF file executing PDF Direct Print. • Current Password • New Password • Confirm New Password A password can be set using on the Web Image Monitor, but in the PDF ...
... the user tools in this menu from the control panel. ❖ PDF Group Password Set the group password already specified with DeskTopBinder. 5 • Current Password • New Password • Confirm New Password A password can be set using on the Web Image Monitor, but in dots per inch.... Default settings are shown in bold type. ❖ Change PDF Password Set the password for the PDF file executing PDF Direct Print. • Current Password • New Password • Confirm New Password A password can be set using on the Web Image Monitor, but in the PDF ...

Operating Instructions
Page 141
..., you to check their use Web Image Monitor to folders, or accessing an LDAP server. 133 You can also register login user names and login passwords to be used when sending e-mail, sending to register names in the Address Book. The manufacturer shall not be lost if there is some kind...
..., you to check their use Web Image Monitor to folders, or accessing an LDAP server. 133 You can also register login user names and login passwords to be used when sending e-mail, sending to register names in the Address Book. The manufacturer shall not be lost if there is some kind...

Operating Instructions
Page 144
.... Reference p.242 "Registering a Protection Code" 136 Reference p.180 "E-mail Destination" Sending scanned files to a shared folder directly After registering the path name, user name and password, you can specify e-mail destinations simply by selecting it from destination search or selecting the Quick Dial keys when sending a document by selecting it from...
.... Reference p.242 "Registering a Protection Code" 136 Reference p.180 "E-mail Destination" Sending scanned files to a shared folder directly After registering the path name, user name and password, you can specify e-mail destinations simply by selecting it from destination search or selecting the Quick Dial keys when sending a document by selecting it from...

Operating Instructions
Page 175
B Select [SEP Code] using the number keys and then press the {OK} key. 167 Programming the SEP Code 7 A Press [Option]. C Enter the SEP Code using {U} or {T}, and then press the {OK} key. E Press [Exit]. D Enter the password using the number keys and then press the {OK} key. Fax Destination C Enter the SUB Code using the number keys and then press the {OK} key.
B Select [SEP Code] using the number keys and then press the {OK} key. 167 Programming the SEP Code 7 A Press [Option]. C Enter the SEP Code using {U} or {T}, and then press the {OK} key. E Press [Exit]. D Enter the password using the number keys and then press the {OK} key. Fax Destination C Enter the SUB Code using the number keys and then press the {OK} key.

Operating Instructions
Page 176
Setting the International TX Mode A Press [Option]. 7 B Select [International TX Mode] using the number keys and then press the {OK} key. Registering Addresses and Users for Facsimile/Scanner Functions D Enter the password using {U} or {T}, and then press the {OK} key. D Press [Exit]. 168 E Press [Exit]. C Select [On] or [Off] using {U} or {T}, and then press the {OK} key.
Setting the International TX Mode A Press [Option]. 7 B Select [International TX Mode] using the number keys and then press the {OK} key. Registering Addresses and Users for Facsimile/Scanner Functions D Enter the password using {U} or {T}, and then press the {OK} key. D Press [Exit]. 168 E Press [Exit]. C Select [On] or [Off] using {U} or {T}, and then press the {OK} key.

Operating Instructions
Page 198
J Select [Specify Other Auth. L Press [Password]. 190 I Select [Folder Authentication] using {U} or {T}, and then press [User]. 7 K Enter the login user name, and then press the {OK} key. Info] using {U} or {T}, and then press the {OK} key. H Select [Auth. Info] using {U} or {T}, and then press the {OK} key. Registering Addresses and Users for Facsimile/Scanner Functions G Press [Details].
J Select [Specify Other Auth. L Press [Password]. 190 I Select [Folder Authentication] using {U} or {T}, and then press [User]. 7 K Enter the login user name, and then press the {OK} key. Info] using {U} or {T}, and then press the {OK} key. H Select [Auth. Info] using {U} or {T}, and then press the {OK} key. Registering Addresses and Users for Facsimile/Scanner Functions G Press [Details].

Operating Instructions
Page 199
P Press the {Escape} key. 7 Q Select [Folder Info] using {U} or {T}, and then press the {OK} key. 191 O Press the {OK} key. M Enter the password, and then press the {OK} key. R Select [SMB] using {U} or {T}, and then press the {OK} key. Registering Folders N Enter the password again to confirm, and then press the {OK} key.
P Press the {Escape} key. 7 Q Select [Folder Info] using {U} or {T}, and then press the {OK} key. 191 O Press the {OK} key. M Enter the password, and then press the {OK} key. R Select [SMB] using {U} or {T}, and then press the {OK} key. Registering Folders N Enter the password again to confirm, and then press the {OK} key.
Operating Instructions
Page 201
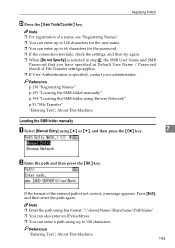
...SMB folder manually A Select [Manual Entry] using up to 64 characters for the user name. ❒ You can enter up to 128 characters for the password. ❒ If the connection test fails, check the settings, and then try again. ❒ When [Do not Specify] is selected in step J, the... SMB User Name and SMB Password that you have specified in Default User Name / Password (Send) of a name, see "Registering Names". ❒ You can enter a path using {U} or {T}, and then press the {OK} key. 7...
...SMB folder manually A Select [Manual Entry] using up to 64 characters for the user name. ❒ You can enter up to 128 characters for the password. ❒ If the connection test fails, check the settings, and then try again. ❒ When [Do not Specify] is selected in step J, the... SMB User Name and SMB Password that you have specified in Default User Name / Password (Send) of a name, see "Registering Names". ❒ You can enter a path using {U} or {T}, and then press the {OK} key. 7...

Operating Instructions
Page 203
... in to the machine if a login screen appears when you have not specified folder authentication, or if an incorrect user name or password has been entered for folder authentication. B Select [Administrator Tools] using {U} or {T}, and then press the {OK} key. B Enter the...} key. The path to access a folder by browsing the network. If a message appears, press [Exit], and then enter the login user name and 7 password again. A Enter the login user name, and then press the {OK} key. Enter the login user name specified for folder authentication. Reference "Entering Text", About...
... in to the machine if a login screen appears when you have not specified folder authentication, or if an incorrect user name or password has been entered for folder authentication. B Select [Administrator Tools] using {U} or {T}, and then press the {OK} key. B Enter the...} key. The path to access a folder by browsing the network. If a message appears, press [Exit], and then enter the login user name and 7 password again. A Enter the login user name, and then press the {OK} key. Enter the login user name specified for folder authentication. Reference "Entering Text", About...

Operating Instructions
Page 211
K Enter the login user name, and then press the {OK} key. Info] using {U} or {T}, and then press the {OK} key. Registering Folders I Select [Folder Authentication] using {U} or {T}, and then press [User]. N Enter the password again to confirm, and then press the {OK} key. 203 J Select [Specify Other Auth. L Press [Password]. 7 M Enter the password, and then press the {OK} key.
K Enter the login user name, and then press the {OK} key. Info] using {U} or {T}, and then press the {OK} key. Registering Folders I Select [Folder Authentication] using {U} or {T}, and then press [User]. N Enter the password again to confirm, and then press the {OK} key. 203 J Select [Specify Other Auth. L Press [Password]. 7 M Enter the password, and then press the {OK} key.
Operating Instructions
Page 214
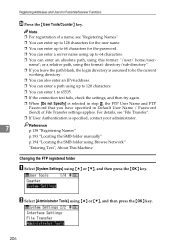
...fails, check the settings, and then try again. ❒ When [Do not Specify] is selected in step J, the FTP User Name and FTP Password that you leave the path blank, the login directory is specified, contact your administrator. 7 Reference p.138 "Registering Names" p.193 "Locating the SMB ... 128 characters. ❒ You can enter a path using this format: directory/sub-directory". ❒ If you have specified in Default User Name / Password (Send) of a name, see "File Transfer". ❒ If User Authentication is assumed to be the current working directory. ❒ You can also...
...fails, check the settings, and then try again. ❒ When [Do not Specify] is selected in step J, the FTP User Name and FTP Password that you leave the path blank, the login directory is specified, contact your administrator. 7 Reference p.138 "Registering Names" p.193 "Locating the SMB ... 128 characters. ❒ You can enter a path using this format: directory/sub-directory". ❒ If you have specified in Default User Name / Password (Send) of a name, see "File Transfer". ❒ If User Authentication is assumed to be the current working directory. ❒ You can also...


