
User Guide
Page 5
Changing the Number of Combine Printing...121 Printing on Envelopes...123 Configuring Envelope Settings Using the Control Panel 123 Printing on Both Sides of Sheets...120 When Using the PCL 6 Printer Driver...120 Types of Two-sided Printing...120 Combining Multiple Pages into Single Page 121 When Using the PCL 6 Printer Driver...121 Types of Sets...105 Storing Data in Document Server 125 Using the Quick Print Release Function...126 Using the Print/Scan(Memory Storage Device) Function 128 3 Print Quick Install...117 Displaying the Printer Driver Properties...118 Standard Printing...119 ...
Changing the Number of Combine Printing...121 Printing on Envelopes...123 Configuring Envelope Settings Using the Control Panel 123 Printing on Both Sides of Sheets...120 When Using the PCL 6 Printer Driver...120 Types of Two-sided Printing...120 Combining Multiple Pages into Single Page 121 When Using the PCL 6 Printer Driver...121 Types of Sets...105 Storing Data in Document Server 125 Using the Quick Print Release Function...126 Using the Print/Scan(Memory Storage Device) Function 128 3 Print Quick Install...117 Displaying the Printer Driver Properties...118 Standard Printing...119 ...

User Guide
Page 119
... installer screen. 2. Click [Quick Install] on as necessary. 8. Select the machine model you are prompted to install the drivers. When the port setting screen appears, specify a port. 7. Click [Continue]. Click [Install]. 6. 5. Using Quick Install, the PCL 6 printer driver is installed under network environment, and the Standard TCP/IP port will be set. • Manage Printers permission is required to restart your computer, restart it by following the instructions that appear. 10. Configure the user code, default printer...
... installer screen. 2. Click [Quick Install] on as necessary. 8. Select the machine model you are prompted to install the drivers. When the port setting screen appears, specify a port. 7. Click [Continue]. Click [Install]. 6. 5. Using Quick Install, the PCL 6 printer driver is installed under network environment, and the Standard TCP/IP port will be set. • Manage Printers permission is required to restart your computer, restart it by following the instructions that appear. 10. Configure the user code, default printer...
User Guide
Page 126
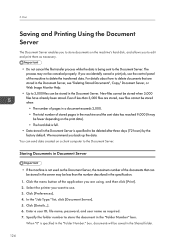
... hours) by the factory default. Storing Documents in Document Server • If the machine is being sent to store the document in the Document Server, see "Deleting Stored Documents", Copy/ Document Server, or Web Image Monitor Help. • Up to the Document Server. New files cannot be canceled properly. Enter a user ID, file name, password, and user name as the Document Server, the maximum number of stored pages in the specification. 1. You can send data created on the machine's hard disk, and allows...
... hours) by the factory default. Storing Documents in Document Server • If the machine is being sent to store the document in the Document Server, see "Deleting Stored Documents", Copy/ Document Server, or Web Image Monitor Help. • Up to the Document Server. New files cannot be canceled properly. Enter a user ID, file name, password, and user name as the Document Server, the maximum number of stored pages in the specification. 1. You can send data created on the machine's hard disk, and allows...

User Guide
Page 156
... menu, the settings made using the control panel 1. Printing from the Bypass Tray Using the Printer Function • If you load paper into the bypass tray. For details, see "Printing Documents", Print. • The default of the screen in the center. 2. Specifying regular sizes using the control panel have priority over the printer driver settings. For details about the sizes that are changed. • For details about setting printer drivers, see "System", Print. • The default of [Bypass Tray] is [Machine Setting(s): Any Type...
... menu, the settings made using the control panel 1. Printing from the Bypass Tray Using the Printer Function • If you load paper into the bypass tray. For details, see "Printing Documents", Print. • The default of the screen in the center. 2. Specifying regular sizes using the control panel have priority over the printer driver settings. For details about the sizes that are changed. • For details about setting printer drivers, see "System", Print. • The default of [Bypass Tray] is [Machine Setting(s): Any Type...

User Guide
Page 163
...) Bypass tray Two-sided • In copier mode: • For details about how to make two-sided copies, see "Duplex Copying", Copy/ Document Server. • In printer mode: • To print on letterhead paper when [Auto Detect] is specified for [Letterhead Setting], you must specify [Letterhead] as the paper type in the printer driver's settings. • If a print job is changed partway through printing from one-sided to two-sided printing, onesided output after the first copy may be printed facing a different direction...
...) Bypass tray Two-sided • In copier mode: • For details about how to make two-sided copies, see "Duplex Copying", Copy/ Document Server. • In printer mode: • To print on letterhead paper when [Auto Detect] is specified for [Letterhead Setting], you must specify [Letterhead] as the paper type in the printer driver's settings. • If a print job is changed partway through printing from one-sided to two-sided printing, onesided output after the first copy may be printed facing a different direction...

User Guide
Page 199
... correct machine email address is specified. "Check whether there are listed in [POP3 / IMAP4 Settings] of e-mail address, see "File Transfer", Connecting the Machine/ System Settings. • For details about settings of [System Settings]. For details about POP3 / IMAP4 Settings, see "File Transfer", Connecting the Machine/ System Settings. • For details about network problems, contact your administrator. • Check that the correct User Name and Password are any network problems." [15-01] Cause No POP3/IMAP4 server address is listed in [Fax Email...
... correct machine email address is specified. "Check whether there are listed in [POP3 / IMAP4 Settings] of e-mail address, see "File Transfer", Connecting the Machine/ System Settings. • For details about settings of [System Settings]. For details about POP3 / IMAP4 Settings, see "File Transfer", Connecting the Machine/ System Settings. • For details about network problems, contact your administrator. • Check that the correct User Name and Password are any network problems." [15-01] Cause No POP3/IMAP4 server address is listed in [Fax Email...

User Guide
Page 208
... Folding Unit. Troubleshooting Message Cause Solution "Error occurred in the Document Server when the [Unauthorized Copy Prevention] was set on the [Unauthorized Copy Prevention for the printer driver. There is a problem with the Fold mode is blank. fold unit. The job has been cancelled." "A job via the network while the error job storing function was specified to be used with a print job via the network that cannot be given to check and print jobs stored when print configuration errors occur...
... Folding Unit. Troubleshooting Message Cause Solution "Error occurred in the Document Server when the [Unauthorized Copy Prevention] was set on the [Unauthorized Copy Prevention for the printer driver. There is a problem with the Fold mode is blank. fold unit. The job has been cancelled." "A job via the network while the error job storing function was specified to be used with a print job via the network that cannot be given to check and print jobs stored when print configuration errors occur...

User Guide
Page 209
... about print volume use limitation, see "Configuring Classification Codes", Print. 207 Messages Displayed When You Use the Printer Function Message "Collate Cancelled" "You reach the usage limit. Job reset is automatically performed if the specified paper size is not supported with the print settings Message "Booklet/Half Fold Error" "Classification Code is not supported. Specify the correct paper type, and then print the file again. The classification code is incorrect. This job has been cancelled." Turn off the power...
... about print volume use limitation, see "Configuring Classification Codes", Print. 207 Messages Displayed When You Use the Printer Function Message "Collate Cancelled" "You reach the usage limit. Job reset is automatically performed if the specified paper size is not supported with the print settings Message "Booklet/Half Fold Error" "Classification Code is not supported. Specify the correct paper type, and then print the file again. The classification code is incorrect. This job has been cancelled." Turn off the power...

User Guide
Page 217
... a print job. PDF direct printing could not be performed because the file system could not be printed on the Configuration Page. "Insufficient Memory" A memory allocation error occurred. In some cases, it will take a long time to the machine. Turn off the power and then back on again. If the message appears again, contact your service representative. Messages Displayed When You Use the Printer Function Message Cause Solution "Failed to the machine. "I /O Buffer], and then set...
... a print job. PDF direct printing could not be performed because the file system could not be printed on the Configuration Page. "Insufficient Memory" A memory allocation error occurred. In some cases, it will take a long time to the machine. Turn off the power and then back on again. If the message appears again, contact your service representative. Messages Displayed When You Use the Printer Function Message Cause Solution "Failed to the machine. "I /O Buffer], and then set...

User Guide
Page 229
... Transmitted Passwords", Security Guide. The maximum number of the original. Messages Displayed When You Use the Scanner Function Message Cause "Any of registrable scan modes has been exceeded. "Authentication succeeded. However, the access privileges for scanner function. Specify the scanning size." The maximum number of Login User Name, Login Password or Driver Encryption Key is 100. For details about how to set original was invalid. For details about login user name, login password, and driver encryption...
... Transmitted Passwords", Security Guide. The maximum number of the original. Messages Displayed When You Use the Scanner Function Message Cause "Any of registrable scan modes has been exceeded. "Authentication succeeded. However, the access privileges for scanner function. Specify the scanning size." The maximum number of Login User Name, Login Password or Driver Encryption Key is 100. For details about how to set original was invalid. For details about login user name, login password, and driver encryption...

Driver Installation Guide
Page 3
...Messages Displayed When Installing the Printer Driver 39 If USB Connection Fails...41 1 Introduction Start Installer...3 Software and Utilities Included on the CD-ROM 5 Printer Drivers...5 TWAIN Driver...7 LAN-Fax Driver...8 For OS X Users...9 2. Installing the Printer Driver Confirming the Connection Method...11 Network Connection...11 Local Connection...12 Quick Install...13 Installing the Printer Driver for a Network Connection 15 Installing the Printer Driver for the Selected Port 15 Using Windows Print Server...21 Installing the Printer Driver for a Local Connection 23 USB Connection...
...Messages Displayed When Installing the Printer Driver 39 If USB Connection Fails...41 1 Introduction Start Installer...3 Software and Utilities Included on the CD-ROM 5 Printer Drivers...5 TWAIN Driver...7 LAN-Fax Driver...8 For OS X Users...9 2. Installing the Printer Driver Confirming the Connection Method...11 Network Connection...11 Local Connection...12 Quick Install...13 Installing the Printer Driver for a Network Connection 15 Installing the Printer Driver for the Selected Port 15 Using Windows Print Server...21 Installing the Printer Driver for a Local Connection 23 USB Connection...

Driver Installation Guide
Page 15
Log on the installer screen. 2. Configure the user code, default printer, and shared printer as an Administrators group member. 1. Click [Finish]. If you want to use the following the instructions that appear. 10. See page 39 "Messages Displayed When Installing the Printer Driver". • The [AutoPlay] dialog box is displayed only for a few seconds under network environment, and the Standard TCP/IP port will be set. • Manage Printers permission is required...
Log on the installer screen. 2. Configure the user code, default printer, and shared printer as an Administrators group member. 1. Click [Finish]. If you want to use the following the instructions that appear. 10. See page 39 "Messages Displayed When Installing the Printer Driver". • The [AutoPlay] dialog box is displayed only for a few seconds under network environment, and the Standard TCP/IP port will be set. • Manage Printers permission is required...
Driver Installation Guide
Page 19
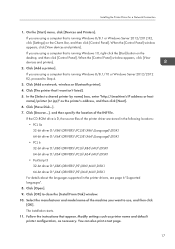
... [Start] menu, click [Devices and Printers]. Click [Add a network, wireless or Bluetooth printer]. 4. Click [Browse...], and then specify the location of the printer driver are using a computer that is D, the source files of the INF file. If the CD-ROM drive is running Windows 10, right-click the [Start] button on the Charm Bar, and then click [Control Panel]. Modify settings such as printer name and default printer configuration, as the printer's address, and...
... [Start] menu, click [Devices and Printers]. Click [Add a network, wireless or Bluetooth printer]. 4. Click [Browse...], and then specify the location of the printer driver are using a computer that is D, the source files of the INF file. If the CD-ROM drive is running Windows 10, right-click the [Start] button on the Charm Bar, and then click [Control Panel]. Modify settings such as printer name and default printer configuration, as the printer's address, and...

Driver Installation Guide
Page 22
... printer drivers, see page 6 "Supported languages". 11. When the [Control Panel] window appears, click [View devices and printers]. • Windows 10: Right-click the [Start] button on the Charm Bar, and then click [Control Panel]. Click the [Drivers] tab, and then click [Add]. 4. Select the manufacturer and model name of the machine you want to the WSD port will appear in the window for configuring printers. • To stop installation of the printer connected to use...
... printer drivers, see page 6 "Supported languages". 11. When the [Control Panel] window appears, click [View devices and printers]. • Windows 10: Right-click the [Start] button on the Charm Bar, and then click [Control Panel]. Click the [Drivers] tab, and then click [Add]. 4. Select the manufacturer and model name of the machine you want to the WSD port will appear in the window for configuring printers. • To stop installation of the printer connected to use...

Driver Installation Guide
Page 23
.... 2. Using Windows Print Server 1. Select a printer driver you want to use, and then click [Next]. 10. Click [Browse...], and then specify the location of the machine you want isn't listed]. 14. Click [OK]. 9. Select the manufacturer and model name of the INF file. Installing the Printer Driver for a Network Connection 5. Click [The printer that I accept the agreement.], and then click [Next >]. 3. The software license agreement appears in the printer drivers, see page 6 "Supported languages...
.... 2. Using Windows Print Server 1. Select a printer driver you want to use, and then click [Next]. 10. Click [Browse...], and then specify the location of the machine you want isn't listed]. 14. Click [OK]. 9. Select the manufacturer and model name of the INF file. Installing the Printer Driver for a Network Connection 5. Click [The printer that I accept the agreement.], and then click [Next >]. 3. The software license agreement appears in the printer drivers, see page 6 "Supported languages...

Driver Installation Guide
Page 26
... installed automatically. 4. Connect the machine and computer using a USB cable. Found New Hardware Wizard starts, and USB Printing Support is not installed, follow the plug-and-play is enabled, the icon of the machine whose driver you want to install it from the CD-ROM provided with this machine. Check that only the operating system is running on the power of the printer driver is off. 2. Connect the USB cable firmly. 3. Windows Vista, Windows Server 2008 1. Check the location...
... installed automatically. 4. Connect the machine and computer using a USB cable. Found New Hardware Wizard starts, and USB Printing Support is not installed, follow the plug-and-play is enabled, the icon of the machine whose driver you want to install it from the CD-ROM provided with this machine. Check that only the operating system is running on the power of the printer driver is off. 2. Connect the USB cable firmly. 3. Windows Vista, Windows Server 2008 1. Check the location...

Driver Installation Guide
Page 28
...]. 3. Connect the USB cable firmly. 14. Select a printer driver you want to use . 8. Enter a port name, and then click [OK]. 7. Select [Specify a new port], and then click [Next]. 5. Select the [Printer Name:] check box of the machine model you want to restart the computer either now or later, and then click [Finish]. 26 Configure the user code, default printer, and shared printer as necessary. 9. The installation starts. 10. The software license...
...]. 3. Connect the USB cable firmly. 14. Select a printer driver you want to use . 8. Enter a port name, and then click [OK]. 7. Select [Specify a new port], and then click [Next]. 5. Select the [Printer Name:] check box of the machine model you want to restart the computer either now or later, and then click [Finish]. 26 Configure the user code, default printer, and shared printer as necessary. 9. The installation starts. 10. The software license...
Driver Installation Guide
Page 33
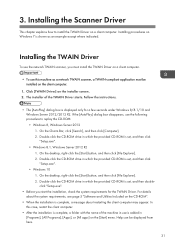
Installing the TWAIN Driver To use the network TWAIN scanner, you start the installation, check the system requirements for a few seconds under Windows 8/8.1/10 and Windows Server 2012/2012 R2. On the Charm Bar, click [Search], and then click [Computer]. 2. On the desktop, right-click the [Start] button, and then click [File Explorer]. 2. For details about the system requirements, see page 5 "Software and Utilities Included...
Installing the TWAIN Driver To use the network TWAIN scanner, you start the installation, check the system requirements for a few seconds under Windows 8/8.1/10 and Windows Server 2012/2012 R2. On the Charm Bar, click [Search], and then click [Computer]. 2. On the desktop, right-click the [Start] button, and then click [File Explorer]. 2. For details about the system requirements, see page 5 "Software and Utilities Included...

Driver Installation Guide
Page 36
... displayed only for a few seconds under Windows 8/8.1/10 and Windows Server 2012/2012 R2. Double-click the CD-ROM drive in which the provided CD-ROM is different from the printer driver when installing the LAN-Fax Driver, see the installation procedure of the printer driver. If the [AutoPlay] dialog box disappears, use the following procedure to replace 1, 2 3 1, 2 34 Specifying the Port When Installing the LAN-Fax Driver To specify a port...
... displayed only for a few seconds under Windows 8/8.1/10 and Windows Server 2012/2012 R2. Double-click the CD-ROM drive in which the provided CD-ROM is different from the printer driver when installing the LAN-Fax Driver, see the installation procedure of the printer driver. If the [AutoPlay] dialog box disappears, use the following procedure to replace 1, 2 3 1, 2 34 Specifying the Port When Installing the LAN-Fax Driver To specify a port...
Quick Reference Scanner Guide
Page 1
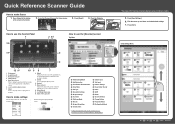
... Indicates the status of the screen in User How to make desired settings. 7. Select the image density by flicking the screen. Name of the application you are using. Place the Originals. Depending on the application, this key may be disabled. 9. [Home] Press to use the [Scanner] screen Top Menu 1 3 2 1 File Emailing Method 2 Add Destination 3 Total Number Of Destinations 4 Color Mode 5 File Type 6 Resolution Settings 7 Original Settings 8 Scan Size 9 File Name Mode 10 Density...
... Indicates the status of the screen in User How to make desired settings. 7. Select the image density by flicking the screen. Name of the application you are using. Place the Originals. Depending on the application, this key may be disabled. 9. [Home] Press to use the [Scanner] screen Top Menu 1 3 2 1 File Emailing Method 2 Add Destination 3 Total Number Of Destinations 4 Color Mode 5 File Type 6 Resolution Settings 7 Original Settings 8 Scan Size 9 File Name Mode 10 Density...


