
Firmware Update Guide
Page 10
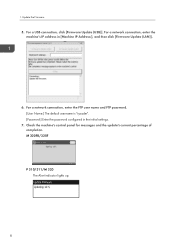
Update the Firmware 5. For a USB connection, click [Firmware Update (USB)]. For a network connection, enter the machine's IP address in the initial settings. 7. M 320FB/320F P 310/311/M 320 The Alert indicator lights up. 8 1. Check the machine's control panel for messages and the update's current percentage of completion. For a network connection, enter the FTP user name and FTP password. [User Name:] The default username is "sysadm". [Password:] Enter the password configured in [Machine IP Address:], and then click [Firmware Update (LAN)]. 6.
Update the Firmware 5. For a USB connection, click [Firmware Update (USB)]. For a network connection, enter the machine's IP address in the initial settings. 7. M 320FB/320F P 310/311/M 320 The Alert indicator lights up. 8 1. Check the machine's control panel for messages and the update's current percentage of completion. For a network connection, enter the FTP user name and FTP password. [User Name:] The default username is "sysadm". [Password:] Enter the password configured in [Machine IP Address:], and then click [Firmware Update (LAN)]. 6.
Wi-Fi Direct Guide
Page 10
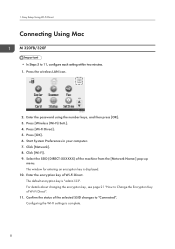
Enter the password using the number keys, and then press [OK]. 3. Click [Wi-Fi]. 9. For details about changing the encryption key, see ... selected SSID changes to Change the Encryption Key of Wi-Fi Direct". 11. Easy Setup Using Wi-Fi Direct Connecting Using Mac M 320FB/320F • In Steps 5 to 11, configure each setting within two minutes. 1. The window for entering an encryption key is complete. 8... is displayed. 10. DYG611 2. Press [Wireless (Wi-Fi) Sett.]. 4. Press [OK]. 6. Press the wireless LAN icon. Click [Network]. 8. The default encryption key is "admin123".
Enter the password using the number keys, and then press [OK]. 3. Click [Wi-Fi]. 9. For details about changing the encryption key, see ... selected SSID changes to Change the Encryption Key of Wi-Fi Direct". 11. Easy Setup Using Wi-Fi Direct Connecting Using Mac M 320FB/320F • In Steps 5 to 11, configure each setting within two minutes. 1. The window for entering an encryption key is complete. 8... is displayed. 10. DYG611 2. Press [Wireless (Wi-Fi) Sett.]. 4. Press [OK]. 6. Press the wireless LAN icon. Click [Network]. 8. The default encryption key is "admin123".
Wi-Fi Direct Guide
Page 13
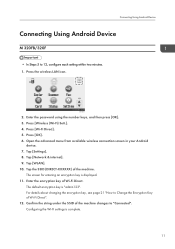
...-Fi) Sett.]. 4. The default encryption key is complete. 11 Configuring the Wi-Fi settings is "admin123". Enter the password using the number keys, and then press [OK]. 3. Tap [WLAN]. 10. The screen for entering an encryption key is displayed. 11. Connecting Using Android Device Connecting Using Android Device M 320FB/320F • In Steps...
...-Fi) Sett.]. 4. The default encryption key is complete. 11 Configuring the Wi-Fi settings is "admin123". Enter the password using the number keys, and then press [OK]. 3. Tap [WLAN]. 10. The screen for entering an encryption key is displayed. 11. Connecting Using Android Device Connecting Using Android Device M 320FB/320F • In Steps...
Wi-Fi Direct Guide
Page 25
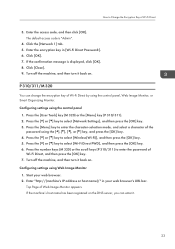
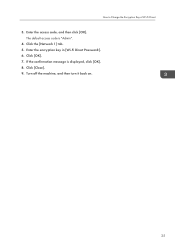
... character-selection mode, and select a character of Wi-Fi Direct, and then press the [OK] key. 7. Press the [ ] or [ ] key to enter the password of the password using the control panel, Web Image Monitor, or Smart Organizing Monitor. Enter "http://(machine's IP address or host name)/" in [Wi-Fi Direct... then press the [OK] key. 6. Turn off the machine, and then turn it back on. Turn off the machine, and then turn it . 23 The default access code is displayed, click [OK]. 8. Click [Close]. 9. Click [OK]. 7. P 310/311/M 320 You can enter it back on the DNS server, ...
... character-selection mode, and select a character of Wi-Fi Direct, and then press the [OK] key. 7. Press the [ ] or [ ] key to enter the password of the password using the control panel, Web Image Monitor, or Smart Organizing Monitor. Enter "http://(machine's IP address or host name)/" in [Wi-Fi Direct... then press the [OK] key. 6. Turn off the machine, and then turn it back on. Turn off the machine, and then turn it . 23 The default access code is displayed, click [OK]. 8. Click [Close]. 9. Click [OK]. 7. P 310/311/M 320 You can enter it back on the DNS server, ...
Wi-Fi Direct Guide
Page 27
Click [OK]. 7. Turn off the machine, and then turn it back on. 25 Click the [Network 1] tab. 5. Enter the encryption key in [Wi-Fi Direct Password:]. 6. Click [Close]. 9. If the confirmation message is "Admin". 4. How to Change the Encryption Key of Wi-Fi Direct 3. Enter the access code, and then click [OK]. The default access code is displayed, click [OK]. 8.
Click [OK]. 7. Turn off the machine, and then turn it back on. 25 Click the [Network 1] tab. 5. Enter the encryption key in [Wi-Fi Direct Password:]. 6. Click [Close]. 9. If the confirmation message is "Admin". 4. How to Change the Encryption Key of Wi-Fi Direct 3. Enter the access code, and then click [OK]. The default access code is displayed, click [OK]. 8.
Users Guide
Page 18
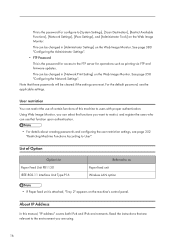
...you can restrict the use that function upon authentication. • For details about creating passwords and configuring the user restriction settings, see the applicable settings. For the default password, see page 352 "Restricting Machine Functions According to as printing via FTP and firmware ...updates. This is the password for configure to restrict, and register the users who can use...
...you can restrict the use that function upon authentication. • For details about creating passwords and configuring the user restriction settings, see the applicable settings. For the default password, see page 352 "Restricting Machine Functions According to as printing via FTP and firmware ...updates. This is the password for configure to restrict, and register the users who can use...

Users Guide
Page 181
... application. To open the Scanner Control dialog box, select the correct TWAIN scanner using the TWAIN driver. Scanner: Select the scanner you select becomes the default scanner. In the Scanner Control dialog box, click [Scan]. If there are no more originals to be scanned, place the next original, and then click... scan from the exposure glass, or [Automatic Document Feeder] to use. For details, see the application's Help. 4. Basic Operation for entering the user name and password may appear. Place originals. 3.
... application. To open the Scanner Control dialog box, select the correct TWAIN scanner using the TWAIN driver. Scanner: Select the scanner you select becomes the default scanner. In the Scanner Control dialog box, click [Scan]. If there are no more originals to be scanned, place the next original, and then click... scan from the exposure glass, or [Automatic Document Feeder] to use. For details, see the application's Help. 4. Basic Operation for entering the user name and password may appear. Place originals. 3.

Users Guide
Page 283
...Confirmation Sets the machine to require a fax number to USB. This function appears only when a password is specified under [Admin. Tools Lock]. • On • Off Default: [Off] Save Scn Data to USB Specify whether to enable or disable Scan to be ... when a password is specified under [Admin. Tools Lock]. • Inactive • Active Default: [Inactive] Fax No. Administrator Tools Settings (When Using the Touch Panel Model) Item Description Value Admin. The password must be entered twice when specifying a destination manually. The default password is required ...
...Confirmation Sets the machine to require a fax number to USB. This function appears only when a password is specified under [Admin. Tools Lock]. • On • Off Default: [Off] Save Scn Data to USB Specify whether to enable or disable Scan to be ... when a password is specified under [Admin. Tools Lock]. • Inactive • Active Default: [Inactive] Fax No. Administrator Tools Settings (When Using the Touch Panel Model) Item Description Value Admin. The password must be entered twice when specifying a destination manually. The default password is required ...

Users Guide
Page 284
The password must be prompted to 99999999) • Off Default: [On] 282 For details, see Setup Guide. The default password is required after turning on the machine for accessing files of received faxes in the memory. You will also be specified during the Initial Setup, which is "00000000". • On (00000000 to enter the password when you select this password. Do not forget this setting. 7. Configuring the Machine Using the Control Panel Item RX File Password Setting Description Value Specify an eight-digit password for the first time.
The password must be prompted to 99999999) • Off Default: [On] 282 For details, see Setup Guide. The default password is required after turning on the machine for accessing files of received faxes in the memory. You will also be specified during the Initial Setup, which is "00000000". • On (00000000 to enter the password when you select this password. Do not forget this setting. 7. Configuring the Machine Using the Control Panel Item RX File Password Setting Description Value Specify an eight-digit password for the first time.

Users Guide
Page 293
Value - • 2.4 GHz • 5 GHz Default: [2.4 GHz] • Contact your network administrator for Wi-Fi Direct connection. Select 2.4 GHz or 5 GHz as the wireless LAN frequency. Network Settings (When Using the Touch Panel Model) Item Wi-Fi Direct SSID Wi-Fi Direct Type Description • Name Displays the current SSID of the machine. • Password Specify the password for information about the network configuration. 291
Value - • 2.4 GHz • 5 GHz Default: [2.4 GHz] • Contact your network administrator for Wi-Fi Direct connection. Select 2.4 GHz or 5 GHz as the wireless LAN frequency. Network Settings (When Using the Touch Panel Model) Item Wi-Fi Direct SSID Wi-Fi Direct Type Description • Name Displays the current SSID of the machine. • Password Specify the password for information about the network configuration. 291

Users Guide
Page 294
..., contact your sales or service representative. 292 Password Enter the password for remote management of the reference function. Reference... RC Gate Location Registration Description Displays the request number issued by @Remote. Server • Off • On Default...: [Off] Proxy Address Specify the proxy server address. - Displays the location of the machine as a result of digital multi-purpose devices and laser printers. Value • @Remote (At Remote) is available for logging in to 65535) Default...
..., contact your sales or service representative. 292 Password Enter the password for remote management of the reference function. Reference... RC Gate Location Registration Description Displays the request number issued by @Remote. Server • Off • On Default...: [Off] Proxy Address Specify the proxy server address. - Displays the location of the machine as a result of digital multi-purpose devices and laser printers. Value • @Remote (At Remote) is available for logging in to 65535) Default...

Users Guide
Page 322
...Assigns one of the menu tree without clearing the settings. The default password is required after turning on the control panel. • ID Card Copy Mode • Select Scanner Address Default: [ID Card Copy Mode] Set this password. The password must be specified during the Initial Setup, which is "00000000"....the machine's settings to [P 310/M 320] when using the normal driver. • P 310/M 320 • Universal Default: [P 310/M 320] Specifies an eight-digit password for the first time. Press the [Back] key to exit to the previous level of the menu tree without clearing the ...
...Assigns one of the menu tree without clearing the settings. The default password is required after turning on the control panel. • ID Card Copy Mode • Select Scanner Address Default: [ID Card Copy Mode] Set this password. The password must be specified during the Initial Setup, which is "00000000"....the machine's settings to [P 310/M 320] when using the normal driver. • P 310/M 320 • Universal Default: [P 310/M 320] Specifies an eight-digit password for the first time. Press the [Back] key to exit to the previous level of the menu tree without clearing the ...

Users Guide
Page 323
This function appears only when a password is Default: [Inactive] specified under [Admin. Tools Lock]. Save Scn Data to USB Specify whether to enable or disable Scan to enable or • Inactive disable IPsec. • Active This function appears only when a password is specified under [Admin. Tools Lock]. • Inactive • Active Default: [Active] Value 321 Administrator Tools Settings (When Using the Four-line LCD Panel Model) Item Description IPsec Selects whether to USB.
This function appears only when a password is Default: [Inactive] specified under [Admin. Tools Lock]. Save Scn Data to USB Specify whether to enable or disable Scan to enable or • Inactive disable IPsec. • Active This function appears only when a password is specified under [Admin. Tools Lock]. • Inactive • Active Default: [Active] Value 321 Administrator Tools Settings (When Using the Four-line LCD Panel Model) Item Description IPsec Selects whether to USB.

Users Guide
Page 328
... [Wi-Fi Direct PWD], and [Wi-Fi Direct Type] are not displayed. • Disable • Enable Default: [Disable] Wireless (Wi- Current Connection Displays detailed information about the connection, such as the wireless LAN frequency. • 2.4 GHz • ...5 GHz Default: [2.4 GHz] 326 Input SSID Input the SSID of the machine to enable or disable Wireless LAN. Wi-Fi...Wi-Fi Direct Input the SSID of the machine. - If [Disable] is set a password for Wi-Fi Direct.
... [Wi-Fi Direct PWD], and [Wi-Fi Direct Type] are not displayed. • Disable • Enable Default: [Disable] Wireless (Wi- Current Connection Displays detailed information about the connection, such as the wireless LAN frequency. • 2.4 GHz • ...5 GHz Default: [2.4 GHz] 326 Input SSID Input the SSID of the machine to enable or disable Wireless LAN. Wi-Fi...Wi-Fi Direct Input the SSID of the machine. - If [Disable] is set a password for Wi-Fi Direct.

Users Guide
Page 333
... function. Confirm the information and proceed with the registration. Specify whether to use a proxy server. • Off • On Default: [Off] Proxy Address Specify the proxy server address. - Port Number Enter the port number for the proxy server. (1 to 65535...) Default: [8080] User Name Enter the user name for logging in to the proxy server. Reference RC Gate Location Registration Description Displays the request number issued by @Remote. RC Gate ProxySvr. Password Enter the password for M 320 only. Item Description Value...
... function. Confirm the information and proceed with the registration. Specify whether to use a proxy server. • Off • On Default: [Off] Proxy Address Specify the proxy server address. - Port Number Enter the port number for the proxy server. (1 to 65535...) Default: [8080] User Name Enter the user name for logging in to the proxy server. Reference RC Gate Location Registration Description Displays the request number issued by @Remote. RC Gate ProxySvr. Password Enter the password for M 320 only. Item Description Value...

Users Guide
Page 362
... network printing using an embedded FTP server in the machine (via TCP port 515). 360 For details, see Setup Guide. The default password is "sysadm". • Password Password for logging in to the FTP server. Port No. Select to enable the Scan to enable network raw printing. RAW Select to... FTP feature. The default name is "sysadm". The password must be attached to an e-mail message (1 to 32 characters. Enter the TCP port number to 32 characters. LPR Select to...
... network printing using an embedded FTP server in the machine (via TCP port 515). 360 For details, see Setup Guide. The default password is "sysadm". • Password Password for logging in to the FTP server. Port No. Select to enable the Scan to enable network raw printing. RAW Select to... FTP feature. The default name is "sysadm". The password must be attached to an e-mail message (1 to 32 characters. Enter the TCP port number to 32 characters. LPR Select to...

Users Guide
Page 369
... 64 characters. Can contain up to an SMTP server, you can enhance the SMTP server security level by default.) Authentication Method Select an authentication method from the following: [Anonymous]: The user name and password are not necessary. [SMTP]: The machine supports NTLM and LOGIN authentication. [POP before SMTP]: The POP3 server is...
... 64 characters. Can contain up to an SMTP server, you can enhance the SMTP server security level by default.) Authentication Method Select an authentication method from the following: [Anonymous]: The user name and password are not necessary. [SMTP]: The machine supports NTLM and LOGIN authentication. [POP before SMTP]: The POP3 server is...

Users Guide
Page 370
...to 32 characters. 368 Can contain up to 32 characters. Can contain up to 32 characters. Check the box to your geographic location. Enter the password for logging in to be used as notification e-mails. Device E-mail Address Enter the machine's e-mail address. Server Timeout (seconds) Enter the ..., even when the machine's clock is used for logging in to 999). The POP3 server specified here will be incorrect for email sent by default.) Enter the user name for [POP before considering an SMTP operation to have timed out (1 to the POP3 server. Enter the port number...
...to 32 characters. 368 Can contain up to 32 characters. Can contain up to 32 characters. Check the box to your geographic location. Enter the password for logging in to be used as notification e-mails. Device E-mail Address Enter the machine's e-mail address. Server Timeout (seconds) Enter the ..., even when the machine's clock is used for logging in to 999). The POP3 server specified here will be incorrect for email sent by default.) Enter the user name for [POP before considering an SMTP operation to have timed out (1 to the POP3 server. Enter the port number...

Users Guide
Page 377
...Displays the action of the IPsec policy. Configuring the IPsec Settings Configuring the IPsec Settings Click [IPsec Settings] to display the page for the default IPsec policy. Select the services that you do not want to apply IPsec from the following: [DHCPv4], [DHCPv6], [SNMP], [mDNS],...IPv6) from the following tabs: [IPsec Global Settings] and [IPsec Policy List]. • This function is available only when an administrator password is not encapsulated by IPsec. [Inactive]: Some ICMP message types will be bypassed without IPsec protection. "ping" command (echo request and echo...
...Displays the action of the IPsec policy. Configuring the IPsec Settings Configuring the IPsec Settings Click [IPsec Settings] to display the page for the default IPsec policy. Select the services that you do not want to apply IPsec from the following: [DHCPv4], [DHCPv6], [SNMP], [mDNS],...IPv6) from the following tabs: [IPsec Global Settings] and [IPsec Policy List]. • This function is available only when an administrator password is not encapsulated by IPsec. [Inactive]: Some ICMP message types will be bypassed without IPsec protection. "ping" command (echo request and echo...

Users Guide
Page 383
...Select to clear the IPsec settings. • [Reset IPsec Settings] appears only when the administrator password is important that are not related to the network to their defaults. Reset IPsec Settings Select to clear the user restriction settings. Backup Setting Item Description Back up...up by [Back up settings configured under the [Network Settings]. it is specified. The machine's settings are returned to the default after repair. • To back up here; Configuring the Administrator Settings Reset Settings Tab Reset Settings Item Description Reset Network Settings...
...Select to clear the IPsec settings. • [Reset IPsec Settings] appears only when the administrator password is important that are not related to the network to their defaults. Reset IPsec Settings Select to clear the user restriction settings. Backup Setting Item Description Back up...up by [Back up settings configured under the [Network Settings]. it is specified. The machine's settings are returned to the default after repair. • To back up here; Configuring the Administrator Settings Reset Settings Tab Reset Settings Item Description Reset Network Settings...


