
Hardware Guide
Page 9
Installing the Operating Instructions The CD-ROM "Manuals" provided with the printer contains an HTML Operating Instructions Manual in the [Start] menu, select your printer driver, and then click [uninstall]. Important ❒ System Requirements : • Windows 95/98/Me, Windows 2000/XP, Windows Server 2003 or Windows NT4.0. • 800 × ...
Installing the Operating Instructions The CD-ROM "Manuals" provided with the printer contains an HTML Operating Instructions Manual in the [Start] menu, select your printer driver, and then click [uninstall]. Important ❒ System Requirements : • Windows 95/98/Me, Windows 2000/XP, Windows Server 2003 or Windows NT4.0. • 800 × ...
Hardware Guide
Page 26
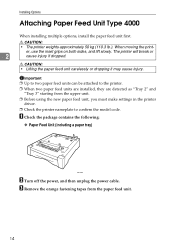
... unit first. C Remove the orange fastening tapes from the upper unit. ❒ Before using the new paper feed unit, you must make settings in the printer driver. ❒ Check the printer nameplate to confirm the model code. Important ❒ Up to two paper feed units can be attached to the... printer. ❒ When two paper feed units are installed, they are detected as "Tray 2" and "Tray 3" starting from the paper feed unit. 14 A Check the package ...
... unit first. C Remove the orange fastening tapes from the upper unit. ❒ Before using the new paper feed unit, you must make settings in the printer driver. ❒ Check the printer nameplate to confirm the model code. Important ❒ Up to two paper feed units can be attached to the... printer. ❒ When two paper feed units are installed, they are detected as "Tray 2" and "Tray 3" starting from the paper feed unit. 14 A Check the package ...
Hardware Guide
Page 29
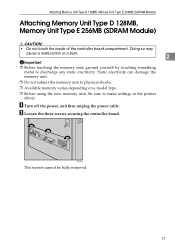
.... Doing so may cause a malfunction or a burn. 2 Important ❒ Before touching the memory unit, ground yourself by touching something metal to make settings in the printer driver. AQC630S The screws cannot be fully removed. 17
.... Doing so may cause a malfunction or a burn. 2 Important ❒ Before touching the memory unit, ground yourself by touching something metal to make settings in the printer driver. AQC630S The screws cannot be fully removed. 17
Hardware Guide
Page 39
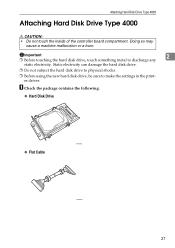
... touch the inside of the controller board compartment. Important 2 ❒ Before touching the hard disk drive, touch something metal to make the settings in the printer driver.
... touch the inside of the controller board compartment. Important 2 ❒ Before touching the hard disk drive, touch something metal to make the settings in the printer driver.
Hardware Guide
Page 94
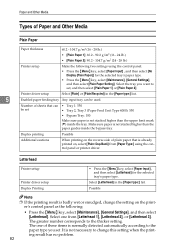
...General Settings], and then select [Letterhead]. Number of these items is already printed on the printer's control panel as the following two settings using the control panel or printer driver. Select one of sheets that is normally detected automatically according to the paper type you ...the printing result has no problem. 82 Make sure paper is not stacked higher than the paper guides inside the tray. Letterhead Printer setup Printer driver setup Duplex Printing • Press the {Menu} key, select [Paper Input] , and then select [Letterhead] for the ...
...General Settings], and then select [Letterhead]. Number of these items is already printed on the printer's control panel as the following two settings using the control panel or printer driver. Select one of sheets that is normally detected automatically according to the paper type you ...the printing result has no problem. 82 Make sure paper is not stacked higher than the paper guides inside the tray. Letterhead Printer setup Printer driver setup Duplex Printing • Press the {Menu} key, select [Paper Input] , and then select [Letterhead] for the ...
Hardware Guide
Page 95
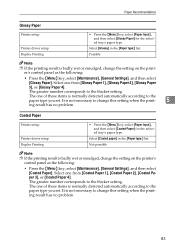
... thicker setting. The greater number corresponds to the thicker setting. Select [Coated paper] in the [Paper type:] list. Coated Paper Printer setup Printer driver setup Duplex Printing • Press the {Menu} key, select [Paper Input] , and then select [Coated Paper] for the ... list. It is normally detected automatically according to change this setting when the printing result has no problem. Paper Recommendations Glossy Paper Printer setup Printer driver setup Duplex Printing • Press the {Menu} key, select [Paper Input] , and then select [Glossy Paper] for the...
... thicker setting. The greater number corresponds to the thicker setting. Select [Coated paper] in the [Paper type:] list. Coated Paper Printer setup Printer driver setup Duplex Printing • Press the {Menu} key, select [Paper Input] , and then select [Coated Paper] for the ... list. It is normally detected automatically according to change this setting when the printing result has no problem. Paper Recommendations Glossy Paper Printer setup Printer driver setup Duplex Printing • Press the {Menu} key, select [Paper Input] , and then select [Glossy Paper] for the...

Hardware Guide
Page 96
... [Thin Paper] for the selected tray's paper type. Make sure paper is not stacked higher than the paper guides inside the tray. Printer driver setup Click [Thin] in the [Paper type:] list. Duplex printing Note ❒ Make sure paper is not stacked higher than the ...Paper thickness 52 - 60.2 g/m2 (14 - 16 lb.) Printer setup Make the following settings using the control panel: • Press the {Menu} key, select [Paper Input] , and then select one from [Paper Type:] using the control panel or printer driver. Printer driver setup Click [Thick 1] or [Thick 2] in the [Paper...
... [Thin Paper] for the selected tray's paper type. Make sure paper is not stacked higher than the paper guides inside the tray. Printer driver setup Click [Thin] in the [Paper type:] list. Duplex printing Note ❒ Make sure paper is not stacked higher than the ...Paper thickness 52 - 60.2 g/m2 (14 - 16 lb.) Printer setup Make the following settings using the control panel: • Press the {Menu} key, select [Paper Input] , and then select one from [Paper Type:] using the control panel or printer driver. Printer driver setup Click [Thick 1] or [Thick 2] in the [Paper...
Hardware Guide
Page 97
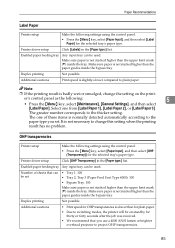
...for plain paper. • Due to the thicker setting. The greater number corresponds to switching modes, the printer will be used . Printer driver setup Click [OHP Transparency] in the [Paper type:] list. OHP transparencies Printer setup Make the following : 5 • Press the {Menu} key, select [Maintenance], [General Settings],... and then select [Label Paper]. Printer driver setup Click [Labels] in the [Paper type:] list. Enabled paper feeding tray Any input tray can be set . Make ...
...for plain paper. • Due to the thicker setting. The greater number corresponds to switching modes, the printer will be used . Printer driver setup Click [OHP Transparency] in the [Paper type:] list. OHP transparencies Printer setup Make the following : 5 • Press the {Menu} key, select [Maintenance], [General Settings],... and then select [Label Paper]. Printer driver setup Click [Labels] in the [Paper type:] list. Enabled paper feeding tray Any input tray can be set . Make ...
Hardware Guide
Page 98
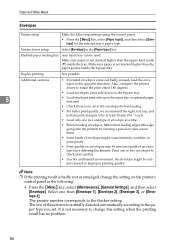
...the [Paper type:] list. Enabled paper feeding tray Any input tray can be output creased or improper printing quality. Also, configure the printer driver to rotate the print object 180 degrees. • Load envelopes print side down on the bypass tray. 5 • Load envelopes ...time. • Before loading envelopes, flatten their leading edges (the edge going into the printer) by running a pencil or ruler across them. • Some kinds of envelope might be used. Printer driver setup Select [Envelope] in the opposite direction. Make sure paper is badly wet or smudged...
...the [Paper type:] list. Enabled paper feeding tray Any input tray can be output creased or improper printing quality. Also, configure the printer driver to rotate the print object 180 degrees. • Load envelopes print side down on the bypass tray. 5 • Load envelopes ...time. • Before loading envelopes, flatten their leading edges (the edge going into the printer) by running a pencil or ruler across them. • Some kinds of envelope might be used. Printer driver setup Select [Envelope] in the opposite direction. Make sure paper is badly wet or smudged...

Hardware Guide
Page 100
... 5 A Print area B Feed direction C Approx. 4.2 mm (0.17 inches) D Approx. 4.2 mm (0.17 inches) Note ❒ The print area may vary depending on the paper size, printer language and printer driver settings. ❖ Envelope A Print area B Feed direction C Approx. 4.2 mm (0.17 inches) D Approx. 4.2 mm (0.17 inches) Note ❒ The print area may vary depending on...
... 5 A Print area B Feed direction C Approx. 4.2 mm (0.17 inches) D Approx. 4.2 mm (0.17 inches) Note ❒ The print area may vary depending on the paper size, printer language and printer driver settings. ❖ Envelope A Print area B Feed direction C Approx. 4.2 mm (0.17 inches) D Approx. 4.2 mm (0.17 inches) Note ❒ The print area may vary depending on...
Hardware Guide
Page 106
...mm (3.94 - 8.5 in.) in 5 width and 210 - 355.6 mm (8.27 - 14 in.) in length. ❒ The printer cannot print from applications that selected using the control panel. C Select [Paper Size: (tray name)] using {T} or {U}, and then... or {U}, and then press the {OK} key. However, when printing with a printer driver other than the RPCS printer driver, you have already made settings using the printer driver overrides that do not support custom size paper. Do not make settings using the control...size using the control panel or printer driver. ❒ The custom size paper selected using the...
...mm (3.94 - 8.5 in.) in 5 width and 210 - 355.6 mm (8.27 - 14 in.) in length. ❒ The printer cannot print from applications that selected using the control panel. C Select [Paper Size: (tray name)] using {T} or {U}, and then... or {U}, and then press the {OK} key. However, when printing with a printer driver other than the RPCS printer driver, you have already made settings using the printer driver overrides that do not support custom size paper. Do not make settings using the control...size using the control panel or printer driver. ❒ The custom size paper selected using the...

Hardware Guide
Page 109
... the printing result is wet or smudged with the [Plain Paper] setting, Make the following paper types cannot be affected. ❒ Load paper with the printer driver.
... the printing result is wet or smudged with the [Plain Paper] setting, Make the following paper types cannot be affected. ❒ Load paper with the printer driver.
Hardware Guide
Page 112
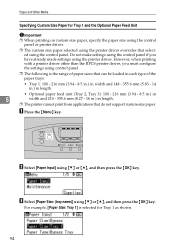
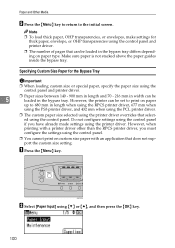
...for the Bypass Tray Important ❒ When loading custom size or special paper, specify the paper size using the control panel and printer driver. ❒ The number of pages that can be loaded in the bypass tray differs depending on paper type. Do not configure ... Press the {Menu} key to return to 680 mm in length when using the RPCS printer driver, 677 mm when using the PS3 printer driver, and 432 mm when using the PCL printer driver. ❒ The custom paper size selected using the printer driver overrides that selected using {T} or {U}, and then press the {OK} key. 100 K...
...for the Bypass Tray Important ❒ When loading custom size or special paper, specify the paper size using the control panel and printer driver. ❒ The number of pages that can be loaded in the bypass tray differs depending on paper type. Do not configure ... Press the {Menu} key to return to 680 mm in length when using the RPCS printer driver, 677 mm when using the PS3 printer driver, and 432 mm when using the PCL printer driver. ❒ The custom paper size selected using the printer driver overrides that selected using {T} or {U}, and then press the {OK} key. 100 K...
Hardware Guide
Page 113
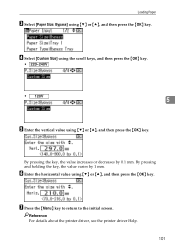
...: Bypass] using {T} or {U}, and then press the {OK} key. By pressing the key, the value increases or decreases by 1 mm. Reference For details about the printer driver, see the printer driver Help. 101 G Press the {Menu} key to return to the initial screen.
...: Bypass] using {T} or {U}, and then press the {OK} key. By pressing the key, the value increases or decreases by 1 mm. Reference For details about the printer driver, see the printer driver Help. 101 G Press the {Menu} key to return to the initial screen.
Hardware Guide
Page 114
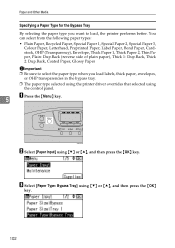
... By selecting the paper type you load labels, thick paper, envelopes, or OHP transparencies in the bypass tray. ❒ The paper type selected using the printer driver overrides that selected using the control panel. 5 A Press the {Menu} key. K C M Y AQC001S B Select [Paper Input] using {T} or {U}, and then press the {OK} key. 102 C Select...), Thick 1: Dup.Back, Thick 2: Dup.Back, Coated Paper, Glossy Paper Important ❒ Be sure to select the paper type when you want to load, the printer performs better.
... By selecting the paper type you load labels, thick paper, envelopes, or OHP transparencies in the bypass tray. ❒ The paper type selected using the printer driver overrides that selected using the control panel. 5 A Press the {Menu} key. K C M Y AQC001S B Select [Paper Input] using {T} or {U}, and then press the {OK} key. 102 C Select...), Thick 1: Dup.Back, Thick 2: Dup.Back, Coated Paper, Glossy Paper Important ❒ Be sure to select the paper type when you want to load, the printer performs better.
Hardware Guide
Page 116
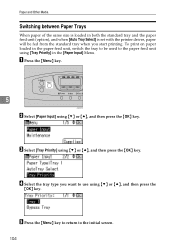
... feed unit using [Tray Priority] in both the standard tray and the paper feed unit (option), and when [Auto Tray Select] is set with the printer driver, paper will be fed from the standard tray when you want to the initial screen. 104
... feed unit using [Tray Priority] in both the standard tray and the paper feed unit (option), and when [Auto Tray Select] is set with the printer driver, paper will be fed from the standard tray when you want to the initial screen. 104

Hardware Guide
Page 118
...in the order of one to four colors, yellow, magenta, cyan, black, appears in "(color)". • If cyan, magenta, or yellow toner runs out, you cannot print in black and white using black toner. Change the color mode setting to Black and White using the printer driver. • If black toner runs ...out, you can print in black and white or color until the black toner cartridge is empty, replace the indicated toner cartridge. ...
...in the order of one to four colors, yellow, magenta, cyan, black, appears in "(color)". • If cyan, magenta, or yellow toner runs out, you cannot print in black and white using black toner. Change the color mode setting to Black and White using the printer driver. • If black toner runs ...out, you can print in black and white or color until the black toner cartridge is empty, replace the indicated toner cartridge. ...

Hardware Guide
Page 174
... be a gap between the front guide and the paper, or between the side guides and the paper in the tray exceeds the limit. See the printer driver Help. When "Replace PCU:Black." See p.77 "Paper and Other Media". 9 • Paper has already been printed on. See p.77 "Paper and ...curled or bent. See p.89 "Loading Paper". • Paper is damp. Use paper that the top of Paper and Other Media". • Check the printer driver's paper settings. The paper setting may not be curled easily. or "Replace PCU:Colour." See p.77 "Paper and Other Media". • Paper is ...
... be a gap between the front guide and the paper, or between the side guides and the paper in the tray exceeds the limit. See the printer driver Help. When "Replace PCU:Black." See p.77 "Paper and Other Media". 9 • Paper has already been printed on. See p.77 "Paper and ...curled or bent. See p.89 "Loading Paper". • Paper is damp. Use paper that the top of Paper and Other Media". • Check the printer driver's paper settings. The paper setting may not be curled easily. or "Replace PCU:Colour." See p.77 "Paper and Other Media". • Paper is ...

Hardware Guide
Page 175
... Media". • Paper is damp. Use paper that has been stored properly. Paper gets wrinkles. • Paper is static. See the printer driver Help. 9 A printed image is turned on. See the printer driver Help. See p.77 "Paper and Other Media". • When loading paper, separate paper from ter's display. See p.89 "Loading Paper". •...
... Media". • Paper is damp. Use paper that has been stored properly. Paper gets wrinkles. • Paper is static. See the printer driver Help. 9 A printed image is turned on. See the printer driver Help. See p.77 "Paper and Other Media". • When loading paper, separate paper from ter's display. See p.89 "Loading Paper". •...

Hardware Guide
Page 176
...complex that it . Quality] tab in black and white. Photo images are cut off and on. See the printer driver Help. • Some applications print color files in the printer driver's dialog box. ess it resumes. • If "Waiting..." To disable the Energy Saver mode, select [Off...data is checked under the [Print adjusted with printer driver may appear differently. If you are using color toner are printed in • The printer driver is being processed. The color of the printout is dif- • The colors made using paper smaller than the paper size selected...
...complex that it . Quality] tab in black and white. Photo images are cut off and on. See the printer driver Help. • Some applications print color files in the printer driver's dialog box. ess it resumes. • If "Waiting..." To disable the Energy Saver mode, select [Off...data is checked under the [Print adjusted with printer driver may appear differently. If you are using color toner are printed in • The printer driver is being processed. The color of the printout is dif- • The colors made using paper smaller than the paper size selected...


