User Guide
Page 8
... 248 Configuring the Paper Settings 249 Specifying the Size of the Machine 282 Printer Problems 283 Changing the Printer Driver Settings 285 Printed Colors Do Not Match Displayed Colors 285 Print Positions Do Not Match Display Positions 285 Copier Problems 286 Scanner Problems 287 Fax Problems ...288 Error and Status Messages on...
... 248 Configuring the Paper Settings 249 Specifying the Size of the Machine 282 Printer Problems 283 Changing the Printer Driver Settings 285 Printed Colors Do Not Match Displayed Colors 285 Print Positions Do Not Match Display Positions 285 Copier Problems 286 Scanner Problems 287 Fax Problems ...288 Error and Status Messages on...
User Guide
Page 9
... a Long Period of Inactivity 323 Using the Machine Again After It Has Been Inactive for a Long Period 325 Where to Inquire 327 Consumables ...328 Print Cartridges ...328 Waste Toner Bottle 329 11.Appendix Specifications of the Machine 331 General Function Specifications 331 Printer Function Specifications 333 Copier Function Specifications 333 Scanner...
... a Long Period of Inactivity 323 Using the Machine Again After It Has Been Inactive for a Long Period 325 Where to Inquire 327 Consumables ...328 Print Cartridges ...328 Waste Toner Bottle 329 11.Appendix Specifications of the Machine 331 General Function Specifications 331 Printer Function Specifications 333 Copier Function Specifications 333 Scanner...

User Guide
Page 30
... the parts of plain paper can be stacked here. 12. This tray can hold up to 150 sheets of this cover to replace the print cartridges. 6. Bypass Tray Load paper here sheet by sheet. 13. Front Cover Open this machine. 1 Exterior: Front View 1. Up to 250 sheets of originals here. Output...
... the parts of plain paper can be stacked here. 12. This tray can hold up to 150 sheets of this cover to replace the print cartridges. 6. Bypass Tray Load paper here sheet by sheet. 13. Front Cover Open this machine. 1 Exterior: Front View 1. Up to 250 sheets of originals here. Output...
User Guide
Page 33
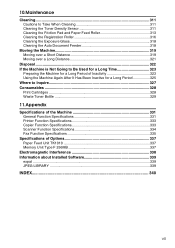
... about the messages that appear on the screen when consumables need to be replaced, see p.291 "Error and Status Messages on the screen when print cartridges need to Components 1 BPC037S 1. Print Cartridges Load from the illustration below, de-
... about the messages that appear on the screen when consumables need to be replaced, see p.291 "Error and Status Messages on the screen when print cartridges need to Components 1 BPC037S 1. Print Cartridges Load from the illustration below, de-
User Guide
Page 40
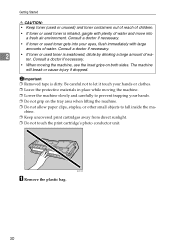
Consult a doctor if necessary. 2 • If toner or used toner is dirty. chine. ❒ Keep uncovered print cartridges away from direct sunlight. ❒ Do not touch the print cartridge's photo conductor unit. The machine will break or cause injury if dropped. Important ❒ Removed tape is swallowed, dilute by drinking a large amount of...
Consult a doctor if necessary. 2 • If toner or used toner is dirty. chine. ❒ Keep uncovered print cartridges away from direct sunlight. ❒ Do not touch the print cartridge's photo conductor unit. The machine will break or cause injury if dropped. Important ❒ Removed tape is swallowed, dilute by drinking a large amount of...
User Guide
Page 45
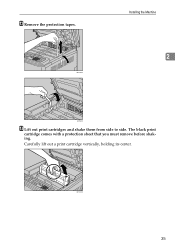
Carefully lift out a print cartridge vertically, holding its center. L Remove the protection tapes. The black print cartridge comes with a protection sheet that you must remove before shaking. BPC070S 35 BPC054S Installing the Machine 2 AZZ066S M Lift out print cartridges and shake them from side to side.
Carefully lift out a print cartridge vertically, holding its center. L Remove the protection tapes. The black print cartridge comes with a protection sheet that you must remove before shaking. BPC070S 35 BPC054S Installing the Machine 2 AZZ066S M Lift out print cartridges and shake them from side to side.
User Guide
Page 46
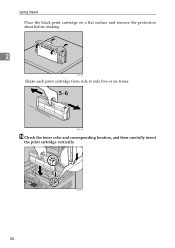
BAA143S N Check the toner color and corresponding location, and then carefully insert the print cartridge vertically. BPC071S 36 Getting Started Place the black print cartridge on a flat surface and remove the protection sheet before shaking. 2 ASI106S Shake each print cartridge from side to side five or six times.
BAA143S N Check the toner color and corresponding location, and then carefully insert the print cartridge vertically. BPC071S 36 Getting Started Place the black print cartridge on a flat surface and remove the protection sheet before shaking. 2 ASI106S Shake each print cartridge from side to side five or six times.

User Guide
Page 255
Reference For details about tray 2 appears only when it is installed. ❒ If non-genuine print cartridges are installed, toner life cannot be reliably in- Shows the number of tray 2. Shows the current state and paper size/type setting of black-and-... setting of tray 1. Checking the Counter Information Click the [Counter] tab on the main page to check the counter information. 8 ❖ Page Counter Item Total Color Black Reception Transmission Description Shows the total number of color pages printed, scanned and copied. Shows the number of pages printed, scanned and copied.
Reference For details about tray 2 appears only when it is installed. ❒ If non-genuine print cartridges are installed, toner life cannot be reliably in- Shows the number of tray 2. Shows the current state and paper size/type setting of black-and-... setting of tray 1. Checking the Counter Information Click the [Counter] tab on the main page to check the counter information. 8 ❖ Page Counter Item Total Color Black Reception Transmission Description Shows the total number of color pages printed, scanned and copied. Shows the number of pages printed, scanned and copied.
User Guide
Page 279
9. Troubleshooting This chapter provides a guide for solving problems in operating the machine. Overview Troubleshooting is divided into the following sections: • p.270 "Common Problems" • p.271 "Paper Feed Problems" • p.282 "Print Quality Problems" • p.283 "Printer Problems" • p.286 "Copier Problems" • p.287 "Scanner Problems" • p.288 "Fax Problems" • p.291 "Error and Status Messages on the Screen" • p.299 "Replacing Print Cartridges" • p.304 "Replacing the Waste Toner Bottle" 269
9. Troubleshooting This chapter provides a guide for solving problems in operating the machine. Overview Troubleshooting is divided into the following sections: • p.270 "Common Problems" • p.271 "Paper Feed Problems" • p.282 "Print Quality Problems" • p.283 "Printer Problems" • p.286 "Copier Problems" • p.287 "Scanner Problems" • p.288 "Fax Problems" • p.291 "Error and Status Messages on the Screen" • p.299 "Replacing Print Cartridges" • p.304 "Replacing the Waste Toner Bottle" 269
User Guide
Page 292
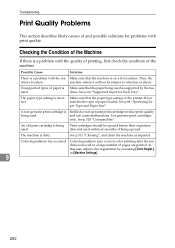
...Machine If there is Refilled or non-genuine print cartridges reduce print quality being opened before their expiration used within six months of pages are printed. An old print cartridge is supported by executing [Color Regist.] in color printing after the ma- The machine is a ...Troubleshooting Print Quality Problems This section describes likely causes of the machine. used is being Print cartridges should be subject to vibration or shock. chine. See p.328 "Consumables". Color degradation may occur in [Machine Settings]. 9 282 Checking the Condition of paper is Make...
...Machine If there is Refilled or non-genuine print cartridges reduce print quality being opened before their expiration used within six months of pages are printed. An old print cartridge is supported by executing [Color Regist.] in color printing after the ma- The machine is a ...Troubleshooting Print Quality Problems This section describes likely causes of the machine. used is being Print cartridges should be subject to vibration or shock. chine. See p.328 "Consumables". Color degradation may occur in [Machine Settings]. 9 282 Checking the Condition of paper is Make...
User Guide
Page 294
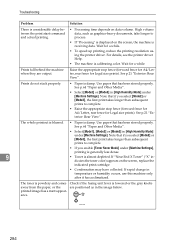
...appropriate stop fence (forward fence for A4/Letter, rear fence for Legal size prints). The whole printout is blurred. • Paper is calibrating color. Note that if you select [Mode2] or [Mode3], the first print takes longer than subsequent prints to complete. • If you ...There is considerable delay between the print start command and actual printing. • Processing time depends on the screen, replace the indicated print cartridge. • Condensation may have collected. For details, see the printer driver Help. • The machine is damp. Raise the appropriate...
...appropriate stop fence (forward fence for A4/Letter, rear fence for Legal size prints). The whole printout is blurred. • Paper is calibrating color. Note that if you select [Mode2] or [Mode3], the first print takes longer than subsequent prints to complete. • If you ...There is considerable delay between the print start command and actual printing. • Processing time depends on the screen, replace the indicated print cartridge. • Condensation may have collected. For details, see the printer driver Help. • The machine is damp. Raise the appropriate...

User Guide
Page 299
...See the solutions provided for [Tray Use: Fax] under [Machine Settings] accordingly. • A cover or tray was empty. See p.299 "Replacing Print Cartridges". • The paper tray is empty. Cannot print received faxes. • The paper tray is empty. Load valid size paper in the tray, and ...the document in parts as several smaller individual faxes, or to troubleshoot problems that you cannot make calls using the telephone. Replace the print cartridge. See p.72 "Loading Paper". • The tray set for errors 2XXX32 to print the received fax, or the machine's memory reached...
...See the solutions provided for [Tray Use: Fax] under [Machine Settings] accordingly. • A cover or tray was empty. See p.299 "Replacing Print Cartridges". • The paper tray is empty. Cannot print received faxes. • The paper tray is empty. Load valid size paper in the tray, and ...the document in parts as several smaller individual faxes, or to troubleshoot problems that you cannot make calls using the telephone. Replace the print cartridge. See p.72 "Loading Paper". • The tray set for errors 2XXX32 to print the received fax, or the machine's memory reached...

User Guide
Page 301
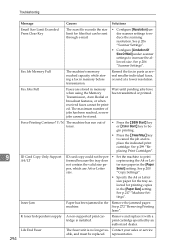
...'s memory reached tray. See p.72 "Loading Pa- Load valid size paper in parts as the paper sizes or types, tray names, or toner colors. Close the cover or tray. • There was open. print the received fax, or the Load paper in the Bypass Tray". 291 See ...p.272 "Removing Printing Jams". • A print cartridge was too large. See p.299 "Replacing Print Cartridges". 9 • The received fax was emp- Ask the sender to resend the document in the tray, and configure [Paper Size]...
...'s memory reached tray. See p.72 "Loading Pa- Load valid size paper in parts as the paper sizes or types, tray names, or toner colors. Close the cover or tray. • There was open. print the received fax, or the Load paper in the Bypass Tray". 291 See ...p.272 "Removing Printing Jams". • A print cartridge was too large. See p.299 "Replacing Print Cartridges". 9 • The received fax was emp- Ask the sender to resend the document in the tray, and configure [Paper Size]...

User Guide
Page 303
...line from the bypass tray. Clean the toner density sensor. line is set to adjust color registration. Paper has been jammed in its place. Remove and replace it with a print cartridge specified by an authorized dealer. Press the {Pause/Redial} key after, for the [Paper...p.200 "Copy Settings" . The machine failed to [Bypass Tray] for example, the area code. Executive size paper (oth- A non-supported print cartridge is open. See p.217 "Machine Settings". 2-sided copy could not be per- Specify a setting other than the bypass tray) in the [Paper Size...
...line from the bypass tray. Clean the toner density sensor. line is set to adjust color registration. Paper has been jammed in its place. Remove and replace it with a print cartridge specified by an authorized dealer. Press the {Pause/Redial} key after, for the [Paper...p.200 "Copy Settings" . The machine failed to [Bypass Tray] for example, the area code. Executive size paper (oth- A non-supported print cartridge is open. See p.217 "Machine Settings". 2-sided copy could not be per- Specify a setting other than the bypass tray) in the [Paper Size...
User Guide
Page 304
...or Letter Select] setting. The maximum number of toner. • Press the {B&W Start} key or {Color Start} key to begin printing. • Press the {Clear/Stop} key to cancel the job and replace the indicated print cartridge. Y/N The machine has run out of jobs has been reached, so new jobs cannot be... the size limit for printing copies in parts as several smaller individual faxes, or send at a lower resolution. Remove and replace it with a print cartridge specified by an authorized dealer. not contain the valid size pa- Life End Fuser The fuser unit is installed.
...or Letter Select] setting. The maximum number of toner. • Press the {B&W Start} key or {Color Start} key to begin printing. • Press the {Clear/Stop} key to cancel the job and replace the indicated print cartridge. Y/N The machine has run out of jobs has been reached, so new jobs cannot be... the size limit for printing copies in parts as several smaller individual faxes, or send at a lower resolution. Remove and replace it with a print cartridge specified by an authorized dealer. not contain the valid size pa- Life End Fuser The fuser unit is installed.
User Guide
Page 305
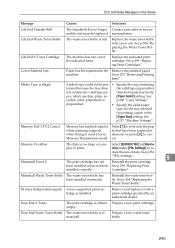
... Toner Bottle The waste toner bottle is too large or com- Lower Misfeed Jam Paper has been jammed in [Resolu- See cycled, color, preprinted or p.200 "Copy Settings" . See p.217 "Machine Settings". Memory Full 1.TX 2.Cancel Memory has reached capacity while scanning...Select [600X600 1Bit] in the Remove the jammed paper. duce the size of the indicated toner. empty. Replace the indicated print cartridge. Memory Overflow Misinstall Toner X The data is full. Media Type is almost full. plex to re- representative. Replace the waste toner ...
... Toner Bottle The waste toner bottle is too large or com- Lower Misfeed Jam Paper has been jammed in [Resolu- See cycled, color, preprinted or p.200 "Copy Settings" . See p.217 "Machine Settings". Memory Full 1.TX 2.Cancel Memory has reached capacity while scanning...Select [600X600 1Bit] in the Remove the jammed paper. duce the size of the indicated toner. empty. Replace the indicated print cartridge. Memory Overflow Misinstall Toner X The data is full. Media Type is almost full. plex to re- representative. Replace the waste toner ...
User Guide
Page 308
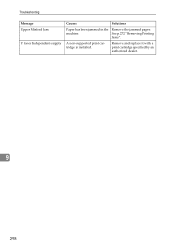
Remove and replace it with a print cartridge specified by an authorized dealer. 9 298 A non-supported print cartridge is installed. See p.272 "Removing Printing Jams". Troubleshooting Message Upper Misfeed Jam Y toner Independent-supply Causes Solutions Paper has been jammed in the Remove the jammed paper. machine.
Remove and replace it with a print cartridge specified by an authorized dealer. 9 298 A non-supported print cartridge is installed. See p.272 "Removing Printing Jams". Troubleshooting Message Upper Misfeed Jam Y toner Independent-supply Causes Solutions Paper has been jammed in the Remove the jammed paper. machine.
User Guide
Page 309
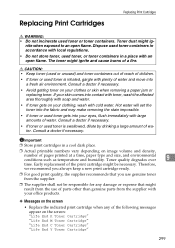
...and density, number of pages printed at a time, paper type and size, and environmental conditions such as temperature and humidity. Replacing Print Cartridges Replacing Print Cartridges R WARNING: • Do not incinerate used toner is inhaled, gargle with large amounts of water. The toner might ig- R ... thoroughly with soap and water. • If toner gets on the screen: "Life End K Toner Cartridge" "Life End M Toner Cartridge" "Life End C Toner Cartridge" "Life End Y Toner Cartridge" 299 Hot water will set the toner into the fabric and may make removing the stain impossible. &#...
...and density, number of pages printed at a time, paper type and size, and environmental conditions such as temperature and humidity. Replacing Print Cartridges Replacing Print Cartridges R WARNING: • Do not incinerate used toner is inhaled, gargle with large amounts of water. The toner might ig- R ... thoroughly with soap and water. • If toner gets on the screen: "Life End K Toner Cartridge" "Life End M Toner Cartridge" "Life End C Toner Cartridge" "Life End Y Toner Cartridge" 299 Hot water will set the toner into the fabric and may make removing the stain impossible. &#...
User Guide
Page 310
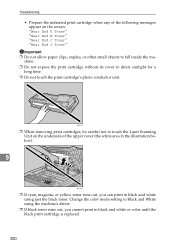
Change the color mode setting to Black and White using just the black toner. Troubleshooting • Prepare the indicated print cartridge when any of the upper cover (the white area in the illustration below). 9 BPC041S ❒ If cyan, magenta, or yellow toner runs out, ...you cannot print in black and white or color until the black print cartridge is replaced. 300 chine. ❒ Do not expose the print cartridge without its cover to fall inside the ma- BAA162S ❒ When removing print cartridges, be careful not to touch the Laser Scanning Unit on the underside of the following ...
Change the color mode setting to Black and White using just the black toner. Troubleshooting • Prepare the indicated print cartridge when any of the upper cover (the white area in the illustration below). 9 BPC041S ❒ If cyan, magenta, or yellow toner runs out, ...you cannot print in black and white or color until the black print cartridge is replaced. 300 chine. ❒ Do not expose the print cartridge without its cover to fall inside the ma- BAA162S ❒ When removing print cartridges, be careful not to touch the Laser Scanning Unit on the underside of the following ...
User Guide
Page 311
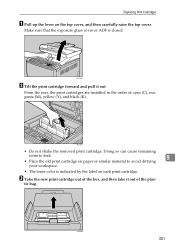
...lever on each print cartridge. From the rear, the print cartridges are installed in the order of the plas- Doing so can cause remaining toner to leak. 9 • Place the old print cartridge on paper or similar material to avoid dirtying your workspace. • The toner color is closed. BPC043S... • Do not shake the removed print cartridge. tic bag. C Take the new print cartridge out of the box, and then take it out....
...lever on each print cartridge. From the rear, the print cartridges are installed in the order of the plas- Doing so can cause remaining toner to leak. 9 • Place the old print cartridge on paper or similar material to avoid dirtying your workspace. • The toner color is closed. BPC043S... • Do not shake the removed print cartridge. tic bag. C Take the new print cartridge out of the box, and then take it out....

