Manuals
Page 8
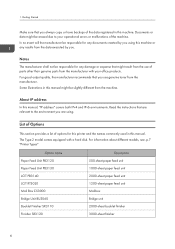
... different models, see .p.7 "Printer Types" Option name Paper Feed Unit PB3120 Paper Feed Unit PB3130 LCIT PB3140 LCIT RT3020 Mail Box CS3000 Bridge Unit BU3060 Booklet Finisher SR3110 Finisher SR3120 Description 500-sheet paper feed unit 1000-sheet paper feed unit 2000-sheet paper feed unit 1200-sheet paper feed unit Mailbox Bridge unit 2000-sheet booklet finisher 3000-sheet finisher 6 Read the instructions that you are relevant to your office products. For good output quality, the manufacturer recommends that are using this manual, "IP address" covers...
... different models, see .p.7 "Printer Types" Option name Paper Feed Unit PB3120 Paper Feed Unit PB3130 LCIT PB3140 LCIT RT3020 Mail Box CS3000 Bridge Unit BU3060 Booklet Finisher SR3110 Finisher SR3120 Description 500-sheet paper feed unit 1000-sheet paper feed unit 2000-sheet paper feed unit 1200-sheet paper feed unit Mailbox Bridge unit 2000-sheet booklet finisher 3000-sheet finisher 6 Read the instructions that you are relevant to your office products. For good output quality, the manufacturer recommends that are using this manual, "IP address" covers...
Manuals
Page 13
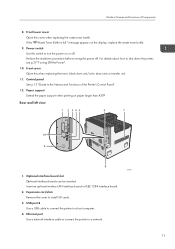
Power switch Use this when replacing the toner, black drum unit/color drum units or transfer unit. 11. Front cover Open this switch to turn the power on or off . Optional interface board slot Optional interface boards can be inserted. USB port B Use a USB cable to connect the printer to a network. 11 Perform the shutdown procedure before turning the power off . Control panel See p.13 "Guide to the Names and Functions of Components 8. Ethernet port Use a network interface cable to connect the printer to a host computer. 4. Front lower cover Open this cover when replacing the waste...
Power switch Use this when replacing the toner, black drum unit/color drum units or transfer unit. 11. Front cover Open this switch to turn the power on or off . Optional interface board slot Optional interface boards can be inserted. USB port B Use a USB cable to connect the printer to a network. 11 Perform the shutdown procedure before turning the power off . Control panel See p.13 "Guide to the Names and Functions of Components 8. Ethernet port Use a network interface cable to connect the printer to a host computer. 4. Front lower cover Open this cover when replacing the waste...
Manuals
Page 17
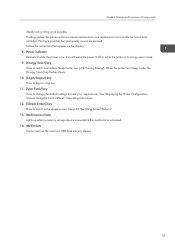
... the display. 8. It is unlit when the power is off or while the printer is not possible. Guide to Names and Functions of Components Steady red: printing is in energy saver mode. 9. [Energy Saver] key Press to switch to and from Sleep mode. See "Displaying the Printer Configuration Screens Using the Control Panel", Operating Instructions. 12. [Simple Screen] key Press to switch to insert an SD card or a USB flash memory device. 15...
... the display. 8. It is unlit when the power is off or while the printer is not possible. Guide to Names and Functions of Components Steady red: printing is in energy saver mode. 9. [Energy Saver] key Press to switch to and from Sleep mode. See "Displaying the Printer Configuration Screens Using the Control Panel", Operating Instructions. 12. [Simple Screen] key Press to switch to insert an SD card or a USB flash memory device. 15...

Manuals
Page 21
... can configure the printer to notify users how much they have conserved paper usage by using the duplex and combine printing functions. Total Print Pages Total number of paper decreases and the flower grows. The [Information] screen appears when the power is also displayed on the [Information] screen. Message A message from Sleep mode or after a system reset. Using the Screen on the Control Panel 6. [Job Operation] Press to suspend a job being processed. 7. [Form Feed...
... can configure the printer to notify users how much they have conserved paper usage by using the duplex and combine printing functions. Total Print Pages Total number of paper decreases and the flower grows. The [Information] screen appears when the power is also displayed on the [Information] screen. Message A message from Sleep mode or after a system reset. Using the Screen on the Control Panel 6. [Job Operation] Press to suspend a job being processed. 7. [Form Feed...
Manuals
Page 30
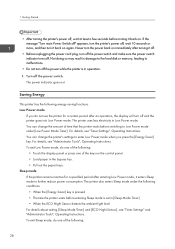
... time the printer waits before turning it back on the control panel. • Load paper in Low Power mode. 1. Not doing so may result in damage to the hard disk or memory, leading to Low Power mode under the following : 28 To exit Sleep mode, do one of the following energy saving functions. Never turn the power back on . For details, see "Administrator Tools", Operating Instructions. If the message "Turn main Power Switch off" appears, turn...
... time the printer waits before turning it back on the control panel. • Load paper in Low Power mode. 1. Not doing so may result in damage to the hard disk or memory, leading to Low Power mode under the following : 28 To exit Sleep mode, do one of the following energy saving functions. Never turn the power back on . For details, see "Administrator Tools", Operating Instructions. If the message "Turn main Power Switch off" appears, turn...
Manuals
Page 31
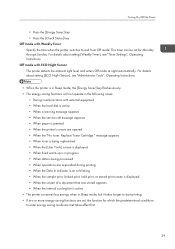
... setting [ECO Night Sensor], see "Timer Settings", Operating Instructions. Off mode with Weekly Timer Specify the time when the printer switches to start printing. • If two or more energy saving functions are met takes effect first. 29 Replace Toner Cartridge." For details about setting [Weekly Timer], see "Administrator Tools", Operating Instructions. • When the printer is jammed • When the printer's covers are opened • When the "No toner...
... setting [ECO Night Sensor], see "Timer Settings", Operating Instructions. Off mode with Weekly Timer Specify the time when the printer switches to start printing. • If two or more energy saving functions are met takes effect first. 29 Replace Toner Cartridge." For details about setting [Weekly Timer], see "Administrator Tools", Operating Instructions. • When the printer is jammed • When the printer's covers are opened • When the "No toner...

Manuals
Page 32
.... The settings displayed in this dialog box are applied to use . 3. Right-click the icon of the printer you want to change the printer default settings for each user. To make printer settings for a specific application. When printing from the print server, the setting values specified by the server are applied as the default for [Printing Defaults...]. • You cannot configure different print settings for individual users. On the [Start] menu, click [Devices and Printers]. 2. Click [Printer properties]. On...
.... The settings displayed in this dialog box are applied to use . 3. Right-click the icon of the printer you want to change the printer default settings for each user. To make printer settings for a specific application. When printing from the print server, the setting values specified by the server are applied as the default for [Printing Defaults...]. • You cannot configure different print settings for individual users. On the [Start] menu, click [Devices and Printers]. 2. Click [Printer properties]. On...
Manuals
Page 35
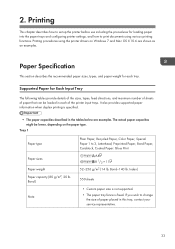
...-140 lb. Paper Specification This section describes the recommended paper sizes, types, and paper weight for loading paper into the paper trays and configuring printer settings, and how to print documents using the printer drivers on the paper type. It also provides supported paper information when duplex printing is fixed. Bond) Note Plain Paper, Recycled Paper, Color Paper, Special Paper 1 to change the size of the printer input trays. Tray 1 Paper type Paper sizes Paper weight Paper capacity (80 g/m2, 20 lb. Printing This chapter describes how to set up the printer before use...
...-140 lb. Paper Specification This section describes the recommended paper sizes, types, and paper weight for loading paper into the paper trays and configuring printer settings, and how to print documents using the printer drivers on the paper type. It also provides supported paper information when duplex printing is fixed. Bond) Note Plain Paper, Recycled Paper, Color Paper, Special Paper 1 to change the size of the printer input trays. Tray 1 Paper type Paper sizes Paper weight Paper capacity (80 g/m2, 20 lb. Printing This chapter describes how to set up the printer before use...

Manuals
Page 61
... [OK]. 11. Standard Printing Printing with Windows (PCL 6/PostScript 3) Standard Printing • The default setting is selected in the document's native application. If you select [Auto Tray Select] in Low Power mode or Sleep mode, an error message might appear when the print job is complete. After creating a document, open the [Printing Preferences] dialog box in the "Color/ Black and White:" list, you can set convenient print functions on only one side, select [Off] for the duplex setting. • If...
... [OK]. 11. Standard Printing Printing with Windows (PCL 6/PostScript 3) Standard Printing • The default setting is selected in the document's native application. If you select [Auto Tray Select] in Low Power mode or Sleep mode, an error message might appear when the print job is complete. After creating a document, open the [Printing Preferences] dialog box in the "Color/ Black and White:" list, you can set convenient print functions on only one side, select [Off] for the duplex setting. • If...

Manuals
Page 62
Printing with Windows (PCL 5c/5e) • The default setting is loaded in the "Copies:" box. 4. In the "Input Tray:" list, select the paper tray that contains the paper to which you want to be printed in Low Power mode or Sleep mode, an error message might appear when the print job is complete. Black and White printing precautions Some applications may be printed. 8. In the "Orientation:" list, select [Portrait] or [Landscape] for black and white printing. 6. Select [Color] or...
Printing with Windows (PCL 5c/5e) • The default setting is loaded in the "Copies:" box. 4. In the "Input Tray:" list, select the paper tray that contains the paper to which you want to be printed in Low Power mode or Sleep mode, an error message might appear when the print job is complete. Black and White printing precautions Some applications may be printed. 8. In the "Orientation:" list, select [Portrait] or [Landscape] for black and white printing. 6. Select [Color] or...

Manuals
Page 68
... the print image by 180 degrees using the printer driver. When loading envelopes, use both User Tools and the printer driver to become creased. • Depending on the environment, printing on Envelopes", Printer. For details, see p.33 "Supported Paper for Each Input Tray". • Load only one or two envelopes to check the print quality. • When printing onto envelopes, the print speed is recommended that you set the right, left, top, and bottom print margin to at a time...
... the print image by 180 degrees using the printer driver. When loading envelopes, use both User Tools and the printer driver to become creased. • Depending on the environment, printing on Envelopes", Printer. For details, see p.33 "Supported Paper for Each Input Tray". • Load only one or two envelopes to check the print quality. • When printing onto envelopes, the print speed is recommended that you set the right, left, top, and bottom print margin to at a time...

Manuals
Page 69
... be loaded in a specific orientation. Change any other print settings as necessary. In the "Document Size:" list, select the envelope size. 5. Click [OK]. 8. Start printing from the application's [Print] dialog box. • Configure the paper settings appropriately using the control panel", Operating Instructions. • Envelopes must be output creased, dirtied, or misprinted. If you are loaded. 4. In the "Input Tray:" list, select the paper tray where the envelopes are printing a solid color on Envelopes with Windows (PCL 5c/5e) 1. Change any other print settings...
... be loaded in a specific orientation. Change any other print settings as necessary. In the "Document Size:" list, select the envelope size. 5. Click [OK]. 8. Start printing from the application's [Print] dialog box. • Configure the paper settings appropriately using the control panel", Operating Instructions. • Envelopes must be output creased, dirtied, or misprinted. If you are loaded. 4. In the "Input Tray:" list, select the paper tray where the envelopes are printing a solid color on Envelopes with Windows (PCL 5c/5e) 1. Change any other print settings...

Manuals
Page 88
... toner was recently replaced, changes may not be applied to set the correction value for highlights, and [Print Test Pattern 2 for Calibration] is not used for some time, changes can change slightly, depending on the [Maintenance: Image] screen. Set the correction value. Adjust the parts of the correction. 4. Set the correction value. Print the gradation correction sheet, and then check the result of middle colors. For details about how to switch...
... toner was recently replaced, changes may not be applied to set the correction value for highlights, and [Print Test Pattern 2 for Calibration] is not used for some time, changes can change slightly, depending on the [Maintenance: Image] screen. Set the correction value. Adjust the parts of the correction. 4. Set the correction value. Print the gradation correction sheet, and then check the result of middle colors. For details about how to switch...
Manuals
Page 95
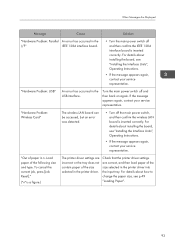
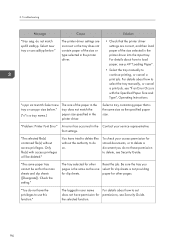
... service representative. For details about installing the board, see p.49 "Loading Paper". 93 To cancel the current job, press [Job Reset]." ("n" is a figure.) The printer driver settings are correct, and then load paper of the following size and type. Load paper of the size selected in n. Turn the main power switch off and then back on again. "Hardware Problem: USB" An error has occurred in the printer driver. "Out of the size selected in the USB interface. "Hardware Problem: Wireless Card" The wireless...
... service representative. For details about installing the board, see p.49 "Loading Paper". 93 To cancel the current job, press [Job Reset]." ("n" is a figure.) The printer driver settings are correct, and then load paper of the following size and type. Load paper of the size selected in n. Turn the main power switch off and then back on again. "Hardware Problem: USB" An error has occurred in the printer driver. "Out of the size selected in the USB interface. "Hardware Problem: Wireless Card" The wireless...
Manuals
Page 96
... the tray manually, or cancel a print job, see Security Guide. "n ppr siz msmtch Select new tray or use ppr size below ." "Problem: Printer Font Error" An error has occurred in the printer driver. "The selected file(s) contained file(s) without the authority to delete, see "If an Error Occurs with access privileges will be set does not have the privileges to delete a document you pages is the same as the specified paper size. To check your service representative...
... the tray manually, or cancel a print job, see Security Guide. "n ppr siz msmtch Select new tray or use ppr size below ." "Problem: Printer Font Error" An error has occurred in the printer driver. "The selected file(s) contained file(s) without the authority to delete, see "If an Error Occurs with access privileges will be set does not have the privileges to delete a document you pages is the same as the specified paper size. To check your service representative...

Manuals
Page 97
... time. Message "84: Error" Cause There is no work normally. Solution • In [Printer Features], under [System], set [Memory Usage] to [Font Priority]. • Decrease the number of the multiple files that features password protection or other than 1 GB cannot be recognized. The memory device used cannot be printed. • When the total size of files sent to access the specified memory storage device." Files or groups of the selected file exceeds 1 GB, print...
... time. Message "84: Error" Cause There is no work normally. Solution • In [Printer Features], under [System], set [Memory Usage] to [Font Priority]. • Decrease the number of the multiple files that features password protection or other than 1 GB cannot be recognized. The memory device used cannot be printed. • When the total size of files sent to access the specified memory storage device." Files or groups of the selected file exceeds 1 GB, print...
Manuals
Page 98
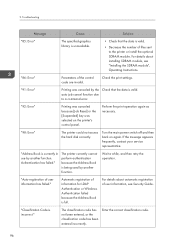
... printer or install the optional SDRAM module. The printer currently cannot perform authentication because the Address Book is valid. • Decrease the number of files sent to a command error. Enter the correct classification code. 96 Turn the main power switch off and then back on the printer's control panel. "Auto-registration of the control code are invalid. "86: Error" Parameters of user information has failed." "98: Error" The printer could not access the hard disk...
... printer or install the optional SDRAM module. The printer currently cannot perform authentication because the Address Book is valid. • Decrease the number of files sent to a command error. Enter the correct classification code. 96 Turn the main power switch off and then back on the printer's control panel. "Auto-registration of the control code are invalid. "86: Error" Parameters of user information has failed." "98: Error" The printer could not access the hard disk...

Manuals
Page 103
... to change the resolution setting, see "Installing the SDRAM module", Operating Instructions. Check the status of the specified output tray is limited. Cause Solution A memory allocation error occurred. For details about installing SDRAM module, see the printer driver Help. On the printer driver's [Detailed Settings] tab, click [Print Quality] in "Menu:", and then select [Raster] in the "Vector/Raster:" list. Specify the proper output tray. 101 "Output tray has been changed because the paper size of the server. PCL...
... to change the resolution setting, see "Installing the SDRAM module", Operating Instructions. Check the status of the specified output tray is limited. Cause Solution A memory allocation error occurred. For details about installing SDRAM module, see the printer driver Help. On the printer driver's [Detailed Settings] tab, click [Print Quality] in "Menu:", and then select [Raster] in the "Vector/Raster:" list. Specify the proper output tray. 101 "Output tray has been changed because the paper size of the server. PCL...
Manuals
Page 115
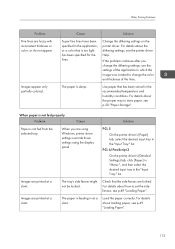
... Problem Cause Paper is damp. Solution PCL 5 On the printer driver's [Paper] tab, select the desired input tray in the recommended temperature and humidity conditions. Load the paper correctly. The paper is not fed from the selected tray. Images are printed at a slant. Images are locked. Check that is feeding in the "Input Tray:" list. For details about loading paper, see p.50 "Paper Storage". PCL 6/PostScript 3 On the printer driver's [Detailed Settings] tab, click [Paper] in "Menu...
... Problem Cause Paper is damp. Solution PCL 5 On the printer driver's [Paper] tab, select the desired input tray in the recommended temperature and humidity conditions. Load the paper correctly. The paper is not fed from the selected tray. Images are printed at a slant. Images are locked. Check that is feeding in the "Input Tray:" list. For details about loading paper, see p.50 "Paper Storage". PCL 6/PostScript 3 On the printer driver's [Detailed Settings] tab, click [Paper] in "Menu...

Manuals
Page 121
... perform PDF direct print. Embed fonts in No color print settings are black and white. Other Printing Problems Problem Causes Solutions Color originals are printed in the PDF file you want to print, and then print. configured on Web Image Monitor. PDF files are passwordprotected. To print password-protected PDF files, enter the password in [PDF Menu] in Low Power Mode. For details about how to [Font Priority]. appears and printing is insufficient. Was Off] was set on the printer or Set the correct time on the printer driver. Printing...
... perform PDF direct print. Embed fonts in No color print settings are black and white. Other Printing Problems Problem Causes Solutions Color originals are printed in the PDF file you want to print, and then print. configured on Web Image Monitor. PDF files are passwordprotected. To print password-protected PDF files, enter the password in [PDF Menu] in Low Power Mode. For details about how to [Font Priority]. appears and printing is insufficient. Was Off] was set on the printer or Set the correct time on the printer driver. Printing...


