
Manuals
Page 5
......110 Coated Paper (Glossy)...110 Coated Paper (Glossy: Thick)...110 Coated Paper (Matted)...111 Coated Paper (Matted: Thick)...111 Special Paper...112 Preprinted Paper...112 Color Paper...112 Recycled Paper...113 Cardstock...113 Bond Paper...113 Envelopes...114 Storing Paper...115 Non-Recommended Paper Types...116 Print Area...117 Loading Paper...
......110 Coated Paper (Glossy)...110 Coated Paper (Glossy: Thick)...110 Coated Paper (Matted)...111 Coated Paper (Matted: Thick)...111 Special Paper...112 Preprinted Paper...112 Color Paper...112 Recycled Paper...113 Cardstock...113 Bond Paper...113 Envelopes...114 Storing Paper...115 Non-Recommended Paper Types...116 Print Area...117 Loading Paper...
Manuals
Page 6
... is different from the image on the computer 217 When Printer is Jammed...225 Paper Misfeed Message (A)...227 4 Adjusting the Printer Adjusting the Color Registration...189 Correcting the Color Gradation...191 Setting the Gradation Correction Value 191 Viewing the Gradation Correction Sheet 194 Resetting the Gradation Correction Value to the Initial Value...
... is different from the image on the computer 217 When Printer is Jammed...225 Paper Misfeed Message (A)...227 4 Adjusting the Printer Adjusting the Color Registration...189 Correcting the Color Gradation...191 Setting the Gradation Correction Value 191 Viewing the Gradation Correction Sheet 194 Resetting the Gradation Correction Value to the Initial Value...
Manuals
Page 36
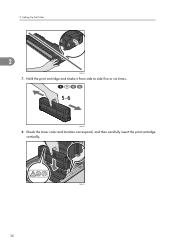
CBK032 8. 2. Hold the print cartridge and shake it from side to side five or six times. Check the toner color and location correspond, and then carefully insert the print cartridge vertically. Setting Up the Printer 2 CBK250 7. CBK033 34
CBK032 8. 2. Hold the print cartridge and shake it from side to side five or six times. Check the toner color and location correspond, and then carefully insert the print cartridge vertically. Setting Up the Printer 2 CBK250 7. CBK033 34

Manuals
Page 107
... Plain Paper, Middle Thick, Thick Paper 1, Thick Paper 2, Thin Paper, Letterhead, Label Paper, Coated Paper (Glossy), Coated Paper (Matted), Special Paper 1, Special Paper 2, Preprinted Paper, Color Paper, Recycled Paper The following custom sizes are supported, but they must be set vertically, regardless of the printer's trays. For details about custom size...
... Plain Paper, Middle Thick, Thick Paper 1, Thick Paper 2, Thin Paper, Letterhead, Label Paper, Coated Paper (Glossy), Coated Paper (Matted), Special Paper 1, Special Paper 2, Preprinted Paper, Color Paper, Recycled Paper The following custom sizes are supported, but they must be set vertically, regardless of the printer's trays. For details about custom size...

Manuals
Page 108
... custom size paper for standard paper feed tray" Optional Paper Feed Tray 6 Paper types Plain Paper, Middle Thick, Thick Paper 1, Thin Paper, Letterhead, Preprinted Paper, Color Paper, Recycled Paper Paper sizes requiring manual settings Paper weight The following sizes are supported, but they must be selected using the control panel. Loading...
... custom size paper for standard paper feed tray" Optional Paper Feed Tray 6 Paper types Plain Paper, Middle Thick, Thick Paper 1, Thin Paper, Letterhead, Preprinted Paper, Color Paper, Recycled Paper Paper sizes requiring manual settings Paper weight The following sizes are supported, but they must be selected using the control panel. Loading...

Manuals
Page 109
..., Coated Paper (Glossy), Coated Paper(Glossy:Thick), Coated Paper (Matted), Coated Paper (Matted:Thick), Cardstock, Special Paper 1, Special Paper 2, Special Paper 3, Bond Paper, Preprinted Paper, Color Paper, Recycled Paper, Envelope The following custom sizes are supported, but they must be selected 6 using the control panel.
..., Coated Paper (Glossy), Coated Paper(Glossy:Thick), Coated Paper (Matted), Coated Paper (Matted:Thick), Cardstock, Special Paper 1, Special Paper 2, Special Paper 3, Bond Paper, Preprinted Paper, Color Paper, Recycled Paper, Envelope The following custom sizes are supported, but they must be selected 6 using the control panel.
Manuals
Page 114
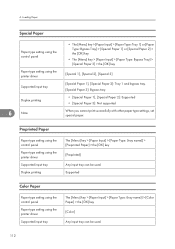
... using the printer driver Supported input tray The [Menu] key > [Paper Input] > [Paper Type: (tray name)] > [Color Paper] > the [OK] key [Color] Any input tray can be used . Preprinted Paper Paper type setting using the control panel Paper type setting using the printer driver ... [Paper Input] > [Paper Type: (tray name)] > [Preprinted Paper] > the [OK] key [Preprinted] Any input tray can be used . 112 6. Supported Color Paper Paper type setting using the control panel Paper type setting using the printer driver Supported input tray Duplex printing 6 Note • The [Menu] key...
... using the printer driver Supported input tray The [Menu] key > [Paper Input] > [Paper Type: (tray name)] > [Color Paper] > the [OK] key [Color] Any input tray can be used . Preprinted Paper Paper type setting using the control panel Paper type setting using the printer driver ... [Paper Input] > [Paper Type: (tray name)] > [Preprinted Paper] > the [OK] key [Preprinted] Any input tray can be used . 112 6. Supported Color Paper Paper type setting using the control panel Paper type setting using the printer driver Supported input tray Duplex printing 6 Note • The [Menu] key...
Manuals
Page 118
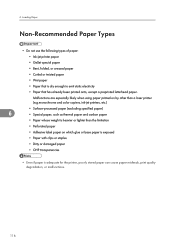
Malfunctions are especially likely when using paper printed on by other than a laser printer (e.g.monochrome and color copiers, ink-jet printers, etc.) • Surface-processed paper (excluding specified paper) 6 • Special paper, such as thermal paper and carbon paper • Paper whose ...
Malfunctions are especially likely when using paper printed on by other than a laser printer (e.g.monochrome and color copiers, ink-jet printers, etc.) • Surface-processed paper (excluding specified paper) 6 • Special paper, such as thermal paper and carbon paper • Paper whose ...
Manuals
Page 150
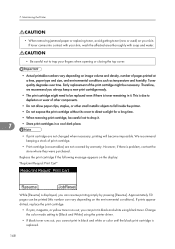
...) on your fingers when opening or closing the top cover. • Actual printable numbers vary depending on the environmental conditions). Change the color mode setting to be necessary. Therefore, we recommend you always keep a new print cartridge ready. • The print cartridge might be ...replaced even if there is toner remaining in it . 7 • Store print cartridges in black and white or color until the black print cartridge is displayed, you cannot print in a cool dark place. • If print cartridge are not covered by pressing...
...) on your fingers when opening or closing the top cover. • Actual printable numbers vary depending on the environmental conditions). Change the color mode setting to be necessary. Therefore, we recommend you always keep a new print cartridge ready. • The print cartridge might be ...replaced even if there is toner remaining in it . 7 • Store print cartridges in black and white or color until the black print cartridge is displayed, you cannot print in a cool dark place. • If print cartridge are not covered by pressing...

Manuals
Page 151
... upper cover. 149 Remaining toner may leak. • Place the old print cartridge on paper or some other material to avoid dirtying your workspace. • Color is labeled on the underside of cyan (C), magenta (M), yellow (Y), 7 and black (K). 2. When removing print cartridges, be replaced soon. CBK122 • Do not shake the removed... its center, carefully pull the print cartridge upward and out. Pull up top cover open lever to open the top cover. "Repl Soon:Prt.Cart. :(color)" Repl Soon:Prt.Cart. :K,C,M,Y 1. Prepare a new print cartridge.
... upper cover. 149 Remaining toner may leak. • Place the old print cartridge on paper or some other material to avoid dirtying your workspace. • Color is labeled on the underside of cyan (C), magenta (M), yellow (Y), 7 and black (K). 2. When removing print cartridges, be replaced soon. CBK122 • Do not shake the removed... its center, carefully pull the print cartridge upward and out. Pull up top cover open lever to open the top cover. "Repl Soon:Prt.Cart. :(color)" Repl Soon:Prt.Cart. :K,C,M,Y 1. Prepare a new print cartridge.
Manuals
Page 154
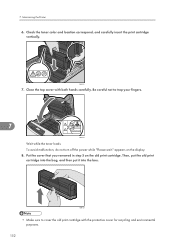
... not turn off the power while "Please wait." CBK125 • Make sure to trap your fingers. 7 CBK034 Wait while the toner loads. Check the toner color and location correspond, and carefully insert the print cartridge vertically. CBK033 7.
... not turn off the power while "Please wait." CBK125 • Make sure to trap your fingers. 7 CBK034 Wait while the toner loads. Check the toner color and location correspond, and carefully insert the print cartridge vertically. CBK033 7.

Manuals
Page 191
... or [ ] key to adjust the color gradations, color alignment, and print position. Adjusting the Printer This chapter explains how to select [Maintenance], and then press the [OK] key. 8 3. After moving the printer, printing on thick paper, or printing repeatedly for some time, color degradation may occur. Press the [ ]... or [ ] key to select [Color Registration], and then press the [OK] key. 189 Press the [ ] or [ ] key to select [Quality ...
... or [ ] key to adjust the color gradations, color alignment, and print position. Adjusting the Printer This chapter explains how to select [Maintenance], and then press the [OK] key. 8 3. After moving the printer, printing on thick paper, or printing repeatedly for some time, color degradation may occur. Press the [ ]... or [ ] key to select [Color Registration], and then press the [OK] key. 189 Press the [ ] or [ ] key to select [Quality ...

Manuals
Page 192
8. Automatic color adjustment begins. Select [Auto Adjust], and then Press the [OK] key. 6. Press [Exit]. 7. Press [OK]. Automatic color adjustment takes about 30 seconds. A confirmation message appears when the adjustment is complete. Press the [Menu] key to return to the initial screen. 8 190 Adjusting the Printer 5.
8. Automatic color adjustment begins. Select [Auto Adjust], and then Press the [OK] key. 6. Press [Exit]. 7. Press [OK]. Automatic color adjustment takes about 30 seconds. A confirmation message appears when the adjustment is complete. Press the [Menu] key to return to the initial screen. 8 190 Adjusting the Printer 5.
Manuals
Page 193
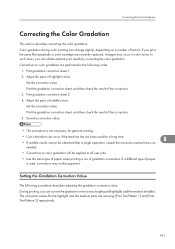
... • If suitable results cannot be obtained after a single operation, repeat the correction several times, as 8 needed. • Corrections to color gradation will be apparent. In such cases, you can occur if the machine has not been used , corrections may occur in two areas: bright...on a number of gradation corrections. If you print the same file repeatedly or print cartridge was recently replaced, changes may not be applied to color gradation are set using [Print Test Pattern 1] and [Print Test Pattern 2] respectively. 191 Adjust the parts of the correction. 5. Print ...
... • If suitable results cannot be obtained after a single operation, repeat the correction several times, as 8 needed. • Corrections to color gradation will be apparent. In such cases, you can occur if the machine has not been used , corrections may occur in two areas: bright...on a number of gradation corrections. If you print the same file repeatedly or print cartridge was recently replaced, changes may not be applied to color gradation are set using [Print Test Pattern 1] and [Print Test Pattern 2] respectively. 191 Adjust the parts of the correction. 5. Print ...

Manuals
Page 194
...3. Press [Exit]. Press the [Menu] key. The confirmation message appears when complete. The confirmation message appears. Press the [ ] or [ ] key to perform only auto color adjusting, press the [ ] or [ ] key select [Adjust Auto Density], and then press the [OK] key. Press the [ ] or [ ] key to select [...Quality Maintenance], and then press the [OK] key. 8 4. Press the [ ] or [ ] key to select [Color Calibration], and then press the [OK] key. 5. The display returns to adjust Auto Density. Adjusting the Printer 1. Press [OK] to the...
...3. Press [Exit]. Press the [Menu] key. The confirmation message appears when complete. The confirmation message appears. Press the [ ] or [ ] key to perform only auto color adjusting, press the [ ] or [ ] key select [Adjust Auto Density], and then press the [OK] key. Press the [ ] or [ ] key to select [...Quality Maintenance], and then press the [OK] key. 8 4. Press the [ ] or [ ] key to select [Color Calibration], and then press the [OK] key. 5. The display returns to adjust Auto Density. Adjusting the Printer 1. Press [OK] to the...
Manuals
Page 195
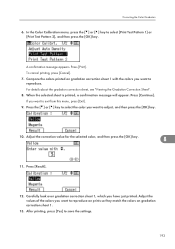
...about the gradation correction sheet, see "Viewing the Gradation Correction Sheet". 8. Press the [ ] or [ ] key to select the color you want to reproduce. Press [Result]. 12. When the selected sheet is printed, a confirmation message will appear. Adjust the values of the... colors you want to exit from this menu, press [Exit]. 9. Correcting the Color Gradation 6. A confirmation message appears. Press [Continue]. Press [Print]. If you have just printed. After ...
...about the gradation correction sheet, see "Viewing the Gradation Correction Sheet". 8. Press the [ ] or [ ] key to select the color you want to reproduce. Press [Result]. 12. When the selected sheet is printed, a confirmation message will appear. Adjust the values of the... colors you want to exit from this menu, press [Exit]. 9. Correcting the Color Gradation 6. A confirmation message appears. Press [Continue]. Press [Print]. If you have just printed. After ...

Manuals
Page 196
...the midtones on gradation correction sheet 2 by repeating the procedure you used . C (cyan)/Y (yellow) correction values Used to correct the colors printed when cyan and yellow are configured for each color, K (black), M (magenta), and C (cyan)/Y (yellow) determine the required gradation correction and configure settings using the control panel....currently set correction value is used . K (black) correction values Used to adjust the color printed when only black toner is used to adjust the color printed when only magenta toner is printed in red. 2. M (magenta) correction values ...
...the midtones on gradation correction sheet 2 by repeating the procedure you used . C (cyan)/Y (yellow) correction values Used to correct the colors printed when cyan and yellow are configured for each color, K (black), M (magenta), and C (cyan)/Y (yellow) determine the required gradation correction and configure settings using the control panel....currently set correction value is used . K (black) correction values Used to adjust the color printed when only black toner is used to adjust the color printed when only magenta toner is printed in red. 2. M (magenta) correction values ...

Manuals
Page 197
... the correction value default. 1. This value corresponds to the value set when the gradation correction sheet is printed. Resetting the Gradation Correction Value to select [Color Calibration], and then press the [OK] key. 195 Setting value The value displayed is the one currently set on the control panel. Press the [... ] or [ ] key to select [Maintenance], and then press the [OK] key. 8 3. CBK049 2. Correcting the Color Gradation 4. Press the [ ] or [ ] key to select [Quality Maintenance], and then press the [OK] key. 4.
... the correction value default. 1. This value corresponds to the value set when the gradation correction sheet is printed. Resetting the Gradation Correction Value to select [Color Calibration], and then press the [OK] key. 195 Setting value The value displayed is the one currently set on the control panel. Press the [... ] or [ ] key to select [Maintenance], and then press the [OK] key. 8 3. CBK049 2. Correcting the Color Gradation 4. Press the [ ] or [ ] key to select [Quality Maintenance], and then press the [OK] key. 4.
Manuals
Page 203
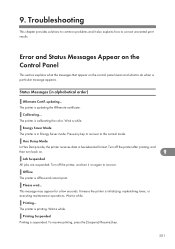
... printer after printing, and then turn it also explains how to recover. Offline The printer is updating the @Remote certificate. The printer is calibrating the color. Calibrating... The printer is printing. Turn off the printer, and turn back on. 9 Job Suspended All jobs are suspended. Printing... Printing Suspended Printing is initializing...
... printer after printing, and then turn it also explains how to recover. Offline The printer is updating the @Remote certificate. The printer is calibrating the color. Calibrating... The printer is printing. Turn off the printer, and turn back on. 9 Job Suspended All jobs are suspended. Printing... Printing Suspended Printing is initializing...
Manuals
Page 214
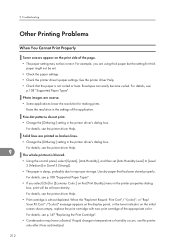
... Use dry paper that the paper is damp, probably due to improper storage. When the "Replcmnt Requrd: Print Cart" / "(color)", or "Repl Soon:Prt.Cart." /"(color)" message appears on the display panel, or the toner indicator on the [Print Quality] menu in the printer properties dialog box...has acclimatized. 212 For details, see p.108 "Supported Paper Types". • If you are using thick paper but the setting for [Economy Color:] on the initial screen shows empty, replace the print cartridge with new print cartridge of the application. For details, see p.108 "Supported Paper ...
... Use dry paper that the paper is damp, probably due to improper storage. When the "Replcmnt Requrd: Print Cart" / "(color)", or "Repl Soon:Prt.Cart." /"(color)" message appears on the display panel, or the toner indicator on the [Print Quality] menu in the printer properties dialog box...has acclimatized. 212 For details, see p.108 "Supported Paper Types". • If you are using thick paper but the setting for [Economy Color:] on the initial screen shows empty, replace the print cartridge with new print cartridge of the application. For details, see p.108 "Supported Paper ...


