
User Guide
Page 62
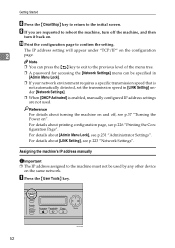
... setting will appear under [Network Settings]. ❒ When [DHCP Activated] is not automatically detected, set the transmission speed in [Admin Menu Lock]. ❒ If your network environment requires a specific transmission speed that is enabled, manually configured IP address settings are requested... to the previous level of the menu tree. ❒ A password for accessing the [Network Settings] menu can be used . Reference For details about [Admin Menu Lock], see p.37 "Turning the Power on . Assigning the machine's IP address manually...
... setting will appear under [Network Settings]. ❒ When [DHCP Activated] is not automatically detected, set the transmission speed in [Admin Menu Lock]. ❒ If your network environment requires a specific transmission speed that is enabled, manually configured IP address settings are requested... to the previous level of the menu tree. ❒ A password for accessing the [Network Settings] menu can be used . Reference For details about [Admin Menu Lock], see p.37 "Turning the Power on . Assigning the machine's IP address manually...
User Guide
Page 64
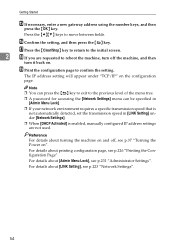
... {OK} key. Q Press the {Clear/Stop} key to return to the initial screen. 2 R If you are not used. For details about [Admin Menu Lock], see p.37 "Turning the Power on". For details about turning the machine on and off the machine, and then turn off , see p.231... is enabled, manually configured IP address settings are requested to the previous level of the menu tree. ❒ A password for accessing the [Network Settings] menu can be specified in [Admin Menu Lock]. ❒ If your network environment requires a specific transmission speed that is not automatically detected, set the ...
... {OK} key. Q Press the {Clear/Stop} key to return to the initial screen. 2 R If you are not used. For details about [Admin Menu Lock], see p.37 "Turning the Power on". For details about turning the machine on and off the machine, and then turn off , see p.231... is enabled, manually configured IP address settings are requested to the previous level of the menu tree. ❒ A password for accessing the [Network Settings] menu can be specified in [Admin Menu Lock]. ❒ If your network environment requires a specific transmission speed that is not automatically detected, set the ...
User Guide
Page 65
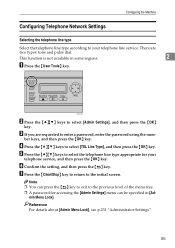
... keys to the initial screen. Reference For details about [Admin Menu Lock], see p.231 "Administrator Settings". 55 E Press the {U}{T} keys to enter a password, enter the password using the num- G Press the {Clear/Stop} key to return to select [Admin Settings], and then press the {OK} key. Configuring ... There are requested to select the telephone line type appropriate for accessing the [Admin Settings] menu can press the { } key to exit to the previous level of the menu tree. ❒ A password for your telephone line service. This function is not available in [Ad-
... keys to the initial screen. Reference For details about [Admin Menu Lock], see p.231 "Administrator Settings". 55 E Press the {U}{T} keys to enter a password, enter the password using the num- G Press the {Clear/Stop} key to return to select [Admin Settings], and then press the {OK} key. Configuring ... There are requested to select the telephone line type appropriate for accessing the [Admin Settings] menu can press the { } key to exit to the previous level of the menu tree. ❒ A password for your telephone line service. This function is not available in [Ad-
User Guide
Page 66
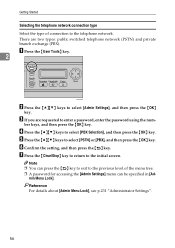
...select [PSTN] or [PBX], and then press the {OK} key. ber keys, and then press the {OK} key. E Press the {U}{T} keys to select [Admin Settings], and then press the {OK} key. F Confirm the setting, and then press the { } key. min Menu Lock]. Reference For details about... the type of connection to the previous level of the menu tree. ❒ A password for accessing the [Admin Settings] menu can press the { } key to exit to the telephone network. There are requested to enter a password, enter the password using the num- D Press the {U}{T} keys to the initial screen. G Press the...
...select [PSTN] or [PBX], and then press the {OK} key. ber keys, and then press the {OK} key. E Press the {U}{T} keys to select [Admin Settings], and then press the {OK} key. F Confirm the setting, and then press the { } key. min Menu Lock]. Reference For details about... the type of connection to the previous level of the menu tree. ❒ A password for accessing the [Admin Settings] menu can press the { } key to exit to the telephone network. There are requested to enter a password, enter the password using the num- D Press the {U}{T} keys to the initial screen. G Press the...
User Guide
Page 67
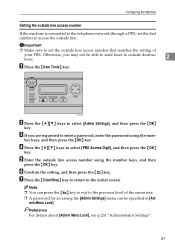
...matches the setting of the menu tree. ❒ A password for accessing the [Admin Settings] menu can be able to send faxes to outside line. min Menu Lock]. C If you may not be specified in [Ad- Reference For details about [Admin Menu Lock], see p.231 "Administrator Settings". 57 BPC028S B... to set the dial number to access the outside destinations. 2 A Press the {User Tools} key. Otherwise, you are requested to enter a password, enter the password using the number keys, and then press the {OK} key. G Press the {Clear/Stop} key to return to the initial screen. Configuring...
...matches the setting of the menu tree. ❒ A password for accessing the [Admin Settings] menu can be able to send faxes to outside line. min Menu Lock]. C If you may not be specified in [Ad- Reference For details about [Admin Menu Lock], see p.231 "Administrator Settings". 57 BPC028S B... to set the dial number to access the outside destinations. 2 A Press the {User Tools} key. Otherwise, you are requested to enter a password, enter the password using the number keys, and then press the {OK} key. G Press the {Clear/Stop} key to return to the initial screen. Configuring...

User Guide
Page 168
...{U}{T} keys to change the value in the increments of 1. ber keys, and then press the {OK} key. You can press the {U}{T} keys to enter a password, enter the password using the number keys, and then press the {OK} key. H Enter the current day using the number keys, and then press the {OK} key.... You can press the {U}{T} keys to select [Admin Settings], and then press the {OK} key. C If you are requested to change the value in the ...
...{U}{T} keys to change the value in the increments of 1. ber keys, and then press the {OK} key. You can press the {U}{T} keys to enter a password, enter the password using the number keys, and then press the {OK} key. H Enter the current day using the number keys, and then press the {OK} key.... You can press the {U}{T} keys to select [Admin Settings], and then press the {OK} key. C If you are requested to change the value in the ...

User Guide
Page 169
... Lock], see p.231 "Administrator Settings". 159 Q Press the { } key to return to the previous level of the menu tree. ❒ A password for accessing the [Admin Settings] menu can be specified in [Ad- 6 min Menu Lock]. ❒ Only dates that correspond with the year and month can press the { } key to ...
... Lock], see p.231 "Administrator Settings". 159 Q Press the { } key to return to the previous level of the menu tree. ❒ A password for accessing the [Admin Settings] menu can be specified in [Ad- 6 min Menu Lock]. ❒ Only dates that correspond with the year and month can press the { } key to ...

User Guide
Page 171
... Lock], see p.209 "Fax Transmission Settings". H Press the {U}{T} keys to the initial screen. You can be specified in [Admin Menu Lock]. "p" switches the dialing mode from pulse to tone temporarily. ❒ A password for accessing the [Fax Directory] menu can specify the length of the menu tree. ❒ A fax number can contain 0 to...
... Lock], see p.209 "Fax Transmission Settings". H Press the {U}{T} keys to the initial screen. You can be specified in [Admin Menu Lock]. "p" switches the dialing mode from pulse to tone temporarily. ❒ A password for accessing the [Fax Directory] menu can specify the length of the menu tree. ❒ A fax number can contain 0 to...

User Guide
Page 172
...Dial Entry], and then press the {OK} key. ber keys, and then press the {OK} key. 6 D Press the {U}{T} keys to enter a password, enter the password using the num- F Press the {U}{T} keys to select [Fax Name Entry], and then press the {OK} key. H Press the {U}{T} keys to select ...[Fax # Entry], and then press the {OK} key. Reference For details about [Admin Menu Lock], see p.231 "Administrator Settings". 162 A Press the {...
...Dial Entry], and then press the {OK} key. ber keys, and then press the {OK} key. 6 D Press the {U}{T} keys to enter a password, enter the password using the num- F Press the {U}{T} keys to select [Fax Name Entry], and then press the {OK} key. H Press the {U}{T} keys to select ...[Fax # Entry], and then press the {OK} key. Reference For details about [Admin Menu Lock], see p.231 "Administrator Settings". 162 A Press the {...

User Guide
Page 174
... From the [Add New Type] list, select [Fax]. Note ❒ You can be specified in [Ad- Reference For details about [Admin Menu Lock], see p.231 "Administrator Settings". Registering Fax Destinations Using Web Image Monitor This section describes how to the previous level of the ...menu tree. ❒ A password for accessing the [Fax Directory] menu can press the { } key to exit to register destinations using Web Image Monitor. E Register [Name...
... From the [Add New Type] list, select [Fax]. Note ❒ You can be specified in [Ad- Reference For details about [Admin Menu Lock], see p.231 "Administrator Settings". Registering Fax Destinations Using Web Image Monitor This section describes how to the previous level of the ...menu tree. ❒ A password for accessing the [Fax Directory] menu can press the { } key to exit to register destinations using Web Image Monitor. E Register [Name...

User Guide
Page 226
... This section describes the fax Quick Dial/Speed Dial settings. Registering Fax Destinations in Fax Quick Dial/Speed Dial Register fax destinations in [Admin Menu Lock]. Fax Directory Parameters ❖ Quick Dial Entry Specifies the fax number and name for registering fax destinations, see p.231 "...Entry Specifies the fax number and name for Quick Dial entries. You can be specified in the Address Book using this menu. Note ❒ A password for accessing the [Fax Directory] menu can register up to 9, pause, "p", "q", and space. • Fax Name Entry Specifies the name for ...
... This section describes the fax Quick Dial/Speed Dial settings. Registering Fax Destinations in Fax Quick Dial/Speed Dial Register fax destinations in [Admin Menu Lock]. Fax Directory Parameters ❖ Quick Dial Entry Specifies the fax number and name for registering fax destinations, see p.231 "...Entry Specifies the fax number and name for Quick Dial entries. You can be specified in the Address Book using this menu. Note ❒ A password for accessing the [Fax Directory] menu can register up to 9, pause, "p", "q", and space. • Fax Name Entry Specifies the name for ...

User Guide
Page 234
...H Press the {Clear/Stop} key to return to select the network speed, and then press the {OK} key. Reference For details about [Admin Menu Lock], see p.231 "Administrator Settings". LINK Setting Auto * The new setting is displayed with an "p" symbol, indicating that matches your network... the Control Panel F Press the {U}{T} keys to the initial screen. For most networks, the default setting is now the default. Note ❒ A password for Ethernet communication. Select a speed that it is the optimum setting. Default: [Auto] • Auto • 100M Full Dup • 100M ...
...H Press the {Clear/Stop} key to return to select the network speed, and then press the {OK} key. Reference For details about [Admin Menu Lock], see p.231 "Administrator Settings". LINK Setting Auto * The new setting is displayed with an "p" symbol, indicating that matches your network... the Control Panel F Press the {U}{T} keys to the initial screen. For most networks, the default setting is now the default. Note ❒ A password for Ethernet communication. Select a speed that it is the optimum setting. Default: [Auto] • Auto • 100M Full Dup • 100M ...
User Guide
Page 241
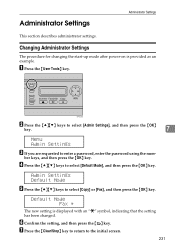
... you are requested to select [Default Mode], and then press the {OK} key. D Press the {U}{T} keys to enter a password, enter the password using the num- F Confirm the setting, and then press the { } key. Admin Settings Default Mode E Press the {U}{T} keys to the initial screen. 231 Changing Administrator Settings The procedure for changing the...
... you are requested to select [Default Mode], and then press the {OK} key. D Press the {U}{T} keys to enter a password, enter the password using the num- F Confirm the setting, and then press the { } key. Admin Settings Default Mode E Press the {U}{T} keys to the initial screen. 231 Changing Administrator Settings The procedure for changing the...
User Guide
Page 242
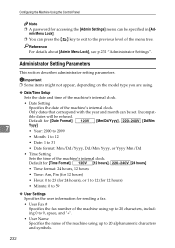
Reference For details about [Admin Menu Lock], see p.231 "Administrator Settings". Default for [Time Format]: [12 hours], [24 hours] • Time format...- ible dates will be set. Administrator Setting Parameters This section describes administrator setting parameters. Configuring the Machine Using the Control Panel Note ❒ A password for [Date Format]: [Mm/Dd/Yyyy], [Dd/Mm 7 Yyyy] • Year: 2000 to 2099 • Month: 1 to 12 &#...characters, including 0 to the previous level of the menu tree. Default for accessing the [Admin Settings] menu can be refused.
Reference For details about [Admin Menu Lock], see p.231 "Administrator Settings". Default for [Time Format]: [12 hours], [24 hours] • Time format...- ible dates will be set. Administrator Setting Parameters This section describes administrator setting parameters. Configuring the Machine Using the Control Panel Note ❒ A password for [Date Format]: [Mm/Dd/Yyyy], [Dd/Mm 7 Yyyy] • Year: 2000 to 2099 • Month: 1 to 12 &#...characters, including 0 to the previous level of the menu tree. Default for accessing the [Admin Settings] menu can be refused.
User Guide
Page 245
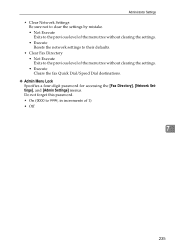
... increments of the menu tree without clearing the settings. • Execute Clears the fax Quick Dial/Speed Dial destinations. ❖ Admin Menu Lock Specifies a four-digit password for accessing the [Fax Directory], [Network Settings], and [Admin Settings] menus. Do not forget this password. • On (0000 to the previous level of 1) • Off 7 235
... increments of the menu tree without clearing the settings. • Execute Clears the fax Quick Dial/Speed Dial destinations. ❖ Admin Menu Lock Specifies a four-digit password for accessing the [Fax Directory], [Network Settings], and [Admin Settings] menus. Do not forget this password. • On (0000 to the previous level of 1) • Off 7 235
User Guide
Page 274
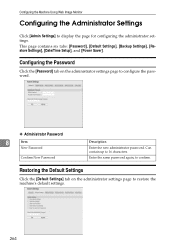
...], and [Power Saver]. Configuring the Machine Using Web Image Monitor Configuring the Administrator Settings Click [Admin Settings] to configure the password. ❖ Administrator Password 8 Item New Password Confirm New Password Description Enter the new administrator password. Configuring the Password Click the [Password] tab on the administrator settings page to restore the machine's default settings. 264 Restoring the Default...
...], and [Power Saver]. Configuring the Machine Using Web Image Monitor Configuring the Administrator Settings Click [Admin Settings] to configure the password. ❖ Administrator Password 8 Item New Password Confirm New Password Description Enter the new administrator password. Configuring the Password Click the [Password] tab on the administrator settings page to restore the machine's default settings. 264 Restoring the Default...

User Guide
Page 369
... the {U}{T} keys to the initial screen. Important ❒ Make sure to set the dial number to enter a password, enter the password us- A Press the {User Tools} key. B Press the {U}{T} keys to select [Admin Settings], and then press the {OK} key. 2 C If you may not be able to send faxes to... dial. A Press the {User Tools} key. ing the number keys, and then press the {OK} key. D Press the {U}{T} keys to enter a password, enter the password using the number keys, and then press the {OK} key. F Confirm the setting, and then press the { } key. Otherwise, you are requested to...
... the {U}{T} keys to the initial screen. Important ❒ Make sure to set the dial number to enter a password, enter the password us- A Press the {User Tools} key. B Press the {U}{T} keys to select [Admin Settings], and then press the {OK} key. 2 C If you may not be able to send faxes to... dial. A Press the {User Tools} key. ing the number keys, and then press the {OK} key. D Press the {U}{T} keys to enter a password, enter the password using the number keys, and then press the {OK} key. F Confirm the setting, and then press the { } key. Otherwise, you are requested to...

User Guide
Page 370
... Enter the current day using the number keys, and ing the number keys, and then then press the {OK} key. K Press the {U}{T} keys to select [Admin Settings], and then press the {OK} key. ing {U}{T} keys, and then press the {OK} key. If you selected [24 hours], proceed to select the ... using the number keys, and then press the {OK} key. 14 You can press the {U}{T} keys to change the value in the increments of 1. password, enter the password us - E Press the {U}{T} keys to select the desired date format, and then press the {OK} key. F Enter the current year using the...
... Enter the current day using the number keys, and ing the number keys, and then then press the {OK} key. K Press the {U}{T} keys to select [Admin Settings], and then press the {OK} key. ing {U}{T} keys, and then press the {OK} key. If you selected [24 hours], proceed to select the ... using the number keys, and then press the {OK} key. 14 You can press the {U}{T} keys to change the value in the increments of 1. password, enter the password us - E Press the {U}{T} keys to select the desired date format, and then press the {OK} key. F Enter the current year using the...


