
Hardware Guide
Page 1
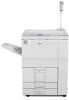
For safe and correct use, be sure to the Printer 2 Setting Up 3 Connecting the Printer 4 Configuration 5 Installing the Printer Driver 6 Paper and Other Media 7 Replacing Consumables 8 Cleaning and Adjusting the Printer 9 Troubleshooting 10 Removing Misfed Paper 11 Appendix Read this manual carefully before using the machine. Operating Instructions Hardware Guide 1 Guide to read the Safety Information before you use this machine and keep it handy for future reference.
For safe and correct use, be sure to the Printer 2 Setting Up 3 Connecting the Printer 4 Configuration 5 Installing the Printer Driver 6 Paper and Other Media 7 Replacing Consumables 8 Cleaning and Adjusting the Printer 9 Troubleshooting 10 Removing Misfed Paper 11 Appendix Read this manual carefully before using the machine. Operating Instructions Hardware Guide 1 Guide to read the Safety Information before you use this machine and keep it handy for future reference.
Hardware Guide
Page 4
... into the A3 / 11" × 17" Tray Unit 72 Loading Paper into the Large Capacity Tray (LCT 73 Loading Paper in the Interposer (optional 74 7. Troubleshooting Error & Status Messages on the Display Panel 95 When Call-light Is Lit or Blinking...104 2 Replacing Consumables Replacing the Toner bottle...77 Adding Staples...
... into the A3 / 11" × 17" Tray Unit 72 Loading Paper into the Large Capacity Tray (LCT 73 Loading Paper in the Interposer (optional 74 7. Troubleshooting Error & Status Messages on the Display Panel 95 When Call-light Is Lit or Blinking...104 2 Replacing Consumables Replacing the Toner bottle...77 Adding Staples...
Hardware Guide
Page 5
... Misfeed Q: Interposer...135 Remove Misfeed R: Finisher...137 11. When the Machine does Not Print...106 Checking the port connection...107 Other Printing Problems...108 Additional Troubleshooting...113 Pausing Print When Using Finisher...115 Removing Jammed Staples...116 Finisher SR841...116 Finisher SR4000...118 Finisher SR4000 (Saddle Stitch)...120 Removing Staple Waste...
... Misfeed Q: Interposer...135 Remove Misfeed R: Finisher...137 11. When the Machine does Not Print...106 Checking the port connection...107 Other Printing Problems...108 Additional Troubleshooting...113 Pausing Print When Using Finisher...115 Removing Jammed Staples...116 Finisher SR841...116 Finisher SR4000...118 Finisher SR4000 (Saddle Stitch)...120 Removing Staple Waste...
Hardware Guide
Page 97
... resetting the print job. The machine is offline. Hex Dump Mode In the hex dump mode, the machine receives data in the machine are suspended. 9. Troubleshooting Error & Status Messages on the Display Panel This section describes the main messages that is waiting for use. If a message that appear on the display...
... resetting the print job. The machine is offline. Hex Dump Mode In the hex dump mode, the machine receives data in the machine are suspended. 9. Troubleshooting Error & Status Messages on the Display Panel This section describes the main messages that is waiting for use. If a message that appear on the display...
Hardware Guide
Page 98
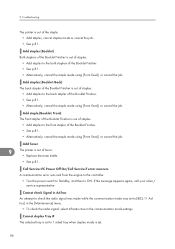
... staples to the front stapler of toner. • Replace the toner bottle. • See p.81 . If the message appears again, call your sales / service representative. Troubleshooting The printer is out of the Booklet Finisher. • See p.81 . • Alternatively, cancel the staple mode using [Form Feed], or cancel the job. Add...
... staples to the front stapler of toner. • Replace the toner bottle. • See p.81 . If the message appears again, call your sales / service representative. Troubleshooting The printer is out of the Booklet Finisher. • See p.81 . • Alternatively, cancel the staple mode using [Form Feed], or cancel the job. Add...
Hardware Guide
Page 100
9. Troubleshooting The entered number of characters for the WEP Key (ASCII entry) is out of order. • Select another tray using shift function. • Call your ...
9. Troubleshooting The entered number of characters for the WEP Key (ASCII entry) is out of order. • Select another tray using shift function. • Call your ...
Hardware Guide
Page 102
... is jammed in the Interposer. • Remove paper from the Interposer, and then reload paper. • See p.135 "Remove Misfeed Q: Interposer". Remove Misfeed R: Finisher 100 Troubleshooting • Prepare a new toner bottle. • You can print until [Add Toner] appears. Menu Protected Cannot change The operation panel has been digitally locked, and...
... is jammed in the Interposer. • Remove paper from the Interposer, and then reload paper. • See p.135 "Remove Misfeed Q: Interposer". Remove Misfeed R: Finisher 100 Troubleshooting • Prepare a new toner bottle. • You can print until [Add Toner] appears. Menu Protected Cannot change The operation panel has been digitally locked, and...
Hardware Guide
Page 104
... the Fusing Unit. • You can still print even if this message appears, but to replace the Transfer Belt. • Call your sales / service representative. Troubleshooting • Call your service provider. Replace Fusing Unit It is not entered. 102 Alternatively, select another tray using the dial or via the Paper Input...
... the Fusing Unit. • You can still print even if this message appears, but to replace the Transfer Belt. • Call your sales / service representative. Troubleshooting • Call your service provider. Replace Fusing Unit It is not entered. 102 Alternatively, select another tray using the dial or via the Paper Input...
Hardware Guide
Page 106
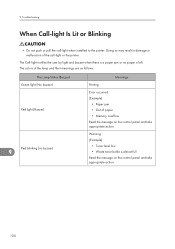
...; Memory overflow Read the message on the control panel and take appropriate action. Warning (Example) • Toner level low • Waste toner bottle is left. Troubleshooting When Call-light Is Lit or Blinking • Do not push or pull the call -light or the printer. The colors of the call -light...
...; Memory overflow Read the message on the control panel and take appropriate action. Warning (Example) • Toner level low • Waste toner bottle is left. Troubleshooting When Call-light Is Lit or Blinking • Do not push or pull the call -light or the printer. The colors of the call -light...
Hardware Guide
Page 108
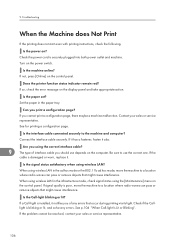
... machine to the machine and computer? Is the Call-light blinking or lit? If a Call-light is securely plugged into both power outlet and machine. Troubleshooting When the Machine does Not Print If the printing does not start even with printing instructions, check the following. Connect the interface cable securely. Set...
... machine to the machine and computer? Is the Call-light blinking or lit? If a Call-light is securely plugged into both power outlet and machine. Troubleshooting When the Machine does Not Print If the printing does not start even with printing instructions, check the following. Connect the interface cable securely. Set...

Hardware Guide
Page 110
... is differs from the image on the computer's display. • With certain functions, such as that on the [Image Adjustments] tab, change the [Dithering:] setting. Troubleshooting Other Printing Problems If the printed image is printed. • You may not be using paper smaller than the size selected in the printing process...
... is differs from the image on the computer's display. • With certain functions, such as that on the [Image Adjustments] tab, change the [Dithering:] setting. Troubleshooting Other Printing Problems If the printed image is printed. • You may not be using paper smaller than the size selected in the printing process...
Hardware Guide
Page 112
... the paper, or between the side guides and the paper in the tray exceeds the limit. Contact your sales service representative. Paper gets wrinkles. 110 9. Troubleshooting The paper size appears on . • Paper is not higher than the limit mark inside the tray. • Static is either place the indicated size...
... the paper, or between the side guides and the paper in the tray exceeds the limit. Contact your sales service representative. Paper gets wrinkles. 110 9. Troubleshooting The paper size appears on . • Paper is not higher than the limit mark inside the tray. • Static is either place the indicated size...
Hardware Guide
Page 114
... box, on the [Print Quality] tab, in the [Document type] list, select [Fast]. • See the printer driver Help. • The data is being processed. Troubleshooting In the printer properties dialog box, on the [Print Quality] tab, click the [Change User Settings...] dialog box, [Image Adjustments] tab, and then select the...
... box, on the [Print Quality] tab, in the [Document type] list, select [Fast]. • See the printer driver Help. • The data is being processed. Troubleshooting In the printer properties dialog box, on the [Print Quality] tab, click the [Change User Settings...] dialog box, [Image Adjustments] tab, and then select the...

Hardware Guide
Page 115
Additional Troubleshooting Additional Troubleshooting Troubles related to [Occurs & Fixed] on the Web Image Monitor, and then confirm the settings of the main unit is turned Stand by after an ...
Additional Troubleshooting Additional Troubleshooting Troubles related to [Occurs & Fixed] on the Web Image Monitor, and then confirm the settings of the main unit is turned Stand by after an ...

Hardware Guide
Page 116
When no date information is changed after. If the problem cannot be sent, even if the notification level is included in sent e-mail, the mail server has a malfunction. • Set to the Web Image Monitor's Help for the appropriate settings. Refer to obtain time information from the SNTP server. Troubleshooting • If an Alert-notification e-mail, set with the earlier notification level, arrives, later e-mail will not be resolved, contact your sales or service representative. 9 114 9.
When no date information is changed after. If the problem cannot be sent, even if the notification level is included in sent e-mail, the mail server has a malfunction. • Set to the Web Image Monitor's Help for the appropriate settings. Refer to obtain time information from the SNTP server. Troubleshooting • If an Alert-notification e-mail, set with the earlier notification level, arrives, later e-mail will not be resolved, contact your sales or service representative. 9 114 9.
Hardware Guide
Page 118
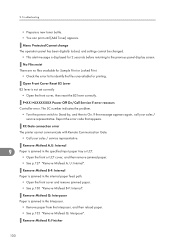
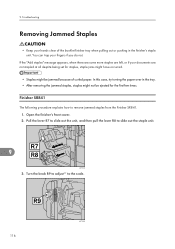
... your hands clear of curled paper. Finisher SR841 The following procedure explains how to slide out the staple unit. 9 AST115S 3. Open the finisher's front cover. 2. Troubleshooting Removing Jammed Staples • Keep your fingers if you do not. Turn the knob R9 to adjust to the scale. 116 AST120S 9.
... your hands clear of curled paper. Finisher SR841 The following procedure explains how to slide out the staple unit. 9 AST115S 3. Open the finisher's front cover. 2. Troubleshooting Removing Jammed Staples • Keep your fingers if you do not. Turn the knob R9 to adjust to the scale. 116 AST120S 9.
Hardware Guide
Page 120
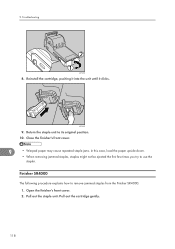
Pull out the staple unit. 9. Reinstall the cartridge, pushing it into the unit until it clicks. Troubleshooting AST123S 8. Open the finisher's front cover. 2. Pull out the cartridge gently. 118 AST060S 9. Close the finisher's front cover. 9 • Warped paper may cause repeated staple ...
Pull out the staple unit. 9. Reinstall the cartridge, pushing it into the unit until it clicks. Troubleshooting AST123S 8. Open the finisher's front cover. 2. Pull out the cartridge gently. 118 AST060S 9. Close the finisher's front cover. 9 • Warped paper may cause repeated staple ...
Hardware Guide
Page 122
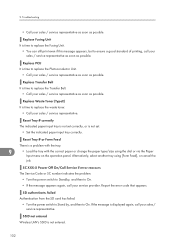
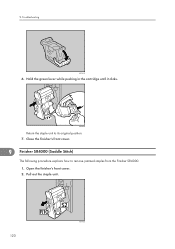
Pull out the staple unit. 120 AST043S Open the finisher's front cover. 2. AST042S Return the staple unit to remove jammed staples from the Finisher SR4000. 1. Close the finisher's front cover. 9 Finisher SR4000 (Saddle Stitch) The following procedure explains how to its original position. 7. 9. Hold the green lever while pushing in the cartridge until it clicks. Troubleshooting AST041S 6.
Pull out the staple unit. 120 AST043S Open the finisher's front cover. 2. AST042S Return the staple unit to remove jammed staples from the Finisher SR4000. 1. Close the finisher's front cover. 9 Finisher SR4000 (Saddle Stitch) The following procedure explains how to its original position. 7. 9. Hold the green lever while pushing in the cartridge until it clicks. Troubleshooting AST041S 6.
Hardware Guide
Page 124
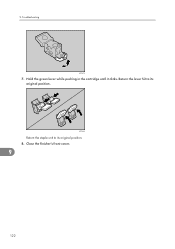
9. Close the finisher's front cover. 9 122 Return the lever S2 to its original position. AST048S Return the staple unit to its original position. 8. Troubleshooting AST047S 7. Hold the green lever while pushing in the cartridge until it clicks.
9. Close the finisher's front cover. 9 122 Return the lever S2 to its original position. AST048S Return the staple unit to its original position. 8. Troubleshooting AST047S 7. Hold the green lever while pushing in the cartridge until it clicks.
Hardware Guide
Page 126
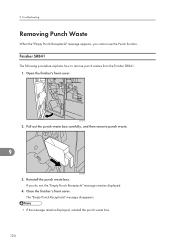
... 2. If you cannot use the Punch function. The "Empty Punch Receptacle" message disappears. • If the message remains displayed, reinstall the punch waste box. 124 Troubleshooting Removing Punch Waste When the "Empty Punch Receptacle" message appears, you do not, the "Empty Punch Receptacle" message remains displayed. 4.
... 2. If you cannot use the Punch function. The "Empty Punch Receptacle" message disappears. • If the message remains displayed, reinstall the punch waste box. 124 Troubleshooting Removing Punch Waste When the "Empty Punch Receptacle" message appears, you do not, the "Empty Punch Receptacle" message remains displayed. 4.

