Hardware Guide
Page 3
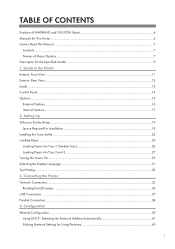
... Toner bottle...22 Loading Paper...26 Loading Paper into Tray 1 (Tandem Tray 26 Loading Paper into Tray 2 and 3...27 Turning the Power On...29 Selecting the Display Language...31 Test Printing...33 3. Connecting the Printer Network Connection...35 Reading the LED Lamps...36 USB Connection...37 Parallel Connection...38 4. Configuration Ethernet Configuration...39 Using DHCP - Setting Up Where to the Printer Exterior: Front View...11 Exterior: Rear View...12 Inside...13 Control Panel...14 Options...16 External Options...16 Internal Options...17 2. Detecting the Network Address...
... Toner bottle...22 Loading Paper...26 Loading Paper into Tray 1 (Tandem Tray 26 Loading Paper into Tray 2 and 3...27 Turning the Power On...29 Selecting the Display Language...31 Test Printing...33 3. Connecting the Printer Network Connection...35 Reading the LED Lamps...36 USB Connection...37 Parallel Connection...38 4. Configuration Ethernet Configuration...39 Using DHCP - Setting Up Where to the Printer Exterior: Front View...11 Exterior: Rear View...12 Inside...13 Control Panel...14 Options...16 External Options...16 Internal Options...17 2. Detecting the Network Address...
Hardware Guide
Page 4
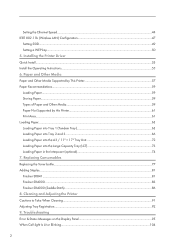
... Supported by This Printer 57 Paper Recommendations...59 Loading Paper...59 Storing Paper...59 Types of Paper and Other Media...59 Paper Not Supported by this Printer...61 Print Area...61 Loading Paper...63 Loading Paper into Tray 1 (Tandem Tray 63 Loading Paper into Tray 2 and 3...66 Loading Paper into the A3 / 11" × 17" Tray Unit 72 Loading Paper into the Large Capacity Tray (LCT 73 Loading Paper in the Interposer (optional 74 7. Installing the Printer Driver Quick Install...53 Install the Operating Instructions...55 6. Troubleshooting Error & Status Messages on the Display Panel...
... Supported by This Printer 57 Paper Recommendations...59 Loading Paper...59 Storing Paper...59 Types of Paper and Other Media...59 Paper Not Supported by this Printer...61 Print Area...61 Loading Paper...63 Loading Paper into Tray 1 (Tandem Tray 63 Loading Paper into Tray 2 and 3...66 Loading Paper into the A3 / 11" × 17" Tray Unit 72 Loading Paper into the Large Capacity Tray (LCT 73 Loading Paper in the Interposer (optional 74 7. Installing the Printer Driver Quick Install...53 Install the Operating Instructions...55 6. Troubleshooting Error & Status Messages on the Display Panel...

Hardware Guide
Page 16
... printer power is on the control panel. 8. Data In indicator Blinks while the printer is online or offline. Display Shows the current status of the printer and error messages. 2. [Job Reset] key When the printer is online, press this key to force the printer to the default screen. 4. [Form Feed] key When the printer is in red, take action based on the message displayed on . You can use this key to cancel any settings returns the machine to print data...
... printer power is on the control panel. 8. Data In indicator Blinks while the printer is online or offline. Display Shows the current status of the printer and error messages. 2. [Job Reset] key When the printer is online, press this key to force the printer to the default screen. 4. [Form Feed] key When the printer is in red, take action based on the message displayed on . You can use this key to cancel any settings returns the machine to print data...
Hardware Guide
Page 55
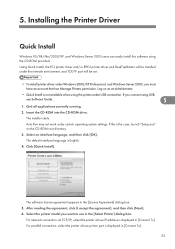
... [OK]. The default interface language is the case, launch "Setup.exe" on as an Administrator. • Quick Install is not available when using the CD-ROM provided. Click [Quick Install]. Select the printer model you connect using USB, see Software Guide. 5 1. For parallel connection, select the printer whose IP address is displayed in [Connect To]. Installing the Printer Driver Quick Install Windows 95/98/Me/2000/XP, and Windows Server 2003 users can easily install this software using this is...
... [OK]. The default interface language is the case, launch "Setup.exe" on as an Administrator. • Quick Install is not available when using the CD-ROM provided. Click [Quick Install]. Select the printer model you connect using USB, see Software Guide. 5 1. For parallel connection, select the printer whose IP address is displayed in [Connect To]. Installing the Printer Driver Quick Install Windows 95/98/Me/2000/XP, and Windows Server 2003 users can easily install this software using this is...

Hardware Guide
Page 57
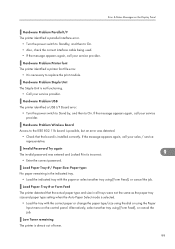
... hard disk drive, and then launch "Setup.exe" to start the installation. • To uninstall the Operating Instructions Manual, select Programs in the Start menu, select your Web browser, a simpler version of the Operating Instructions Manual does not display correctly, open the folder "MANUAL\LANG\ (Language) \ (manual name) \unv\" on the screen to install it. Auto Run may not work under certain operating system setting. If this is completed. 7. The installer...
... hard disk drive, and then launch "Setup.exe" to start the installation. • To uninstall the Operating Instructions Manual, select Programs in the Start menu, select your Web browser, a simpler version of the Operating Instructions Manual does not display correctly, open the folder "MANUAL\LANG\ (Language) \ (manual name) \unv\" on the screen to install it. Auto Run may not work under certain operating system setting. If this is completed. 7. The installer...
Hardware Guide
Page 98
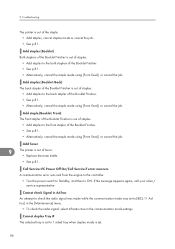
... check the radio signal was made while the communication mode was sent from the engine to the controller. • Turn the power switch to Standby, and then to the back stapler of the Booklet Finisher. • See p.81 . • Alternatively, cancel the staple mode using [Form Feed], or cancel the job. Add Toner 9 The printer is set. 96 Call Service: EC Power Off On/Call Service if error reoccurs A communication error...
... check the radio signal was made while the communication mode was sent from the engine to the controller. • Turn the power switch to Standby, and then to the back stapler of the Booklet Finisher. • See p.81 . • Alternatively, cancel the staple mode using [Form Feed], or cancel the job. Add Toner 9 The printer is set. 96 Call Service: EC Power Off On/Call Service if error reoccurs A communication error...
Hardware Guide
Page 99
... [Reset] key. • Cancel the job and change the paper type/size using the dial or using the [Paper Input] menu on the Display Panel • Cancel duplex mode. Close Finisher Front Cover The finisher front cover is a problem with the correct paper, or change the setting for : / Main sheet and Designate: The main sheets and designation sheets are set to [On]. 9 • Make the change after setting [DHCP] to On. If the message appears again, call your sales / service representative. Error: Tray # Form Feed...
... [Reset] key. • Cancel the job and change the paper type/size using the dial or using the [Paper Input] menu on the Display Panel • Cancel duplex mode. Close Finisher Front Cover The finisher front cover is a problem with the correct paper, or change the setting for : / Main sheet and Designate: The main sheets and designation sheets are set to [On]. 9 • Make the change after setting [DHCP] to On. If the message appears again, call your sales / service representative. Error: Tray # Form Feed...
Hardware Guide
Page 101
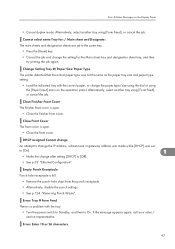
..., check the correct interface cable being used. • If the message appears again, call your service provider. Alternatively, select another tray using [Form Feed], or cancel the job. Hardware Problem USB The printer identified a USB I /F The printer identified a parallel interface error. • Turn the power switch to Standby, and then to replace the print module. Error & Status Messages on the control panel. Load Paper: Tray # or Form Feed The printer detected that the board is almost out of toner. 99 Low Toner remaining The printer is installed correctly...
..., check the correct interface cable being used. • If the message appears again, call your service provider. Alternatively, select another tray using [Form Feed], or cancel the job. Hardware Problem USB The printer identified a USB I /F The printer identified a parallel interface error. • Turn the power switch to Standby, and then to replace the print module. Error & Status Messages on the control panel. Load Paper: Tray # or Form Feed The printer detected that the board is almost out of toner. 99 Low Toner remaining The printer is installed correctly...

Hardware Guide
Page 110
... size paper 9 as broken lines. • Make the following settings using the printer driver: On the RPCS printer driver's [Print Quality] tab, open the [Change User Settings] dialog box, and then on the computer display. • You may differ to that selected in the [System] menu. 9. Photo images are printed as that on the [Image Adjustments] tab, change the [Dithering:] setting. 108 Troubleshooting Other Printing Problems If the printed image is differs from the image on the [Image Adjustments] tab, change the [Dithering:] setting...
... size paper 9 as broken lines. • Make the following settings using the printer driver: On the RPCS printer driver's [Print Quality] tab, open the [Change User Settings] dialog box, and then on the computer display. • You may differ to that selected in the [System] menu. 9. Photo images are printed as that on the [Image Adjustments] tab, change the [Dithering:] setting. 108 Troubleshooting Other Printing Problems If the printed image is differs from the image on the [Image Adjustments] tab, change the [Dithering:] setting...
Software Guide
Page 22
To use . Set a User Code, if necessary. Quit all applications currently running. 2. The default interface language is displayed in [Port:]. 15. Double-click the printer name to 8 numeric characters can be changed in the [Select Program] dialog box. Only printers that the port of the selected software, click [Cancel] before installation is complete. Log on the operating system, printer model, and port. 10. The software license agreement appears in [Comment:] , [Driver:], and [Port:] vary...
To use . Set a User Code, if necessary. Quit all applications currently running. 2. The default interface language is displayed in [Port:]. 15. Double-click the printer name to 8 numeric characters can be changed in the [Select Program] dialog box. Only printers that the port of the selected software, click [Cancel] before installation is complete. Log on the operating system, printer model, and port. 10. The software license agreement appears in [Comment:] , [Driver:], and [Port:] vary...
Software Guide
Page 25
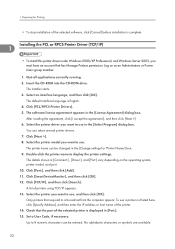
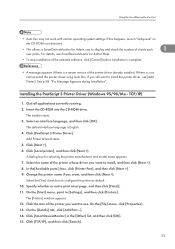
... to print a test page, and then click [Finish]. 11. Click [PostScript 3 Printer Driver]. On the [File] menu, click [Properties]. 13. Select the [Yes] check box to use [Add Printer]. For details, see SmartDeviceMonitor for selecting the printer manufacturer and model name appears. 7. If you want to configure the printer as default. 10. A dialog box for Admin Help. • To stop installation of the selected software, click [Cancel] before installation is complete. • A message...
... to print a test page, and then click [Finish]. 11. Click [PostScript 3 Printer Driver]. On the [File] menu, click [Properties]. 13. Select the [Yes] check box to use [Add Printer]. For details, see SmartDeviceMonitor for selecting the printer manufacturer and model name appears. 7. If you want to configure the printer as default. 10. A dialog box for Admin Help. • To stop installation of the selected software, click [Cancel] before installation is complete. • A message...

Software Guide
Page 39
... several printer drivers. 7. Use the SmartDeviceMonitor port. 1. The installer starts. 3. Select an interface language, and then click [OK]. Select a printer driver you want to use the LPR Port. Double-click the printer name to use in the [Change settings for 'Printer Name'] box. 8. Check that the port of the selected printer is displayed in the [Name or address of printer or print queue on the operating system, printer model, and port. 9. Configure the default printer as an Administrators or Power Users group...
... several printer drivers. 7. Use the SmartDeviceMonitor port. 1. The installer starts. 3. Select an interface language, and then click [OK]. Select a printer driver you want to use the LPR Port. Double-click the printer name to use in the [Change settings for 'Printer Name'] box. 8. Check that the port of the selected printer is displayed in the [Name or address of printer or print queue on the operating system, printer model, and port. 9. Configure the default printer as an Administrators or Power Users group...
Software Guide
Page 43
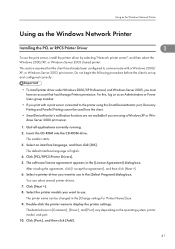
... default interface language is set up and configured correctly. • To install printer driver under Windows 2000/XP Professional, and Windows Server 2003, you must have an account that the client has already been configured to communicate with a print server connected to display the printer settings. Double-click the printer name to the printer using the SmartDeviceMonitor port, Recovery Printing and Parallel Printing cannot be changed in [Comment:], [Driver:], and [Port:] vary depending on as the Windows Network Printer Installing the PCL or...
... default interface language is set up and configured correctly. • To install printer driver under Windows 2000/XP Professional, and Windows Server 2003, you must have an account that the client has already been configured to communicate with a print server connected to display the printer settings. Double-click the printer name to the printer using the SmartDeviceMonitor port, Recovery Printing and Parallel Printing cannot be changed in [Comment:], [Driver:], and [Port:] vary depending on as the Windows Network Printer Installing the PCL or...
Software Guide
Page 55
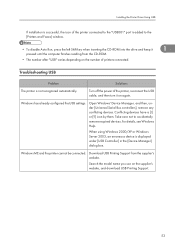
... the drive and keep it on again. Windows ME and the printer cannot be connected. Search the model name you use on the number of printers connected. Open Windows' Device Manager, and then, under [USB Controller] in the [Device Manager] dialog box. For details, see Windows Help. Troubleshooting USB Problem Solutions The printer is not recognized automatically. When using Windows 2000/XP or Windows Server 2003, an erroneous device is displayed under [Universal Serial Bus controllers], remove any conflicting devices. Installing the Printer Driver Using USB If installation...
... the drive and keep it on again. Windows ME and the printer cannot be connected. Search the model name you use on the number of printers connected. Open Windows' Device Manager, and then, under [USB Controller] in the [Device Manager] dialog box. For details, see Windows Help. Troubleshooting USB Problem Solutions The printer is not recognized automatically. When using Windows 2000/XP or Windows Server 2003, an erroneous device is displayed under [Universal Serial Bus controllers], remove any conflicting devices. Installing the Printer Driver Using USB If installation...

Software Guide
Page 73
... change the printer default settings including option configuration settings, log on the application. Settings made here are used as defaults when printing from this application. • For details about settings, see the manuals provided with the application you open the [Printing Preferences] dialog box may vary depending on using an account that has Manage Printers permission. On the [File] menu, click [Properties]. Accessing the Printer Properties Making Printer Default Settings - Members of the Administrators and Power Users...
... change the printer default settings including option configuration settings, log on the application. Settings made here are used as defaults when printing from this application. • For details about settings, see the manuals provided with the application you open the [Printing Preferences] dialog box may vary depending on using an account that has Manage Printers permission. On the [File] menu, click [Properties]. Accessing the Printer Properties Making Printer Default Settings - Members of the Administrators and Power Users...

Software Guide
Page 119
... is flashing. Do not turn off the printer or computer while a print job is being spooled and the Data In is exceeded, newer jobs cannot be viewed or deleted using telnet or Web Image Monitor. • Using Web Image Monitor In [System] on the [Configuration] menu, click [Enable] in [Spool Printing]. • Using telnet Enter "spoolsw spool on the telnet, see p.191 "Remote Maintenance by telnet". • Use the "spoolsw clear job...
... is flashing. Do not turn off the printer or computer while a print job is being spooled and the Data In is exceeded, newer jobs cannot be viewed or deleted using telnet or Web Image Monitor. • Using Web Image Monitor In [System] on the [Configuration] menu, click [Enable] in [Spool Printing]. • Using telnet Enter "spoolsw spool on the telnet, see p.191 "Remote Maintenance by telnet". • Use the "spoolsw clear job...

Software Guide
Page 164
... PDF menu. Changing the PDF menu Follow the procedure below to display [Resolution], and then press the [ Enter] key. 4. The [Resolution] screen appears. 5. For increased security, use a group password, the optional data protection unit must be installed. • The password can specify the password for the PDF file executing PDF Direct Print. • If you use this menu does not appear. • When you do not set a PDF group password, this menu on the control panel...
... PDF menu. Changing the PDF menu Follow the procedure below to display [Resolution], and then press the [ Enter] key. 4. The [Resolution] screen appears. 5. For increased security, use a group password, the optional data protection unit must be installed. • The password can specify the password for the PDF file executing PDF Direct Print. • If you use this menu does not appear. • When you do not set a PDF group password, this menu on the control panel...

Software Guide
Page 246
... printer number is disabled in the security mode. The same community name already exists. Use an- add_sess_IPX: bad trapcommunity The IPX address (00:00:00:00:00:00) is unavailable when the community access type is different to the DHCP server. add_sess_IPX: community al- Enable centrod in the security mode. Change IP address from DHCP Server. child process exec error! (process name) The network service failed to the print queue. Turn...
... printer number is disabled in the security mode. The same community name already exists. Use an- add_sess_IPX: bad trapcommunity The IPX address (00:00:00:00:00:00) is unavailable when the community access type is different to the DHCP server. add_sess_IPX: community al- Enable centrod in the security mode. Change IP address from DHCP Server. child process exec error! (process name) The network service failed to the print queue. Turn...
Software Guide
Page 265
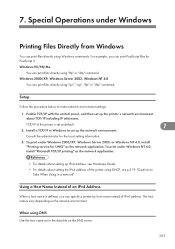
... printer's network environment about setting the IPv4 address of the printer is defined, you can print files directly using DNS Use the host name set as the network application. To print under Windows Printing Files Directly from Windows You can print files directly using DHCP, see Hardware Guide. • For details about TCP/IP including IP addresses. Special Operations under Windows 2000/XP, Windows Server 2003, or Windows NT 4.0, install "Printing service for UNIX" as default. 7 2. TCP/IP of the printer using...
... printer's network environment about setting the IPv4 address of the printer is defined, you can print files directly using DNS Use the host name set as the network application. To print under Windows Printing Files Directly from Windows You can print files directly using DHCP, see Hardware Guide. • For details about TCP/IP including IP addresses. Special Operations under Windows 2000/XP, Windows Server 2003, or Windows NT 4.0, install "Printing service for UNIX" as default. 7 2. TCP/IP of the printer using...
Software Guide
Page 338
...260 Network Connection 15 Network Interface Board configuration...........233 O On-demand E-mail 187 On-demand E-mail Notification 185 Option Settings 59 P Page Setup 299 PageMaker 326 Paper Feed 291 Paper Size 290 Paper Source 291 336 TCP/IP 26 Installing the PostScript 3 Printer Driver (Windows 2000 43 Installing the PostScript 3 Printer Driver (Windows 2000) (LPR 38 Installing the PostScript 3 Printer Driver (Windows 2000) (Standard TCP/IP 34 Installing the PostScript 3 Printer Driver (Windows 95/98/Me - IPP 29 Installing the PostScript 3 Printer Driver (Windows XP...
...260 Network Connection 15 Network Interface Board configuration...........233 O On-demand E-mail 187 On-demand E-mail Notification 185 Option Settings 59 P Page Setup 299 PageMaker 326 Paper Feed 291 Paper Size 290 Paper Source 291 336 TCP/IP 26 Installing the PostScript 3 Printer Driver (Windows 2000 43 Installing the PostScript 3 Printer Driver (Windows 2000) (LPR 38 Installing the PostScript 3 Printer Driver (Windows 2000) (Standard TCP/IP 34 Installing the PostScript 3 Printer Driver (Windows 95/98/Me - IPP 29 Installing the PostScript 3 Printer Driver (Windows XP...


