
User Guide
Page 2
... of procedures other than those specified in this manual might result in hazardous radiation exposure. Caution: Use of controls or adjustments or performance of the printer. The machine contains two AlGaAs laser diodes, 6.2 milliwatt, 770 - 795 nanometer wavelength for office/ EDP use genuine toner, maintenance kits and parts from the supplier...
... of procedures other than those specified in this manual might result in hazardous radiation exposure. Caution: Use of controls or adjustments or performance of the printer. The machine contains two AlGaAs laser diodes, 6.2 milliwatt, 770 - 795 nanometer wavelength for office/ EDP use genuine toner, maintenance kits and parts from the supplier...
User Guide
Page 3
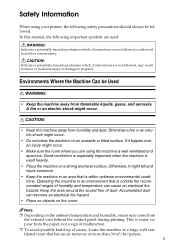
Indicates a potentially hazardous situation which , if instructions are using your printer, the following important symbols are used heavily. • Place the machine on the cover. A fire or an electric shock might occur. • Do not place ...
Indicates a potentially hazardous situation which , if instructions are using your printer, the following important symbols are used heavily. • Place the machine on the cover. A fire or an electric shock might occur. • Do not place ...
User Guide
Page 4
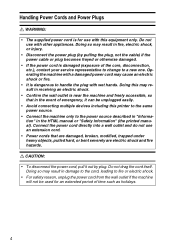
... safety reason, unplug the power cord from the wall outlet if the machine will not be unplugged easily. • Avoid connecting multiple devices including this printer to the same power source. • Connect the machine only to handle the plug with other appliances. Connect the power cord directly into a wall outlet...
... safety reason, unplug the power cord from the wall outlet if the machine will not be unplugged easily. • Avoid connecting multiple devices including this printer to the same power source. • Connect the machine only to handle the plug with other appliances. Connect the power cord directly into a wall outlet...

User Guide
Page 5
... plugs or cords can take out toner and development unit to another floor). Disposal can cause an electrical or fire hazard. • When moving the printer after use, do not dispose of the machine or expended supply waste at both sides, and then lift the... printer slowly. The machine's various handling areas are for options: Max. Otherwise the machine might move or come down to fall inside the machine. • When ...
... plugs or cords can take out toner and development unit to another floor). Disposal can cause an electrical or fire hazard. • When moving the printer after use, do not dispose of the machine or expended supply waste at both sides, and then lift the... printer slowly. The machine's various handling areas are for options: Max. Otherwise the machine might move or come down to fall inside the machine. • When ...

User Guide
Page 6
.... Caution should be turned off and unplugged for cleaning the machine's interior. • Do not pull out the paper tray forcefully. Not allowing the printer to this printer becomes very hot. But take care not to trap or injure your fingers. • Fire and breakdown can be very hot. • Do not...
.... Caution should be turned off and unplugged for cleaning the machine's interior. • Do not pull out the paper tray forcefully. Not allowing the printer to this printer becomes very hot. But take care not to trap or injure your fingers. • Fire and breakdown can be very hot. • Do not...

User Guide
Page 9
Do not touch parts which a label is put on. Be careful of hot parts when clearing paper jams. The inside of RWARNING and RCAUTION labels This machine has labels for RWARNING and RCAUTION at the positions shown below. Otherwise, an injury might occur. 9 Positions of this printer could be very hot. BEK205S High temperature. For safety, please follow the instructions and handle the machine as indicated.
Do not touch parts which a label is put on. Be careful of hot parts when clearing paper jams. The inside of RWARNING and RCAUTION labels This machine has labels for RWARNING and RCAUTION at the positions shown below. Otherwise, an injury might occur. 9 Positions of this printer could be very hot. BEK205S High temperature. For safety, please follow the instructions and handle the machine as indicated.

User Guide
Page 13
... open program in which manufacturers participate voluntarily. Targeted products are internationally uniform. ❖ Energy Saver mode This printer automatically lowers its power consumption 1 minute after the last operation has been completed. Energy Star standards and logos are computers, monitors..., printers, facsimiles, copiers, scanners, and multifunction devices. The program backs the development and dissemination of products that feature energy saving...
... open program in which manufacturers participate voluntarily. Targeted products are internationally uniform. ❖ Energy Saver mode This printer automatically lowers its power consumption 1 minute after the last operation has been completed. Energy Star standards and logos are computers, monitors..., printers, facsimiles, copiers, scanners, and multifunction devices. The program backs the development and dissemination of products that feature energy saving...

User Guide
Page 18
Copyright © 2008 Printed in place. 8. Holding the fusing unit by the handles, carefully push the fusing unit into the printer completely. 7. Carefully close the right cover. Lower the brown levers back in USA GB GB EN USA G179-7549 5. Turn toward you the pins that have a red tag, and then pull those pins out. 6.
Copyright © 2008 Printed in place. 8. Holding the fusing unit by the handles, carefully push the fusing unit into the printer completely. 7. Carefully close the right cover. Lower the brown levers back in USA GB GB EN USA G179-7549 5. Turn toward you the pins that have a red tag, and then pull those pins out. 6.
User Guide
Page 19
...front to verify the items that the following specification: • 120 V, 60 Hz, 12 A or more MLP150DN/SP 8200DN LP150dn/Aficio SP 8200DN Unpacking To protect it from the printer to a wall outlet and do not use the grips on the front or inner cover. Pull out the handle from...follows: BEK339S • White area: Permissible Range • Gray area: Recommended Range BEK258S BEK252S Push the paper tray carefully into the printer completely. Remove these protective materials after bringing the machine to read the Safety Information in "Safety Information" and do not use the ...
...front to verify the items that the following specification: • 120 V, 60 Hz, 12 A or more MLP150DN/SP 8200DN LP150dn/Aficio SP 8200DN Unpacking To protect it from the printer to a wall outlet and do not use the grips on the front or inner cover. Pull out the handle from...follows: BEK339S • White area: Permissible Range • Gray area: Recommended Range BEK258S BEK252S Push the paper tray carefully into the printer completely. Remove these protective materials after bringing the machine to read the Safety Information in "Safety Information" and do not use the ...
User Guide
Page 20
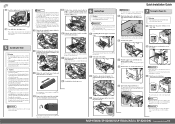
...between the paper and paper guides. BEK254S MLP150DN/SP 8200DN/LP150dn/Aficio SP 8200DN 1/2 Quick Installation Guide Turn the green handle counterclockwise until it clicks into place. Toner dust might ignite when exposed to " " Off. If your eyes, flush immediately with the printer. Hot water will set to an open flame... toner, wash the affected area thoroughly with an open , and install the toner as shown next. • The number of the printer. Doing so results in toner leak. The toner might fall and cause an injury. • To avoid paper jams, make removing the...
...between the paper and paper guides. BEK254S MLP150DN/SP 8200DN/LP150dn/Aficio SP 8200DN 1/2 Quick Installation Guide Turn the green handle counterclockwise until it clicks into place. Toner dust might ignite when exposed to " " Off. If your eyes, flush immediately with the printer. Hot water will set to an open flame... toner, wash the affected area thoroughly with an open , and install the toner as shown next. • The number of the printer. Doing so results in toner leak. The toner might fall and cause an injury. • To avoid paper jams, make removing the...
User Guide
Page 21
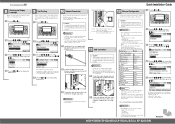
...AutoObtain (DHCP)], and then press the {OK} key. • If DHCP is in use . MLP150DN/SP 8200DN/LP150dn/Aficio SP 8200DN Next Sheet Network Connection Prepare a hub and other end of the printer. Caution • Properly shielded and grounded cables and connectors must be used for example using the control ... Mac OS X. Press the {▼} or {▲} key to the initial screen. Attach the ferrite core supplied with this printer at the printer end of the printer. The language is selected, you can also use . Press the {Menu} key to return to select the preferred language, ...
...AutoObtain (DHCP)], and then press the {OK} key. • If DHCP is in use . MLP150DN/SP 8200DN/LP150dn/Aficio SP 8200DN Next Sheet Network Connection Prepare a hub and other end of the printer. Caution • Properly shielded and grounded cables and connectors must be used for example using the control ... Mac OS X. Press the {▼} or {▲} key to the initial screen. Attach the ferrite core supplied with this printer at the printer end of the printer. The language is selected, you can also use . Press the {Menu} key to return to select the preferred language, ...
User Guide
Page 22
... the IP address from the CD-ROM labeled "Printer Drivers and Utilities". Quit all fields, press the {OK} key. Click [Quick Install]. Copyright © 2007 EN USA G179-7536 MLP150DN/SP 8200DN/LP150dn/Aficio SP 8200DN 2/2 Quick Installation Guide To assign these, press ...[Subnet M] or [Gateway]. A message about installing the printer drivers, see Software Guide. • To stop installation of NetWare 5/5.1, NetWare ...
... the IP address from the CD-ROM labeled "Printer Drivers and Utilities". Quit all fields, press the {OK} key. Click [Quick Install]. Copyright © 2007 EN USA G179-7536 MLP150DN/SP 8200DN/LP150dn/Aficio SP 8200DN 2/2 Quick Installation Guide To assign these, press ...[Subnet M] or [Gateway]. A message about installing the printer drivers, see Software Guide. • To stop installation of NetWare 5/5.1, NetWare ...

User Guide
Page 23
...unit. appears on the right side, and open the front cover. Do not turn off the printer and unplug the power cord. Maintenance Kit SP 8200 A Replacement Guide (this printer becomes very hot. or "Replace Maintenance Kit B." Wait until it stops. Disposal Bag BEK179S ...For packing the used development unit on the left and right side grips, carefully open the printer's right cover carefully. BEK037S...
...unit. appears on the right side, and open the front cover. Do not turn off the printer and unplug the power cord. Maintenance Kit SP 8200 A Replacement Guide (this printer becomes very hot. or "Replace Maintenance Kit B." Wait until it stops. Disposal Bag BEK179S ...For packing the used development unit on the left and right side grips, carefully open the printer's right cover carefully. BEK037S...

User Guide
Page 24
Maintenance Kit SP 8200 B Replacement Guide (this printer becomes very hot. Turn off before replacing Maintenance Kit B. Otherwise, ... • If you turn the pins with the shaft. BEK161S • Be careful not to an open the printer's right cover carefully. Take the new transfer unit out of the bag. This completes transfer unit replacement. After that... the new transfer unit was in place. Replacing the Fusing Unit Raise the brown levers on the printer. • The first time you attempt to install the transfer unit again. BEK180S Take the new fusing...
Maintenance Kit SP 8200 B Replacement Guide (this printer becomes very hot. Turn off before replacing Maintenance Kit B. Otherwise, ... • If you turn the pins with the shaft. BEK161S • Be careful not to an open the printer's right cover carefully. Take the new transfer unit out of the bag. This completes transfer unit replacement. After that... the new transfer unit was in place. Replacing the Fusing Unit Raise the brown levers on the printer. • The first time you attempt to install the transfer unit again. BEK180S Take the new fusing...

User Guide
Page 25
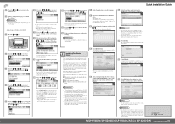
Operating Instructions Hardware Guide 1 Guide to read the Safety Information before you use , be sure to the Printer 2 Installing Options 3 Connecting the Printer Cables 4 Configuration 5 Paper and Other Media 6 Replacing Consumables 7 Cleaning the Printer 8 Adjusting the Printer 9 Troubleshooting 10 Removing Misfed Paper 11 Appendix Read this machine and keep it handy for future reference. For safe and correct use this manual carefully before using the machine.
Operating Instructions Hardware Guide 1 Guide to read the Safety Information before you use , be sure to the Printer 2 Installing Options 3 Connecting the Printer Cables 4 Configuration 5 Paper and Other Media 6 Replacing Consumables 7 Cleaning the Printer 8 Adjusting the Printer 9 Troubleshooting 10 Removing Misfed Paper 11 Appendix Read this machine and keep it handy for future reference. For safe and correct use this manual carefully before using the machine.

User Guide
Page 26
Keep this manual carefully before using the printer. For your safety and benefit, read this manual in a handy place for quick reference.For safe and correct use of this printer. Introduction This manual contains detailed instructions and notes on the operation and use , be sure to read the "Safety Information" before using the machine.
Keep this manual carefully before using the printer. For your safety and benefit, read this manual in a handy place for quick reference.For safe and correct use of this printer. Introduction This manual contains detailed instructions and notes on the operation and use , be sure to read the "Safety Information" before using the machine.
User Guide
Page 27
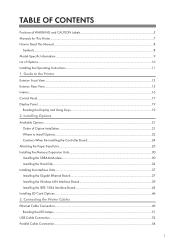
... to Read This Manual...8 Symbols...8 Model-Specific Information...9 List of Option Installation...21 Where to the Printer Exterior: Front View...13 Exterior: Rear View...15 Interior...16 Control Panel...17 Display Panel...19 Reading the Display and Using Keys...19... Board...37 Installing the Wireless LAN Interface Board 39 Installing the IEEE 1284 Interface Board 43 Installing SD Card Options...46 3. Connecting the Printer Cables Ethernet Cable Connection...49 Reading the LED Lamps...51 USB Cable Connection...52 Parallel Cable Connection...54 1 Installing Options Available Options...21 ...
... to Read This Manual...8 Symbols...8 Model-Specific Information...9 List of Option Installation...21 Where to the Printer Exterior: Front View...13 Exterior: Rear View...15 Interior...16 Control Panel...17 Display Panel...19 Reading the Display and Using Keys...19... Board...37 Installing the Wireless LAN Interface Board 39 Installing the IEEE 1284 Interface Board 43 Installing SD Card Options...46 3. Connecting the Printer Cables Ethernet Cable Connection...49 Reading the LED Lamps...51 USB Cable Connection...52 Parallel Cable Connection...54 1 Installing Options Available Options...21 ...

User Guide
Page 28
... Configuring WPA/WPA2...73 Installing a Site Certificate...73 Installing Device Certificate...74 Setting Items of Paper and Other Media...80 Paper Not Supported by This Printer...87 Print Area...87 Loading Paper...89 500-sheet Paper Feed Trays...89 2000-sheet Paper Feed Unit...97 1200-sheet Paper Feed Unit...99...
... Configuring WPA/WPA2...73 Installing a Site Certificate...73 Installing Device Certificate...74 Setting Items of Paper and Other Media...80 Paper Not Supported by This Printer...87 Print Area...87 Loading Paper...89 500-sheet Paper Feed Trays...89 2000-sheet Paper Feed Unit...97 1200-sheet Paper Feed Unit...99...
User Guide
Page 29
Cleaning the Printer Cautions When Cleaning...137 Cleaning the Friction Pads...138 500-sheet Paper Trays...138 2000-... Tray Finisher is Installed...173 10. Troubleshooting Error and Status Messages Appears on the Control Panel 151 Panel Tones...155 Printer Does Not Print...156 Checking the Port Connection...157 Printing Problems...159 Additional Troubleshooting...166 Removing Jammed Staples...168 When the... is Installed...170 Removing Punch Waste...173 When the 2 Tray Finisher is Installed...133 7. Adjusting the Printer Adjusting Image Density...145 Adjusting Printing Position...147 9.
Cleaning the Printer Cautions When Cleaning...137 Cleaning the Friction Pads...138 500-sheet Paper Trays...138 2000-... Tray Finisher is Installed...173 10. Troubleshooting Error and Status Messages Appears on the Control Panel 151 Panel Tones...155 Printer Does Not Print...156 Checking the Port Connection...157 Printing Problems...159 Additional Troubleshooting...166 Removing Jammed Staples...168 When the... is Installed...170 Removing Punch Waste...173 When the 2 Tray Finisher is Installed...133 7. Adjusting the Printer Adjusting Image Density...145 Adjusting Printing Position...147 9.
User Guide
Page 30
... Installed...186 Paper Misfeed Message (Y)...191 Paper Misfeed Message (Z)...192 Paper Misfeed Message (U)...194 Duplex Print Always Misfeeds...198 11. Appendix Moving and Transporting the Printer...201 Moving the Printer...201 Consumables...204 Toner...204 Maintenance Kit...204 Staple Cartridge...205 Specifications...206 Mainframe...206 Options...208 INDEX...219 4
... Installed...186 Paper Misfeed Message (Y)...191 Paper Misfeed Message (Z)...192 Paper Misfeed Message (U)...194 Duplex Print Always Misfeeds...198 11. Appendix Moving and Transporting the Printer...201 Moving the Printer...201 Consumables...204 Toner...204 Maintenance Kit...204 Staple Cartridge...205 Specifications...206 Mainframe...206 Options...208 INDEX...219 4


