Quick Guide
Page 2
... Scan Settings 21 4 Using the Fax Function • Initial Screen and Basic Operation for Sending a Fax 22 • Advanced Scan Settings 25 5 Troubleshooting • Error and Status Messages on the Screen 26 • Printing or Scanning Problems 30 • Fax Transmission Problems 31 6 Removing Paper Jams • Removing Internal/Tray 1/Tray 2 Jam 32 • Removing Bypass Tray Jam 34 • Removing Standard Tray/Duplex Unit Jam 36 • Removing from the ARDF or ADF 40 7 Print Cartridge • Before Replacing the Print Cartridge 44 • Replacing the Print...
... Scan Settings 21 4 Using the Fax Function • Initial Screen and Basic Operation for Sending a Fax 22 • Advanced Scan Settings 25 5 Troubleshooting • Error and Status Messages on the Screen 26 • Printing or Scanning Problems 30 • Fax Transmission Problems 31 6 Removing Paper Jams • Removing Internal/Tray 1/Tray 2 Jam 32 • Removing Bypass Tray Jam 34 • Removing Standard Tray/Duplex Unit Jam 36 • Removing from the ARDF or ADF 40 7 Print Cartridge • Before Replacing the Print Cartridge 44 • Replacing the Print...
Quick Guide
Page 3
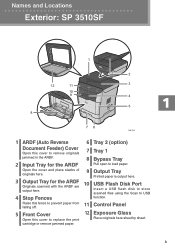
... 10 USB Flash Disk Port output here. Insert a USB flash disk to store scanned files using the Scan to load paper. Names and Locations Exterior: SP 3510SF 1 2 12 11 3 10 9 4 5 8 76 CMF352 1 ARDF (Auto Reverse 6 Tray 2 (option) Document Feeder) Cover Open this cover to replace the print cartridge or remove jammed paper. 12 Exposure Glass Place originals here sheet by sheet. 3 Open the cover and place stacks of originals here. 9 Output Tray Printed paper is output here. 3 Output Tray for the ARDF 7 Tray 1 8 Bypass Tray Pull open to USB 4 Stop Fences function.
... 10 USB Flash Disk Port output here. Insert a USB flash disk to store scanned files using the Scan to load paper. Names and Locations Exterior: SP 3510SF 1 2 12 11 3 10 9 4 5 8 76 CMF352 1 ARDF (Auto Reverse 6 Tray 2 (option) Document Feeder) Cover Open this cover to replace the print cartridge or remove jammed paper. 12 Exposure Glass Place originals here sheet by sheet. 3 Open the cover and place stacks of originals here. 9 Output Tray Printed paper is output here. 3 Output Tray for the ARDF 7 Tray 1 8 Bypass Tray Pull open to USB 4 Stop Fences function.

Quick Guide
Page 6
... a job: press to machine errors such as Lights up Use to 10 Fax Received indicator cancel temporary settings such as an empty paper tray or a paper jam. 6 turn to standby mode. • While in "Error 4 [Clear/Stop] key and Status Messages on the Screen" on page 23. • While the machine is to scan, copy, or send a fax. Flashes when the machine is on the screen and follow ters when specifying names. es due to cancel the current job. 9 Power indicator • While configuring...
... a job: press to machine errors such as Lights up Use to 10 Fax Received indicator cancel temporary settings such as an empty paper tray or a paper jam. 6 turn to standby mode. • While in "Error 4 [Clear/Stop] key and Status Messages on the Screen" on page 23. • While the machine is to scan, copy, or send a fax. Flashes when the machine is on the screen and follow ters when specifying names. es due to cancel the current job. 9 Power indicator • While configuring...
Quick Guide
Page 12
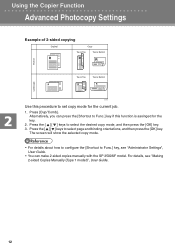
....] key, see "Making 2-sided Copies Manually (Type 1 model)", User Guide. 12 Press [Dup/Comb]. Press the [ ][ ] keys to select the desired copy mode, and then press the [OK] key. 3. The screen will show the selected copy mode. • For details about how to configure the [Shortcut to Func.] key if this procedure to set copy mode for the key. 2. Alternatively, you can make 2-sided copies manually with the SP 3500SF model. Using the Copier Function Advanced Photocopy Settings Example of 2-sided copying Original Copy Top...
....] key, see "Making 2-sided Copies Manually (Type 1 model)", User Guide. 12 Press [Dup/Comb]. Press the [ ][ ] keys to select the desired copy mode, and then press the [OK] key. 3. The screen will show the selected copy mode. • For details about how to configure the [Shortcut to Func.] key if this procedure to set copy mode for the key. 2. Alternatively, you can make 2-sided copies manually with the SP 3500SF model. Using the Copier Function Advanced Photocopy Settings Example of 2-sided copying Original Copy Top...

Quick Guide
Page 24
... page 32. 24 When in a fax number. For details, see "Removing Paper Jams" on a pulse-dialing line, insert " " in Memory Transmission mode, scan the entire originals again. • You can also specify destinations using the One Touch buttons, Speed Dial function, LDAP server, or [Pause/Redial] key. Repeat this case, re-enter the number within 60 seconds, the machine will start sending the fax. • To cancel sending a fax, press the [Facsimile] key, and then press the [Clear/Stop] key. • A fax number...
... page 32. 24 When in a fax number. For details, see "Removing Paper Jams" on a pulse-dialing line, insert " " in Memory Transmission mode, scan the entire originals again. • You can also specify destinations using the One Touch buttons, Speed Dial function, LDAP server, or [Pause/Redial] key. Repeat this case, re-enter the number within 60 seconds, the machine will start sending the fax. • To cancel sending a fax, press the [Facsimile] key, and then press the [Clear/Stop] key. • A fax number...

Quick Guide
Page 26
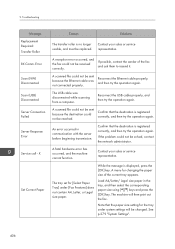
...Size The paper size set for scanning. See "Registering Scan Destinations", User Guide. Failed to Access File Press Clear key The Scan to the One Touch button. See "Placing Originals", User Guide. Dest. Use a USB flash disk that appear differently depending on the USB flash disk. Troubleshooting Error and Status Messages on the Screen "X" indicates the parts of the messages that is open A cover is not password- or write-protected. Cover open . Failed to Create File Press Clear key The Scan to cancel the job. Message (alphabetical order) Causes Solutions ADF...
...Size The paper size set for scanning. See "Registering Scan Destinations", User Guide. Failed to Access File Press Clear key The Scan to the One Touch button. See "Placing Originals", User Guide. Dest. Use a USB flash disk that appear differently depending on the USB flash disk. Troubleshooting Error and Status Messages on the Screen "X" indicates the parts of the messages that is open A cover is not password- or write-protected. Cover open . Failed to Create File Press Clear key The Scan to cancel the job. Message (alphabetical order) Causes Solutions ADF...
Quick Guide
Page 55
Turning the Power on...55 Initial Setup...58 Changing Operation Modes...59 Saving Energy...60 Multi-access...61 Connecting the Machine...66 Connecting with a Computer Using a USB Cable 66 Connecting with a Network Cable...66 Connecting to a Telephone Line...67 Configuring the Machine...70 Configuring the IPv4 Address Settings...70 Configuring the IPv6 Address Settings...72 Configuring the Ethernet Speed...75 Configuring Telephone Network Settings 76 Sharing the Printer on a Network...80 Installing Option...81 Installing the Paper Feed Unit (Tray 2)...81 Paper and Other Media...84 Supported ...
Turning the Power on...55 Initial Setup...58 Changing Operation Modes...59 Saving Energy...60 Multi-access...61 Connecting the Machine...66 Connecting with a Computer Using a USB Cable 66 Connecting with a Network Cable...66 Connecting to a Telephone Line...67 Configuring the Machine...70 Configuring the IPv4 Address Settings...70 Configuring the IPv6 Address Settings...72 Configuring the Ethernet Speed...75 Configuring Telephone Network Settings 76 Sharing the Printer on a Network...80 Installing Option...81 Installing the Paper Feed Unit (Tray 2)...81 Paper and Other Media...84 Supported ...
Quick Guide
Page 56
... Printers] Window 134 Accessing the Printer Properties from an Application 134 Basic Operation in Copier Mode...153 Canceling a Copy...155 Making Enlarged or Reduced Copies...156 Combining Pages and Making 2-sided Copies 158 Copying Both Sides of an ID Card onto One Side of Paper 167 Making 2-sided Copies Manually (Type 1 model 169 Specifying Scan Settings...170 3 Using the Copier Function The Screen in Copier Mode...151 Basic Operation in Printer Mode...136 If a Paper Mismatch Occurs...136 Canceling a Print Job...137 Printing Confidential Documents...139 Storing a Locked Print file...
... Printers] Window 134 Accessing the Printer Properties from an Application 134 Basic Operation in Copier Mode...153 Canceling a Copy...155 Making Enlarged or Reduced Copies...156 Combining Pages and Making 2-sided Copies 158 Copying Both Sides of an ID Card onto One Side of Paper 167 Making 2-sided Copies Manually (Type 1 model 169 Specifying Scan Settings...170 3 Using the Copier Function The Screen in Copier Mode...151 Basic Operation in Printer Mode...136 If a Paper Mismatch Occurs...136 Canceling a Print Job...137 Printing Confidential Documents...139 Storing a Locked Print file...
Quick Guide
Page 65
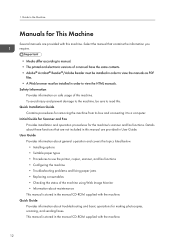
...general operation and covers the topics listed below. • Installing options • Suitable paper types • Procedures to use the printer, copier, scanner, and fax functions • Configuring the machine • Troubleshooting problems and fixing paper jams • Replacing consumables • Checking the status of this machine. Initial Guide for Scanner and Fax Provides installation and operation procedures for making photocopies, scanning, and sending faxes. Quick Guide Provides information about maintenance This manual is stored in order to view the manuals as PDF files...
...general operation and covers the topics listed below. • Installing options • Suitable paper types • Procedures to use the printer, copier, scanner, and fax functions • Configuring the machine • Troubleshooting problems and fixing paper jams • Replacing consumables • Checking the status of this machine. Initial Guide for Scanner and Fax Provides installation and operation procedures for making photocopies, scanning, and sending faxes. Quick Guide Provides information about maintenance This manual is stored in order to view the manuals as PDF files...
Quick Guide
Page 83
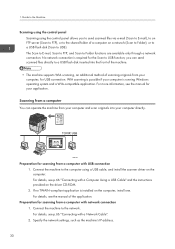
... can operate the machine from your computer and scan originals into the front of the machine. • The machine supports WIA scanning, an additional method of scanning originals from your computer directly. If no TWAIN-compliant application is required for USB connection. Connect the machine to USB). Guide to the Machine Scanning using the control panel Scanning using a USB cable, and install the scanner driver on a network (Scan to Folder), or to a USB flash disk (Scan to the network. Connect the machine to USB function; CMF007...
... can operate the machine from your computer and scan originals into the front of the machine. • The machine supports WIA scanning, an additional method of scanning originals from your computer directly. If no TWAIN-compliant application is required for USB connection. Connect the machine to USB). Guide to the Machine Scanning using the control panel Scanning using a USB cable, and install the scanner driver on a network (Scan to Folder), or to a USB flash disk (Scan to the network. Connect the machine to USB function; CMF007...

Quick Guide
Page 93
... the power switch is turned off the power (for example, prior to display the menu for the current job. • Copier mode: select Text, Photo, or Mixed. • Scanner mode: select the resolution. • Fax mode: select Standard, Detail, or Photo. 6. [User Tools] key Press to relocating the machine). CMF130 1. Guide to the Machine • The actual control panel may look different from the Address Book. 5. [Image Quality] key Press to select scan quality for configuring the machine's system settings...
... the power switch is turned off the power (for example, prior to display the menu for the current job. • Copier mode: select Text, Photo, or Mixed. • Scanner mode: select the resolution. • Fax mode: select Standard, Detail, or Photo. 6. [User Tools] key Press to relocating the machine). CMF130 1. Guide to the Machine • The actual control panel may look different from the Address Book. 5. [Image Quality] key Press to select scan quality for configuring the machine's system settings...
Quick Guide
Page 94
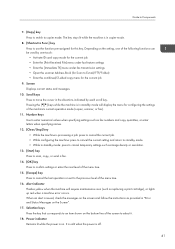
... copier mode. 8. [Shortcut to Func.] key Press to copier mode. It is unlit when the power is in "Error and Status Messages on the setting, one -touch: • Activate ID card copy mode for the current job • Enter the [Print Received File] menu under fax feature settings • Enter the [Immediate TX] menu under fax transmission settings • Open the scanner Address Book (for configuring the settings of the menu tree. 16. Alert indicator Flashes yellow when the machine will display the menu for Scan...
... copier mode. 8. [Shortcut to Func.] key Press to copier mode. It is unlit when the power is in "Error and Status Messages on the setting, one -touch: • Activate ID card copy mode for the current job • Enter the [Print Received File] menu under fax feature settings • Enter the [Immediate TX] menu under fax transmission settings • Open the scanner Address Book (for configuring the settings of the menu tree. 16. Alert indicator Flashes yellow when the machine will display the menu for Scan...

Quick Guide
Page 128
... "Turning the Power on the default setting, [Auto Select]. To use for Ethernet communications. auto- selection) Machine [100Mbps Half Duplex] - - [100Mbps Full Duplex] - - [Auto Select] - 75 Configuring the Ethernet Speed You can set the speed that the machine will use it, select [Auto Select]. In most cases, this should be established if the selected Ethernet speed does not match your network's transmission speed. • The use of this feature is activated, manually configured IPv6 address settings...
... "Turning the Power on the default setting, [Auto Select]. To use for Ethernet communications. auto- selection) Machine [100Mbps Half Duplex] - - [100Mbps Full Duplex] - - [Auto Select] - 75 Configuring the Ethernet Speed You can set the speed that the machine will use it, select [Auto Select]. In most cases, this should be established if the selected Ethernet speed does not match your network's transmission speed. • The use of this feature is activated, manually configured IPv6 address settings...

Quick Guide
Page 292
About... Restore Defaults Restores the settings to their factory defaults. • The settings configured here are applicable for a document with small print. • Photo Select this check box and enter a user code before sending a fax job to enable user authentication and enter a user name and password before sending a fax. 5. Displays the version of the LAN-Fax driver. 7. Orientation Specifies the page orientation. 3. User Code If sending faxes via LAN-Fax is specified, click this button to the machine. 6. Authentication If LDAP authentication is restricted, select...
About... Restore Defaults Restores the settings to their factory defaults. • The settings configured here are applicable for a document with small print. • Photo Select this check box and enter a user code before sending a fax job to enable user authentication and enter a user name and password before sending a fax. 5. Displays the version of the LAN-Fax driver. 7. Orientation Specifies the page orientation. 3. User Code If sending faxes via LAN-Fax is specified, click this button to the machine. 6. Authentication If LDAP authentication is restricted, select...
Quick Guide
Page 459
... Paper Tray] under system settings will then print out the fax. While the message is registered correctly, and then try the operation again. The machine will be replaced. See p.279 "System Settings". 406 An error occurred in the tray, and then select the corresponding paper size using [ ][ ] keys and press the [OK] key. Load A4/Letter/ Legal size paper in communication with the server before beginning transmission. Error Scan (NW) Disconnected Scan (USB) Disconnected Server Connection Failed Server Response Error Service call...
... Paper Tray] under system settings will then print out the fax. While the message is registered correctly, and then try the operation again. The machine will be replaced. See p.279 "System Settings". 406 An error occurred in the tray, and then select the corresponding paper size using [ ][ ] keys and press the [OK] key. Load A4/Letter/ Legal size paper in communication with the server before beginning transmission. Error Scan (NW) Disconnected Scan (USB) Disconnected Server Connection Failed Server Response Error Service call...

User Guide
Page 4
Turning the Power on...55 Initial Setup...58 Changing Operation Modes...59 Saving Energy...60 Multi-access...61 Connecting the Machine...66 Connecting with a Computer Using a USB Cable 66 Connecting with a Network Cable...66 Connecting to a Telephone Line...67 Configuring the Machine...70 Configuring the IPv4 Address Settings...70 Configuring the IPv6 Address Settings...72 Configuring the Ethernet Speed...75 Configuring Telephone Network Settings 76 Sharing the Printer on a Network...80 Installing Option...81 Installing the Paper Feed Unit (Tray 2)...81 Paper and Other Media...84 Supported ...
Turning the Power on...55 Initial Setup...58 Changing Operation Modes...59 Saving Energy...60 Multi-access...61 Connecting the Machine...66 Connecting with a Computer Using a USB Cable 66 Connecting with a Network Cable...66 Connecting to a Telephone Line...67 Configuring the Machine...70 Configuring the IPv4 Address Settings...70 Configuring the IPv6 Address Settings...72 Configuring the Ethernet Speed...75 Configuring Telephone Network Settings 76 Sharing the Printer on a Network...80 Installing Option...81 Installing the Paper Feed Unit (Tray 2)...81 Paper and Other Media...84 Supported ...

User Guide
Page 32
... Folder functions are available only through a network connection. For details, see the manual for scanning from a computer with USB connection 1. If no TWAIN-compliant application is running Windows operating system and a WIA-compatible application. CMF007 Preparation for your computer directly. Guide to the Machine Scanning using the control panel Scanning using a USB cable, and install the scanner driver on the driver CD-ROM. 2. The Scan to E-mail, Scan to FTP, and Scan to USB function; you to send scanned files via e-mail (Scan...
... Folder functions are available only through a network connection. For details, see the manual for scanning from a computer with USB connection 1. If no TWAIN-compliant application is running Windows operating system and a WIA-compatible application. CMF007 Preparation for your computer directly. Guide to the Machine Scanning using the control panel Scanning using a USB cable, and install the scanner driver on the driver CD-ROM. 2. The Scan to E-mail, Scan to FTP, and Scan to USB function; you to send scanned files via e-mail (Scan...

User Guide
Page 43
... machine is in standby mode will require maintenance soon (such as replacing a print cartridge), or lights up red when a machine error occurs. It is unlit when the power is on the setting, one -touch: • Activate ID card copy mode for the current job • Enter the [Print Received File] menu under fax feature settings • Enter the [Immediate TX] menu under fax transmission settings • Open the scanner Address Book (for this key. Scroll keys Press to use the function pre-assigned for Scan...
... machine is in standby mode will require maintenance soon (such as replacing a print cartridge), or lights up red when a machine error occurs. It is unlit when the power is on the setting, one -touch: • Activate ID card copy mode for the current job • Enter the [Print Received File] menu under fax feature settings • Enter the [Immediate TX] menu under fax transmission settings • Open the scanner Address Book (for this key. Scroll keys Press to use the function pre-assigned for Scan...

User Guide
Page 241
.... 4. Displays the version of the LAN-Fax driver. 7. Authentication If LDAP authentication is restricted, select this button to enable user authentication and enter a user name and password before sending a fax. 5. Restore Defaults Restores the settings to the machine. 6. Using the Fax Function from a Computer (LAN-Fax) 2. User Code If sending faxes via LAN-Fax is specified, click this check box and enter a user code before sending a fax job to their factory defaults. • The settings configured here are applicable for a document with small print. • Photo Select...
.... 4. Displays the version of the LAN-Fax driver. 7. Authentication If LDAP authentication is restricted, select this button to enable user authentication and enter a user name and password before sending a fax. 5. Restore Defaults Restores the settings to the machine. 6. Using the Fax Function from a Computer (LAN-Fax) 2. User Code If sending faxes via LAN-Fax is specified, click this check box and enter a user code before sending a fax job to their factory defaults. • The settings configured here are applicable for a document with small print. • Photo Select...

User Guide
Page 408
... correctly, and then try the operation again. X Set Correct Paper Causes Solutions The transfer roller is displayed, press the [OK] key. Load A4/Letter/ Legal size paper in communication with the server before beginning transmission. A fatal hardware error has occurred, and the machine cannot function. Troubleshooting Message Replacement Required: Transfer Roller RX Comm. If the problem could not be solved, contact the network administrator. A scanned file could not be sent because...
... correctly, and then try the operation again. X Set Correct Paper Causes Solutions The transfer roller is displayed, press the [OK] key. Load A4/Letter/ Legal size paper in communication with the server before beginning transmission. A fatal hardware error has occurred, and the machine cannot function. Troubleshooting Message Replacement Required: Transfer Roller RX Comm. If the problem could not be solved, contact the network administrator. A scanned file could not be sent because...


