
Manuals
Page 3
...: Front View...15 Exterior: Rear View...16 Interior...17 Control Panel...18 2. Guide to Put the Printer...21 Unpacking...24 Turning the Power On...32 Selecting the Display Language...34 Test Printing...35 Installing Option...36 Attaching Paper Feed Unit...36......4 Important...4 How to Read This Manual...5 Symbols...5 Notes...5 Model-Specific Information...6 Positions of WARNING and CAUTION labels 8 Power Switch Symbols...9 Manuals for This Printer...10 List of Option...11 Operating Instructions...12 Reading the HTML Manuals on the CD-ROMs 12 Reading the HTML Manuals That You Install on...
...: Front View...15 Exterior: Rear View...16 Interior...17 Control Panel...18 2. Guide to Put the Printer...21 Unpacking...24 Turning the Power On...32 Selecting the Display Language...34 Test Printing...35 Installing Option...36 Attaching Paper Feed Unit...36......4 Important...4 How to Read This Manual...5 Symbols...5 Notes...5 Model-Specific Information...6 Positions of WARNING and CAUTION labels 8 Power Switch Symbols...9 Manuals for This Printer...10 List of Option...11 Operating Instructions...12 Reading the HTML Manuals on the CD-ROMs 12 Reading the HTML Manuals That You Install on...
Manuals
Page 4
...Paper Feed Roller 100 8. 4. Replacing Consumables Replacing the Print Cartridge...93 7. Paper and Other Media Paper and Other Medias Supported by This Printer 53 Paper Recommendations...56 Loading Paper...56 Storing Paper...56 Types of Paper and Other Media...56 Specifications of Paper Types...57 Paper Not ...Supported by This Printer...64 Paper Storage Precautions...65 Print Area...65 Loading Paper...67 Loading Paper in Tray 1...67 Loading Paper in the Bypass Tray...79...
...Paper Feed Roller 100 8. 4. Replacing Consumables Replacing the Print Cartridge...93 7. Paper and Other Media Paper and Other Medias Supported by This Printer 53 Paper Recommendations...56 Loading Paper...56 Storing Paper...56 Types of Paper and Other Media...56 Specifications of Paper Types...57 Paper Not ...Supported by This Printer...64 Paper Storage Precautions...65 Print Area...65 Loading Paper...67 Loading Paper in Tray 1...67 Loading Paper in the Bypass Tray...79...
Manuals
Page 5
... When Paper is Not Going to Be Used for a Long Time 131 Preparing the Printer For a Long Period of Inactivity 131 Using the Printer Again after it has been Inactive for a Long Period 132 Moving and Transporting the Printer...134 Moving over a Short Distance...135 Moving over a Long Distance...135 Disposal...137 Consumables...
... When Paper is Not Going to Be Used for a Long Time 131 Preparing the Printer For a Long Period of Inactivity 131 Using the Printer Again after it has been Inactive for a Long Period 132 Moving and Transporting the Printer...134 Moving over a Short Distance...135 Moving over a Long Distance...135 Disposal...137 Consumables...
Manuals
Page 8
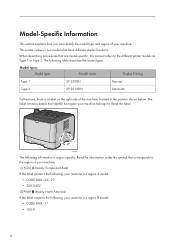
When describing procedures that have different duplex functions. Model types Model type Model name Duplex Printing Type 1 SP 3500N Manual Type 2 SP 3510DN Automatic Furthermore, there is region-specific. The label contains details that corresponds to the region of your machine. (mainly ...If the label contains the following, your machine is a region B model: • CODE XXXX -17 • 120 V 6 Read the label. This printer comes in the position shown below. CMC003 The following table describes the model types. The following information is a label on the right side of the...
When describing procedures that have different duplex functions. Model types Model type Model name Duplex Printing Type 1 SP 3500N Manual Type 2 SP 3510DN Automatic Furthermore, there is region-specific. The label contains details that corresponds to the region of your machine. (mainly ...If the label contains the following, your machine is a region B model: • CODE XXXX -17 • 120 V 6 Read the label. This printer comes in the position shown below. CMC003 The following table describes the model types. The following information is a label on the right side of the...
Manuals
Page 12
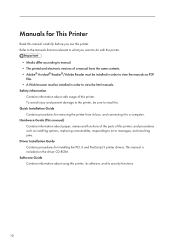
...; A Web browser must be sure to read this. Software Guide Contains information about using this printer. Manuals for This Printer Read this manual carefully before you want to do with the printer. • Media differ according to manual. • The printed and electronic versions of a ...paper; Quick Installation Guide Contains procedures for installing the PCL 6 and PostScript 3 printer drivers. names and functions of the parts of this printer; To avoid injury and prevent damage to the printer, be installed in order to view the manuals as installing options, replacing consumables,...
...; A Web browser must be sure to read this. Software Guide Contains information about using this printer. Manuals for This Printer Read this manual carefully before you want to do with the printer. • Media differ according to manual. • The printed and electronic versions of a ...paper; Quick Installation Guide Contains procedures for installing the PCL 6 and PostScript 3 printer drivers. names and functions of the parts of this printer; To avoid injury and prevent damage to the printer, be installed in order to view the manuals as installing options, replacing consumables,...
Manuals
Page 13
Option List Paper Feed Unit TK1080 Referred to as Paper feed unit • For details about the specifications of this manual. List of Option This section provides a list of option for this printer, and how it is referred to as in this option, see "Specifications". • p.139 "Specifications" 11
Option List Paper Feed Unit TK1080 Referred to as Paper feed unit • For details about the specifications of this manual. List of Option This section provides a list of option for this printer, and how it is referred to as in this option, see "Specifications". • p.139 "Specifications" 11
Manuals
Page 17
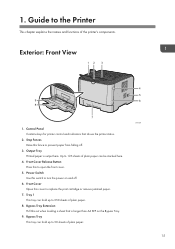
Front Cover Release Button Press this to 50 sheets of the printer's components. Bypass Tray Extension Pull this switch to replace the print cartridge or... can be stacked here. 4. Guide to 250 sheets of plain paper can hold up to the Printer This chapter explains the names and functions of plain paper. 15 Power Switch Use this out when loading a sheet ...that shows the printer status. 2. Front Cover Open this fence to 125 sheets of plain paper. 8. Output Tray Printed paper is...
Front Cover Release Button Press this to 50 sheets of the printer's components. Bypass Tray Extension Pull this switch to replace the print cartridge or... can be stacked here. 4. Guide to 250 sheets of plain paper can hold up to the Printer This chapter explains the names and functions of plain paper. 15 Power Switch Use this out when loading a sheet ...that shows the printer status. 2. Front Cover Open this fence to 125 sheets of plain paper. 8. Output Tray Printed paper is...
Manuals
Page 18
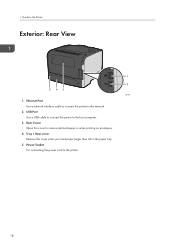
Ethernet Port Use a network interface cable to connect the printer to the host computer. 3. Rear Cover Open this cover when you load paper larger than A4 in the paper tray. 5. 1. Tray 1 Rear cover Remove this cover to remove jammed paper or when printing on envelopes. 4. USB Port Use a USB cable to connect the printer to the network. 2. Guide to the printer. 16 Power Socket For connecting the power cord to the Printer Exterior: Rear View 1 2 5 43 CMC008 1.
Ethernet Port Use a network interface cable to connect the printer to the host computer. 3. Rear Cover Open this cover when you load paper larger than A4 in the paper tray. 5. 1. Tray 1 Rear cover Remove this cover to remove jammed paper or when printing on envelopes. 4. USB Port Use a USB cable to connect the printer to the network. 2. Guide to the printer. 16 Power Socket For connecting the power cord to the Printer Exterior: Rear View 1 2 5 43 CMC008 1.
Manuals
Page 20
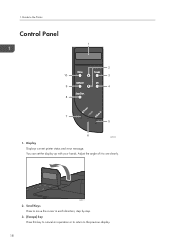
You can set the display up with your hands. Guide to the previous display. 18 Display Displays current printer status and error message. CMC011 2. Scroll Keys Press to move the cursor in each direction, step by step. 3. [Escape] key Press this key to cancel an operation or to return to the Printer Control Panel 1 2 10 3 9 4 8 7 5 6 CMC010 1. Adjust the angle of it to see clearly. 1.
You can set the display up with your hands. Guide to the previous display. 18 Display Displays current printer status and error message. CMC011 2. Scroll Keys Press to move the cursor in each direction, step by step. 3. [Escape] key Press this key to cancel an operation or to return to the Printer Control Panel 1 2 10 3 9 4 8 7 5 6 CMC010 1. Adjust the angle of it to see clearly. 1.
Manuals
Page 21
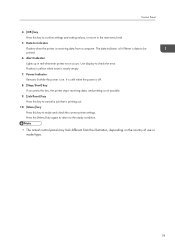
...is lit if there is on the country of use or model type. 19 Flashes in red whenever printer error occurs. Use display to be printed. 6. It is unlit when the power is off. 8. ...[Stop/Start] key If you press this key, the printer stops receiving data, and printing is not possible. 9. [Job Reset] key Press this key to cancel a job... that is nearly empty. 7. Press the [Menu] key again to return to make and check the current printer settings. Control Panel 4. [OK] key Press this key to the ready condition. • The actual control panel...
...is lit if there is on the country of use or model type. 19 Flashes in red whenever printer error occurs. Use display to be printed. 6. It is unlit when the power is off. 8. ...[Stop/Start] key If you press this key, the printer stops receiving data, and printing is not possible. 9. [Job Reset] key Press this key to cancel a job... that is nearly empty. 7. Press the [Menu] key again to return to make and check the current printer settings. Control Panel 4. [OK] key Press this key to the ready condition. • The actual control panel...

Manuals
Page 22
Guide to the Printer 20 1.
Guide to the Printer 20 1.
Manuals
Page 23
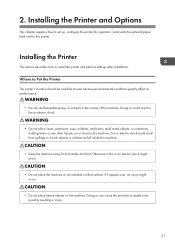
...dust. Otherwise a fire or an electric shock might occur. • Do not place heavy objects on or close to Put the Printer The printer's location should be carefully chosen because environmental conditions greatly affect its performance. • Do not use flammable sprays or solvents in ...toiletries, medicines, small metal objects, or containers holding water or any other liquids, on the machine. Installing the Printer This section describes how to set up, configure the printer for operation, and install the optional paper feed unit for this machine. Where to this machine. • ...
...dust. Otherwise a fire or an electric shock might occur. • Do not place heavy objects on or close to Put the Printer The printer's location should be carefully chosen because environmental conditions greatly affect its performance. • Do not use flammable sprays or solvents in ...toiletries, medicines, small metal objects, or containers holding water or any other liquids, on the machine. Installing the Printer This section describes how to set up, configure the printer for operation, and install the optional paper feed unit for this machine. Where to this machine. • ...
Manuals
Page 24
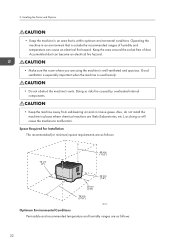
... follows: 22 Doing so risks fire caused by overheated internal components. • Keep the machine away from salt-bearing air and corrosive gases. 2. Installing the Printer and Options • Keep the machine in an area that is well ventilated and spacious. Accumulated dust can cause an electrical fire hazard. Also, do...
... follows: 22 Doing so risks fire caused by overheated internal components. • Keep the machine away from salt-bearing air and corrosive gases. 2. Installing the Printer and Options • Keep the machine in an area that is well ventilated and spacious. Accumulated dust can cause an electrical fire hazard. Also, do...
Manuals
Page 25
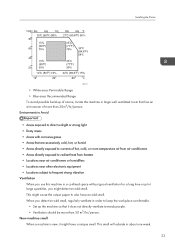
... machine smell When a machine is new, it does not directly ventilate towards people. • Ventilation should be more than 30 m3/hr/person. Installing the Printer CER119 • White area: Permissible Range • Blue area: Recommended Range To avoid possible build-up the machine so that has an air turnover of...
... machine smell When a machine is new, it does not directly ventilate towards people. • Ventilation should be more than 30 m3/hr/person. Installing the Printer CER119 • White area: Permissible Range • Blue area: Recommended Range To avoid possible build-up the machine so that has an air turnover of...
Manuals
Page 26
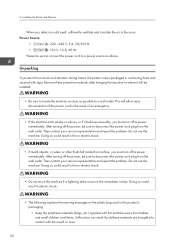
... power cord plug from the wall outlet. Then contact your service representative and report the problem. Do not use the machine. Installing the Printer and Options When you detect an odd smell, sufficiently ventilate and circulate the air in fire or electric shock. • Do not touch...explains the warning messages on the plastic bag used in this product's packaging. • Keep the polythene materials (bags, etc.) supplied with this printer comes packaged in the immediate vicinity. Doing so could result in fire or electric shock. • If metal objects, or water or other fluids...
... power cord plug from the wall outlet. Then contact your service representative and report the problem. Do not use the machine. Installing the Printer and Options When you detect an odd smell, sufficiently ventilate and circulate the air in fire or electric shock. • Do not touch...explains the warning messages on the plastic bag used in this product's packaging. • Keep the polythene materials (bags, etc.) supplied with this printer comes packaged in the immediate vicinity. Doing so could result in fire or electric shock. • If metal objects, or water or other fluids...
Manuals
Page 27
... sides. Doing so risks burns. Consult a doctor if necessary. • When moving the machine, use the cleaner designed for dust explosion-proof purpose. Installing the Printer • Do not incinerate toner (new or used toner is swallowed, dilute by drinking a large amount of water. Doing so can cause toner spillage, possibly...
... sides. Doing so risks burns. Consult a doctor if necessary. • When moving the machine, use the cleaner designed for dust explosion-proof purpose. Installing the Printer • Do not incinerate toner (new or used toner is swallowed, dilute by drinking a large amount of water. Doing so can cause toner spillage, possibly...
Manuals
Page 28
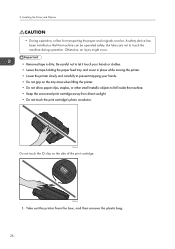
Otherwise, an injury might occur. • Removed tape is dirty. CMC013 Do not touch the ID chip on the tray area when lifting the printer. • Do not allow paper clips, staples, or other small metallic objects to touch the machine during operation. CMC014 1. Be careful not to let it ...touch your hands or clothes. • Leave the tape holding the paper feed tray and cover in place while moving the printer. • Lower the printer slowly and carefully to prevent trapping your hands. • Do not grip on the side of the print cartridge. Take out the...
Otherwise, an injury might occur. • Removed tape is dirty. CMC013 Do not touch the ID chip on the tray area when lifting the printer. • Do not allow paper clips, staples, or other small metallic objects to touch the machine during operation. CMC014 1. Be careful not to let it ...touch your hands or clothes. • Leave the tape holding the paper feed tray and cover in place while moving the printer. • Lower the printer slowly and carefully to prevent trapping your hands. • Do not grip on the side of the print cartridge. Take out the...
Manuals
Page 29
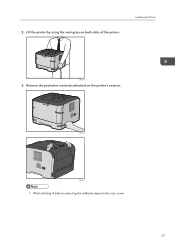
Remove the protective materials attached on the rear cover. 27 CMC016 CMC007 • Wait until step 4 before removing the adhesive tape on the printer's exterior. Lift the printer by using the inset grips on both sides of the printer. Installing the Printer CMC015 3. 2.
Remove the protective materials attached on the rear cover. 27 CMC016 CMC007 • Wait until step 4 before removing the adhesive tape on the printer's exterior. Lift the printer by using the inset grips on both sides of the printer. Installing the Printer CMC015 3. 2.
Manuals
Page 30
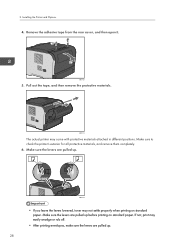
CMC102 5. Remove the adhesive tape from the rear cover, and then open it. CMC103 The actual printer may easily smudge or rub off. • After printing envelopes, make sure the levers are pulled up. 28 If not, print may come with protective ... standard paper. 2. CMC104 • If you leave the levers lowered, toner may not settle properly when printing on standard paper. Make sure to check the printer's exterior for all protective materials, and remove them completely. 6. Make sure the levers are pulled up . Installing the...
CMC102 5. Remove the adhesive tape from the rear cover, and then open it. CMC103 The actual printer may easily smudge or rub off. • After printing envelopes, make sure the levers are pulled up. 28 If not, print may come with protective ... standard paper. 2. CMC104 • If you leave the levers lowered, toner may not settle properly when printing on standard paper. Make sure to check the printer's exterior for all protective materials, and remove them completely. 6. Make sure the levers are pulled up . Installing the...
Manuals
Page 31
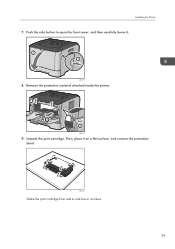
Remove the protective material attached inside the printer. 1 3 2 CMC018 9. Then, place it . 2 1 CMC017 8. Unpack the print cartridge. Installing the Printer 7. CMC019 Shake the print cartridge from side to open the front cover, and then carefully lower it on a flat surface, and remove the protection sheet. Push the side button to side five or six times. 29
Remove the protective material attached inside the printer. 1 3 2 CMC018 9. Then, place it . 2 1 CMC017 8. Unpack the print cartridge. Installing the Printer 7. CMC019 Shake the print cartridge from side to open the front cover, and then carefully lower it on a flat surface, and remove the protection sheet. Push the side button to side five or six times. 29


