
User Guide
Page 3
... 34 Checking the power source...37 Checking the Computer to be Connected 38 Checking the Supplied Items and Unpacking the Machine 39 Installing the Print Cartridges...41 Plugging in the Power Cord and Turning the Power On 43 1
... 34 Checking the power source...37 Checking the Computer to be Connected 38 Checking the Supplied Items and Unpacking the Machine 39 Installing the Print Cartridges...41 Plugging in the Power Cord and Turning the Power On 43 1
User Guide
Page 7
Maintenance Restricting Machine Functions...179 Locking the Keys...179 Unlocking the Keys...179 Replacing a Print Cartridge...180 Checking the Remaining Ink...180 Replacing a Print Cartridge...181 Handling Print Cartridges...183 Replacing an Ink Collector Unit...186 Checking the Waste Ink Level...186 Replacing an Ink Collector Unit...187 Cleaning...191 Cleaning the Power Cable...
Maintenance Restricting Machine Functions...179 Locking the Keys...179 Unlocking the Keys...179 Replacing a Print Cartridge...180 Checking the Remaining Ink...180 Replacing a Print Cartridge...181 Handling Print Cartridges...183 Replacing an Ink Collector Unit...186 Checking the Waste Ink Level...186 Replacing an Ink Collector Unit...187 Cleaning...191 Cleaning the Power Cable...
User Guide
Page 9
... Drivers...266 7 Paper Size Mismatch/Paper Type Mismatch (Auto Tray Select 242 Cover Open...242 Cover Open / Print Cartridge(s) Not Detected 244 Duplex Unit Not Detected...246 Cartridge Almost Empty...246 Cartridge Empty...246 Used Cartridge...247 Ink Collector Unit Not Detected...247 Ink Collector Unit Almost Full...248 Ink Collector Unit Full...249...
... Drivers...266 7 Paper Size Mismatch/Paper Type Mismatch (Auto Tray Select 242 Cover Open...242 Cover Open / Print Cartridge(s) Not Detected 244 Duplex Unit Not Detected...246 Cartridge Almost Empty...246 Cartridge Empty...246 Used Cartridge...247 Ink Collector Unit Not Detected...247 Ink Collector Unit Almost Full...248 Ink Collector Unit Full...249...

User Guide
Page 14
... these limits may fill up to let paper clips and other foreign objects fall , they fall inside the machine. • After you install the print cartridge and turn the machine on your sales or service representative as early as that it . • When not using the machine, turn off the power...
... these limits may fill up to let paper clips and other foreign objects fall , they fall inside the machine. • After you install the print cartridge and turn the machine on your sales or service representative as early as that it . • When not using the machine, turn off the power...

User Guide
Page 15
... the print head to clog the following day. It may be used even if you print all-black text or if you use genuine print cartridges and supplies. • Single-sided copies are done to maintain machine performance. • If the machine will not be used for maintenance usage. •... it is powered. Make sure the machine is idle before their expiry date, ideally within six months of being removed from their packaging. • Cartridges that are no longer usable for printing reserve a small quantity of inactivity, we recommend you specify black and white printing. Even when it is off...
... the print head to clog the following day. It may be used even if you print all-black text or if you use genuine print cartridges and supplies. • Single-sided copies are done to maintain machine performance. • If the machine will not be used for maintenance usage. •... it is powered. Make sure the machine is idle before their expiry date, ideally within six months of being removed from their packaging. • Cartridges that are no longer usable for printing reserve a small quantity of inactivity, we recommend you specify black and white printing. Even when it is off...
User Guide
Page 19
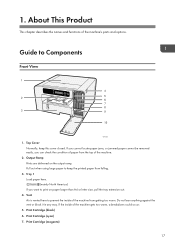
... printed paper from the top of the machine's parts and options. Pull out when using large paper to print on the output ramp. Print Cartridge (cyan) 7. About This Product This chapter describes the names and functions of the machine. 2. Output Ramp Prints are delivered on paper larger... than A4 or letter size, pull the tray extension out. 4. Print Cartridge (black) 6. 1. Print Cartridge (magenta) 17 If you cannot locate paper jams, or jammed paper cannot be removed easily, you want to keep this cover closed.
... printed paper from the top of the machine's parts and options. Pull out when using large paper to print on the output ramp. Print Cartridge (cyan) 7. About This Product This chapter describes the names and functions of the machine. 2. Output Ramp Prints are delivered on paper larger... than A4 or letter size, pull the tray extension out. 4. Print Cartridge (black) 6. 1. Print Cartridge (magenta) 17 If you cannot locate paper jams, or jammed paper cannot be removed easily, you want to keep this cover closed.

User Guide
Page 20
Rear cover Open this to install or replace the print cartridge or the ink collector unit. Rear View 1 CHU061 2 CHU065 1. 1. Print Cartridge (yellow) 9. Open this cover closed. Ink Collector Unit 10. About This Product 8. Right Front Cover Normally, keep this cover only when you need to clear paper jams inside the machine. 18 Duplex Unit Turns the paper over when performing duplex printing. 2.
Rear cover Open this to install or replace the print cartridge or the ink collector unit. Rear View 1 CHU061 2 CHU065 1. 1. Print Cartridge (yellow) 9. Open this cover closed. Ink Collector Unit 10. About This Product 8. Right Front Cover Normally, keep this cover only when you need to clear paper jams inside the machine. 18 Duplex Unit Turns the paper over when performing duplex printing. 2.
User Guide
Page 26
...level display. 10. [Form Feed] key You can use this key to force it is a paper jam, press this key according to a print cartridge. About This Product 8. Cartridge replacement indicator Each color corresponds to the displayed error message and remove the jammed paper. K, C, M, and Y indicate black, cyan, magenta, and... If there is time to perform head cleaning for all colors. 24 Waste ink full indicator The amount of paper loaded in each print cartridge is indicated on the six-level display. If a print job using the PCL driver does not start, press this to force the machine...
...level display. 10. [Form Feed] key You can use this key to force it is a paper jam, press this key according to a print cartridge. About This Product 8. Cartridge replacement indicator Each color corresponds to the displayed error message and remove the jammed paper. K, C, M, and Y indicate black, cyan, magenta, and... If there is time to perform head cleaning for all colors. 24 Waste ink full indicator The amount of paper loaded in each print cartridge is indicated on the six-level display. If a print job using the PCL driver does not start, press this to force the machine...
User Guide
Page 35
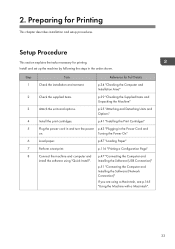
p.25 "Attaching and Detaching Units and Options" 4 Install the print cartridges. Step Task Reference for Printing This chapter describes installation and setup procedures. p.87 "Loading Paper" 7 Perform a test print. p.116 "Printing a Configuration Page" 8 ... and p.47 "Connecting the Computer and install the software using a Macintosh, see p.165 "Using the Machine with a Macintosh". 33 p.41 "Installing the Print Cartridges" 5 Plug the power cord in and turn the power p.43 "Plugging in the order shown. p.34 "Checking the Computer and Installation Area" 2 Check the...
p.25 "Attaching and Detaching Units and Options" 4 Install the print cartridges. Step Task Reference for Printing This chapter describes installation and setup procedures. p.87 "Loading Paper" 7 Perform a test print. p.116 "Printing a Configuration Page" 8 ... and p.47 "Connecting the Computer and install the software using a Macintosh, see p.165 "Using the Machine with a Macintosh". 33 p.41 "Installing the Print Cartridges" 5 Plug the power cord in and turn the power p.43 "Plugging in the order shown. p.34 "Checking the Computer and Installation Area" 2 Check the...
User Guide
Page 38
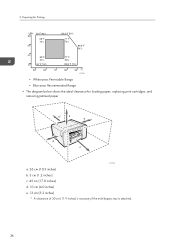
2. Preparing for Printing CFT066 • White area: Permissible Range • Blue area: Recommended Range • The diagram below shows the ideal clearance for loading paper, replacing print cartridges, and removing jammed paper e* a b d c CHU108 a. 26 cm (10.3 inches) b. 3 cm (1.2 inches) c. 45 cm (17.8 inches) d. 10 cm (4.0 inches) e. 13 cm (5.2 inches) * A clearance of 30 cm (11.9 inches) is necessary if the multi bypass tray is attached. 36
2. Preparing for Printing CFT066 • White area: Permissible Range • Blue area: Recommended Range • The diagram below shows the ideal clearance for loading paper, replacing print cartridges, and removing jammed paper e* a b d c CHU108 a. 26 cm (10.3 inches) b. 3 cm (1.2 inches) c. 45 cm (17.8 inches) d. 10 cm (4.0 inches) e. 13 cm (5.2 inches) * A clearance of 30 cm (11.9 inches) is necessary if the multi bypass tray is attached. 36

User Guide
Page 41
... Unpacking the Machine Checking the Supplied Items and Unpacking the Machine • The following items are present: • Power Cord • Starter cartridge - Magenta • Starter cartridge - Cyan • Starter cartridge - Black • Quick Installation Guide • Safety information 39 Suffocation can result in this machine away from babies and small children at... machine's sides. CHU042 Open the box and take out all supplied items. Check that all times. Lift it slowly and do so. Yellow • Starter cartridge -
... Unpacking the Machine Checking the Supplied Items and Unpacking the Machine • The following items are present: • Power Cord • Starter cartridge - Magenta • Starter cartridge - Cyan • Starter cartridge - Black • Quick Installation Guide • Safety information 39 Suffocation can result in this machine away from babies and small children at... machine's sides. CHU042 Open the box and take out all supplied items. Check that all times. Lift it slowly and do so. Yellow • Starter cartridge -

User Guide
Page 43
...not touch the ink supply ports or silicon substrates of children. • If ink gets into contact with your clothing. Installing any other cartridge could result in incomplete ink filling and malfunction. 1. Consult a doctor immediately. • When removing jammed paper or replacing ink, avoid... getting ink on until you have read how to install the unused print cartridge that is ingested, induce vomiting by drinking a strong saline solution. If ink comes into contact with eyes, wash eyes immediately with running ...
...not touch the ink supply ports or silicon substrates of children. • If ink gets into contact with your clothing. Installing any other cartridge could result in incomplete ink filling and malfunction. 1. Consult a doctor immediately. • When removing jammed paper or replacing ink, avoid... getting ink on until you have read how to install the unused print cartridge that is ingested, induce vomiting by drinking a strong saline solution. If ink comes into contact with eyes, wash eyes immediately with running ...
User Guide
Page 44
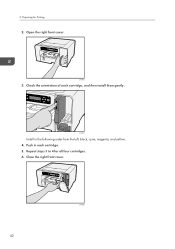
Open the right front cover. 2. Repeat steps 3 to 4 for Printing 2. Close the right front cover. 42 CHU038 Check the orientation of each cartridge. 5. CHU034 3. CHU037 Install in each cartridge, and then install them gently. Push in the following order from the left: black, cyan, magenta, and yellow. 4. Preparing for all four cartridges. 6.
Open the right front cover. 2. Repeat steps 3 to 4 for Printing 2. Close the right front cover. 42 CHU038 Check the orientation of each cartridge. 5. CHU034 3. CHU037 Install in each cartridge, and then install them gently. Push in the following order from the left: black, cyan, magenta, and yellow. 4. Preparing for all four cartridges. 6.
User Guide
Page 46
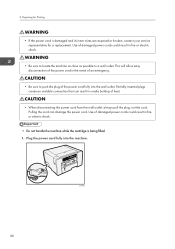
... as possible to push the plug of damaged power cords could result in fire or electric shock. • Do not handle the machine while the cartridge is damaged and its inner wires are exposed or broken, contact your service representative for Printing • If the power cord is being filled. 1. Preparing...
... as possible to push the plug of damaged power cords could result in fire or electric shock. • Do not handle the machine while the cartridge is damaged and its inner wires are exposed or broken, contact your service representative for Printing • If the power cord is being filled. 1. Preparing...
User Guide
Page 122
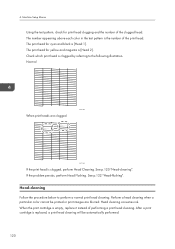
... p.120 "Head-cleaning". See p.122 "Head-flushing". The print head for print head clogging and the number of the clogged head. After a print cartridge is replaced, a print head cleaning will be printed or print images are clogged CFT169 If the print head is [Head 2]. Check which print head is... [Head 1]. When the print cartridge is the number of performing a print head cleaning. 4. The number appearing above each color in the test pattern is empty, replace it instead of...
... p.120 "Head-cleaning". See p.122 "Head-flushing". The print head for print head clogging and the number of the clogged head. After a print cartridge is replaced, a print head cleaning will be printed or print images are clogged CFT169 If the print head is [Head 2]. Check which print head is... [Head 1]. When the print cartridge is the number of performing a print head cleaning. 4. The number appearing above each color in the test pattern is empty, replace it instead of...

User Guide
Page 124
4. Press the [#Enter] key. After a print cartridge is replaced, a print head cleaning will be cleaned properly by head cleaning. If the machine is empty, replace it only if the print head cannot ...], and then press the [#Enter] key. Press the [ /Menu] key. 2. Maintenance: Head-flushing 122 Press the [ ] or [ /Menu] key to clean heads 2. When the print cartridge is turned off during print head cleaning, start again from the beginning. 1. Machine Setup Menus 1. CHU254 The following message appears: Press # to display [Maintenance], and...
4. Press the [#Enter] key. After a print cartridge is replaced, a print head cleaning will be cleaned properly by head cleaning. If the machine is empty, replace it only if the print head cannot ...], and then press the [#Enter] key. Press the [ /Menu] key. 2. Maintenance: Head-flushing 122 Press the [ ] or [ /Menu] key to clean heads 2. When the print cartridge is turned off during print head cleaning, start again from the beginning. 1. Machine Setup Menus 1. CHU254 The following message appears: Press # to display [Maintenance], and...

User Guide
Page 149
... Monitor Using the Status Monitor, you can cancel printing from the Status Monitor". • To check the amount of remaining ink, see p.180 "Replacing a Print Cartridge". • To check the amount of waste ink, see p.186 "Replacing an Ink Collector Unit". • To check the error messages on the Status Monitor...
... Monitor Using the Status Monitor, you can cancel printing from the Status Monitor". • To check the amount of remaining ink, see p.180 "Replacing a Print Cartridge". • To check the amount of waste ink, see p.186 "Replacing an Ink Collector Unit". • To check the error messages on the Status Monitor...

User Guide
Page 168
... settings See p.138 "Using the [Host Interface] Menu". Specifying the machine's settings using a Web browser See p.148 "Using Web Image Monitor". Replacing a print cartridge See p.180 "Replacing a Print Cartridge". Cleaning See p.191 "Cleaning". 166 Specifying the paper settings See p.114 "Using the [Paper Input] Menu". Checking the number of printed pages See...
... settings See p.138 "Using the [Host Interface] Menu". Specifying the machine's settings using a Web browser See p.148 "Using Web Image Monitor". Replacing a print cartridge See p.180 "Replacing a Print Cartridge". Cleaning See p.191 "Cleaning". 166 Specifying the paper settings See p.114 "Using the [Paper Input] Menu". Checking the number of printed pages See...

User Guide
Page 182
...the Display You can be used to check when to replace print cartridges using the Status Monitor or the cartridge replacement indicators. Make sure you have a new print cartridge for the color indicated by the icon. Replace the print cartridge for the color indicated by the or icon. K, C, M,...Cover / Replace Ink Crtg" appears on the Status Monitor The cartridge status can check the remaining ink level by looking at the icon that appears above the cartridge replacement indicator. Maintenance Replacing a Print Cartridge Checking the Remaining Ink Follow the procedure below to check when ...
...the Display You can be used to check when to replace print cartridges using the Status Monitor or the cartridge replacement indicators. Make sure you have a new print cartridge for the color indicated by the icon. Replace the print cartridge for the color indicated by the or icon. K, C, M,...Cover / Replace Ink Crtg" appears on the Status Monitor The cartridge status can check the remaining ink level by looking at the icon that appears above the cartridge replacement indicator. Maintenance Replacing a Print Cartridge Checking the Remaining Ink Follow the procedure below to check when ...

User Guide
Page 183
... To do this, open the printer driver dialog box, click [Status Monitor Settings] on the [Maintenance] tab, and then select the [Notify cartridge replacement] check box. • Be sure to detect the amount of children. • If ink gets into contact with eyes, wash eyes ..., Status Monitor might not be able to insert the print cartridges correctly. Click [Display Status Monitor]. 4. Check the cartridge status. • You can specify that is remaining in the cartridges. Click the [Maintenance] tab. 3. Replacing a Print Cartridge Clear any errors, such as when there is a paper ...
... To do this, open the printer driver dialog box, click [Status Monitor Settings] on the [Maintenance] tab, and then select the [Notify cartridge replacement] check box. • Be sure to detect the amount of children. • If ink gets into contact with eyes, wash eyes ..., Status Monitor might not be able to insert the print cartridges correctly. Click [Display Status Monitor]. 4. Check the cartridge status. • You can specify that is remaining in the cartridges. Click the [Maintenance] tab. 3. Replacing a Print Cartridge Clear any errors, such as when there is a paper ...

