Troubleshooting Guide
Page 1
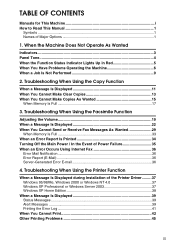
For safe and correct use this machine and keep it handy for future reference. Operating Instructions Troubleshooting 1 When the Machine Does Not Operate As Wanted 2 Troubleshooting When Using the Copy Function 3 Troubleshooting When Using the Facsimile Function 4 Troubleshooting When Using the Printer Function 5 Troubleshooting When Using the Scanner Function 6 Adding Paper and Replacing Toner 7 Clearing Misfeeds 8 Remarks Read this manual carefully before you use , be sure to read the Safety Information in "About This Machine" before using the machine.
For safe and correct use this machine and keep it handy for future reference. Operating Instructions Troubleshooting 1 When the Machine Does Not Operate As Wanted 2 Troubleshooting When Using the Copy Function 3 Troubleshooting When Using the Facsimile Function 4 Troubleshooting When Using the Printer Function 5 Troubleshooting When Using the Scanner Function 6 Adding Paper and Replacing Toner 7 Clearing Misfeeds 8 Remarks Read this manual carefully before you use , be sure to read the Safety Information in "About This Machine" before using the machine.
Troubleshooting Guide
Page 2
...Power Connection". For good copy quality, the supplier recommends that might be responsible for quick reference. Notes: Some illustrations in this manual carefully before reading this machine. For details, please contact your local dealer. For your office products. For details, please contact ... the machine. For details about power source, see "Machine Types", About This Machine.) • Type 1: MP 1600/Aficio MP 1600/IS 2316 • Type 2: MP 2000/Aficio MP 2000/IS 2320 Certain types might not be sure to connect the power cord to the metric version. Power ...
...Power Connection". For good copy quality, the supplier recommends that might be responsible for quick reference. Notes: Some illustrations in this manual carefully before reading this machine. For details, please contact your local dealer. For your office products. For details, please contact ... the machine. For details about power source, see "Machine Types", About This Machine.) • Type 1: MP 1600/Aficio MP 1600/IS 2316 • Type 2: MP 2000/Aficio MP 2000/IS 2320 Certain types might not be sure to connect the power cord to the metric version. Power ...
Troubleshooting Guide
Page 3
...settings, and Address Book procedures such as setting user and administrator authentication. ❖ Copy Reference Explains Copier functions and operations. Also refer to this manual before using the machine, how to enter text, and how to the functions of the machine. It explains security functions that are in, there... may also be installed. ❖ About This Machine Be sure to read the Safety Information in order to view the manuals as PDF files. ❒ Depending on which country you are relevant to what you want to do with , or prevent the machine from ...
...settings, and Address Book procedures such as setting user and administrator authentication. ❖ Copy Reference Explains Copier functions and operations. Also refer to this manual before using the machine, how to enter text, and how to the functions of the machine. It explains security functions that are in, there... may also be installed. ❖ About This Machine Be sure to read the Safety Information in order to view the manuals as PDF files. ❒ Depending on which country you are relevant to what you want to do with , or prevent the machine from ...

Troubleshooting Guide
Page 4
...machine. ii Images, illustrations, and information about operating systems that are supported might also differ slightly from those of this machine. ❖ Other manuals • Quick Reference Copy Guide • Quick Reference Fax Guide • Quick Reference Printer Guide • Quick Reference Scanner Guide •... Lite • DeskTopBinder Lite Setup Guide • DeskTopBinder Introduction Guide • Auto Document Link Guide Note ❒ Manuals provided are specific to configure and operate the machine in a network environment, and use the software provided. ❖ Network...
...machine. ii Images, illustrations, and information about operating systems that are supported might also differ slightly from those of this machine. ❖ Other manuals • Quick Reference Copy Guide • Quick Reference Fax Guide • Quick Reference Printer Guide • Quick Reference Scanner Guide •... Lite • DeskTopBinder Lite Setup Guide • DeskTopBinder Introduction Guide • Auto Document Link Guide Note ❒ Manuals provided are specific to configure and operate the machine in a network environment, and use the software provided. ❖ Network...
Troubleshooting Guide
Page 5
... Memory Is Full 17 3. Troubleshooting When Using the Printer Function When a Message Is Displayed during Installation of Major Options 1 1. TABLE OF CONTENTS Manuals for This Machine i How to Read This Manual 1 Symbols ...1 Names of the Printer Driver .........37 Windows 95/98/Me, Windows 2000 or Windows NT 4.0 37 Windows XP Professional or...
... Memory Is Full 17 3. Troubleshooting When Using the Printer Function When a Message Is Displayed during Installation of Major Options 1 1. TABLE OF CONTENTS Manuals for This Machine i How to Read This Manual 1 Symbols ...1 Names of the Printer Driver .........37 Windows 95/98/Me, Windows 2000 or Windows NT 4.0 37 Windows XP Professional or...
Troubleshooting Guide
Page 7
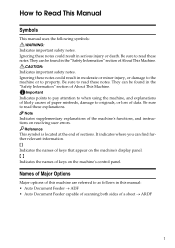
... notes. Indicates points to pay attention to when using the machine, and explanations of likely causes of paper misfeeds, damage to as follows in this manual: • Auto Document Feeder → ADF • Auto Document Feeder capable of scanning both sides of a sheet → ARDF 1 This symbol... of data. It indicates where you can be found in moderate or minor injury, or damage to the machine or to Read This Manual Symbols This manual uses the following symbols: Indicates important safety notes. Ignoring these notes could result in the "Safety Information" section of keys on the ...
... notes. Indicates points to pay attention to when using the machine, and explanations of likely causes of paper misfeeds, damage to as follows in this manual: • Auto Document Feeder → ADF • Auto Document Feeder capable of scanning both sides of a sheet → ARDF 1 This symbol... of data. It indicates where you can be found in moderate or minor injury, or damage to the machine or to Read This Manual Symbols This manual uses the following symbols: Indicates important safety notes. Ignoring these notes could result in the "Safety Information" section of keys on the ...

Troubleshooting Guide
Page 15
... function keys to proceed to a subsequent job. ...means that another job will automatically start after the current job is finished. ×...means that you must manually start another job after the current job is finished (i.e., these functions cannot be that the machine is completed. 9 ier, facsimile, printer, or scanner) without canceling...
... function keys to proceed to a subsequent job. ...means that another job will automatically start after the current job is finished. ×...means that you must manually start another job after the current job is finished (i.e., these functions cannot be that the machine is completed. 9 ier, facsimile, printer, or scanner) without canceling...
Troubleshooting Guide
Page 17
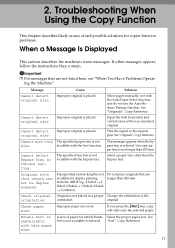
... and possible solutions for copier function problems. When a Message Is Displayed This section describes the machine's main messages. If other than 433 mm. Select paper manually, not with the bypass tray. Cannot detect original size Improper original is set. Place the original on the exposure glass. See "Originals", Copy Reference. Use...
... and possible solutions for copier function problems. When a Message Is Displayed This section describes the machine's main messages. If other than 433 mm. Select paper manually, not with the bypass tray. Cannot detect original size Improper original is set. Place the original on the exposure glass. See "Originals", Copy Reference. Use...
Troubleshooting Guide
Page 22
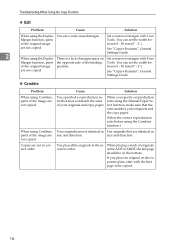
... ADF or ARDF, the last page should be on the bottom. If you specify a reproduction tio that does not match the sizes ratio using the Manual Paper Seof your originals and the copy paper. (Select the correct reproduction ratio before using the Combine function.) Your originals are not identical in Use...
... ADF or ARDF, the last page should be on the bottom. If you specify a reproduction tio that does not match the sizes ratio using the Manual Paper Seof your originals and the copy paper. (Select the correct reproduction ratio before using the Combine function.) Your originals are not identical in Use...

Troubleshooting Guide
Page 35
... terminal adaptor setting is pressed, it correctly. reception are impossible. Originals", Facsimile Reference. to "Off", when using On Hook Dial or Manual Dial, "Receiving..." See "Parameter Setting", General Settings Guide. Check your login user name, password, or driver encryption key, and enter them ... security function. 29 phone Line and Telephone", General Settings Guide. Then, re-send the document. When using Manual Dial, you use On Hook Dial or Manual Dial frequently, it is incorrect. Press [Original Size:], select the scanning area, and then resend the document....
... terminal adaptor setting is pressed, it correctly. reception are impossible. Originals", Facsimile Reference. to "Off", when using On Hook Dial or Manual Dial, "Receiving..." See "Parameter Setting", General Settings Guide. Check your login user name, password, or driver encryption key, and enter them ... security function. 29 phone Line and Telephone", General Settings Guide. Then, re-send the document. When using Manual Dial, you use On Hook Dial or Manual Dial frequently, it is incorrect. Press [Original Size:], select the scanning area, and then resend the document....

Troubleshooting Guide
Page 64
... for the destination folder are correct. • Check that can be recognized. Sender's name is incorrect. The sender's name was being sent, a net- Cannot enter manually more ) destinations. Split the destinations into two or more than 100 destinations. The e-mail has too many (nnn or more groups. at one time is...
... for the destination folder are correct. • Check that can be recognized. Sender's name is incorrect. The sender's name was being sent, a net- Cannot enter manually more ) destinations. Split the destinations into two or more than 100 destinations. The e-mail has too many (nnn or more groups. at one time is...

Troubleshooting Guide
Page 95
... described on it more than one misfeed area may be indicated. Important ❒ When clearing misfeeds, do not leave any modifications to return. If this manual.
... described on it more than one misfeed area may be indicated. Important ❒ When clearing misfeeds, do not leave any modifications to return. If this manual.

Troubleshooting Guide
Page 101
... of the core, disconnection, etc.), contact your service representative to fire or electric shock. • When the main power switch is damaged (exposure of this manual. In an emergency, unplug the machine's power cord. • When you should take care that the power cord will not be easily accessible. 95 These...
... of the core, disconnection, etc.), contact your service representative to fire or electric shock. • When the main power switch is damaged (exposure of this manual. In an emergency, unplug the machine's power cord. • When you should take care that the power cord will not be easily accessible. 95 These...

Troubleshooting Guide
Page 103
... and charges for cleaning the machine's interior. Cleaning the Exposure Glass This section describes how to remove the water. If such substances get inside this manual.
... and charges for cleaning the machine's interior. Cleaning the Exposure Glass This section describes how to remove the water. If such substances get inside this manual.
Quick Use Guide
Page 8
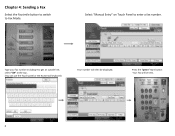
Type your fax number including 9 to get an outside line, select "OK" at the top . (You can use the Touch panel or the Numerical keyboard) Your number will be displayed. Press the "green" Start button Your Fax will then be Sent. 8 Select "Manual Entry" on Touch Panel to Fax Mode. Chapter 4: Sending a Fax Select the Facsimile button to switch to enter a fax number.
Type your fax number including 9 to get an outside line, select "OK" at the top . (You can use the Touch panel or the Numerical keyboard) Your number will be displayed. Press the "green" Start button Your Fax will then be Sent. 8 Select "Manual Entry" on Touch Panel to Fax Mode. Chapter 4: Sending a Fax Select the Facsimile button to switch to enter a fax number.
Quick Use Guide
Page 14
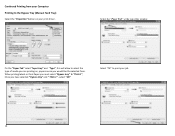
Select the "Paper Tab" at the top of the window On the "Paper Tab" select "Input tray" and "Type", this will allow to select the type of media you are printing on your print driver. When printing labels or thick Paper you must select "Bypass tray" & "Thick 1", Once you have selected " Bypass tray" and " Thick 1" , select "OK" Select "OK" to print your job 14 Continued Printing from your Computer Printing to the Bypass Tray (Manual Feed Tray) Select the "Properties" button on , paper source you would like the selected from.
Select the "Paper Tab" at the top of the window On the "Paper Tab" select "Input tray" and "Type", this will allow to select the type of media you are printing on your print driver. When printing labels or thick Paper you must select "Bypass tray" & "Thick 1", Once you have selected " Bypass tray" and " Thick 1" , select "OK" Select "OK" to print your job 14 Continued Printing from your Computer Printing to the Bypass Tray (Manual Feed Tray) Select the "Properties" button on , paper source you would like the selected from.
Quick Use Guide
Page 15
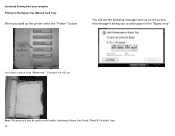
Note: This process is placed in the "Bypass tray" Your print job will see the following message come up on the screen, this message is asking you to place paper in the "Bypass tray" Once paper is also be used to the Bypass Tray (Manual Feed Tray) When you walk up the printer select the "Printer" button You will start. Continued Printing from your computer Printing to print Lables, letterhead, Heavy Card Stock (Think) & Printable Tabs 15
Note: This process is placed in the "Bypass tray" Your print job will see the following message come up on the screen, this message is asking you to place paper in the "Bypass tray" Once paper is also be used to the Bypass Tray (Manual Feed Tray) When you walk up the printer select the "Printer" button You will start. Continued Printing from your computer Printing to print Lables, letterhead, Heavy Card Stock (Think) & Printable Tabs 15
Quick Use Guide
Page 19
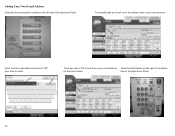
Adding Your Own E-mail Address Select the Scanner button located on the main screen. side of the Operations Panel 19 Once you select "OK' you will see your scan to email. To manually add an e‐mail not in the address book, select manual entry Enter the full e‐mail address and press "OK" your e‐mail address Press the Start Button on the right To complete on the left sideof the Operation Panel.
Adding Your Own E-mail Address Select the Scanner button located on the main screen. side of the Operations Panel 19 Once you select "OK' you will see your scan to email. To manually add an e‐mail not in the address book, select manual entry Enter the full e‐mail address and press "OK" your e‐mail address Press the Start Button on the right To complete on the left sideof the Operation Panel.


