
Quick Guide
Page 1
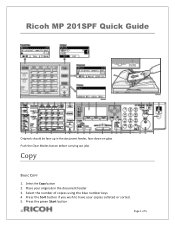
Ricoh MP 201SPF Quick Guide Originals should be face-up in the document feeder 3. Select the number of 5 Press the green Start button © Page 1 of copies using the blue number keys 4. Press the Sort button if you wish to have your originals in the document feeder, face-down on glass Push the Clear Modes button before carrying out jobs Copy BASIC COPY 1. Select the Copy button 2. Place your copies collated or sorted. 5.
Ricoh MP 201SPF Quick Guide Originals should be face-up in the document feeder 3. Select the number of 5 Press the green Start button © Page 1 of copies using the blue number keys 4. Press the Sort button if you wish to have your originals in the document feeder, face-down on glass Push the Clear Modes button before carrying out jobs Copy BASIC COPY 1. Select the Copy button 2. Place your copies collated or sorted. 5.
Quick Guide
Page 2
.... Press the Start button REDUCE OR ENLARGE COPIES 1. Press the R/E button on the left hand side 3. Place your originals in the document feeder 2. Press the Start button 2 SIDED ORIGINALS INTO 1 SIDED COPIES 1. Press the Start button Fax SEND A FAX 1. Select the Facsimile button 2. 2 SIDED COPIES (DUPLEX) 1. Press the Duplex button 3. Press the OK key to 1 sided copy is allowing you have placed your selection 5. Dial the number using the blue numeric key pad or press the pre programmed button(s) on the panel display 3. Press...
.... Press the Start button REDUCE OR ENLARGE COPIES 1. Press the R/E button on the left hand side 3. Place your originals in the document feeder 2. Press the Start button 2 SIDED ORIGINALS INTO 1 SIDED COPIES 1. Press the Start button Fax SEND A FAX 1. Select the Facsimile button 2. 2 SIDED COPIES (DUPLEX) 1. Press the Duplex button 3. Press the OK key to 1 sided copy is allowing you have placed your selection 5. Dial the number using the blue numeric key pad or press the pre programmed button(s) on the panel display 3. Press...
Quick Guide
Page 3
... the User Tools /Counter button 2. Press the Start button Note: when sending a fax you can look up the pre-programmed fax numbers by pressing the Check Destination button, choose one page document, press the pound key "#" and the fax machine will appear or make your originals in the document feeder 6. Arrow down and select Address Book Management press OK 5. Press OK. 9. Select Details 10. list) and select it for the remaining originals. Enter the fax number using...
... the User Tools /Counter button 2. Press the Start button Note: when sending a fax you can look up the pre-programmed fax numbers by pressing the Check Destination button, choose one page document, press the pound key "#" and the fax machine will appear or make your originals in the document feeder 6. Arrow down and select Address Book Management press OK 5. Press OK. 9. Select Details 10. list) and select it for the remaining originals. Enter the fax number using...
Quick Guide
Page 4
... System Settings by clicking 3. Arrow down and select Administration Tools press OK 4. If you want to delete, press OK 7. Use the arrow keys to exit, press User Tools button DELETE FAX NUMBERS IN THE ADDRESS BOOK 1. Press OK © Page 4 of 5 Press the User Tools /Counter button 2. Scanning SEND A DOCUMENT TO YOUR E-MAIL ADDRESS OR FOLDER 1. To continue programming, continue from step 5 Address Book Management OR to select 2 Sided Original 4. Place your originals in the panel...
... System Settings by clicking 3. Arrow down and select Administration Tools press OK 4. If you want to delete, press OK 7. Use the arrow keys to exit, press User Tools button DELETE FAX NUMBERS IN THE ADDRESS BOOK 1. Press OK © Page 4 of 5 Press the User Tools /Counter button 2. Scanning SEND A DOCUMENT TO YOUR E-MAIL ADDRESS OR FOLDER 1. To continue programming, continue from step 5 Address Book Management OR to select 2 Sided Original 4. Place your originals in the panel...
Quick Guide
Page 5
... 5 Address Book Management or to program or change an existing quick dial and press OK 6. Arrow down and select Administration Tools press OK 4. Select Program/Change to exit, press User Tools button © Page 5 of the search options (i.e. Use the 02 button for sending, press Start CHANGE THE FILE FORMAT WHEN SCANNING 1. and then press the OK key 12. list) and select it for D E or F) press OK. 8. Press OK 5. The first available quick dial location...
... 5 Address Book Management or to program or change an existing quick dial and press OK 6. Arrow down and select Administration Tools press OK 4. Select Program/Change to exit, press User Tools button © Page 5 of the search options (i.e. Use the 02 button for sending, press Start CHANGE THE FILE FORMAT WHEN SCANNING 1. and then press the OK key 12. list) and select it for D E or F) press OK. 8. Press OK 5. The first available quick dial location...


