
Printer Configuration
Page 1
... makes no liability of any kind including but not limited to be caused directly or indirectly from this document. Ricoh Printer Configuration on CUPS Ricoh Printer Configuration on the Common UNIX Printing System NOTICE THIS DOCUMENT SHALL NOT BE REPRODUCED IN WHOLE OR IN PART, FOR ANY... PURPOSE OR IN ANY FASHION AND DISTRIBUTED WITHOUT THE PRIOR WRITTEN CONSENT OF RICOH CORPORATION. They are trademarks, registered trademarks or the property of...
... makes no liability of any kind including but not limited to be caused directly or indirectly from this document. Ricoh Printer Configuration on CUPS Ricoh Printer Configuration on the Common UNIX Printing System NOTICE THIS DOCUMENT SHALL NOT BE REPRODUCED IN WHOLE OR IN PART, FOR ANY... PURPOSE OR IN ANY FASHION AND DISTRIBUTED WITHOUT THE PRIOR WRITTEN CONSENT OF RICOH CORPORATION. They are trademarks, registered trademarks or the property of...

Printer Configuration
Page 2
... 26 27 29 30 Page 2 of Contents Section 1 2 2.1 2.2 2.3 2.4 2.5 3 3.1 3.2 3.2.1 3.2.2 3.2.3 3.2.4 4 4.1 4.2 4.3 5 Title Introduction Hardware/Software Requirements Workstation Operating System Applicable Products Hardware Requirements Who Should Read this Document? Ricoh Printer Configuration on CUPS Table of 30 Visit our knowledgebase at: http://www...
... 26 27 29 30 Page 2 of Contents Section 1 2 2.1 2.2 2.3 2.4 2.5 3 3.1 3.2 3.2.1 3.2.2 3.2.3 3.2.4 4 4.1 4.2 4.3 5 Title Introduction Hardware/Software Requirements Workstation Operating System Applicable Products Hardware Requirements Who Should Read this Document? Ricoh Printer Configuration on CUPS Table of 30 Visit our knowledgebase at: http://www...
Printer Configuration
Page 3
...) as the same tool exists on the Line Print Daemon Protocol (LPD) for LPD client by defining new sets of communication. Ricoh Printer Configuration on devices with both System V and Berkeley style of features can be easily implemented by providing its own LPD daemon. To... platform for both screenshots and command line interface to readers interested in printing system loaded with the advancement in addition to configure a Ricoh printer or multifunction device (MFD) on how to setup non-Postscript devices, refer to the CUPS documentations listed in this paper. This ...
...) as the same tool exists on the Line Print Daemon Protocol (LPD) for LPD client by defining new sets of communication. Ricoh Printer Configuration on devices with both System V and Berkeley style of features can be easily implemented by providing its own LPD daemon. To... platform for both screenshots and command line interface to readers interested in printing system loaded with the advancement in addition to configure a Ricoh printer or multifunction device (MFD) on how to setup non-Postscript devices, refer to the CUPS documentations listed in this paper. This ...
Printer Configuration
Page 4
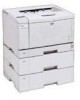
... Products: This document is also desirable. 2.2. Product Code Ricoh Corp Model Savin (USA) Model Gestetner Model Name Name ...Aficio 1515** 3515 Aficio 1515F* 3515F Aficio 1515MF/1515PS 3515MF Aficio 220/270* 9922DP/9927DP Aficio 2015*** 4015 Aficio 2018*** 4018 Aficio 2018D*** 4018D Aficio 2022*** 4022 Aficio 2027*** 4027 Aficio 2035 4035 Aficio 2035e/2035eG*** 4035e/4135eG Aficio 2045 4045 Aficio 2045e/2045eG*** 4045e/4145eG Aficio 2090** 4090 Aficio 2105** 10512 Aficio 2090/2105 EB105EX** Aficio 2228c 4090/4105 C2820 Aficio 2232c*** C3224 Aficio...
... Products: This document is also desirable. 2.2. Product Code Ricoh Corp Model Savin (USA) Model Gestetner Model Name Name ...Aficio 1515** 3515 Aficio 1515F* 3515F Aficio 1515MF/1515PS 3515MF Aficio 220/270* 9922DP/9927DP Aficio 2015*** 4015 Aficio 2018*** 4018 Aficio 2018D*** 4018D Aficio 2022*** 4022 Aficio 2027*** 4027 Aficio 2035 4035 Aficio 2035e/2035eG*** 4035e/4135eG Aficio 2045 4045 Aficio 2045e/2045eG*** 4045e/4145eG Aficio 2090** 4090 Aficio 2105** 10512 Aficio 2090/2105 EB105EX** Aficio 2228c 4090/4105 C2820 Aficio 2232c*** C3224 Aficio...

Printer Configuration
Page 6
...unless the preferred method of the file transfer protocols such as basic UNIX commands in order to Red Hat Linux 8.x. Ricoh Printer Configuration on CUPS Product Code Ricoh Corp Model Savin (USA) Model Gestetner Model Name Name Name Lanier Model Name CL7100*** * These models support PS... (file format) only. Hardware Requirements: A Linux or UNIX Workstation and a Windows Workstation PC, a printer or multifunction device with the ...
...unless the preferred method of the file transfer protocols such as basic UNIX commands in order to Red Hat Linux 8.x. Ricoh Printer Configuration on CUPS Product Code Ricoh Corp Model Savin (USA) Model Gestetner Model Name Name Name Lanier Model Name CL7100*** * These models support PS... (file format) only. Hardware Requirements: A Linux or UNIX Workstation and a Windows Workstation PC, a printer or multifunction device with the ...
Printer Configuration
Page 7
... downloads, download the Windows Postscript driver and obtain the PPD files from the installer files. Ricoh Printer Configuration on CUPS 3. Using a Windows based PC, go to http://www.ricoh-usa.com/downloads and download the appropriate Windows 2000/XP Postscript driver for the device you ...intend to the device you are installing (e.g., aficioAP3800C.ppd). Open the PPD file using a Postscript Printer Definition (PPD) file. PPD File Setup: ...
... downloads, download the Windows Postscript driver and obtain the PPD files from the installer files. Ricoh Printer Configuration on CUPS 3. Using a Windows based PC, go to http://www.ricoh-usa.com/downloads and download the appropriate Windows 2000/XP Postscript driver for the device you ...intend to the device you are installing (e.g., aficioAP3800C.ppd). Open the PPD file using a Postscript Printer Definition (PPD) file. PPD File Setup: ...
Printer Configuration
Page 8
.../cups/ 6. Ricoh Printer Configuration on CUPS *PPD-Adobe: "4.3" *% *% Printer Description file *% for "RICOH Aficio AP3800C PS" *% *% CreationDate: 2000/07/12 *% Modified: 2002/11/21 *% *% COPYRIGHT (C) 2000-2002 RICOH COMPANY, LTD. *% All rights reserved. *% *FileVersion: "2.1" *FormatVersion: "4.3" *LanguageEncoding: ISOLatin1 *LanguageVersion: English *ModelName: "RICOH Aficio AP3800C" *PCFileName: "RICL8003.PPD" *Manufacturer: "RICOH" *Product: "(RICOH Aficio AP3800C PS3)" *PSVersion: "(3011.103) 2" *ShortNickName: "RICOH Aficio AP3800C PS" *NickName: "RICOH Aficio AP3800C...
.../cups/ 6. Ricoh Printer Configuration on CUPS *PPD-Adobe: "4.3" *% *% Printer Description file *% for "RICOH Aficio AP3800C PS" *% *% CreationDate: 2000/07/12 *% Modified: 2002/11/21 *% *% COPYRIGHT (C) 2000-2002 RICOH COMPANY, LTD. *% All rights reserved. *% *FileVersion: "2.1" *FormatVersion: "4.3" *LanguageEncoding: ISOLatin1 *LanguageVersion: English *ModelName: "RICOH Aficio AP3800C" *PCFileName: "RICL8003.PPD" *Manufacturer: "RICOH" *Product: "(RICOH Aficio AP3800C PS3)" *PSVersion: "(3011.103) 2" *ShortNickName: "RICOH Aficio AP3800C PS" *NickName: "RICOH Aficio AP3800C...
Printer Configuration
Page 9
Ricoh Printer Configuration on CUPS Or, by using this command if the CUPS daemon is running as root: # kill -HUP
Ricoh Printer Configuration on CUPS Or, by using this command if the CUPS daemon is running as root: # kill -HUP
Printer Configuration
Page 10
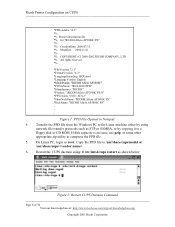
... shown in the following sections. Page 10 of 30 Visit our knowledgebase at: http://www.ricoh-usa.com/support/knowledgebase.asp Copyright 2003 Ricoh Corporation The Printer setup: Autodetected printers window shown in the following figure, Print Directly to a Network Printer is required to perform the procedures described in Figure 5, below except section 3.2.1 are applicable...
... shown in the following sections. Page 10 of 30 Visit our knowledgebase at: http://www.ricoh-usa.com/support/knowledgebase.asp Copyright 2003 Ricoh Corporation The Printer setup: Autodetected printers window shown in the following figure, Print Directly to a Network Printer is required to perform the procedures described in Figure 5, below except section 3.2.1 are applicable...

Printer Configuration
Page 11
NOTE All three protocols listed in Figure 7. Page 11 of network printing protocol from the Select Your Printer Type field in the Figure 7 should be supported by most Ricoh printers or MFDs. Ricoh Printer Configuration on CUPS Figure 6: Printer Type Window Click the Next button to continue 3. Two protocols, Direct TCP Port Printing and Remote LPD Queue, are generally used. Select the type of 30 Visit our knowledgebase at: http://www.ricoh-usa.com/support/knowledgebase.asp Copyright 2003 Ricoh Corporation
NOTE All three protocols listed in Figure 7. Page 11 of network printing protocol from the Select Your Printer Type field in the Figure 7 should be supported by most Ricoh printers or MFDs. Ricoh Printer Configuration on CUPS Figure 6: Printer Type Window Click the Next button to continue 3. Two protocols, Direct TCP Port Printing and Remote LPD Queue, are generally used. Select the type of 30 Visit our knowledgebase at: http://www.ricoh-usa.com/support/knowledgebase.asp Copyright 2003 Ricoh Corporation
Printer Configuration
Page 12
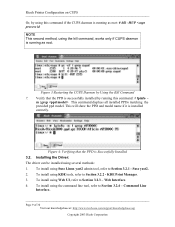
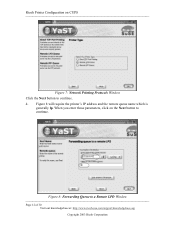
When you enter those parameters, click on CUPS Figure 7: Network Printing Protocols Window Click the Next button to continue. 4. Figure 8 will require the printer's IP address and the remote queue name which is generally lp. Figure 8: Forwarding Queue to a Remote LPD Window Page 12 of 30 Visit our knowledgebase at: http://www.ricoh-usa.com/support/knowledgebase.asp Copyright 2003 Ricoh Corporation Ricoh Printer Configuration on the Next button to continue.
When you enter those parameters, click on CUPS Figure 7: Network Printing Protocols Window Click the Next button to continue. 4. Figure 8 will require the printer's IP address and the remote queue name which is generally lp. Figure 8: Forwarding Queue to a Remote LPD Window Page 12 of 30 Visit our knowledgebase at: http://www.ricoh-usa.com/support/knowledgebase.asp Copyright 2003 Ricoh Corporation Ricoh Printer Configuration on the Next button to continue.
Printer Configuration
Page 13
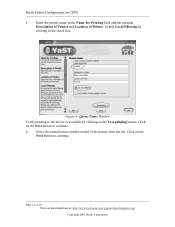
Figure 9: Queue Name Window Verify printing to the device is available by clicking in the Name for Printing field and the optional Description of Printer and Location of Printer. Ricoh Printer Configuration on the Test printing button. Click on the Next button to continue. 6. Click on the Next button to continue. Select the manufacturer and...
Figure 9: Queue Name Window Verify printing to the device is available by clicking in the Name for Printing field and the optional Description of Printer and Location of Printer. Ricoh Printer Configuration on the Test printing button. Click on the Next button to continue. 6. Click on the Next button to continue. Select the manufacturer and...
Printer Configuration
Page 14
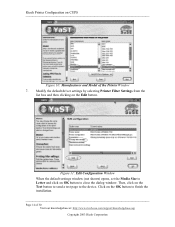
Click on the Test button to send a test page to finish the installation Page 14 of the Printer Window 7. Then, click on the OK button to the device. Figure 11: Edit Configuration Window When the default settings window (not shown) opens, set the ...Media Size to close the dialog window. Modify the default driver settings by selecting Printer Filter Settings from the list box and then clicking on OK button to Letter and click on the Edit button. Ricoh Printer Configuration on CUPS Figure 10: Manufacturer and Model of 30 Visit our knowledgebase at: http...
Click on the Test button to send a test page to finish the installation Page 14 of the Printer Window 7. Then, click on the OK button to the device. Figure 11: Edit Configuration Window When the default settings window (not shown) opens, set the ...Media Size to close the dialog window. Modify the default driver settings by selecting Printer Filter Settings from the list box and then clicking on OK button to Letter and click on the Edit button. Ricoh Printer Configuration on CUPS Figure 10: Manufacturer and Model of 30 Visit our knowledgebase at: http...

Printer Configuration
Page 15
... to continue. 2. Click on the Next button to use. Click on Printers. To display the KDE Control Center UI, type the following at : http://www.ricoh-usa.com/support/knowledgebase.asp Copyright 2003 Ricoh Corporation Page 15 of 30 Visit our knowledgebase at the command line: #... Enter. In the example in Figure 13, Network (TCP) printing is selected. This setting will open . Ricoh Printer Configuration on upper portion of the main window and select Add Printer/Class from the pull down menu. To start the installation, right click on CUPS 3.2.2. When the Welcome dialog...
... to continue. 2. Click on the Next button to use. Click on Printers. To display the KDE Control Center UI, type the following at : http://www.ricoh-usa.com/support/knowledgebase.asp Copyright 2003 Ricoh Corporation Page 15 of 30 Visit our knowledgebase at the command line: #... Enter. In the example in Figure 13, Network (TCP) printing is selected. This setting will open . Ricoh Printer Configuration on upper portion of the main window and select Add Printer/Class from the pull down menu. To start the installation, right click on CUPS 3.2.2. When the Welcome dialog...
Printer Configuration
Page 16
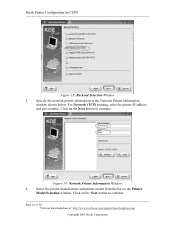
... window. Click on the Next button to continue Page 16 of 30 Visit our knowledgebase at: http://www.ricoh-usa.com/support/knowledgebase.asp Copyright 2003 Ricoh Corporation Specify the network printer information in the Network Printer Information window shown below. Click on the Next button to continue. For Network (TCP) printing, enter the...
... window. Click on the Next button to continue Page 16 of 30 Visit our knowledgebase at: http://www.ricoh-usa.com/support/knowledgebase.asp Copyright 2003 Ricoh Corporation Specify the network printer information in the Network Printer Information window shown below. Click on the Next button to continue. For Network (TCP) printing, enter the...
Printer Configuration
Page 17
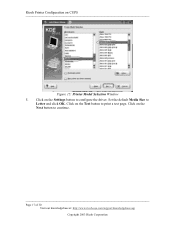
Click on the Test button to continue. Page 17 of 30 Visit our knowledgebase at: http://www.ricoh-usa.com/support/knowledgebase.asp Copyright 2003 Ricoh Corporation Click on the Next button to print a test page. Ricoh Printer Configuration on the Settings button to Letter and click OK. Click on CUPS Figure 15: Printer Model Selection Window 5. Set the default Media Size to configure the driver.
Click on the Test button to continue. Page 17 of 30 Visit our knowledgebase at: http://www.ricoh-usa.com/support/knowledgebase.asp Copyright 2003 Ricoh Corporation Click on the Next button to print a test page. Ricoh Printer Configuration on the Settings button to Letter and click OK. Click on CUPS Figure 15: Printer Model Selection Window 5. Set the default Media Size to configure the driver.

Printer Configuration
Page 18
Continue with installation by skipping the next three screens of the Add Printer Wizard until you get to the General Information window Page 18 of 30 Visit our knowledgebase at: http://www.ricoh-usa.com/support/knowledgebase.asp Copyright 2003 Ricoh Corporation Ricoh Printer Configuration on CUPS Figure 16: Setting Printer Defaults and Printing a Test Page 6.
Continue with installation by skipping the next three screens of the Add Printer Wizard until you get to the General Information window Page 18 of 30 Visit our knowledgebase at: http://www.ricoh-usa.com/support/knowledgebase.asp Copyright 2003 Ricoh Corporation Ricoh Printer Configuration on CUPS Figure 16: Setting Printer Defaults and Printing a Test Page 6.
Printer Configuration
Page 19
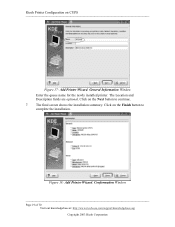
Ricoh Printer Configuration on the Finish button to continue. 7. Click on CUPS Figure 17: Add Printer Wizard, General Information Window Enter the queue name for the newly installed printer. The Location and Description fields are optional. Click on the Next button to complete the installation. Figure 18: Add Printer Wizard, Conformation Window Page 19 of 30 Visit our knowledgebase at: http://www.ricoh-usa.com/support/knowledgebase.asp Copyright 2003 Ricoh Corporation The final screen shows the installation summary.
Ricoh Printer Configuration on the Finish button to continue. 7. Click on CUPS Figure 17: Add Printer Wizard, General Information Window Enter the queue name for the newly installed printer. The Location and Description fields are optional. Click on the Next button to complete the installation. Figure 18: Add Printer Wizard, Conformation Window Page 19 of 30 Visit our knowledgebase at: http://www.ricoh-usa.com/support/knowledgebase.asp Copyright 2003 Ricoh Corporation The final screen shows the installation summary.
Printer Configuration
Page 20
...: Logging into CUPS via a Web Interface Enter the root account name and password. You should note that not all web browsers support Digest authentication. Ricoh Printer Configuration on Add Printer to continue. If Basic authentication is displayed. Page 20 of authentication: Basic and Digest. Web Interface: This section describes how to administer CUPS...
...: Logging into CUPS via a Web Interface Enter the root account name and password. You should note that not all web browsers support Digest authentication. Ricoh Printer Configuration on Add Printer to continue. If Basic authentication is displayed. Page 20 of authentication: Basic and Digest. Web Interface: This section describes how to administer CUPS...

Printer Configuration
Page 21
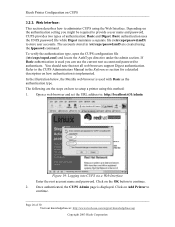
Select the backend or the method on Continue to communicate with the printer from the Device pulldown. Location and Description are optional. In the example below the IPP protocol is required. Click on how to proceed Page 21 of 30 Visit our knowledgebase at: http://www.ricoh-usa.com/support/knowledgebase.asp Copyright 2003 Ricoh Corporation Figure 21: CUPS Admin, Add New Printer Page Only the queue Name field is selected. Click on CUPS Figure 20: CUPS Admin Page 3. Enter the printer information. Ricoh Printer Configuration on Continue to proceed. 4.
Select the backend or the method on Continue to communicate with the printer from the Device pulldown. Location and Description are optional. In the example below the IPP protocol is required. Click on how to proceed Page 21 of 30 Visit our knowledgebase at: http://www.ricoh-usa.com/support/knowledgebase.asp Copyright 2003 Ricoh Corporation Figure 21: CUPS Admin, Add New Printer Page Only the queue Name field is selected. Click on CUPS Figure 20: CUPS Admin Page 3. Enter the printer information. Ricoh Printer Configuration on Continue to proceed. 4.


