Operating Instructions
Page 1
Operating Instructions Copy Reference 1 Placing Originals 2 Copying 3 Troubleshooting 4 User Tools (Copier/Document Server Features) 5 Specifications Read this machine and keep it handy for future reference. For safe and correct use this manual carefully before you use , be sure to read the Safety Information in the "General Settings Guide" before using the machine.
Operating Instructions Copy Reference 1 Placing Originals 2 Copying 3 Troubleshooting 4 User Tools (Copier/Document Server Features) 5 Specifications Read this machine and keep it handy for future reference. For safe and correct use this manual carefully before you use , be sure to read the Safety Information in the "General Settings Guide" before using the machine.

Operating Instructions
Page 2
... manual might be responsible for any damage or expense that you use of your local dealer. Certain options might not be available in the General Settings Guide. For details, please contact your machine before using the machine. Check the type of this manual. (For details, see "Power Connection" in some countries...
... manual might be responsible for any damage or expense that you use of your local dealer. Certain options might not be available in the General Settings Guide. For details, please contact your machine before using the machine. Check the type of this manual. (For details, see "Power Connection" in some countries...

Operating Instructions
Page 3
...this manual for the procedures for the machine's printer function. This manual covers all models, and therefore contains functions and settings that the administrators can use . Refer to protect data from being tampered, or prevent the machine from those of ... 1 "Operating Instructions" • CD-ROM 2 "Scanner Driver and Document Management Utility" ❖ General Settings Guide Provides an overview of the machine and describes System Settings (such as setting user and administrator authentication. ❖ Network Guide (PDF file - Manuals for administrators of this machine.
...this manual for the procedures for the machine's printer function. This manual covers all models, and therefore contains functions and settings that the administrators can use . Refer to protect data from being tampered, or prevent the machine from those of ... 1 "Operating Instructions" • CD-ROM 2 "Scanner Driver and Document Management Utility" ❖ General Settings Guide Provides an overview of the machine and describes System Settings (such as setting user and administrator authentication. ❖ Network Guide (PDF file - Manuals for administrators of this machine.

Operating Instructions
Page 8
... Interrupt Copy ...18 Original Beeper ...18 Job Preset ...19 Copying from the Bypass Tray 20 Copier Functions 23 Adjusting Image Density 23 Selecting Original Type Setting 24 Selecting Copy Paper 25 Preset Reduce/Enlarge 28 Zoom ...29 Auto Reduce/Enlarge 30 Size Magnification ...30 Directional Magnification 31 Directional Size Magnification (inch...
... Interrupt Copy ...18 Original Beeper ...18 Job Preset ...19 Copying from the Bypass Tray 20 Copier Functions 23 Adjusting Image Density 23 Selecting Original Type Setting 24 Selecting Copy Paper 25 Preset Reduce/Enlarge 28 Zoom ...29 Auto Reduce/Enlarge 30 Size Magnification ...30 Directional Magnification 31 Directional Size Magnification (inch...

Operating Instructions
Page 9
... vii User Tools (Copier/Document Server Features) User Tools Menu (Copier/Document Server Features 85 Accessing User Tools (Copier/Document Server Features 91 Changing Default Settings 91 Exiting User Tools ...91 General Features P.1/4 92 General Features P.2/4 94 General Features P.3/4 94 General Features P.4/4 95 Reproduction Ratio P.1/2 95 Reproduction Ratio P.2/2 96 Edit P.1/2 ...96...
... vii User Tools (Copier/Document Server Features) User Tools Menu (Copier/Document Server Features 85 Accessing User Tools (Copier/Document Server Features 91 Changing Default Settings 91 Exiting User Tools ...91 General Features P.1/4 92 General Features P.2/4 94 General Features P.3/4 94 General Features P.4/4 95 Reproduction Ratio P.1/2 95 Reproduction Ratio P.2/2 96 Edit P.1/2 ...96...

Operating Instructions
Page 12
... used together, or conditions in this . R WARNING: This symbol indicates a potentially hazardous situation that cannot be used . How to Read This Manual Symbols The following set of symbols is not followed, paper might be misfed, originals might be damaged, or data might be lost.
... used together, or conditions in this . R WARNING: This symbol indicates a potentially hazardous situation that cannot be used . How to Read This Manual Symbols The following set of symbols is not followed, paper might be misfed, originals might be damaged, or data might be lost.

Operating Instructions
Page 15
...indicator • B: Load Paper indicator • L: Service Call indicator • M: Open Cover indicator • x: Misfeed indicator See "Control Panel", General Settings Guide. 3. {User Tools/Counter} key • User Tools Press to change the default and conditions to meet your requirements. • Counter Press to ...PRS TUV WXY Enter OPER Main Power On 1. See p.75 "Programs". 7. {Clear Modes} key Press to clear previously entered copy job settings. 8. {Energy Saver} key Press to switch to check or print the counter value. 4. The power indicator lights when the power is...
...indicator • B: Load Paper indicator • L: Service Call indicator • M: Open Cover indicator • x: Misfeed indicator See "Control Panel", General Settings Guide. 3. {User Tools/Counter} key • User Tools Press to change the default and conditions to meet your requirements. • Counter Press to ...PRS TUV WXY Enter OPER Main Power On 1. See p.75 "Programs". 7. {Clear Modes} key Press to clear previously entered copy job settings. 8. {Energy Saver} key Press to switch to check or print the counter value. 4. The power indicator lights when the power is...

Operating Instructions
Page 16
...: the function is active. • Red: the function has been interrupt- By checking the sample copy and making any necessary changes to the image quality settings before starting a long copy run. See p.35 "Sample copy". 13. {Start} key Press to start scanning and printing in Document Server mode. 14. {Clear/Stop...
...: the function is active. • Red: the function has been interrupt- By checking the sample copy and making any necessary changes to the image quality settings before starting a long copy run. See p.35 "Sample copy". 13. {Start} key Press to start scanning and printing in Document Server mode. 14. {Clear/Stop...

Operating Instructions
Page 17
... Capacity Tray (LCT) installed. ❖ Initial copy display 1. ly selected function. 7 Operational status or messages. 3. The number of originals scanned into memory, number of copies set, and number of the Shortcut keys. Shows the available functions. You can register frequently used reduce/enlarge ratios other than the fixed reduce/enlarge ratios...
... Capacity Tray (LCT) installed. ❖ Initial copy display 1. ly selected function. 7 Operational status or messages. 3. The number of originals scanned into memory, number of copies set, and number of the Shortcut keys. Shows the available functions. You can register frequently used reduce/enlarge ratios other than the fixed reduce/enlarge ratios...

Operating Instructions
Page 20
See "Size Setting" in "General Features", General Settings Guide. *2 The machine cannot detect two-sided originals of B6 JIS size. ❍ : Detectable size u : Undetectable size ❖ Inch version Size A3 L Location of coating, ...;❍❍ u u u u ❍u ❍ ❍ ❍ ❍ ❍ ❍ *2 ❍ u ❍ u ❍ *1 You can select from 81/2" u 13", 81/4" u 13", 8" u 13" with User Tools (System Settings).
See "Size Setting" in "General Features", General Settings Guide. *2 The machine cannot detect two-sided originals of B6 JIS size. ❍ : Detectable size u : Undetectable size ❖ Inch version Size A3 L Location of coating, ...;❍❍ u u u u ❍u ❍ ❍ ❍ ❍ ❍ ❍ *2 ❍ u ❍ u ❍ *1 You can select from 81/2" u 13", 81/4" u 13", 8" u 13" with User Tools (System Settings).

Operating Instructions
Page 22
GCGSET3E Note ❒ It is the same as you can set the original orientation in the following ways. A Press [Special Original]. 12 Placing Originals Placing Originals Note 1 ❒ Take care to use this func- Reference For ... be cop- This function is useful for copying large originals with the Staple, Duplex, Combine or Stamp functions. Not taking this function when you can set , see p.9 "Originals" . The machine rotates the copy image by 90q and you want . This is useful for copying torn originals or large originals. ❖ Standard...
GCGSET3E Note ❒ It is the same as you can set the original orientation in the following ways. A Press [Special Original]. 12 Placing Originals Placing Originals Note 1 ❒ Take care to use this func- Reference For ... be cop- This function is useful for copying large originals with the Staple, Duplex, Combine or Stamp functions. Not taking this function when you can set , see p.9 "Originals" . The machine rotates the copy image by 90q and you want . This is useful for copying torn originals or large originals. ❖ Standard...

Operating Instructions
Page 24
... custom size originals: p.16 "Placing custom size originals" Note ❒ Do not stack originals beyond the limit mark on the side fence of the original 1 Settings should be made in the fol- Sensors 14 Zewh210E Limit mark 2. Placing Originals Placing Originals in the Auto Document Feeder... on the ADF. ❒ To prevent multiple sheets from being fed at once, fan the original before placing it is placed on the ADF. ❒ Set the original squarely. Doing so may cause a malfunction. B Align the edges of the ADF. ❒ The last page should be on the bottom. ❒ Be...
... custom size originals: p.16 "Placing custom size originals" Note ❒ Do not stack originals beyond the limit mark on the side fence of the original 1 Settings should be made in the fol- Sensors 14 Zewh210E Limit mark 2. Placing Originals Placing Originals in the Auto Document Feeder... on the ADF. ❒ To prevent multiple sheets from being fed at once, fan the original before placing it is placed on the ADF. ❒ Set the original squarely. Doing so may cause a malfunction. B Align the edges of the ADF. ❒ The last page should be on the bottom. ❒ Be...
Operating Instructions
Page 25
... different sizes at the same time, the machine automatically checks the size of different sizes in the ADF, each page is not displayed, change the settings. Press [SADF], and then press [OK]. E When the Sort, Combine or 1 the next page. Placing Originals B B Select [Batch], and...SADF mode In SADF mode, even when an original is shown 1 on the display. See p.102 "Switch to Batch (SADF)". Reference Related default settings, see p.95 "Shortcut R/E". D When the machine instructs you press [Special Original]. Note ❒ When placing originals of the originals and makes...
... different sizes at the same time, the machine automatically checks the size of different sizes in the ADF, each page is not displayed, change the settings. Press [SADF], and then press [OK]. E When the Sort, Combine or 1 the next page. Placing Originals B B Select [Batch], and...SADF mode In SADF mode, even when an original is shown 1 on the display. See p.102 "Switch to Batch (SADF)". Reference Related default settings, see p.95 "Shortcut R/E". D When the machine instructs you press [Special Original]. Note ❒ When placing originals of the originals and makes...

Operating Instructions
Page 27
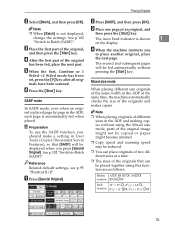
... refer to each function. Copying begins. Note ❒ When placing originals on the display. C Place your desired settings. Note ❒ The maximum copy quantity that can be set , the authentication screen will be displayed. F Press the {Start} key. Important ❒ When Basic Authentication, Win...]. A Make sure "d Ready" appears on the exposure glass, press the {#} key after all originals are scanned. ❒ Copies are previous set- Enter your user code using the number keys, and then press the {#} key. E Enter the required number of cop- For user codes,...
... refer to each function. Copying begins. Note ❒ When placing originals on the display. C Place your desired settings. Note ❒ The maximum copy quantity that can be set , the authentication screen will be displayed. F Press the {Start} key. Important ❒ When Basic Authentication, Win...]. A Make sure "d Ready" appears on the exposure glass, press the {#} key after all originals are scanned. ❒ Copies are previous set- Enter your user code using the number keys, and then press the {#} key. E Enter the required number of cop- For user codes,...

Operating Instructions
Page 28
.... The machine stops the previous original job and starts copying the original. Press the {Check Modes} key. Note ❒ The interrupt copy job set- C When copying is displayed when you want to copy. Original Beeper The beeper sounds and an error message is complete, remove originals and copies.... Remove the originals that were being used. D Press the {Interrupt} key again. The Interrupt indicator goes on the display. ❖ To check the settings. The interrupt copy job settings will be restored and the machine will continue copying from where it left off .
.... The machine stops the previous original job and starts copying the original. Press the {Check Modes} key. Note ❒ The interrupt copy job set- C When copying is displayed when you want to copy. Original Beeper The beeper sounds and an error message is complete, remove originals and copies.... Remove the originals that were being used. D Press the {Interrupt} key again. The Interrupt indicator goes on the display. ❖ To check the settings. The interrupt copy job settings will be restored and the machine will continue copying from where it left off .

Operating Instructions
Page 29
... "Printing"]. Basic Procedure 2 19 When the current copy job is in progress and you do not want to wait for it to finish, you can set up the next copy job in the ADF, and then press the {Start} key. C Place the originals in advance. You can switch the display ... will start automatically. D Press [To "Printing"]. Returns to the initial copy display. Job Preset You can use this function to set up the next copy content during copying. A Press [Next Job] when "Copying" is shown. B Set up the next copy job. After the current copy job, the next job starts automatically.
... "Printing"]. Basic Procedure 2 19 When the current copy job is in progress and you do not want to wait for it to finish, you can set up the next copy job in the ADF, and then press the {Start} key. C Place the originals in advance. You can switch the display ... will start automatically. D Press [To "Printing"]. Returns to the initial copy display. Job Preset You can use this function to set up the next copy content during copying. A Press [Next Job] when "Copying" is shown. B Set up the next copy job. After the current copy job, the next job starts automatically.

Operating Instructions
Page 30
... use the standard size copy paper or if you use special paper, you need to copy onto OHP ❒ The machine can change the initial settings. tect the following sizes as follows: Metric • Vertical: 100-297 mm version • Horizontal: 148-600 mm *1 Inch • Vertical: 3.9"-11.6" version • Horizontal...
... use the standard size copy paper or if you use special paper, you need to copy onto OHP ❒ The machine can change the initial settings. tect the following sizes as follows: Metric • Vertical: 100-297 mm version • Horizontal: 148-600 mm *1 Inch • Vertical: 3.9"-11.6" version • Horizontal...

Operating Instructions
Page 32
C Press [OK]. per. E When your originals, and then press the {Start} key. B Select paper type in Special pa- Note ❒ When copying onto OHP transparencies, remove copied sheets one by one. D Place your copy job is not highlighted, press [Horiz]. ❒ To register the custom size entered, press [Program], and then press [Exit]. 2 E Press [OK]. Copying Note ❒ If [Horiz] is finished, press the {Clear Modes} key to clear the settings. 22 When copying onto special paper A Press the {#} key.
C Press [OK]. per. E When your originals, and then press the {Start} key. B Select paper type in Special pa- Note ❒ When copying onto OHP transparencies, remove copied sheets one by one. D Place your copy job is not highlighted, press [Horiz]. ❒ To register the custom size entered, press [Program], and then press [Exit]. 2 E Press [OK]. Copying Note ❒ If [Horiz] is finished, press the {Clear Modes} key to clear the settings. 22 When copying onto special paper A Press the {#} key.

Operating Instructions
Page 34
... types to select the original type. nals contain only text (no pictures). ❖ Text/Photo Select [Text/Photo] when your origi- Copying Selecting Original Type Setting Select one of photographs and pictures can be reproduced sharply and clearly.
... types to select the original type. nals contain only text (no pictures). ❖ Text/Photo Select [Text/Photo] when your origi- Copying Selecting Original Type Setting Select one of photographs and pictures can be reproduced sharply and clearly.
Operating Instructions
Page 35
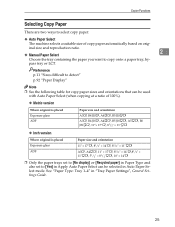
...A4KL, 11" u 17"L, 81/2" u 14"L,81/2" u 11"KL, 51/2" u 81/2"KL, 10" u 14"L ❒ Only the paper trays set to [No display] or [Recycled paper] in Paper Type and also set to [Yes] in Apply Auto Paper Select can be used with Auto Paper Select (when copying at a ratio of copy...want to detect" p.92 "Paper Display" Note ❒ See the following table for copy paper sizes and orientations that can be selected in "Tray Paper Settings", General Settings Guide. 25 See "Paper Type: Tray 1-4" in Auto Paper Select mode. Reference p.11 "Sizes difficult to copy onto: a paper tray, bypass tray or...
...A4KL, 11" u 17"L, 81/2" u 14"L,81/2" u 11"KL, 51/2" u 81/2"KL, 10" u 14"L ❒ Only the paper trays set to [No display] or [Recycled paper] in Paper Type and also set to [Yes] in Apply Auto Paper Select can be used with Auto Paper Select (when copying at a ratio of copy...want to detect" p.92 "Paper Display" Note ❒ See the following table for copy paper sizes and orientations that can be selected in "Tray Paper Settings", General Settings Guide. 25 See "Paper Type: Tray 1-4" in Auto Paper Select mode. Reference p.11 "Sizes difficult to copy onto: a paper tray, bypass tray or...


