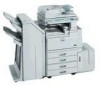
Ricoh 3045 Copier - Aficio B W Laser
Ricoh 3045 Copier
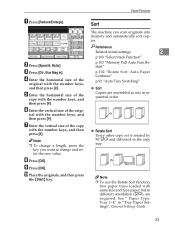
Related Manual Pages


Related Videos

Ricoh 3045 loaded jkbm Tel 01233 668309 used secondhand copiers www.jkbm.com
Duration: 3:55
Total Views: 2,153
Duration: 3:55
Total Views: 2,153
Mesin fotostat model RICOH Aficio 3045
Duration: :46
Total Views: 3,947
Duration: :46
Total Views: 3,947
Similar Questions

How Install Unit Drum For Copier Ricoh Aficio 3045
(Posted by PeppeSYDDAL 9 years ago)

My Ricoh 200l2 Copier Shown Massage Follow Instruction Right Cover To Removed `b
My ricoh 200L2 copier shown massage FOLLOW INSTRUCTION RIGHT COVER TO REMOVED `B' but no paper jam, ...
My ricoh 200L2 copier shown massage FOLLOW INSTRUCTION RIGHT COVER TO REMOVED `B' but no paper jam, ...
(Posted by fatafatitumi 9 years ago)

Ricoh Copier Hard Drive
will a Ricoh copier still work if the hard drive is removed?
will a Ricoh copier still work if the hard drive is removed?
(Posted by Anonymous-102127 11 years ago)

Ricoh Copier/printer
Can you reprint a document from a copier/printer that has already been print? Is there such a thing ...
Can you reprint a document from a copier/printer that has already been print? Is there such a thing ...
(Posted by helpdesk2205 11 years ago)
Related Terms
The following terms were also used when searching for Ricoh 3045 Copier - Aficio B W Laser:- ricoh 3045
- aficio 3045
- 3045 driver
- 3045 copier
- 3045 manual
- ricoh aficio 3045 driver
- 3045 drivers
- 3045 toner
- 3045 printer
- 3045 price
- 3045 user manual
- 3045 specs
- ricoh 3045 copier
- 3045 brochure
- 3045 scanner
- aficio 3045 driver
- ricoh 3045 driver
- 3045 specifications
- aficio 3045 toner
- ricoh 3045 scanner
- 3045 default password
- 3045 photo
- ricoh 3045 printer
- ricoh 3045 specs
- ricoh 3045 toner
- 3045 windows 7 driver
- aficio 3045 manual
- ricoh 3045 photo
- ricoh 3045 price
- 3045 64 bit driver
- 3045 address book
- 3045 administrator manual
- 3045 change language
- 3045 check the settings
- 3045 default login
- 3045 developer
- 3045 downloads
- 3045 driver download
- 3045 driver windows 7
- 3045 driver windows xp
- 3045 driver xp
- 3045 drivers download
- 3045 drum unit
- 3045 duplex unit not set error
- 3045 error code list
- 3045 fax driver
- 3045 fax to email
- 3045 firmware
- 3045 firmware update
- 3045 folder
- 3045 ftp scan setup
- 3045 fuser assembly
- 3045 hard drive location
- 3045 hard drive remove
- 3045 login
- 3045 mac driver
- 3045 maintenance kits
- 3045 manual print
- 3045 optional finish tray
- 3045 parts
- 3045 pcl 6 driver
- 3045 pcl6 driver
- 3045 postscript
- 3045 printer driver
- 3045 printer driver download
- 3045 review
- 3045 reviews
- 3045 scanner driver
- 3045 scanner setup
- 3045 security reference
- 3045 service manual
- 3045 service manual pdf
- 3045 settings
- 3045 setup
- 3045 staples
- 3045 twain
- 3045 twain driver
- 3045 windows 7
- 3045 windows vista driver
- 3045 windows xp driver
- aficio 3025
- aficio 3045 brochure
- aficio 3045 copy machine
- aficio 3045 default login
- aficio 3045 default password
- aficio 3045 driver download
- aficio 3045 drivers
- aficio 3045 duplex unit is not set properly
- aficio 3045 factory reset
- aficio 3045 fax errors
- aficio 3045 fax troubleshooting
- aficio 3045 firmware
- aficio 3045 pcl 6
- aficio 3045 printer driver
- aficio 3045 ps
- aficio 3045 scan folder stop working
- aficio 3045 scan to folder
- aficio 3045 snmp
- aficio 3045 spec
- aficio 3045 specifications
- aficio 3045 specs
- aficio 3045 user manual
- aficio 3045 windows 7
- aficio3045
- aficio3045 driver
- aficio3045 price
- driver aficio 3045
- i t works 3045 driver
- ricoh 3045 64 bit driver
- ricoh 3045 address book
- ricoh 3045 administrator manual
- ricoh 3045 brochure
- ricoh 3045 change language
- ricoh 3045 check the settings
- ricoh 3045 default login
- ricoh 3045 default password
- ricoh 3045 developer
- ricoh 3045 downloads
- ricoh 3045 driver download
- ricoh 3045 driver windows 7
- ricoh 3045 driver windows xp
- ricoh 3045 driver xp
- ricoh 3045 drivers
- ricoh 3045 drivers download
- ricoh 3045 drum
- ricoh 3045 drum unit
- ricoh 3045 duplex unit not set error
- ricoh 3045 error code list
- ricoh 3045 fax
- ricoh 3045 fax driver
- ricoh 3045 fax to email
- ricoh 3045 firmware
- ricoh 3045 firmware update
- ricoh 3045 folder
- ricoh 3045 ftp scan setup
- ricoh 3045 fuser assembly
- ricoh 3045 hard drive location
- ricoh 3045 hard drive remove
- ricoh 3045 login
- ricoh 3045 mac driver
- ricoh 3045 maintenance kits
- ricoh 3045 manual
- ricoh 3045 manual print
- ricoh 3045 optional finish tray
- ricoh 3045 parts
- ricoh 3045 pcl 6 driver
- ricoh 3045 pcl6 driver
- ricoh 3045 pdf
- ricoh 3045 postscript
- ricoh 3045 printer driver
- ricoh 3045 printer driver download
- ricoh 3045 review
- ricoh 3045 reviews
- ricoh 3045 scanner driver
- ricoh 3045 scanner setup
- ricoh 3045 security reference
- ricoh 3045 service manual
- ricoh 3045 service manual pdf
- ricoh 3045 settings
- ricoh 3045 setup
- ricoh 3045 sp
- ricoh 3045 specifications
- ricoh 3045 staples
- ricoh 3045 twain
- ricoh 3045 twain driver
- ricoh 3045 user manual
- ricoh 3045 windows 7
- ricoh 3045 windows 7 driver
- ricoh 3045 windows vista driver
- ricoh 3045 windows xp driver
- ricoh 3045spf
- ricoh aficio 3045
- ricoh aficio 3045 brochure
- ricoh aficio 3045 driver download
- ricoh aficio 3045 manual
- ricoh aficio 3045 printer driver
- ricoh aficio 3045 user manual
- ricoh mp 3045