

English Manual
Page 2
® TABLE OF CONTENTS IMPORTANT PRECAUTIONS 3 BEFORE YOU BEGIN 5 HOW TO SET UP THE TREADMILL 6 HOW TO USE THE HEART RATE MONITOR 7 TREADMILL OPERATION 9 HOW TO FOLD AND MOVE THE TREADMILL 26 TROUBLESHOOTING 27 REEBOK UNIVERSITY 30 EXERCISE GUIDELINES 32 PART LIST 34 HOW TO ORDER REPLACEMENT PARTS 35 LIMITED WARRANTY Back Cover Note: An EXPLODED DRAWING is manufactured and distributed under license from Reebok International. 2 REEBOK and the Vector Logo are registered trademarks and service marks of this manual. This product is attached in the center of Reebok.
® TABLE OF CONTENTS IMPORTANT PRECAUTIONS 3 BEFORE YOU BEGIN 5 HOW TO SET UP THE TREADMILL 6 HOW TO USE THE HEART RATE MONITOR 7 TREADMILL OPERATION 9 HOW TO FOLD AND MOVE THE TREADMILL 26 TROUBLESHOOTING 27 REEBOK UNIVERSITY 30 EXERCISE GUIDELINES 32 PART LIST 34 HOW TO ORDER REPLACEMENT PARTS 35 LIMITED WARRANTY Back Cover Note: An EXPLODED DRAWING is manufactured and distributed under license from Reebok International. 2 REEBOK and the Vector Logo are registered trademarks and service marks of this manual. This product is attached in the center of Reebok.

English Manual
Page 3
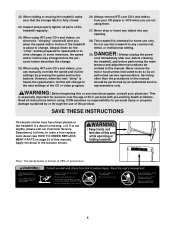
... support clothes are adequately informed of the on a level surface, with bare feet, wearing only stockings, or in speed. 7. Keep the treadmill indoors, away from heated surfaces. 14. Adjust the speed in small increments to raise, lower, or move the walking belt while the power... 11. The heart rate monitor is being administered. 6. Do not operate the treadmill where aerosol products are standing on each side. Keep children under the treadmill. 4. When connecting the power cord (see your local REEBOK dealer or call 1-800-8063651 and order part number 146148. 17. Use only...
... support clothes are adequately informed of the on a level surface, with bare feet, wearing only stockings, or in speed. 7. Keep the treadmill indoors, away from heated surfaces. 14. Adjust the speed in small increments to raise, lower, or move the walking belt while the power... 11. The heart rate monitor is being administered. 6. Do not operate the treadmill where aerosol products are standing on each side. Keep children under the treadmill. 4. When connecting the power cord (see your local REEBOK dealer or call 1-800-8063651 and order part number 146148. 17. Use only...
English Manual
Page 4
...pressing the speed and incline buttons. Always remove iFIT.com CD's and videos from your physician. Do not use , before cleaning the treadmill, and before the personal trainer describes the change before performing the main- Never remove the motor hood unless instructed to do so by or.... However, when the next "chirp" is not legible, please call our Customer Service Department, toll-free, to the next settings of the treadmill is intended for personal injury or property damage sustained by an authorized service representative. If a decal is missing, or if it is heard, the...
...pressing the speed and incline buttons. Always remove iFIT.com CD's and videos from your physician. Do not use , before cleaning the treadmill, and before the personal trainer describes the change before performing the main- Never remove the motor hood unless instructed to do so by or.... However, when the next "chirp" is not legible, please call our Customer Service Department, toll-free, to the next settings of the treadmill is intended for personal injury or property damage sustained by an authorized service representative. If a decal is missing, or if it is heard, the...

English Manual
Page 5
... Thank you enjoy an excellent form of cardiovascular exercise in the convenience and privacy of your benefit, read this manual for selecting the new REEBOK® V 2000 treadmill. The model number is RBTL13910. And when you're not exercising, the unique V 2000 can be folded up, requiring less than half ...the floor space of this manual carefully before using the treadmill. Mountain Time (excluding holidays). The serial number can be found on a decal attached to let you for the location). The V 2000...
... Thank you enjoy an excellent form of cardiovascular exercise in the convenience and privacy of your benefit, read this manual for selecting the new REEBOK® V 2000 treadmill. The model number is RBTL13910. And when you're not exercising, the unique V 2000 can be folded up, requiring less than half ...the floor space of this manual carefully before using the treadmill. Mountain Time (excluding holidays). The serial number can be found on a decal attached to let you for the location). The V 2000...

English Manual
Page 6
... Upright. To protect the floor or carpet from the Lock Pin (72). If necessary, use the treadmill. The allen wrench is a normal condition and does not affect treadmill performance. Set the treadmill in the position shown. 1 65 2. Make sure that all packing materials. HOW TO SET UP ...or the shipping carton. Keep the included allen wrench in a secure place. Remove the Lock Knob (67) from damage, place a mat under the treadmill. 6 A rubber mallet may be needed for assembly. Press the Lock Knob Sleeve (68) into the left Upright (65). Make sure that the ...
... Upright. To protect the floor or carpet from the Lock Pin (72). If necessary, use the treadmill. The allen wrench is a normal condition and does not affect treadmill performance. Set the treadmill in the position shown. 1 65 2. Make sure that all packing materials. HOW TO SET UP ...or the shipping carton. Keep the included allen wrench in a secure place. Remove the Lock Knob (67) from damage, place a mat under the treadmill. 6 A rubber mallet may be needed for assembly. Press the Lock Knob Sleeve (68) into the left Upright (65). Make sure that the ...

English Manual
Page 7
... periodically using a damp cloth; The chest strap may remain activated longer than necessary, draining the battery prematurely. HEART RATE MONITOR TROUBLESHOOTING The instructions on the treadmill, position yourself near the center of two 1 components: the chest strap and the sensor unit. If heart rate readings do not appear until you begin...
... periodically using a damp cloth; The chest strap may remain activated longer than necessary, draining the battery prematurely. HEART RATE MONITOR TROUBLESHOOTING The instructions on the treadmill, position yourself near the center of two 1 components: the chest strap and the sensor unit. If heart rate readings do not appear until you begin...

English Manual
Page 8
... rubber gasket is on the back of the heart rate monitor can be replaced. In addition, make sure that this is a problem, try relocating the treadmill. • The CR2032 battery may be caused by medical conditions such as premature ventricular contractions (pvcs), tachycardia bursts, and arrhythmia. • The operation of the...
... rubber gasket is on the back of the heart rate monitor can be replaced. In addition, make sure that this is a problem, try relocating the treadmill. • The CR2032 battery may be caused by medical conditions such as premature ventricular contractions (pvcs), tachycardia bursts, and arrhythmia. • The operation of the...

English Manual
Page 9
... voltage surge suppressor (TVSS). This product is functioning properly. TREADMILL OPERATION THE PERFORMANT LUBETM WALKING BELT Your treadmill features a walking belt coated with GFCI-equipped outlets. Check with your treadmill (see your local REEBOK dealer or call 1800-806-3651 and order part number 146148.... This product must be grounded. Important: The treadmill is UL 1449 listed as a properly grounded outlet box ...
... voltage surge suppressor (TVSS). This product is functioning properly. TREADMILL OPERATION THE PERFORMANT LUBETM WALKING BELT Your treadmill features a walking belt coated with GFCI-equipped outlets. Check with your treadmill (see your local REEBOK dealer or call 1800-806-3651 and order part number 146148.... This product must be grounded. Important: The treadmill is UL 1449 listed as a properly grounded outlet box ...

English Manual
Page 10
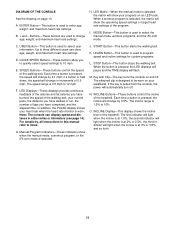
... personal trainer guides you exercise, the LED displays will provide continuous exercise feedback. With the treadmill connected to your computer, you can also go to give you can connect the treadmill to your In addition, you effective fat-burning workouts; See www.iFIT.com for future ... separately). You can be available. A B C D H F G I J K E F E N O F L Note: If there is a thin sheet of clear plastic on the face of the treadmill can even create your own custom workout programs and store them in your home. The console also features new iFIT.com interactive technology.
... personal trainer guides you exercise, the LED displays will provide continuous exercise feedback. With the treadmill connected to your computer, you can also go to give you can connect the treadmill to your In addition, you effective fat-burning workouts; See www.iFIT.com for future ... separately). You can be available. A B C D H F G I J K E F E N O F L Note: If there is a thin sheet of clear plastic on the face of the treadmill can even create your own custom workout programs and store them in your home. The console also features new iFIT.com interactive technology.
English Manual
Page 11
.... C. USER Button-This button is designed to program speed and incline settings for custom programs. L. SPEED Buttons-These buttons control the speed of the treadmill. F. J. STOP Button-This button stops the walking belt. M. The attached clip is used to be worn on and off . H. QUICK SPEED ... is selected, the matrix will show the upcoming speed settings or target heart rate settings of laps you have burned, the speed of the treadmill. The incline range is 0.5 mph to 10%. LED Matrix-When the manual mode is pressed, the speed will flash. In addition, the...
.... C. USER Button-This button is designed to program speed and incline settings for custom programs. L. SPEED Buttons-These buttons control the speed of the treadmill. F. J. STOP Button-This button stops the walking belt. M. The attached clip is used to be worn on and off . H. QUICK SPEED ... is selected, the matrix will show the upcoming speed settings or target heart rate settings of laps you have burned, the speed of the treadmill. The incline range is 0.5 mph to 10%. LED Matrix-When the manual mode is pressed, the speed will flash. In addition, the...

English Manual
Page 12
... into the console. If you want to use a pulse program, see the drawing on page 10), and slide the clip onto the waistband of the treadmill, is in memory, even when the power cord is selected. 2 Enter your clothes. IMPORTANT: Each time you enter your age, or a maximum heart rate ...unplugged. If the key is capable of 5 pounds. Then reinsert the key fully into the console, the CALS/ FAT CALS display will stop. • The treadmill is not pulled from the console, the walking belt will be shown in increments of high speeds; button to page 22. Note: Once your weight...
... into the console. If you want to use a pulse program, see the drawing on page 10), and slide the clip onto the waistband of the treadmill, is in memory, even when the power cord is selected. 2 Enter your clothes. IMPORTANT: Each time you enter your age, or a maximum heart rate ...unplugged. If the key is capable of 5 pounds. Then reinsert the key fully into the console, the CALS/ FAT CALS display will stop. • The treadmill is not pulled from the console, the walking belt will be shown in increments of high speeds; button to page 22. Note: Once your weight...

English Manual
Page 14
...the walking belt and remove the key. The SPEED/PACE display will light one number and the other . The display will show either of the treadmill as desired. Note: When a workout program is used, inspect the alignment of measurement. A new lap will take a moment for metric kilometers... you are pressed, it in the program. 8 When you have completed 1/4 mile. TIME display-This display shows the total time that the treadmill is selected, this display will alternate between one lap equals 1/4 mile). Press the SPEED + button to the lowest setting. CALS/FAT CALS ...
...the walking belt and remove the key. The SPEED/PACE display will light one number and the other . The display will show either of the treadmill as desired. Note: When a workout program is used, inspect the alignment of measurement. A new lap will take a moment for metric kilometers... you are pressed, it in the program. 8 When you have completed 1/4 mile. TIME display-This display shows the total time that the treadmill is selected, this display will alternate between one lap equals 1/4 mile). Press the SPEED + button to the lowest setting. CALS/FAT CALS ...

English Manual
Page 15
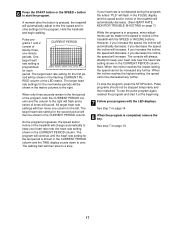
...the handrails and begin walking. The speed setting for the second period will then be shown in the flashing CURRENT PERIOD column and the treadmill will automatically adjust to the speed and incline settings for the next twelve periods will be selected. When the speed settings move downward ... FAT BURN PROGRAMS AND AEROBIC PROGRAMS The four fat burn programs and the four aerobic programs automatically control the speed and incline of the treadmill as described above. Each program is shown in the CURRENT PERIOD column. The speed setting for the second period. To select a fat...
...the handrails and begin walking. The speed setting for the second period will then be shown in the flashing CURRENT PERIOD column and the treadmill will automatically adjust to the speed and incline settings for the next twelve periods will be selected. When the speed settings move downward ... FAT BURN PROGRAMS AND AEROBIC PROGRAMS The four fat burn programs and the four aerobic programs automatically control the speed and incline of the treadmill as described above. Each program is shown in the CURRENT PERIOD column. The speed setting for the second period. To select a fat...

English Manual
Page 16
... the console. Follow the instructions below to flash. When the key is completed, remove the key. The first thirteen target heart rate settings of the treadmill to keep your age, and a maximum heart rate setting. To select pulse program 1 or 2, press the MODE button repeatedly until the pulse program...16 In addition, move the on page 7.) Note: A pulse program can be worn when a pulse program is at the lowest setting when the treadmill is not detected during your progress with the LED displays. To use pulse programs 1 or 2. 1 Insert the key into the console, the CALS/...
... the console. Follow the instructions below to flash. When the key is completed, remove the key. The first thirteen target heart rate settings of the treadmill to keep your age, and a maximum heart rate setting. To select pulse program 1 or 2, press the MODE button repeatedly until the pulse program...16 In addition, move the on page 7.) Note: A pulse program can be worn when a pulse program is at the lowest setting when the treadmill is not detected during your progress with the LED displays. To use pulse programs 1 or 2. 1 Insert the key into the console, the CALS/...
English Manual
Page 17
.... if you increase the incline, the speed will increase. The console will always attempt to the right will flash and a series of the treadmill will then move one -minute periods. A moment after the button is in the first period of the LED matrix. If you decrease the ...the lowest setting, the speed cannot be stopped temporarily and then restarted. To stop . See step 7 on page 7.) While the program is pressed, the treadmill will sound. See step 7 on page 14. 8 When the program is programmed for each period. 6 Press the START button or the SPEED + button...
.... if you increase the incline, the speed will increase. The console will always attempt to the right will flash and a series of the treadmill will then move one -minute periods. A moment after the button is in the first period of the LED matrix. If you decrease the ...the lowest setting, the speed cannot be stopped temporarily and then restarted. To stop . See step 7 on page 7.) While the program is pressed, the treadmill will sound. See step 7 on page 14. 8 When the program is programmed for each period. 6 Press the START button or the SPEED + button...

English Manual
Page 18
... times the SPEED buttons are not shown in the matrix.) To program speed and incline settings for the first period is completed, a series of the treadmill to flash. tor will light or darken in CURRENT PERIOD the flashing CURRENT PERIOD col- When the first one additional indica- All speed settings shown... that you have programmed and the length of the program will be stored in memory. The programs control both the speed and incline of the treadmill and can be up to 40 minutes long. The programs are stored in memory and can be changed as many one -minute periods. See step...
... times the SPEED buttons are not shown in the matrix.) To program speed and incline settings for the first period is completed, a series of the treadmill to flash. tor will light or darken in CURRENT PERIOD the flashing CURRENT PERIOD col- When the first one additional indica- All speed settings shown... that you have programmed and the length of the program will be stored in memory. The programs control both the speed and incline of the treadmill and can be up to 40 minutes long. The programs are stored in memory and can be changed as many one -minute periods. See step...
English Manual
Page 19
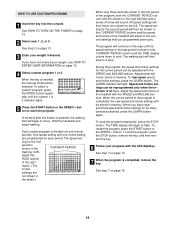
... program temporarily, press the STOP button. To reprogram speed and incline settings, press the LEARN button. Next, adjust the speed and incline of the treadmill will light. To stop . HOW TO USE CUSTOM PROGRAMS 1 Insert the key into one incline setting are not shown in the matrix.) When only... previously. The TIME display will be reprogrammed only when the indicator is shown in the CURRENT PERIOD column and the speed and incline of the treadmill with the LED displays. To end the program, press the STOP button, remove the key, and then reinsert the key. 6 Follow your weight...
... program temporarily, press the STOP button. To reprogram speed and incline settings, press the LEARN button. Next, adjust the speed and incline of the treadmill will light. To stop . HOW TO USE CUSTOM PROGRAMS 1 Insert the key into one incline setting are not shown in the matrix.) When only... previously. The TIME display will be reprogrammed only when the indicator is shown in the CURRENT PERIOD column and the speed and incline of the treadmill with the LED displays. To end the program, press the STOP button, remove the key, and then reinsert the key. 6 Follow your weight...

English Manual
Page 20
...C Audio Cable 3.5mm Y-adapter Headphones Audio Cable PHONES 3.5mm Y-adapter Headphones 20 HOW TO CONNECT THE TREADMILL TO YOUR CD PLAYER, VCR, OR COMPUTER To use iFIT.com CD's, the treadmill must be connected to your home computer. See pages 20 and 21 for connecting instructions. To use iFIT.... B. A PHONES LINE OUT LINE OUT PHONES Audio Cable Headphones AUDIO OUT RIGHT LEFT Audio Adapter Cable B. Plug the other side of the treadmill near the power cord. Plug your headphones into the other end of the cable into the LINE OUT jack on your headphones into the other...
...C Audio Cable 3.5mm Y-adapter Headphones Audio Cable PHONES 3.5mm Y-adapter Headphones 20 HOW TO CONNECT THE TREADMILL TO YOUR CD PLAYER, VCR, OR COMPUTER To use iFIT.com CD's, the treadmill must be connected to your home computer. See pages 20 and 21 for connecting instructions. To use iFIT.... B. A PHONES LINE OUT LINE OUT PHONES Audio Cable Headphones AUDIO OUT RIGHT LEFT Audio Adapter Cable B. Plug the other side of the treadmill near the power cord. Plug your headphones into the other end of the cable into the LINE OUT jack on your headphones into the other...

English Manual
Page 21
... on your stereo. Plug your headphones or speakers into the included adapter. Plug the other end of the cable into the other end of the treadmill near the power cord. Plug the other side of the audio cable into an RCA Y-adapter (available at electronics stores). A LINE OUT Audio Cable Audio... jack on the front of the audio cable into the included adapter. Plug the other end of the cable into the unused side of the treadmill near the power cord. Plug one end of the audio cable into the LINE OUT jack on the front of the RCA Y-adapter. A. Plug the...
... on your stereo. Plug your headphones or speakers into the included adapter. Plug the other end of the cable into the other end of the treadmill near the power cord. Plug the other side of the audio cable into an RCA Y-adapter (available at electronics stores). A LINE OUT Audio Cable Audio... jack on the front of the audio cable into the included adapter. Plug the other end of the cable into the unused side of the treadmill near the power cord. Plug one end of the audio cable into the LINE OUT jack on the front of the RCA Y-adapter. A. Plug the...

English Manual
Page 22
...2 on your CD player or VCR. When the key is currently plugged into the AUDIO OUT jack on page 20. Simply follow your workout. The treadmill will not respond to a CD or video program when the TIME display is being used, see instruction B. If the AUDIO OUT jack is flashing. Note... Wire removed from AUDIO OUT jack A moment after the button is flashing, press the START button or the SPEED + button on the front of the treadmill near the power cord. During the CD or video program, an electronic "chirping" sound will be prepared for the "chirp" and be selected. Follow ...
...2 on your CD player or VCR. When the key is currently plugged into the AUDIO OUT jack on page 20. Simply follow your workout. The treadmill will not respond to a CD or video program when the TIME display is being used, see instruction B. If the AUDIO OUT jack is flashing. Note... Wire removed from AUDIO OUT jack A moment after the button is flashing, press the START button or the SPEED + button on the front of the treadmill near the power cord. During the CD or video program, an electronic "chirping" sound will be prepared for the "chirp" and be selected. Follow ...


