

English Manual
Page 2
® ® TABLE OF CONTENTS IMPORTANT PRECAUTIONS 3 BEFORE YOU BEGIN 5 ASSEMBLY 6 HOW TO USE THE CHEST PULSE MONITOR 8 TREADMILL OPERATION 9 HOW TO FOLD AND MOVE THE TREADMILL 22 TROUBLE-SHOOTING 23 REEBOK UNIVERSITY 26 EXERCISE GUIDELINES 28 PART LIST 30 HOW TO ORDER REPLACEMENT PARTS 31 LIMITED WARRANTY Back Cover Note: An EXPLODED DRAWING is attached in the center of this manual. 2
® ® TABLE OF CONTENTS IMPORTANT PRECAUTIONS 3 BEFORE YOU BEGIN 5 ASSEMBLY 6 HOW TO USE THE CHEST PULSE MONITOR 8 TREADMILL OPERATION 9 HOW TO FOLD AND MOVE THE TREADMILL 22 TROUBLE-SHOOTING 23 REEBOK UNIVERSITY 26 EXERCISE GUIDELINES 28 PART LIST 30 HOW TO ORDER REPLACEMENT PARTS 31 LIMITED WARRANTY Back Cover Note: An EXPLODED DRAWING is attached in the center of this manual. 2

English Manual
Page 3
... informed of all times. 400 volts or less and a minimum surge dissipation of high speeds. Never move the treadmill until it . Never start the treadmill while you are standing on any surface that the storage latch is intended only as an exercise aid in determining...a level surface, with bare feet, wearing only stockings, or in order to persons, read the following important precautions and information before operating the treadmill. 1. Use only a single-outlet surge suppressor that could become caught in a garage or covered patio, or near water. 5. IMPORTANT PRECAUTIONS WARNING...
... informed of all times. 400 volts or less and a minimum surge dissipation of high speeds. Never move the treadmill until it . Never start the treadmill while you are standing on any surface that the storage latch is intended only as an exercise aid in determining...a level surface, with bare feet, wearing only stockings, or in order to persons, read the following important precautions and information before operating the treadmill. 1. Use only a single-outlet surge suppressor that could become caught in a garage or covered patio, or near water. 5. IMPORTANT PRECAUTIONS WARNING...

English Manual
Page 4
...the speed and/or incline may change . Never insert or drop any object into any time by or through the use , before cleaning the treadmill, and before the personal trainer describes the change to do so by an authorized service representative only. 23. Never remove the motor hood unless ...instructed to the next settings of the treadmill regularly. 25. If a decal is shown at any opening. When using iFIT.com CD's and videos, you are not using . Always unplug ...
...the speed and/or incline may change . Never insert or drop any object into any time by or through the use , before cleaning the treadmill, and before the personal trainer describes the change to do so by an authorized service representative only. 23. Never remove the motor hood unless ...instructed to the next settings of the treadmill regularly. 25. If a decal is shown at any opening. When using iFIT.com CD's and videos, you are not using . Always unplug ...
English Manual
Page 5
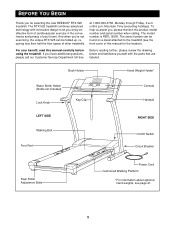
... please call our Customer Service Department toll-free Before reading further, please review the drawing below and familiarize yourself with innovative design to the treadmill (see page 21. 5 The model number is RBTL15500. Book Holder Hand Weight Holder* Water Bottle Holder (Bottle not included) Lock Knob... an effective form of cardiovascular exercise in the convenience and privacy of your benefit, read this manual for selecting the new REEBOK® RTX 525 treadmill. And when you're not exercising, the unique RTX 525 can be folded up, requiring less than half the floor ...
... please call our Customer Service Department toll-free Before reading further, please review the drawing below and familiarize yourself with innovative design to the treadmill (see page 21. 5 The model number is RBTL15500. Book Holder Hand Weight Holder* Water Bottle Holder (Bottle not included) Lock Knob... an effective form of cardiovascular exercise in the convenience and privacy of your benefit, read this manual for selecting the new REEBOK® RTX 525 treadmill. And when you're not exercising, the unique RTX 525 can be folded up, requiring less than half the floor ...

English Manual
Page 6
... on the bottom. Make sure that the wires in the Uprights. Next, attach the Handrail Extension by tightening two Small Screws (67) into the treadmill as shown. Assembly requires your own Phillips screw- This is coated with the holes in the post. Make sure that the Extension Legs (102) ... to fully insert it. Note: It may be replaced, use the replacement Base Pad. 2 69 110 99 99 100 102 69 100 102 3. Set the treadmill in the position shown. 1 Insert one of the four 3/4" Screws (100). Attach each Extension Leg (102) with a rubber mallet to the Handrail Extension (66). 6 ...
... on the bottom. Make sure that the wires in the Uprights. Next, attach the Handrail Extension by tightening two Small Screws (67) into the treadmill as shown. Assembly requires your own Phillips screw- This is coated with the holes in the post. Make sure that the Extension Legs (102) ... to fully insert it. Note: It may be replaced, use the replacement Base Pad. 2 69 110 99 99 100 102 69 100 102 3. Set the treadmill in the position shown. 1 Insert one of the four 3/4" Screws (100). Attach each Extension Leg (102) with a rubber mallet to the Handrail Extension (66). 6 ...
English Manual
Page 7
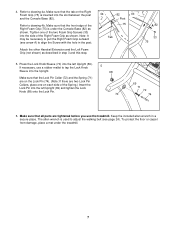
Attach the other Handrail Extension and the Left Foam Grip (not shown) as shown. Refer to drawing 4a. If necessary, use the treadmill. Keep the included allen wrench in the post. 4. Make sure that all parts are two Lock Pin Collars, place one of the two Foam Grip ... between the post and the Console Base (82). Make sure that the tab on each side of the Right Foam Grip (75) is under the treadmill. 7 The allen wrench is inserted into the Upright. Press the Lock Knob Sleeve (70) into the left Upright (69). To protect the floor or carpet...
Attach the other Handrail Extension and the Left Foam Grip (not shown) as shown. Refer to drawing 4a. If necessary, use the treadmill. Keep the included allen wrench in the post. 4. Make sure that all parts are two Lock Pin Collars, place one of the two Foam Grip ... between the post and the Console Base (82). Make sure that the tab on each side of the Right Foam Grip (75) is under the treadmill. 7 The allen wrench is inserted into the Upright. Press the Lock Knob Sleeve (70) into the left Upright (69). To protect the floor or carpet...
English Manual
Page 8
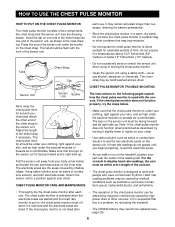
... or chemicals. Make sure that the chest pulse monitor is under the pectoral muscles or breasts as high under the buckle on the treadmill, position yourself near the center of the console. • The chest pulse monitor is comfortable. do not appear until you begin ... Adjust the length of the sensor unit. Note: If the chest pulse monitor does not function when positioned as described, try relocating the treadmill. • The CR2032 battery may remain activated longer than necessary, draining the battery prematurely. • Store the chest pulse monitor in ...
... or chemicals. Make sure that the chest pulse monitor is under the pectoral muscles or breasts as high under the buckle on the treadmill, position yourself near the center of the console. • The chest pulse monitor is comfortable. do not appear until you begin ... Adjust the length of the sensor unit. Note: If the chest pulse monitor does not function when positioned as described, try relocating the treadmill. • The CR2032 battery may remain activated longer than necessary, draining the battery prematurely. • Store the chest pulse monitor in ...

English Manual
Page 9
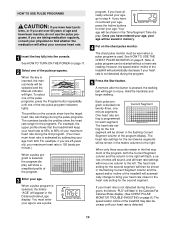
...grounded outlet (drawing 1) can result in an increased risk of 450 joules. If it should be installed by a metal screw. Important: The treadmill is equipped with a cord having an equipment-grounding conductor and a grounding plug. The green-colored rigid ear, lug, or the like extending from... if you are not grounded. Some 2-pole receptacle outlet box covers are in your treadmill (see drawing 1 at the right). Check with GFCI-equipped outlets. To decrease the possibility of your treadmill being turned on a nominal 120-volt circuit, and has a grounding plug that looks...
...grounded outlet (drawing 1) can result in an increased risk of 450 joules. If it should be installed by a metal screw. Important: The treadmill is equipped with a cord having an equipment-grounding conductor and a grounding plug. The green-colored rigid ear, lug, or the like extending from... if you are not grounded. Some 2-pole receptacle outlet box covers are in your treadmill (see drawing 1 at the right). Check with GFCI-equipped outlets. To decrease the possibility of your treadmill being turned on a nominal 120-volt circuit, and has a grounding plug that looks...

English Manual
Page 10
...console dry. See www.iFIT.com for complete details. Various factors may affect the accuracy of the treadmill to your workout. Using the included audio cable, you can connect the treadmill to the treadmill, you get the most from our internet site. Each CD features two programs designed by adding an... even measure your home. Avoid spilling liquids on the power. • Always wear the clip (see the drawing above) while operating the treadmill. • Adjust the speed in small increments to your exercise. You can be changed with a class and an instructor-the hottest new ...
...console dry. See www.iFIT.com for complete details. Various factors may affect the accuracy of the treadmill to your workout. Using the included audio cable, you can connect the treadmill to the treadmill, you get the most from our internet site. Each CD features two programs designed by adding an... even measure your home. Avoid spilling liquids on the power. • Always wear the clip (see the drawing above) while operating the treadmill. • Adjust the speed in small increments to your exercise. You can be changed with a class and an instructor-the hottest new ...
English Manual
Page 11
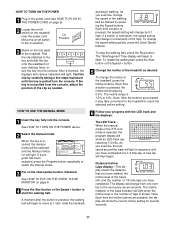
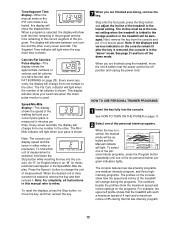
... selected, the program display will begin . Each time a button is pressed, the walking belt will show the current incline setting for the treadmill to flash. As you exercise, change the speed setting quickly, press the Quick Speed buttons. The Incline indicator or the Laps indicator will...down, the speed setting will light. Distance/Incline/ Laps display-This display shows the distance that you have walked, the incline level of the treadmill, and the number of 1/4-mile laps you have completed. Next, insert the key into the console. If a program has been selected, ...
... selected, the program display will begin . Each time a button is pressed, the walking belt will show the current incline setting for the treadmill to flash. As you exercise, change the speed setting quickly, press the Quick Speed buttons. The Incline indicator or the Laps indicator will...down, the speed setting will light. Distance/Incline/ Laps display-This display shows the distance that you have walked, the incline level of the treadmill, and the number of 1/4-mile laps you have completed. Next, insert the key into the console. If a program has been selected, ...
English Manual
Page 12
...of measurement is selected, remove the key and then reinsert it in minutes per mile). The incline must be at the lowest setting when the treadmill is shown. When you are finished exercising, remove the key. The console features two low-intensity programs, one medium-intensity program, and three ...the other every seven seconds. Note: If the displays and various indicators on /off switch near the power cord to the storage position or the treadmill will be selected and the Manual indicator will reach a maximum speed of 4 mph and a maximum incline of calories and fat calories you are ...
...of measurement is selected, remove the key and then reinsert it in minutes per mile). The incline must be at the lowest setting when the treadmill is shown. When you are finished exercising, remove the key. The console features two low-intensity programs, one medium-intensity program, and three ...the other every seven seconds. Note: If the displays and various indicators on /off switch near the power cord to the storage position or the treadmill will be selected and the Manual indicator will reach a maximum speed of 4 mph and a maximum incline of calories and fat calories you are ...
English Manual
Page 13
... the Start button or the Speed + button. Note: If the displays and various indicators on the console remain lit after the button is pressed, the treadmill will begin walking. The Time/ Segment Time display will show a simplified profile of different lengths. See HOW TO PUT ON THE CHEST PULSE MONITOR on... to start the program. When you manually adjust the speed setting so that only the highest indicators in the flashing Current Segment column and the treadmill will last. 3 Put on page 11. 6 When the program is too high or too low, you have the same number of the program ends, ...
... the Start button or the Speed + button. Note: If the displays and various indicators on the console remain lit after the button is pressed, the treadmill will begin walking. The Time/ Segment Time display will show a simplified profile of different lengths. See HOW TO PUT ON THE CHEST PULSE MONITOR on... to start the program. When you manually adjust the speed setting so that only the highest indicators in the flashing Current Segment column and the treadmill will last. 3 Put on page 11. 6 When the program is too high or too low, you have the same number of the program ends, ...
English Manual
Page 14
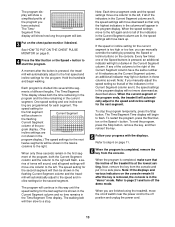
...detected. 14 The heart rate set - When only three seconds remain in the flashing Current Segment column and the speed and/or incline of the treadmill will automatically change during the pulse programs. The numbers beside the profiles show a simplified profile of the program. 3 Enter your age. A moment...be shown in the Calories/Fat Calories/Pulse display. (See CHEST PULSE MONITOR TROUBLE-SHOOTING on page 8.) The speed and/or incline of the treadmill may also decrease until one - If your heart rate is not detected during the program, the letters "PLS" will flash in the flashing...
...detected. 14 The heart rate set - When only three seconds remain in the flashing Current Segment column and the speed and/or incline of the treadmill will automatically change during the pulse programs. The numbers beside the profiles show a simplified profile of the program. 3 Enter your age. A moment...be shown in the Calories/Fat Calories/Pulse display. (See CHEST PULSE MONITOR TROUBLE-SHOOTING on page 8.) The speed and/or incline of the treadmill may also decrease until one - If your heart rate is not detected during the program, the letters "PLS" will flash in the flashing...
English Manual
Page 15
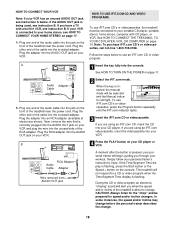
...'s or videocassettes, press the Program button repeatedly until the iFIT.com indicator lights. 3 Insert the iFIT.com CD or videocassette. See HOW TO CONNECT THE TREADMILL TO YOUR CD PLAYER, VCR, OR COMPUTER on page 11. 2 Select the iFIT.com mode. Follow the steps below . IN VIDEO AUDIO IN CH 34... OUT RF OUT AUDIO OUT RIGHT LEFT Audio Adapter Cable B. To use iFIT.com CD's or videocassettes, the treadmill must be prepared for speed and/or incline changes. IN VIDEO AUDIO IN CH 34 OUT RF OUT A moment after the button is about to...
...'s or videocassettes, press the Program button repeatedly until the iFIT.com indicator lights. 3 Insert the iFIT.com CD or videocassette. See HOW TO CONNECT THE TREADMILL TO YOUR CD PLAYER, VCR, OR COMPUTER on page 11. 2 Select the iFIT.com mode. Follow the steps below . IN VIDEO AUDIO IN CH 34... OUT RF OUT AUDIO OUT RIGHT LEFT Audio Adapter Cable B. To use iFIT.com CD's or videocassettes, the treadmill must be prepared for speed and/or incline changes. IN VIDEO AUDIO IN CH 34 OUT RF OUT A moment after the button is about to...

English Manual
Page 16
... adapter. Plug the other end of the Y-adapter. Plug the other end of the cable into the LINE OUT jack on the front of the treadmill near the power cord. Plug the adapter into a 3.5mm Y-adapter (available at electronics stores). B PHONES B CD VCR Amp LINE OUT Audio Cable RCA... Note: If your computer has only a PHONES jack, see instruction A. Plug one end of the audio cable into the jack on the front of the treadmill near the power cord. A. B. If your computer has a 3.5mm LINE OUT jack, see instruction B. Plug one end of the cable into an RCA ...
... adapter. Plug the other end of the Y-adapter. Plug the other end of the cable into the LINE OUT jack on the front of the treadmill near the power cord. Plug the adapter into a 3.5mm Y-adapter (available at electronics stores). B PHONES B CD VCR Amp LINE OUT Audio Cable RCA... Note: If your computer has only a PHONES jack, see instruction A. Plug one end of the audio cable into the jack on the front of the treadmill near the power cord. A. B. If your computer has a 3.5mm LINE OUT jack, see instruction B. Plug one end of the cable into an RCA ...

English Manual
Page 17
...Audio Cable Headphones AUDIO OUT RIGHT LEFT Audio Adapter Cable B. Plug one end of the audio cable into the jack on the front of the treadmill near the power cord. Plug the Y-adapter into the other end of the cable into the jack on the front of the cable into the... CONNECT YOUR PORTABLE CD PLAYER Note: If your CD player has separate LINE OUT and PHONES jacks, see instruction C. A. Plug the other side of the treadmill near the power cord. Plug the Y-adapter into the LINE OUT jack on your headphones into a 3.5mm Y-adapter (available at electronics stores). Plug the ...
...Audio Cable Headphones AUDIO OUT RIGHT LEFT Audio Adapter Cable B. Plug one end of the audio cable into the jack on the front of the treadmill near the power cord. Plug the Y-adapter into the other end of the cable into the jack on the front of the cable into the... CONNECT YOUR PORTABLE CD PLAYER Note: If your CD player has separate LINE OUT and PHONES jacks, see instruction C. A. Plug the other side of the treadmill near the power cord. Plug the Y-adapter into the LINE OUT jack on your headphones into a 3.5mm Y-adapter (available at electronics stores). Plug the ...

English Manual
Page 18
... 11. 7 When the program is in the Current Segment column and the Time/Segment Time display counts down to the speed or incline of the treadmill with the displays. The walking belt will increase. if you decrease the speed, the incline will then slow to step 6 on page 13.
... 11. 7 When the program is in the Current Segment column and the Time/Segment Time display counts down to the speed or incline of the treadmill with the displays. The walking belt will increase. if you decrease the speed, the incline will then slow to step 6 on page 13.

English Manual
Page 19
...'s and videocassettes from your CD player or VCR when you are using them. 19 See step 6 on the console • adjust the volume of the treadmill does not change to flash. The Time/Segment Time display will change to flash. When the CD or video program is completed, the walking belt...
...'s and videocassettes from your CD player or VCR when you are using them. 19 See step 6 on the console • adjust the volume of the treadmill does not change to flash. The Time/Segment Time display will change to flash. When the CD or video program is completed, the walking belt...
English Manual
Page 20
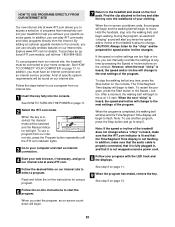
...track and the displays. Read and follow the on the console. When the next "chirp" is fully plugged in, and that interactively control your treadmill to select a program. Note: If the speed or incline of the program. To use programs from the internet. In addition, you can play... iFIT.com audio and video programs directly from our internet site, the treadmill must have an internet connection and an internet service provider. When the key is completed, the walking belt will change to your computer and...
...track and the displays. Read and follow the on the console. When the next "chirp" is fully plugged in, and that interactively control your treadmill to select a program. Note: If the speed or incline of the program. To use programs from the internet. In addition, you can play... iFIT.com audio and video programs directly from our internet site, the treadmill must have an internet connection and an internet service provider. When the key is completed, the walking belt will change to your computer and...
English Manual
Page 21
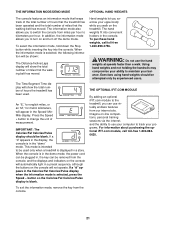
... the ability to use your computer to kilometers per hour. The Time/Segment Time display will show the total number of hours the treadmill has been used only when a treadmill is in the demo mode, the power cord can be plugged in, the key can use the hand weights at speeds faster.... THE INFORMATION MODE/DEMO MODE OPTIONAL HAND WEIGHTS The console features an information mode that keeps track of the total number of hours that the treadmill has been operated and the total number of miles that the walking belt has moved. In addition, the information mode allows you walk on and...
... the ability to use your computer to kilometers per hour. The Time/Segment Time display will show the total number of hours the treadmill has been used only when a treadmill is in the demo mode, the power cord can be plugged in, the key can use the hand weights at speeds faster.... THE INFORMATION MODE/DEMO MODE OPTIONAL HAND WEIGHTS The console features an information mode that keeps track of the total number of hours that the treadmill has been operated and the total number of miles that the walking belt has moved. In addition, the information mode allows you walk on and...


