
User Manual
Page 2
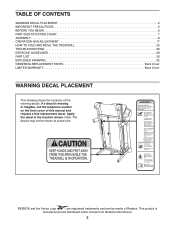
... 7 ASSEMBLY 8 OPERATION AND ADJUSTMENT 17 HOW TO FOLD AND MOVE THE TREADMILL 25 TROUBLESHOOTING 26 EXERCISE GUIDELINES 29 PART LIST 30 EXPLODED DRAWING 32 ORDERING REPLACEMENT PARTS Back Cover LIMITED WARRANTY Back Cover WARNING DECAL PLACEMENT This drawing shows the locations of Reebok. Apply the decal in the location shown. Note: The decals may...
... 7 ASSEMBLY 8 OPERATION AND ADJUSTMENT 17 HOW TO FOLD AND MOVE THE TREADMILL 25 TROUBLESHOOTING 26 EXERCISE GUIDELINES 29 PART LIST 30 EXPLODED DRAWING 32 ORDERING REPLACEMENT PARTS Back Cover LIMITED WARRANTY Back Cover WARNING DECAL PLACEMENT This drawing shows the locations of Reebok. Apply the decal in the location shown. Note: The decals may...
User Manual
Page 4
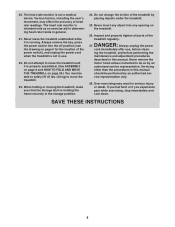
...to move the treadmill. 23. Inspect and properly tighten all parts of heart rate readings. ing the treadmill, and before clean- vice representative only. 28. Do not change the incline of the power switch), and unplug the power cord when the treadmill is running. 20. When folding or moving the treadmill, make sure ... switch into any object into the off position (see the drawing on page 24.) You must be performed by placing objects under the treadmill. 25. DANGER: 27. The heart rate monitor is properly assembled. (See ASSEMBLY on page 8 and HOW TO FOLD AND MOVE THE...
...to move the treadmill. 23. Inspect and properly tighten all parts of heart rate readings. ing the treadmill, and before clean- vice representative only. 28. Do not change the incline of the power switch), and unplug the power cord when the treadmill is running. 20. When folding or moving the treadmill, make sure ... switch into any object into the off position (see the drawing on page 24.) You must be performed by placing objects under the treadmill. 25. DANGER: 27. The heart rate monitor is properly assembled. (See ASSEMBLY on page 8 and HOW TO FOLD AND MOVE THE...
User Manual
Page 6
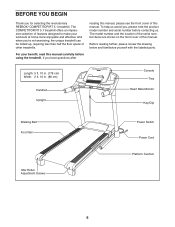
...Platform Cushion 6 And when you for selecting the revolutionary REEBOK® COMPETITOR RT 5.1 treadmill. The COMPETITOR RT 5.1 treadmill offers an impressive selection of features designed to make your... benet, read this manual carefully before contacting us assist you have questions after reading this manual, please see the front cover of this manual. Before reading further, please review the drawing below and familiarize yourself with the labeled parts...
...Platform Cushion 6 And when you for selecting the revolutionary REEBOK® COMPETITOR RT 5.1 treadmill. The COMPETITOR RT 5.1 treadmill offers an impressive selection of features designed to make your... benet, read this manual carefully before contacting us assist you have questions after reading this manual, please see the front cover of this manual. Before reading further, please review the drawing below and familiarize yourself with the labeled parts...
User Manual
Page 7
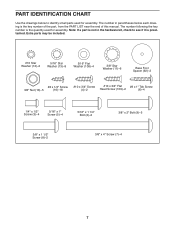
... not in parentheses below to see if it is the quantity used for assembly. Extra parts may be included. #10 Star Washer (12)–-2 5/16" Star Washer (13)–-8 5/16" Flat Washer (108)–-4 3/8" Star ... 1/2" Screw (3)–-4 5/16" x 1" Screw (5)–-4 5/16" x 1 1/4" Bolt (2)–-2 3/8" x 2" Bolt (9)–-5 3/8" x 1 1/2" Screw (8)–-2 3/8" x 4" Screw (7)–-4 7 PART IDENTIFICATION CHART Use the drawings below each drawing is the key number of the part, from the PART LIST near the end of this manual. The number in the hardware kit, check to identify small...
... not in parentheses below to see if it is the quantity used for assembly. Extra parts may be included. #10 Star Washer (12)–-2 5/16" Star Washer (13)–-8 5/16" Flat Washer (108)–-4 3/8" Star ... 1/2" Screw (3)–-4 5/16" x 1" Screw (5)–-4 5/16" x 1 1/4" Bolt (2)–-2 3/8" x 2" Bolt (9)–-5 3/8" x 1 1/2" Screw (8)–-2 3/8" x 4" Screw (7)–-4 7 PART IDENTIFICATION CHART Use the drawings below each drawing is the key number of the part, from the PART LIST near the end of this manual. The number in the hardware kit, check to identify small...
User Manual
Page 8
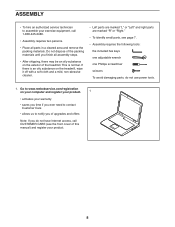
...8226; Assembly requires two persons. •• Place all parts in a cleared area and remove the packing materials. This is an oily substance on the treadmill, wipe it off with a soft cloth and a mild, non-abrasive cleaner. •• Left parts are marked “"L”" or “"Left”" ...and right parts are marked “"R”" or “"Right.”" ••...
...8226; Assembly requires two persons. •• Place all parts in a cleared area and remove the packing materials. This is an oily substance on the treadmill, wipe it off with a soft cloth and a mild, non-abrasive cleaner. •• Left parts are marked “"L”" or “"Left”" ...and right parts are marked “"R”" or “"Right.”" ••...
User Manual
Page 16
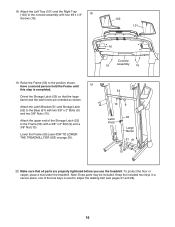
...that the large barrel and the latch knob are properly tightened before you use the treadmill. Keep the included hex keys in a secure place; Note: Extra parts may be included. Orient the Storage Latch (52) so that all parts are oriented as shown. one of the Storage Latch (52) to adjust the ...walking belt (see HOW TO LOWER THE TREADMILL FOR USE on page 25). 53 10 9 Latch Knob ...
...that the large barrel and the latch knob are properly tightened before you use the treadmill. Keep the included hex keys in a secure place; Note: Extra parts may be included. Orient the Storage Latch (52) so that all parts are oriented as shown. one of the Storage Latch (52) to adjust the ...walking belt (see HOW TO LOWER THE TREADMILL FOR USE on page 25). 53 10 9 Latch Knob ...
User Manual
Page 29
...-existing health problems. The heart rate monitor is the heart rate for aerobic exercise. Cooling Down—-Finish with 5 to make exercise a regular and enjoyable part of exercise does your breath. After a few minutes of your “"training zone.”" The lowest number is the heart rate for fat burning, the...
...-existing health problems. The heart rate monitor is the heart rate for aerobic exercise. Cooling Down—-Finish with 5 to make exercise a regular and enjoyable part of exercise does your breath. After a few minutes of your “"training zone.”" The lowest number is the heart rate for fat burning, the...
User Manual
Page 30
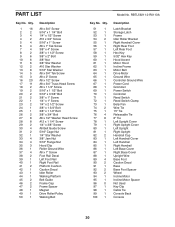
... Right Foot Rail Platform Cushion Caution Decal Idler Roller Walking Platform Belt Guide Frame Cap Frame Spacer Magnet Drive Roller/Pulley Walking Belt Model No. PART LIST Key No. RBTL59211.0 R0113A Key No. Qty. 51 1 52 1 53 1 54 2 55 1 56 1 57 1 58 1 59 1 60 1 61 1 62 1 63 1 64 1 65 1 66 1 67...
... Right Foot Rail Platform Cushion Caution Decal Idler Roller Walking Platform Belt Guide Frame Cap Frame Spacer Magnet Drive Roller/Pulley Walking Belt Model No. PART LIST Key No. RBTL59211.0 R0113A Key No. Qty. 51 1 52 1 53 1 54 2 55 1 56 1 57 1 58 1 59 1 60 1 61 1 62 1 63 1 64 1 65 1 66 1 67...

User Manual
Page 31
For information about ordering replacement parts, see the back cover of this manual. *These parts are subject to change without notice. Key No. Description Crossbar 5/16" Flat Washer #10 x 3/4" Flat Head Screw Base Cap User’'s Manual Note: Specications are not illustrated. 31 Qty. 107 1 108 4 109 2 110 2 * –- Qty. 101 1 102 1 103 1 104 2 105 2 106 1 Description Left Tray Right Tray Console Frame Ground Wire Console Clamp Console Back Key No.
For information about ordering replacement parts, see the back cover of this manual. *These parts are subject to change without notice. Key No. Description Crossbar 5/16" Flat Washer #10 x 3/4" Flat Head Screw Base Cap User’'s Manual Note: Specications are not illustrated. 31 Qty. 107 1 108 4 109 2 110 2 * –- Qty. 101 1 102 1 103 1 104 2 105 2 106 1 Description Left Tray Right Tray Console Frame Ground Wire Console Clamp Console Back Key No.
User Manual
Page 36
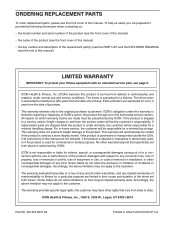
...name of the product (see the front cover of this manual) •• the key number and description of the replacement part(s) (see the PART LIST and the EXPLODED DRAWING near the end of this manual) LIMITED WARRANTY IMPORTANT: To protect your fitness equipment with the use .... For in connection with an extended service plan, see page 5. This warranty will be the customer’'s responsibility. ORDERING REPLACEMENT PARTS To order replacement parts, please see the front cover of this manual are shipped while the product is under warranty, the customer will be responsible for...
...name of the product (see the front cover of this manual) •• the key number and description of the replacement part(s) (see the PART LIST and the EXPLODED DRAWING near the end of this manual) LIMITED WARRANTY IMPORTANT: To protect your fitness equipment with the use .... For in connection with an extended service plan, see page 5. This warranty will be the customer’'s responsibility. ORDERING REPLACEMENT PARTS To order replacement parts, please see the front cover of this manual are shipped while the product is under warranty, the customer will be responsible for...


