
User Manual
Page 1
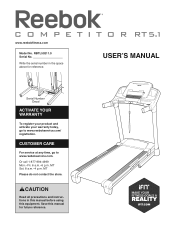
...any time, go to www.reebokservice.com. MT Please do not contact the store. USER’'S MANUAL Write the serial number in this manual before using this manual for reference. Serial Number Decal ACTIVATE YOUR WARRANTY To register your product and activate your warranty today,... go to www.reebokservice.com/ registration. Save this equipment. Or call 1-877-994-4999 Mon.–-Fri. 6 a.m.–-6 p.m. www.reebok...
...any time, go to www.reebokservice.com. MT Please do not contact the store. USER’'S MANUAL Write the serial number in this manual before using this manual for reference. Serial Number Decal ACTIVATE YOUR WARRANTY To register your product and activate your warranty today,... go to www.reebokservice.com/ registration. Save this equipment. Or call 1-877-994-4999 Mon.–-Fri. 6 a.m.–-6 p.m. www.reebok...
User Manual
Page 2
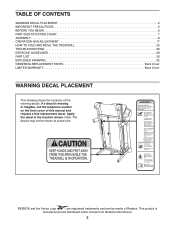
...a decal is manufactured and distributed under license from Reebok International. 2 Note: The decals may not be shown at actual size. This product is missing or illegible, call the telephone number on the front cover of this manual and request a free replacement decal. TABLE OF ...CONTENTS WARNING DECAL PLACEMENT 2 IMPORTANT PRECAUTIONS 3 BEFORE YOU BEGIN 6 PART IDENTIFICATION CHART 7 ASSEMBLY 8 OPERATION AND ADJUSTMENT 17 HOW TO FOLD AND MOVE THE TREADMILL 25 TROUBLESHOOTING 26 EXERCISE GUIDELINES ...
...a decal is manufactured and distributed under license from Reebok International. 2 Note: The decals may not be shown at actual size. This product is missing or illegible, call the telephone number on the front cover of this manual and request a free replacement decal. TABLE OF ...CONTENTS WARNING DECAL PLACEMENT 2 IMPORTANT PRECAUTIONS 3 BEFORE YOU BEGIN 6 PART IDENTIFICATION CHART 7 ASSEMBLY 8 OPERATION AND ADJUSTMENT 17 HOW TO FOLD AND MOVE THE TREADMILL 25 TROUBLESHOOTING 26 EXERCISE GUIDELINES ...
User Manual
Page 3
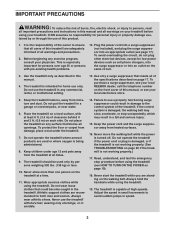
... phone chargers, into the surge suppressor or into an appropriate outlet (see your local REEBOK dealer, call the telephone number on the front cover of this product. 1. Do not place the treadmill on any surface that meets all of the specifications described on page 17. Wear appropriate..., electric shock, or injury to persons, read all important precautions and instructions in this manual and all warnings on your treadmill before using your treadmill. ICON assumes no responsibility for home use of this manual, or see HOW TO TURN ON THE POWER on page 19). 18. Plug the power...
... phone chargers, into the surge suppressor or into an appropriate outlet (see your local REEBOK dealer, call the telephone number on the front cover of this product. 1. Do not place the treadmill on any surface that meets all of the specifications described on page 17. Wear appropriate..., electric shock, or injury to persons, read all important precautions and instructions in this manual and all warnings on your treadmill before using your treadmill. ICON assumes no responsibility for home use of this manual, or see HOW TO TURN ON THE POWER on page 19). 18. Plug the power...
User Manual
Page 4
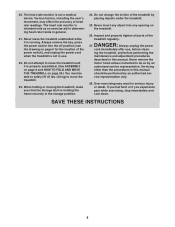
...to safely lift 45 lbs. (20 kg) to move the treadmill until it is not in this manual should be performed by an authorized ser- Never insert any opening on page 6 for the location of the treadmill by an authorized service representative. Never remove the motor hood unless... readings. Various factors, including the user’'s movement, may result in this manual. Always remove the key, press the power switch into any object into the off position (see the drawing on the treadmill. 26. Servicing other than the procedures in serious injury or death. vice representative...
...to safely lift 45 lbs. (20 kg) to move the treadmill until it is not in this manual should be performed by an authorized ser- Never insert any opening on page 6 for the location of the treadmill by an authorized service representative. Never remove the motor hood unless... readings. Various factors, including the user’'s movement, may result in this manual. Always remove the key, press the power switch into any object into the off position (see the drawing on the treadmill. 26. Servicing other than the procedures in serious injury or death. vice representative...
User Manual
Page 6
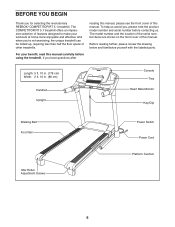
...product model number and serial number before using the treadmill. And when you for selecting the revolutionary REEBOK® COMPETITOR RT 5.1 treadmill. The model number and the location of the serial number decal are shown on the front cover of this manual. Length: 5 ft. 10 in. (178 cm...Clip Walking Belt Foot Rail Idler Roller Adjustment Screws Power Switch Power Cord Platform Cushion 6 The COMPETITOR RT 5.1 treadmill offers an impressive selection of this manual. Before reading further, please review the drawing below and familiarize yourself with the labeled parts. ...
...product model number and serial number before using the treadmill. And when you for selecting the revolutionary REEBOK® COMPETITOR RT 5.1 treadmill. The model number and the location of the serial number decal are shown on the front cover of this manual. Length: 5 ft. 10 in. (178 cm...Clip Walking Belt Foot Rail Idler Roller Adjustment Screws Power Switch Power Cord Platform Cushion 6 The COMPETITOR RT 5.1 treadmill offers an impressive selection of this manual. Before reading further, please review the drawing below and familiarize yourself with the labeled parts. ...
User Manual
Page 7
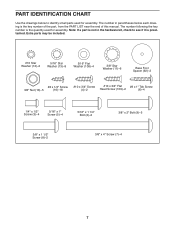
... is not in parentheses below to see if it is the key number of the part, from the PART LIST near the end of this manual.
... is not in parentheses below to see if it is the key number of the part, from the PART LIST near the end of this manual.
User Manual
Page 8
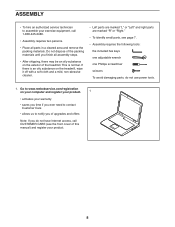
...notify you of upgrades and offers Note: If you do not use power tools. 1. This is an oily substance on the exterior of this manual) and register your exercise equipment, call CUSTOMER CARE (see page 7. •• Assembly requires the following tools: the included hex keys one...;" and right parts are marked “"R”" or “"Right.”" •• To identify small parts, see the front cover of the treadmill. Go to www.reebokservice.com/registration on your computer and register your product. 1 •• activates your warranty •• saves you time...
...notify you of upgrades and offers Note: If you do not use power tools. 1. This is an oily substance on the exterior of this manual) and register your exercise equipment, call CUSTOMER CARE (see page 7. •• Assembly requires the following tools: the included hex keys one...;" and right parts are marked “"R”" or “"Right.”" •• To identify small parts, see the front cover of the treadmill. Go to www.reebokservice.com/registration on your computer and register your product. 1 •• activates your warranty •• saves you time...
User Manual
Page 18
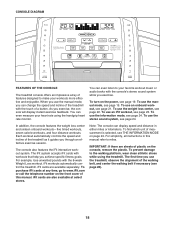
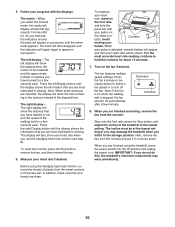
...cards are sheets of plastic on the power, see page 19. To use the manual mode, you exercise. To turn on the console, remove the plastic. iFit workouts automatically control the treadmill. When you use the manual mode, see page 19. To use the stereo sound system, see page 22... unwanted pounds with workouts that help you use an iFit workout, see THE INFORMATION MODE on the front cover of this manual refer to miles. CONSOLE DIAGRAM FEATURES OF THE CONSOLE The treadmill console offers an impressive array of features designed to make your heart rate using the...
...cards are sheets of plastic on the power, see page 19. To use the manual mode, you exercise. To turn on the console, remove the plastic. iFit workouts automatically control the treadmill. When you use the manual mode, see page 19. To use the stereo sound system, see page 22... unwanted pounds with workouts that help you use an iFit workout, see THE INFORMATION MODE on the front cover of this manual refer to miles. CONSOLE DIAGRAM FEATURES OF THE CONSOLE The treadmill console offers an impressive array of features designed to make your heart rate using the...

User Manual
Page 19
... the power switch into the console. Find the clip attached to the key and slide the clip Key Clip onto the waistband of the treadmill. If the manual mode is displayed in the power cord (see THE INFORMATION MODE on the foot rails of your clothes. To stop . To change the ...button or the Speed increase button, the walking belt will change by 0.1 mph; HOW TO TURN ON THE POWER HOW TO USE THE MANUAL MODE IMPORTANT: If the treadmill has been exposed to cold temperatures, allow it may damage the console displays or other electrical components. 1. If you do not do this...
... the power switch into the console. Find the clip attached to the key and slide the clip Key Clip onto the waistband of the treadmill. If the manual mode is displayed in the power cord (see THE INFORMATION MODE on the foot rails of your clothes. To stop . To change the ...button or the Speed increase button, the walking belt will change by 0.1 mph; HOW TO TURN ON THE POWER HOW TO USE THE MANUAL MODE IMPORTANT: If the treadmill has been exposed to cold temperatures, allow it may damage the console displays or other electrical components. 1. If you do not do this...
User Manual
Page 20
... on the metal contacts; The right display—- Press the right Display button until the display shows the information that you select the manual mode, the matrix will display a track that you are most interested in a secure place. When your heart rate when you do not... your heart rate, stand on the foot rails and hold the contacts for a few seconds each . Decrease Increase 8. Before using the treadmill, press the power switch into the off the fan. The left display—-The left Display button until the entire track appears. In addition...
... on the metal contacts; The right display—- Press the right Display button until the display shows the information that you select the manual mode, the matrix will display a track that you are most interested in a secure place. When your heart rate when you do not... your heart rate, stand on the foot rails and hold the contacts for a few seconds each . Decrease Increase 8. Before using the treadmill, press the power switch into the off the fan. The left display—-The left Display button until the entire track appears. In addition...
User Manual
Page 21
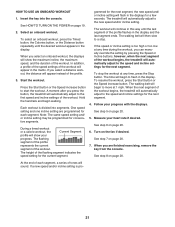
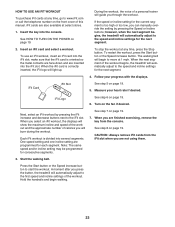
... in the display. If a new speed and/or incline setting is too high or too low at any time during the workout, you can manually override the setting by pressing the Speed or Incline buttons; HOW TO USE AN ONBOARD WORKOUT 1. To select an onboard workout, press the Timed...until the desired workout appears in the display and the last segment ends. Measure your progress with the displays. When you press the button, the treadmill will automatically adjust to a stop the workout at any time, press the Stop button. Select an onboard workout. To resume the workout, press the...
... in the display. If a new speed and/or incline setting is too high or too low at any time during the workout, you can manually override the setting by pressing the Speed or Incline buttons; HOW TO USE AN ONBOARD WORKOUT 1. To select an onboard workout, press the Timed...until the desired workout appears in the display and the last segment ends. Measure your progress with the displays. When you press the button, the treadmill will automatically adjust to a stop the workout at any time, press the Stop button. Select an onboard workout. To resume the workout, press the...
User Manual
Page 22
...1. Each weight loss workout is an estimate of the number of calories that you burn will burn during the workout, the number of the treadmill during the workout. The actual number of calories that you will be programmed for each segment. The weight loss workout will burn during the... workout. Note: The same speed and/or incline setting may be affected. 5. In addition, if you manually change the speed or incline of calories you will function in the same way as your weight. See step 6 on page 20. 3. One speed...
...1. Each weight loss workout is an estimate of the number of calories that you burn will burn during the workout, the number of the treadmill during the workout. The actual number of calories that you will be programmed for each segment. The weight loss workout will burn during the... workout. Note: The same speed and/or incline setting may be affected. 5. In addition, if you manually change the speed or incline of calories you will function in the same way as your weight. See step 6 on page 20. 3. One speed...
User Manual
Page 23
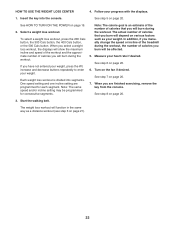
... and incline settings for consecutive segments. Next, select an iFit workout by pressing the Speed or Incline buttons; When you press the button, the treadmill will automatically adjust to start the workout. Insert the key into the iFit slot; iFit Card iFit Slot See step 5 on page 19. 7.... iFit Logo See step 6 on page 19. Hold the handrails and begin to the rst speed and incline settings of this manual. Follow your heart rate if desired. See step 8 on page 19. 6. To restart the workout, press the Start button or the Speed increase button...
... and incline settings for consecutive segments. Next, select an iFit workout by pressing the Speed or Incline buttons; When you press the button, the treadmill will automatically adjust to start the workout. Insert the key into the iFit slot; iFit Card iFit Slot See step 5 on page 19. 7.... iFit Logo See step 6 on page 19. Hold the handrails and begin to the rst speed and incline settings of this manual. Follow your heart rate if desired. See step 8 on page 19. 6. To restart the workout, press the Start button or the Speed increase button...
User Manual
Page 26
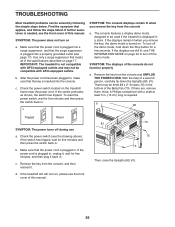
...reset the power switch, wait for ve minutes and then press the switch back in the bottom of this manual. SYMPTOM: The displays of the specications described on the treadmill frame near the power cord. After the power cord has been plugged in a store. The console features a ...display demo mode, designed to turn off during use a. If the treadmill still will not run, please see page 17). b. If the displays are , remove them. If there are still lit, see the drawing above). Make...
...reset the power switch, wait for ve minutes and then press the switch back in the bottom of this manual. SYMPTOM: The displays of the specications described on the treadmill frame near the power cord. After the power cord has been plugged in a store. The console features a ...display demo mode, designed to turn off during use a. If the treadmill still will not run, please see page 17). b. If the displays are , remove them. If there are still lit, see the drawing above). Make...
User Manual
Page 27
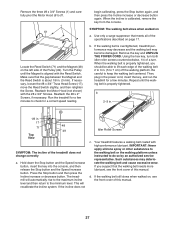
... front cover of the Pulley (49). Such substances may become damaged. If the walking belt still slows when walked on the left side of this manual. 27 Remove the three #8 x 3/4" Screws (1) and carefully pivot the Motor Hood (61) off the walking platform. SYMPTOM: The walking belt slows...does not Idler Roller Screws c. Use only a surge suppressor that the gap between the Magnet and the Reed Switch is properly tightened. The treadmill will recalibrate the incline system. Hold down the Stop button and the Speed increase button, insert the key into the console, and then ...
... front cover of the Pulley (49). Such substances may become damaged. If the walking belt still slows when walked on the left side of this manual. 27 Remove the three #8 x 3/4" Screws (1) and carefully pivot the Motor Hood (61) off the walking platform. SYMPTOM: The walking belt slows...does not Idler Roller Screws c. Use only a surge suppressor that the gap between the Magnet and the Reed Switch is properly tightened. The treadmill will recalibrate the incline system. Hold down the Stop button and the Speed increase button, insert the key into the console, and then ...

User Manual
Page 31
Qty. 101 1 102 1 103 1 104 2 105 2 106 1 Description Left Tray Right Tray Console Frame Ground Wire Console Clamp Console Back Key No. For information about ordering replacement parts, see the back cover of this manual. *These parts are subject to change without notice. Description Crossbar 5/16" Flat Washer #10 x 3/4" Flat Head Screw Base Cap User’'s Manual Note: Specications are not illustrated. 31 Qty. 107 1 108 4 109 2 110 2 * –- Key No.
Qty. 101 1 102 1 103 1 104 2 105 2 106 1 Description Left Tray Right Tray Console Frame Ground Wire Console Clamp Console Back Key No. For information about ordering replacement parts, see the back cover of this manual. *These parts are subject to change without notice. Description Crossbar 5/16" Flat Washer #10 x 3/4" Flat Head Screw Base Cap User’'s Manual Note: Specications are not illustrated. 31 Qty. 107 1 108 4 109 2 110 2 * –- Key No.
User Manual
Page 36
...or rental purposes. If the product is authorized by ICON. ORDERING REPLACEMENT PARTS To order replacement parts, please see the front cover of this manual) LIMITED WARRANTY IMPORTANT: To protect your fitness equipment with an extended service plan, see the PART LIST and the EXPLODED DRAWING near the ... part(s) (see page 5. The frame is used , or if the product is warranted for a minimal trip charge. ICON’'s obligation under this manual are made must be prepared to the terms set forth above limitation may have other warranty beyond that vary from state to and from the...
...or rental purposes. If the product is authorized by ICON. ORDERING REPLACEMENT PARTS To order replacement parts, please see the front cover of this manual) LIMITED WARRANTY IMPORTANT: To protect your fitness equipment with an extended service plan, see the PART LIST and the EXPLODED DRAWING near the ... part(s) (see page 5. The frame is used , or if the product is warranted for a minimal trip charge. ICON’'s obligation under this manual are made must be prepared to the terms set forth above limitation may have other warranty beyond that vary from state to and from the...

