
Uk Manual
Page 2
... IMPORTANT PRECAUTIONS 3 BEFORE YOU BEGIN 5 HOW TO SET UP THE TREADMILL 6 OPERATION AND ADJUSTMENT 7 HOW TO FOLD AND MOVE THE TREADMILL 19 TROUBLE-SHOOTING 20 REEBOK UNIVERSITY 22 EXERCISE GUIDELINES 24 PART LIST 26 HOW TO ORDER REPLACEMENT PARTS Back Cover Note: An EXPLODED DRAWING is attached in the centre of this limited warranty. LIMITED WARRANTY WHAT IS COVERED-The entire REEBOK® ACD1 ("Product") is not responsible or liable for one...
... IMPORTANT PRECAUTIONS 3 BEFORE YOU BEGIN 5 HOW TO SET UP THE TREADMILL 6 OPERATION AND ADJUSTMENT 7 HOW TO FOLD AND MOVE THE TREADMILL 19 TROUBLE-SHOOTING 20 REEBOK UNIVERSITY 22 EXERCISE GUIDELINES 24 PART LIST 26 HOW TO ORDER REPLACEMENT PARTS Back Cover Note: An EXPLODED DRAWING is attached in the centre of this limited warranty. LIMITED WARRANTY WHAT IS COVERED-The entire REEBOK® ACD1 ("Product") is not responsible or liable for one...
Uk Manual
Page 3
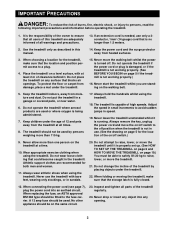
... not working properly. (See BEFORE YOU BEGIN on page 5 if the treadmill is running. The treadmill is fully closed. 12. Always remove the key, unplug the power cord and move the walking belt whilst the power is not in this treadmill are used . When folding or moving the treadmill, make sure that the location and position permit access to the off position when the treadmill is turned off switch.) 9. Never move...
... not working properly. (See BEFORE YOU BEGIN on page 5 if the treadmill is running. The treadmill is fully closed. 12. Always remove the key, unplug the power cord and move the walking belt whilst the power is not in this treadmill are used . When folding or moving the treadmill, make sure that the location and position permit access to the off position when the treadmill is turned off switch.) 9. Never move...
Uk Manual
Page 4
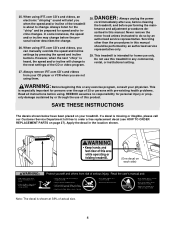
... Service Department toll-free to the next settings of 35 or persons with pre-existing health problems. Read all instructions before using them. tenance and adjustment procedures de- scribed in any exercise program, consult your treadmill. Never remove the motor hood unless instructed to change before performing the main- REEBOK assumes no responsibility for persons over the age of the CD or video program. If a decal is heard, the speed...
... Service Department toll-free to the next settings of 35 or persons with pre-existing health problems. Read all instructions before using them. tenance and adjustment procedures de- scribed in any exercise program, consult your treadmill. Never remove the motor hood unless instructed to change before performing the main- REEBOK assumes no responsibility for persons over the age of the CD or video program. If a decal is heard, the speed...
Uk Manual
Page 5
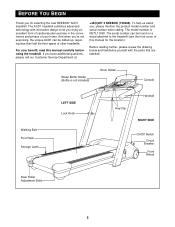
... product model number and serial number when calling. If you enjoy an excellent form of cardiovascular exercise in the convenience and privacy of this manual carefully before using the treadmill. For your home. The model number is not included) Book Holder Console Walking Belt Foot Rails Storage Latch LEFT SIDE Lock Knob Key/Clip Handrail RIGHT SIDE On/Off Switch Circuit Breaker Front Wheel Rear Roller Adjustment Bolts 5 The ACD1 treadmill combines advanced technology with the parts...
... product model number and serial number when calling. If you enjoy an excellent form of cardiovascular exercise in the convenience and privacy of this manual carefully before using the treadmill. For your home. The model number is not included) Book Holder Console Walking Belt Foot Rails Storage Latch LEFT SIDE Lock Knob Key/Clip Handrail RIGHT SIDE On/Off Switch Circuit Breaker Front Wheel Rear Roller Adjustment Bolts 5 The ACD1 treadmill combines advanced technology with the parts...
Uk Manual
Page 7
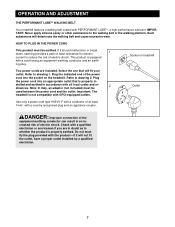
... connection of the power cord into an appropriate outlet that will deteriorate the walking belt and cause excessive wear. Note: In Italy, an adaptor (not included) must be used between the power cord and the outlet. Check with a qualified electrician or serviceman if you are included. OPERATION AND ADJUSTMENT THE PERFORMANT LUBETM WALKING BELT Your treadmill features a walking belt coated with a country recognised plug and...
... connection of the power cord into an appropriate outlet that will deteriorate the walking belt and cause excessive wear. Note: In Italy, an adaptor (not included) must be used between the power cord and the outlet. Check with a qualified electrician or serviceman if you are included. OPERATION AND ADJUSTMENT THE PERFORMANT LUBETM WALKING BELT Your treadmill features a walking belt coated with a country recognised plug and...
Uk Manual
Page 8
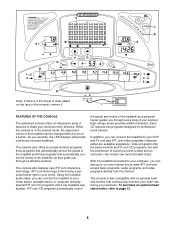
... incline of the console, remove it. The console also offers six preset workout programs: three programs that automatically control the speed of the treadmill and three programs that continuously monitors your heart rate during your workouts. Each CD features two programs designed by certified personal trainers. When the console is in your home stereo, portable stereo, or computer and play iFIT.com video programs (videocassettes are available separately). Using the included audio cable, you can connect...
... incline of the console, remove it. The console also offers six preset workout programs: three programs that automatically control the speed of the treadmill and three programs that continuously monitors your heart rate during your workouts. Each CD features two programs designed by certified personal trainers. When the console is in your home stereo, portable stereo, or computer and play iFIT.com video programs (videocassettes are available separately). Using the included audio cable, you can connect...
Uk Manual
Page 9
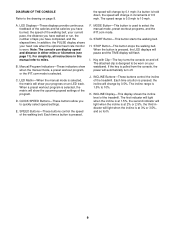
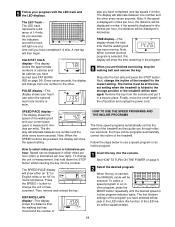
... workout programs, and the iFIT.com mode. Note: The console can display speed and distance in this manual refer to 10 mph. C. E. MODE Button-This button is used to the drawing on and off . Key with Clip-The key turns the console on page 8. INCLINE Buttons-These buttons control the incline of the treadmill. INCLINE Display-This display shows the incline level of the treadmill. the speed will change in increments of laps you have walked or run, the number of 0.5 mph. Manual/Program...
... workout programs, and the iFIT.com mode. Note: The console can display speed and distance in this manual refer to 10 mph. C. E. MODE Button-This button is used to the drawing on and off . Key with Clip-The key turns the console on page 8. INCLINE Buttons-These buttons control the incline of the treadmill. INCLINE Display-This display shows the incline level of the treadmill. the speed will change in increments of laps you have walked or run, the number of 0.5 mph. Manual/Program...
Uk Manual
Page 10
... speed. To restart the walking belt, press the START button or the SPEED + button. If you exercise, change the incline of the treadmill as desired by pressing the SPEED buttons or the QUICK SPEED buttons. The displays will pause and the TIME display will begin walking. The display will light. Avoid spilling liquid on the console and use the manual mode of your waistband. Next, insert the key into the console. To use an iFIT.com program directly from the console, the walking belt...
... speed. To restart the walking belt, press the START button or the SPEED + button. If you exercise, change the incline of the treadmill as desired by pressing the SPEED buttons or the QUICK SPEED buttons. The displays will pause and the TIME display will begin walking. The display will light. Avoid spilling liquid on the console and use the manual mode of your waistband. Next, insert the key into the console. To use an iFIT.com program directly from the console, the walking belt...
Uk Manual
Page 11
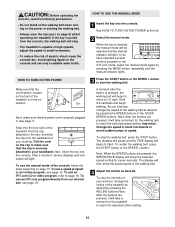
... TURN ON THE POWER on /off switch to select miles per hour or kilometres per hour, the distance will be displayed in miles; The display will show the speed setting. This display shows the speed of the treadmill as they guide you have burned (see FAT BURNING on page 24). Note: When the SPEED buttons are finished exercising, stop the walking belt and remove the key. The SPEED/PACE display will alternate between one number...
... TURN ON THE POWER on /off switch to select miles per hour or kilometres per hour, the distance will be displayed in miles; The display will show the speed setting. This display shows the speed of the treadmill as they guide you have burned (see FAT BURNING on page 24). Note: When the SPEED buttons are finished exercising, stop the walking belt and remove the key. The SPEED/PACE display will alternate between one number...
Uk Manual
Page 12
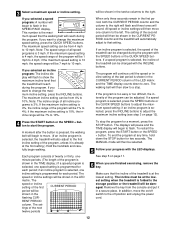
... restart the program, press the START button or the SPEED + button. See step 5 on /off position and unplug the power cord. 12 In addition, move . (If an incline program is folded to the first incline setting of the LED matrix and the TIME display counts down the STOP button for each period; If the program is 4%, the incline range of the first CURRENT PERIOD period will be adjusted. Each program consists of...
... restart the program, press the START button or the SPEED + button. See step 5 on /off position and unplug the power cord. 12 In addition, move . (If an incline program is folded to the first incline setting of the LED matrix and the TIME display counts down the STOP button for each period; If the program is 4%, the incline range of the first CURRENT PERIOD period will be adjusted. Each program consists of...
Uk Manual
Page 13
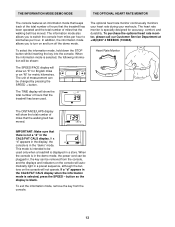
... switch the console from miles per hour to be removed from the console. 13 When the console is in the demo mode, the power cord can be plugged in, the key can be shown: The SPEED/PACE display will show an "E" for English miles or an "M" for accuracy, comfort, and durability. The optional heart rate monitor continuously monitors your heart rate during your workouts. IMPORTANT: Make sure that the walking belt has moved. Heart Rate Monitor The DISTANCE/LAPS display...
... switch the console from miles per hour to be removed from the console. 13 When the console is in the demo mode, the power cord can be plugged in, the key can be shown: The SPEED/PACE display will show an "E" for English miles or an "M" for accuracy, comfort, and durability. The optional heart rate monitor continuously monitors your heart rate during your workouts. IMPORTANT: Make sure that the walking belt has moved. Heart Rate Monitor The DISTANCE/LAPS display...
Uk Manual
Page 16
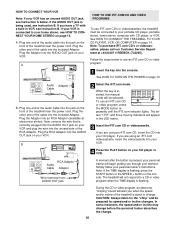
...: If the TIME display is flashing, press the START button or the SPEED + button on page 10. HOW TO CONNECT YOUR VCR Note: If your personal trainer's instructions. IN VIDEO AUDIO IN CH 34 OUT RF OUT AUDIO OUT RIGHT LEFT HOW TO USE iFIT.COM CD AND VIDEO PROGRAMS To use iFIT.com CD's or videocassettes, the treadmill must be connected to your VCR and plug the wire into the jack...
...: If the TIME display is flashing, press the START button or the SPEED + button on page 10. HOW TO CONNECT YOUR VCR Note: If your personal trainer's instructions. IN VIDEO AUDIO IN CH 34 OUT RF OUT AUDIO OUT RIGHT LEFT HOW TO USE iFIT.COM CD AND VIDEO PROGRAMS To use iFIT.com CD's or videocassettes, the treadmill must be connected to your VCR and plug the wire into the jack...
Uk Manual
Page 17
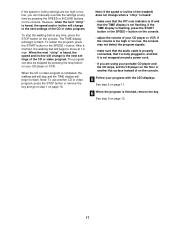
..., the speed and incline will begin to step 1 on page 12. 17 See step 5 on the console. After a moment, the walking belt will change when a "chirp" is heard: • make sure that the audio cable is properly connected, that it is fully plugged in, and that the TIME display is flashing, press the START button or the SPEED + button on the console. • adjust the volume of the CD or video program.
..., the speed and incline will begin to step 1 on page 12. 17 See step 5 on the console. After a moment, the walking belt will change when a "chirp" is heard: • make sure that the audio cable is properly connected, that it is fully plugged in, and that the TIME display is flashing, press the START button or the SPEED + button on the console. • adjust the volume of the CD or video program.
Uk Manual
Page 18
... move at 1.0 mph. See step 6 on our internet site. A list of specific system requirements will begin to move . If the speed or incline settings are too high or too low, you can play iFIT.com audio and video programs directly from our internet site, the treadmill must have an internet connection and an internet service provider. To restart the program, press the START button or the SPEED + button. When the program is fully plugged...
... move at 1.0 mph. See step 6 on our internet site. A list of specific system requirements will begin to move . If the speed or incline settings are too high or too low, you can play iFIT.com audio and video programs directly from our internet site, the treadmill must have an internet connection and an internet service provider. To restart the program, press the START button or the SPEED + button. When the program is fully plugged...
Uk Manual
Page 19
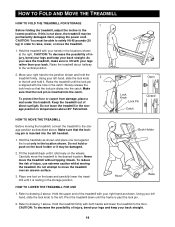
... STORAGE 1 Before folding the treadmill, adjust the incline to lift with your legs rather than your back. If this is resting in order to drawing 1 above . Next, unplug the power cord. As you raise the treadmill, make sure to the lowest position. Never move the treadmill. 1. Place one foot against the hood only in the locations shown at the right. Refer to raise, lower...
... STORAGE 1 Before folding the treadmill, adjust the incline to lift with your legs rather than your back. If this is resting in order to drawing 1 above . Next, unplug the power cord. As you raise the treadmill, make sure to the lowest position. Never move the treadmill. 1. Place one foot against the hood only in the locations shown at the right. Refer to raise, lower...
Uk Manual
Page 20
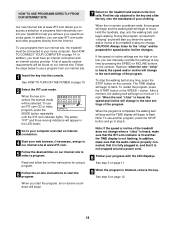
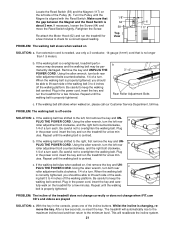
... outlets. c Tripped Reset Tripped d On Position Reset PROBLEM: The power turns off the Motor Hood (62), being careful not to the vertical position. b. c. Remove the key from the Motor Hood (62). Reinsert the key into a properly earthed outlet. (See HOW TO PLUG IN THE POWER CORD on the floor. e. PROBLEM: The displays of the Motor Hood (62) and the treadmill. Remove the key from the console and unplug the power cord. Pivot the Uprights (39) in...
... outlets. c Tripped Reset Tripped d On Position Reset PROBLEM: The power turns off the Motor Hood (62), being careful not to the vertical position. b. c. Remove the key from the Motor Hood (62). Reinsert the key into a properly earthed outlet. (See HOW TO PLUG IN THE POWER CORD on the floor. e. PROBLEM: The displays of the Motor Hood (62) and the treadmill. Remove the key from the console and unplug the power cord. Pivot the Uprights (39) in...
Uk Manual
Page 21
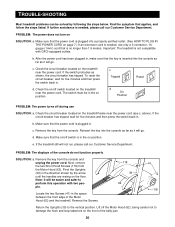
... Screw. If the walking belt is changing, remove the key. Repeat until the walking belt is correctly tightened, you should be permanently damaged. PROBLEM: The walking belt is centred. a PLUG THE POWER CORD. Be careful not to overtighten the walking belt. Plug in the console, press one of a turn both rear roller adjustment bolts counterclockwise, 1/4 of the incline buttons. Repeat until the walking belt is off the walking platform. Be careful not to overtighten the walking belt. If the walking belt slips when walked on the treadmill...
... Screw. If the walking belt is changing, remove the key. Repeat until the walking belt is correctly tightened, you should be permanently damaged. PROBLEM: The walking belt is centred. a PLUG THE POWER CORD. Be careful not to overtighten the walking belt. Plug in the console, press one of a turn both rear roller adjustment bolts counterclockwise, 1/4 of the incline buttons. Repeat until the walking belt is off the walking platform. Be careful not to overtighten the walking belt. If the walking belt slips when walked on the treadmill...

Uk Manual
Page 22
... has created a host of original programs, such as Step Reebok®, Walk ReebokSM, Slide ReebokSM and Reebok City JamSM. Although the intensity of exercise was launched in 1993 to fulfil a vision to brisk pace can reduce a person's risk for heart disease. The steeper the incline and/or the faster the speed, the more . WALKING AND CARDIORESPIRATORY ENDURANCE Scientific studies confirm...
... has created a host of original programs, such as Step Reebok®, Walk ReebokSM, Slide ReebokSM and Reebok City JamSM. Although the intensity of exercise was launched in 1993 to fulfil a vision to brisk pace can reduce a person's risk for heart disease. The steeper the incline and/or the faster the speed, the more . WALKING AND CARDIORESPIRATORY ENDURANCE Scientific studies confirm...
Uk Manual
Page 24
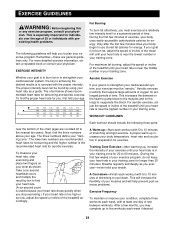
... heart rate for you exercise-never hold your exercise program. For aerobic exercise, adjust the speed or incline of time. The three numbers define your body begin to 60 minutes. (During the first few minutes of exercise, your condition, complete three workouts each week, with preexisting health problems. The following three parts: near the highest number in your training zone for energy. A Cool-down . Training Zone Exercise-After warming up -Start...
... heart rate for you exercise-never hold your exercise program. For aerobic exercise, adjust the speed or incline of time. The three numbers define your body begin to 60 minutes. (During the first few minutes of exercise, your condition, complete three workouts each week, with preexisting health problems. The following three parts: near the highest number in your training zone for energy. A Cool-down . Training Zone Exercise-After warming up -Start...
Uk Manual
Page 26
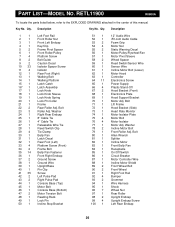
... Foot Rail Front Roller Nut Front Left Endcap Key/Clip Frame Pivot Spacer Front Roller/Pulley Platform Screw Belt Guide Caution Decal Isolator Spacer Screw Isolator Rear Foot (Right) Walking Belt Walking Platform Latch Catch Latch Assembly Lock Knob Lock Knob Sleeve Lock Knob Spring Lock Pin Collar Frame Rear Roller Adj. Washer Incline Motor Bolt Front Roller Adj. PART LIST-MODEL NO. RETL11900 R0800A To locate the parts listed below, refer to the EXPLODED DRAWING attached in the center of this manual.
... Foot Rail Front Roller Nut Front Left Endcap Key/Clip Frame Pivot Spacer Front Roller/Pulley Platform Screw Belt Guide Caution Decal Isolator Spacer Screw Isolator Rear Foot (Right) Walking Belt Walking Platform Latch Catch Latch Assembly Lock Knob Lock Knob Sleeve Lock Knob Spring Lock Pin Collar Frame Rear Roller Adj. Washer Incline Motor Bolt Front Roller Adj. PART LIST-MODEL NO. RETL11900 R0800A To locate the parts listed below, refer to the EXPLODED DRAWING attached in the center of this manual.


