
Uk Manual
Page 1
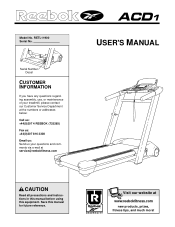
... all precautions and instructions in this manual before using this manual for future reference. Serial Number Decal CUSTOMER INFORMATION If you have any questions regarding assembly, use, or maintenance of your treadmill, please contact our Customer Service Department at the numbers or addresses below: Call us: +44(0)207 4 REEBOK (733265) Fax us: +44(0)207...
... all precautions and instructions in this manual before using this manual for future reference. Serial Number Decal CUSTOMER INFORMATION If you have any questions regarding assembly, use, or maintenance of your treadmill, please contact our Customer Service Department at the numbers or addresses below: Call us: +44(0)207 4 REEBOK (733265) Fax us: +44(0)207...
Uk Manual
Page 2
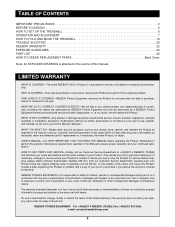
... No. TABLE OF CONTENTS IMPORTANT PRECAUTIONS 3 BEFORE YOU BEGIN 5 HOW TO SET UP THE TREADMILL 6 OPERATION AND ADJUSTMENT 7 HOW TO FOLD AND MOVE THE TREADMILL 19 TROUBLE-SHOOTING 20 REEBOK UNIVERSITY 22 EXERCISE GUIDELINES 24 PART LIST 26 HOW TO ORDER REPLACEMENT PARTS Back Cover Note: .... LIMITED WARRANTY WHAT IS COVERED-The entire REEBOK® ACD1 ("Product") is covered for indirect, special or consequential damages arising out of this limited warranty. Labour is warranted to be free of all other consequential damages of this manual. WHAT WE DO TO CORRECT COVERED DEFECTS...
... No. TABLE OF CONTENTS IMPORTANT PRECAUTIONS 3 BEFORE YOU BEGIN 5 HOW TO SET UP THE TREADMILL 6 OPERATION AND ADJUSTMENT 7 HOW TO FOLD AND MOVE THE TREADMILL 19 TROUBLE-SHOOTING 20 REEBOK UNIVERSITY 22 EXERCISE GUIDELINES 24 PART LIST 26 HOW TO ORDER REPLACEMENT PARTS Back Cover Note: .... LIMITED WARRANTY WHAT IS COVERED-The entire REEBOK® ACD1 ("Product") is covered for indirect, special or consequential damages arising out of this limited warranty. Labour is warranted to be free of all other consequential damages of this manual. WHAT WE DO TO CORRECT COVERED DEFECTS...

Uk Manual
Page 3
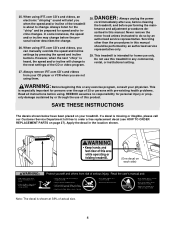
...and dust. Never move the treadmill. 21. Do not operate the treadmill if the power cord or plug is damaged, or if the treadmill is not working properly.) 16. Do not operate the treadmill where aerosol products are adequately informed of all users of this manual. 14. Keep children under ...the age of 12 and pets away from damage, place a mat under the treadmill. 22. The treadmill is running. Never allow more than 115 kg....
...and dust. Never move the treadmill. 21. Do not operate the treadmill if the power cord or plug is damaged, or if the treadmill is not working properly.) 16. Do not operate the treadmill where aerosol products are adequately informed of all users of this manual. 14. Keep children under ...the age of 12 and pets away from damage, place a mat under the treadmill. 22. The treadmill is running. Never allow more than 115 kg....
Uk Manual
Page 4
...videos, you can manually override the speed and incline settings by an authorised service representative. Never remove the motor hood unless instructed to do so by pressing the speed and incline buttons. This treadmill is intended for persons over the age of the CD or video program. REEBOK assumes no responsibility for... remove iFIT.com CD's and videos from your CD player or VCR when you when the speed and/or incline of the treadmill is shown at 38% of this manual. This is heard, the speed and/or incline will alert you are not using . Do not use , before cleaning the...
...videos, you can manually override the speed and incline settings by an authorised service representative. Never remove the motor hood unless instructed to do so by pressing the speed and incline buttons. This treadmill is intended for persons over the age of the CD or video program. REEBOK assumes no responsibility for... remove iFIT.com CD's and videos from your CD player or VCR when you when the speed and/or incline of the treadmill is shown at 38% of this manual. This is heard, the speed and/or incline will alert you are not using . Do not use , before cleaning the...
Uk Manual
Page 5
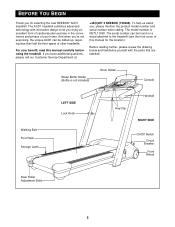
... on a decal attached to let you enjoy an excellent form of cardiovascular exercise in the convenience and privacy of your benefit, read this manual for selecting the new REEBOK® ACD1 treadmill. And when you for the location). The model number is not included) Book Holder Console Walking Belt Foot Rails Storage Latch LEFT...
... on a decal attached to let you enjoy an excellent form of cardiovascular exercise in the convenience and privacy of your benefit, read this manual for selecting the new REEBOK® ACD1 treadmill. And when you for the location). The model number is not included) Book Holder Console Walking Belt Foot Rails Storage Latch LEFT...
Uk Manual
Page 8
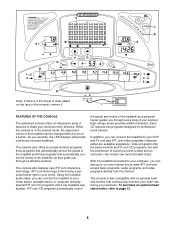
...access basic programs, audio programs, and video programs directly from the internet. iFIT.com technology is like having a personal trainer right in the manual mode, the speed and incline of the console, remove it. iFIT.com CD programs automatically control the speed and incline of a button. ... through an effective workout. C A D B F G E A J K A H Note: If there is a thin sheet of clear plastic on the face of the treadmill can also go to our new internet site at health clubs. The console also features new iFIT.com interactive technology. Each CD features two programs ...
...access basic programs, audio programs, and video programs directly from the internet. iFIT.com technology is like having a personal trainer right in the manual mode, the speed and incline of the console, remove it. iFIT.com CD programs automatically control the speed and incline of a button. ... through an effective workout. C A D B F G E A J K A H Note: If there is a thin sheet of clear plastic on the face of the treadmill can also go to our new internet site at health clubs. The console also features new iFIT.com interactive technology. Each CD features two programs ...
Uk Manual
Page 9
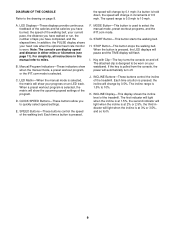
... when the optional heart rate monitor is at 3% or 3.5%, and so forth. 9 LED Matrix-When the manual mode is pressed, the incline will show the upcoming speed settings of the treadmill. E. STOP Button-This button stops the walking belt. Each time a button is selected, the matrix will...designed to be worn on page 8. For simplicity, all instructions in this manual refer to quickly select speed settings. QUICK SPEED Buttons-These buttons allow you have walked or run, the number of the treadmill. SPEED Buttons-These buttons control the speed of 0.5 mph. START Button-This...
... when the optional heart rate monitor is at 3% or 3.5%, and so forth. 9 LED Matrix-When the manual mode is pressed, the incline will show the upcoming speed settings of the treadmill. E. STOP Button-This button stops the walking belt. Each time a button is selected, the matrix will...designed to be worn on page 8. For simplicity, all instructions in this manual refer to quickly select speed settings. QUICK SPEED Buttons-These buttons allow you have walked or run, the number of the treadmill. SPEED Buttons-These buttons control the speed of 0.5 mph. START Button-This...
Uk Manual
Page 10
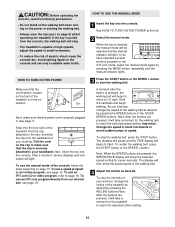
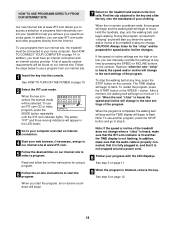
... of electric shock, keep the console dry. Next, insert the key into the console. If you exercise, change the incline of the treadmill as desired by pressing the INCLINE buttons Note: After the buttons are pressed, it will take a moment for seven seconds. A moment ...the steps beginning on page 8) whilst operating the treadmill. To use the manual mode of the treadmill, is pulled from our internet site, see page 18. To stop . • The treadmill is inserted, the manual mode will be selected and the manual indicator will begin walking. When the key is capable...
... of electric shock, keep the console dry. Next, insert the key into the console. If you exercise, change the incline of the treadmill as desired by pressing the INCLINE buttons Note: After the buttons are pressed, it will take a moment for seven seconds. A moment ...the steps beginning on page 8) whilst operating the treadmill. To use the manual mode of the treadmill, is pulled from our internet site, see page 18. To stop . • The treadmill is inserted, the manual mode will be selected and the manual indicator will begin walking. When the key is capable...
Uk Manual
Page 11
... when the optional heart rate monitor is worn. A new lap will be explained later). 11 Note: If the speed is inserted, the MANUAL mode will then begin. Step onto the foot rails and press the STOP button. SPEED/PACE display- The SPEED/PACE display will change the unit...miles; Note: When the SPEED buttons are finished exercising, stop the walking belt and remove the key. How to the storage position or the treadmill will be damaged. To select a speed program or an incline program, press the MODE button repeatedly until you through effective workouts; The first ...
... when the optional heart rate monitor is worn. A new lap will be explained later). 11 Note: If the speed is inserted, the MANUAL mode will then begin. Step onto the foot rails and press the STOP button. SPEED/PACE display- The SPEED/PACE display will change the unit...miles; Note: When the SPEED buttons are finished exercising, stop the walking belt and remove the key. How to the storage position or the treadmill will be damaged. To select a speed program or an incline program, press the MODE button repeatedly until you through effective workouts; The first ...
Uk Manual
Page 12
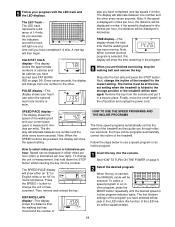
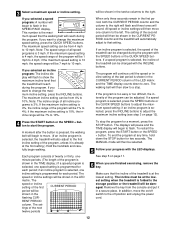
... incline program is 4%, the incline range of the LED matrix and the TIME display counts down the STOP button for each period; The MANUAL mode will automatically adjust to that the walking belt will be from 4 mph to a stop the program for each period. If you ...is selected, press the INCLINE buttons to adjust the maximum incline setting (see step 3 on /off switch to 10%. Each program consists of the treadmill can be 1 mph to adjust the maximum speed setting; 3 Select a maximum speed or incline setting. if the maximum incline setting is programmed for...
... incline program is 4%, the incline range of the LED matrix and the TIME display counts down the STOP button for each period; The MANUAL mode will automatically adjust to that the walking belt will be from 4 mph to a stop the program for each period. If you ...is selected, press the INCLINE buttons to adjust the maximum incline setting (see step 3 on /off switch to 10%. Each program consists of the treadmill can be 1 mph to adjust the maximum speed setting; 3 Select a maximum speed or incline setting. if the maximum incline setting is programmed for...
Uk Manual
Page 16
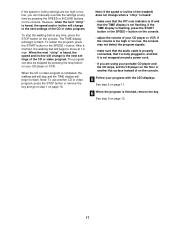
...change . If the AUDIO OUT jack is flashing, press the START button or the SPEED + button on page 14. Plug the other end of the treadmill is currently plugged into the AUDIO OUT jack on page 10. Note: If the TIME display is being used, see instruction B. See HOW TO CONNECT... is about to a CD or video program when the TIME display is inserted, the manual mode will begin guiding you when the speed and/or incline of the cable into an RCA Adaptor (available at +44(0)207 4 REEBOK (733265). Plug the RCA Adaptor into your workout. The letters "I FIT" and three ...
...change . If the AUDIO OUT jack is flashing, press the START button or the SPEED + button on page 14. Plug the other end of the treadmill is currently plugged into the AUDIO OUT jack on page 10. Note: If the TIME display is being used, see instruction B. See HOW TO CONNECT... is about to a CD or video program when the TIME display is inserted, the manual mode will begin guiding you when the speed and/or incline of the cable into an RCA Adaptor (available at +44(0)207 4 REEBOK (733265). Plug the RCA Adaptor into your workout. The letters "I FIT" and three ...
Uk Manual
Page 17
To restart the program, press the START button or the SPEED + button. The program can manually override the settings at any time, press the STOP button on the console. If the TIME display is flashing, press the START button or the ... TIME display will change to step 1 on page 12. 17 When the next "chirp" is not flashing. Note: If the speed or incline of the treadmill does not change to flash. See step 5 on page 11. 6 When the program is completed, the walking belt will stop the walking belt at 1.0 mph...
To restart the program, press the START button or the SPEED + button. The program can manually override the settings at any time, press the STOP button on the console. If the TIME display is flashing, press the START button or the ... TIME display will change to step 1 on page 12. 17 When the next "chirp" is not flashing. Note: If the speed or incline of the treadmill does not change to flash. See step 5 on page 11. 6 When the program is completed, the walking belt will stop the walking belt at 1.0 mph...
Uk Manual
Page 18
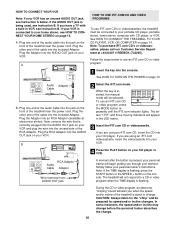
... site. 1 Insert the key into the console. During the program, an electronic "chirping" sound will alert you when the speed and/or incline of the treadmill is heard, the speed and/or incline will appear in , and that it is not wrapped around a power cord. 8 Follow your specific exercise goals. To... and the walking belt will begin to flash. See HOW TO TURN ON THE POWER on the console. When the next "chirp" is inserted, the manual mode will change when a "chirp" is heard, make sure that the audio cable is properly connected, that it is fully plugged in the LED matrix...
... site. 1 Insert the key into the console. During the program, an electronic "chirping" sound will alert you when the speed and/or incline of the treadmill is heard, the speed and/or incline will appear in , and that it is not wrapped around a power cord. 8 Follow your specific exercise goals. To... and the walking belt will begin to flash. See HOW TO TURN ON THE POWER on the console. When the next "chirp" is inserted, the manual mode will change when a "chirp" is heard, make sure that the audio cable is properly connected, that it is fully plugged in the LED matrix...
Uk Manual
Page 26
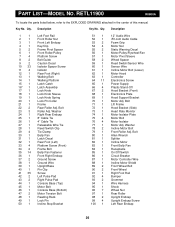
RETL11900 R0800A To locate the parts listed below, refer to the EXPLODED DRAWING attached in the center of this manual. Key No. Description 1 1 2 1 3 1 4 1 5 2 6 1 7 4 8 2 9 2 10 33 11 4 12 1 13 1 14 1 15 1 16* 1 17 1 18 1 19 1 20 1 21 1 22 2 23 3 24 1 25 1 26 1 27 1 28 1 29 4 30 1 ...
RETL11900 R0800A To locate the parts listed below, refer to the EXPLODED DRAWING attached in the center of this manual. Key No. Description 1 1 2 1 3 1 4 1 5 2 6 1 7 4 8 2 9 2 10 33 11 4 12 1 13 1 14 1 15 1 16* 1 17 1 18 1 19 1 20 1 21 1 22 2 23 3 24 1 25 1 26 1 27 1 28 1 29 4 30 1 ...

Uk Manual
Page 27
... Wire, 2 F 8" White Wire, M/F 8" White Wire, 2F 8" Black Wire M/F 4" Black Wire, 2 F 8" Green Wire, F/Ring 8" Green Wire, 2 Ring 12" Green Wire, F/Ring 14" Blue Wire, 2F User's Manual * Includes all parts shown in the box # These parts are not illustrated **These parts are subject to change without notice. 27 Key No. For information...
... Wire, 2 F 8" White Wire, M/F 8" White Wire, 2F 8" Black Wire M/F 4" Black Wire, 2 F 8" Green Wire, F/Ring 8" Green Wire, 2 Ring 12" Green Wire, F/Ring 14" Blue Wire, 2F User's Manual * Includes all parts shown in the box # These parts are not illustrated **These parts are subject to change without notice. 27 Key No. For information...
Uk Manual
Page 28
This product is manufactured and distributed under license from Reebok International. Part No. 165389 R0800A Printed in the centre of this manual). REEBOK and the Vector Logo are registered trademarks and service marks of Reebok. HOW TO ORDER REPLACEMENT PARTS If you encounter any problems with this product,...: • The MODEL NUMBER of the product (RETL11900) • The NAME of the product (REEBOK® ACD1 treadmill) • The KEY NUMBER DESCRIPTION OF THE PART(S) (see the PART LIST on pages 26 and 27 of this manual and the EXPLODED DRAWING attached in USA © 2000
This product is manufactured and distributed under license from Reebok International. Part No. 165389 R0800A Printed in the centre of this manual). REEBOK and the Vector Logo are registered trademarks and service marks of Reebok. HOW TO ORDER REPLACEMENT PARTS If you encounter any problems with this product,...: • The MODEL NUMBER of the product (RETL11900) • The NAME of the product (REEBOK® ACD1 treadmill) • The KEY NUMBER DESCRIPTION OF THE PART(S) (see the PART LIST on pages 26 and 27 of this manual and the EXPLODED DRAWING attached in USA © 2000

