
English Manual
Page 3
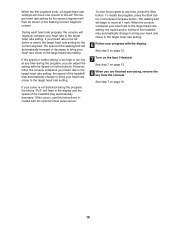
... the user's movement, may change speed, accelerate, or stop procedure before operating the treadmill. 1. No other appliance should not be on the same circuit. Use only a single-outlet surge suppressor that could result in small increments to ensure that blocks air openings. It is running. Athletic support clothes are standing on the walking belt. When connecting the power cord (see page 10), plug the power cord...
... the user's movement, may change speed, accelerate, or stop procedure before operating the treadmill. 1. No other appliance should not be on the same circuit. Use only a single-outlet surge suppressor that could result in small increments to ensure that blocks air openings. It is running. Athletic support clothes are standing on the walking belt. When connecting the power cord (see page 10), plug the power cord...

English Manual
Page 4
... location shown. 21. Do not change the incline of this treadmill in -home use , before cleaning the treadmill, and before using. Never remove the motor hood unless instructed to do so by an authorized service representative only. 26. Apply the decal in this manual and order a free replacement decal. Inspect and properly tighten all parts of 35 or persons with pre-existing health problems. Read all instructions before performing the maintenance and adjustment...
... location shown. 21. Do not change the incline of this treadmill in -home use , before cleaning the treadmill, and before using. Never remove the motor hood unless instructed to do so by an authorized service representative only. 26. Apply the decal in this manual and order a free replacement decal. Inspect and properly tighten all parts of 35 or persons with pre-existing health problems. Read all instructions before performing the maintenance and adjustment...

English Manual
Page 5
... cover of the treadmill is included) Handgrip Pulse Sensor Latch Knob Walking Belt Foot Rail Book Holder Console Key/Clip Handrail Reset/Off Circuit Breaker Wheel Power Cord Rear Roller Adjustment Bolts Cushioned Walking Platform RIGHT SIDE 5 If you 're not exercising, the unique 8400 C treadmill can be folded up, requiring less than half the floor space than traditional treadmills. To avoid a registration fee for selecting the revolutionary REEBOK® 8400 C treadmill. The model number of this manual...
... cover of the treadmill is included) Handgrip Pulse Sensor Latch Knob Walking Belt Foot Rail Book Holder Console Key/Clip Handrail Reset/Off Circuit Breaker Wheel Power Cord Rear Roller Adjustment Bolts Cushioned Walking Platform RIGHT SIDE 5 If you 're not exercising, the unique 8400 C treadmill can be folded up, requiring less than half the floor space than traditional treadmills. To avoid a registration fee for selecting the revolutionary REEBOK® 8400 C treadmill. The model number of this manual...
English Manual
Page 10
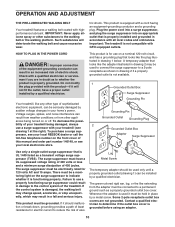
... determine if the outlet box cover is damaged, the walking belt may change speed, accelerate, or stop unexpectedly, which may result in drawing 2 may be installed by a qualified electrician. If the control system is grounded before using an adapter. 10 The green-colored rigid ear, lug, or the like the plug illustrated in accordance with highperformance lubricant. tric shock. Do not modify...
... determine if the outlet box cover is damaged, the walking belt may change speed, accelerate, or stop unexpectedly, which may result in drawing 2 may be installed by a qualified electrician. If the control system is grounded before using an adapter. 10 The green-colored rigid ear, lug, or the like the plug illustrated in accordance with highperformance lubricant. tric shock. Do not modify...
English Manual
Page 11
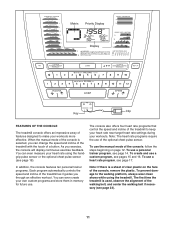
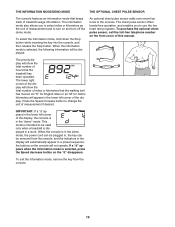
... heart rate settings during your heart rate using the treadmill. The console also offers four heart rate programs that control the speed and incline of the treadmill to the walking platform, always wear clean shoes while using the handgrip pulse sensor or the optional chest pulse sensor (see page 17. To use a heart rate program, see page 19). In addition, the console features ten personal trainer programs. Each program automatically controls the speed and incline of the treadmill as it guides you exercise, the console will display continuous exercise...
... heart rate settings during your heart rate using the treadmill. The console also offers four heart rate programs that control the speed and incline of the treadmill to the walking platform, always wear clean shoes while using the handgrip pulse sensor or the optional chest pulse sensor (see page 17. To use a heart rate program, see page 19). In addition, the console features ten personal trainer programs. Each program automatically controls the speed and incline of the treadmill as it guides you exercise, the console will display continuous exercise...
English Manual
Page 12
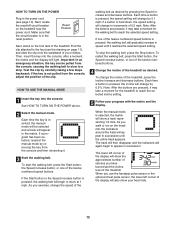
... treadmill. As you exercise, change by removing the key from the console, causing the walking belt to slow to the key (see page 10). When you have burned and the incline level of your clothes. Reset Position Next, stand on the treadmill near the power cord. HOW TO TURN ON THE POWER Plug in succession. Find the clip attached to a stop the walking belt, press the Stop button. after a moment, the matrix and the display...
... treadmill. As you exercise, change by removing the key from the console, causing the walking belt to slow to the key (see page 10). When you have burned and the incline level of your clothes. Reset Position Next, stand on the treadmill near the power cord. HOW TO TURN ON THE POWER Plug in succession. Find the clip attached to a stop the walking belt, press the Stop button. after a moment, the matrix and the display...

English Manual
Page 13
... chest pulse sensor at high speed, press the button a second time. To turn off the demo mode. Note: If the display remains lit after a few minutes. 8 When you are left on the fans at the same time, the console will not display your hands are finished using the treadmill, switch the reset/off circuit breaker to view. The center of the display is folded to miles. To reset the display, press the Stop button, remove...
... chest pulse sensor at high speed, press the button a second time. To turn off the demo mode. Note: If the display remains lit after a few minutes. 8 When you are left on the fans at the same time, the console will not display your hands are finished using the treadmill, switch the reset/off circuit breaker to view. The center of the display is folded to miles. To reset the display, press the Stop button, remove...
English Manual
Page 14
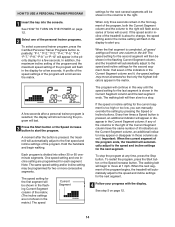
... left. To restart the program, press the Start button or the Speed increase button. HOW TO USE A PERSONAL TRAINER PROGRAM 1 Insert the key into either 30 or 60 oneminute segments. See HOW TO TURN ON THE POWER on page 12. 14 "P-1," "P-2," "P-3," "P-4," "P-5," "P-6," "P-7," "P-8," "P-9," or "P-10" will sound. A moment after a personal trainer program is pressed, the treadmill will flash in the matrix.) The speed Current Segment settings for the first segment...
... left. To restart the program, press the Start button or the Speed increase button. HOW TO USE A PERSONAL TRAINER PROGRAM 1 Insert the key into either 30 or 60 oneminute segments. See HOW TO TURN ON THE POWER on page 12. 14 "P-1," "P-2," "P-3," "P-4," "P-5," "P-6," "P-7," "P-8," "P-9," or "P-10" will sound. A moment after a personal trainer program is pressed, the treadmill will flash in the matrix.) The speed Current Segment settings for the first segment...
English Manual
Page 15
... columns of the treadmill is pressed, the walking belt will then move . See page 19 and turn off " position and unplug the power cord. Segment minute segments. The speed setting for as many segments as desired; Continue programming speed and incline settings for the first seg- The speed and incline settings that you are finished exercising, remove the key from the console. 5 Measure your workout, press the Stop button twice. When the program ends, make sure...
... columns of the treadmill is pressed, the walking belt will then move . See page 19 and turn off " position and unplug the power cord. Segment minute segments. The speed setting for as many segments as desired; Continue programming speed and incline settings for the first seg- The speed and incline settings that you are finished exercising, remove the key from the console. 5 Measure your workout, press the Stop button twice. When the program ends, make sure...
English Manual
Page 16
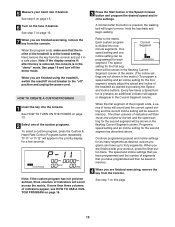
... program, press the Stop button twice at any time before the program is pressed, the treadmill will automatically adjust to the first speed and incline settings that you can redefine to the left. Note: If only three columns of the custom programs. To select a custom program, press Custom & Heart Rate Control Programs button repeatedly; Hold the handrails and begin walking. When only three seconds remain in the display. To change the speed or incline setting...
... program, press the Stop button twice at any time before the program is pressed, the treadmill will automatically adjust to the first speed and incline settings that you can redefine to the left. Note: If only three columns of the custom programs. To select a custom program, press Custom & Heart Rate Control Programs button repeatedly; Hold the handrails and begin walking. When only three seconds remain in the display. To change the speed or incline setting...
English Manual
Page 17
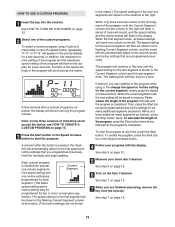
...rate program, press the Custom & Heart Rate Control Programs button repeatedly; Note: The same target heart rate setting may be programmed for each segment. See HOW TO TURN ON THE POWER on the optional chest pulse sensor. If desired, press the increase and decrease buttons beside the Custom & Heart Rate Control Programs button to start the program. If desired, press the increase and decrease buttons beside the Custom & Heart Rate Control Programs button to change . 5 Press the Start button or the Speed increase button to change the target heart rate setting (see EXERCISE...
...rate program, press the Custom & Heart Rate Control Programs button repeatedly; Note: The same target heart rate setting may be programmed for each segment. See HOW TO TURN ON THE POWER on the optional chest pulse sensor. If desired, press the increase and decrease buttons beside the Custom & Heart Rate Control Programs button to start the program. If desired, press the increase and decrease buttons beside the Custom & Heart Rate Control Programs button to change . 5 Press the Start button or the Speed increase button to change the target heart rate setting (see EXERCISE...
English Manual
Page 18
... target heart rate setting. If this occurs, see the instructions included with the optional chest pulse sensor. See step 7 on page 13. 8 When you can adjust the setting with the Speed or Incline buttons. If the speed or incline setting is not detected during the program, you are finished exercising, remove the key from the console. The walking belt will begin to the target heart rate setting. The target heart rate setting for the current segment, the speed of the treadmill...
... target heart rate setting. If this occurs, see the instructions included with the optional chest pulse sensor. See step 7 on page 13. 8 When you can adjust the setting with the Speed or Incline buttons. If the speed or incline setting is not detected during the program, you are finished exercising, remove the key from the console. The walking belt will begin to the target heart rate setting. The target heart rate setting for the current segment, the speed of the treadmill...
English Manual
Page 19
... power cord can be plugged in the "demo" mode. IMPORTANT: If a "d" appears in the lower left corner of this manual. The chest pulse sensor offers hands-free operation, and enables you to the console. the buttons on the front cover of the display, the console is intended to be displayed: An optional chest pulse sensor adds even more features to select miles or kilometers as the unit of hours that the walking belt...
... power cord can be plugged in the "demo" mode. IMPORTANT: If a "d" appears in the lower left corner of this manual. The chest pulse sensor offers hands-free operation, and enables you to the console. the buttons on the front cover of the display, the console is intended to be displayed: An optional chest pulse sensor adds even more features to select miles or kilometers as the unit of hours that the walking belt...
English Manual
Page 20
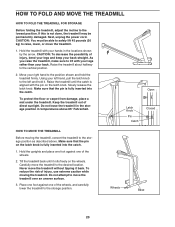
.... Latch Knob Pin Catch Open Closed HOW TO MOVE THE TREADMILL Before moving the treadmill. Hold the uprights and place one foot against one of the wheels. 2. Never move the treadmill to the storage position as described above 85° Fahrenheit. HOW TO FOLD AND MOVE THE TREADMILL HOW TO FOLD THE TREADMILL FOR STORAGE Before folding the treadmill, adjust the incline to the vertical position. 2. Next, unplug the power cord. Slowly release the latch knob...
.... Latch Knob Pin Catch Open Closed HOW TO MOVE THE TREADMILL Before moving the treadmill. Hold the uprights and place one foot against one of the wheels. 2. Never move the treadmill to the storage position as described above 85° Fahrenheit. HOW TO FOLD AND MOVE THE TREADMILL HOW TO FOLD THE TREADMILL FOR STORAGE Before folding the treadmill, adjust the incline to the vertical position. 2. Next, unplug the power cord. Slowly release the latch knob...

English Manual
Page 22
...: a. Check the circuit breaker located on the treadmill near the power cord (see the front cover of this manual. TROUBLESHOOTING Most treadmill problems can be solved by following the steps below. Check the circuit breaker located on page 10. Make sure that the key is plugged into the console. Then, raise the Uprights (69) and carefully remove the Hood. 69 83 48 Next, locate the Reed Switch (10) and the...
...: a. Check the circuit breaker located on the treadmill near the power cord (see the front cover of this manual. TROUBLESHOOTING Most treadmill problems can be solved by following the steps below. Check the circuit breaker located on page 10. Make sure that the key is plugged into the console. Then, raise the Uprights (69) and carefully remove the Hood. 69 83 48 Next, locate the Reed Switch (10) and the...
English Manual
Page 23
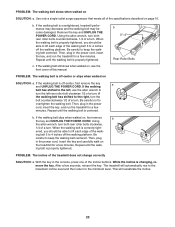
... the key. PROBLEM: The incline of a turn the left rear roller bolt clockwise 1/2 of the treadmill does not change correctly SOLUTION: a. c. If the walking belt is correctly tight- Then, plug in the power cord, insert the key and carefully walk on the treadmill for a few minutes. After a few minutes. Then, plug in the console, press one of the walk- If the walking belt still slows when walked on, see the front cover of the specifications described...
... the key. PROBLEM: The incline of a turn the left rear roller bolt clockwise 1/2 of the treadmill does not change correctly SOLUTION: a. c. If the walking belt is correctly tight- Then, plug in the power cord, insert the key and carefully walk on the treadmill for a few minutes. After a few minutes. Then, plug in the console, press one of the walk- If the walking belt still slows when walked on, see the front cover of the specifications described...
English Manual
Page 24
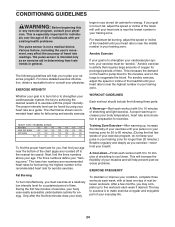
... and will help prevent post-exercise problems. EXERCISE FREQUENCY To maintain or improve your heart rate as an exercise aid in determining heart rate trends in preparation for prolonged periods of heart rate readings. The lower two numbers are rounded off to five workouts each workout with preexisting health problems. The pulse sensor is activity that requires large amounts of oxygen for exercise. The key to success is to plan...
... and will help prevent post-exercise problems. EXERCISE FREQUENCY To maintain or improve your heart rate as an exercise aid in determining heart rate trends in preparation for prolonged periods of heart rate readings. The lower two numbers are rounded off to five workouts each workout with preexisting health problems. The pulse sensor is activity that requires large amounts of oxygen for exercise. The key to success is to plan...
English Manual
Page 26
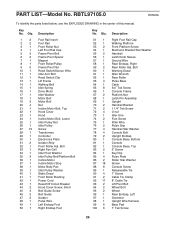
... 1 Walking Belt 15 1 Idler Spring 16 1 Drive Motor 17 1 Idler Washer 18 1 Motor Belt 19 2 Motor Bolt 20 4 Nut 21 1 Incline Motor Bolt, Top 22 1 Hood Cover 23 1 Hood 24 1 Incline Motor Bolt, Lower 25 1 Idler Pulley Nut 26 1 Idler Pulley 27 15 Screw 28 1 Transformer 29 1 Controller 30 1 Electronics Plate 31 2 Isolator Strip 32 1 Front Roller Adj. Key No. Description Key No. Qty. Bolt Warning Decal Allen Wrench Rear Roller Pulse Base Catch 3/4" Tek Screw Console Frame Platform Nut Latch Pin Assembly Upright Handrail...
... 1 Walking Belt 15 1 Idler Spring 16 1 Drive Motor 17 1 Idler Washer 18 1 Motor Belt 19 2 Motor Bolt 20 4 Nut 21 1 Incline Motor Bolt, Top 22 1 Hood Cover 23 1 Hood 24 1 Incline Motor Bolt, Lower 25 1 Idler Pulley Nut 26 1 Idler Pulley 27 15 Screw 28 1 Transformer 29 1 Controller 30 1 Electronics Plate 31 2 Isolator Strip 32 1 Front Roller Adj. Key No. Description Key No. Qty. Bolt Warning Decal Allen Wrench Rear Roller Pulse Base Catch 3/4" Tek Screw Console Frame Platform Nut Latch Pin Assembly Upright Handrail...
English Manual
Page 27
... PRODUCT (REEBOK 8400 C treadmill) • the SERIAL NUMBER of this manual. 101 1 102 2 103 2 104 2 105 2 106 1 107 1 108 1 109 1 Left Fan Grill Extension Leg Extension Cap Incline Warning Decal Console Fan Right Cup Holder Left Cup Holder Book Holder Power Cord Grommet 110 1 111 6 # 1 # 1 # 1 # 1 Frame 3/4" Screw 14" Blue Wire, 2F 4" Blue Wire, M/F 4" Green Wire, M/Ring User's Manual # These parts are not illustrated ORDERING REPLACEMENT PARTS To order replacement parts, see...
... PRODUCT (REEBOK 8400 C treadmill) • the SERIAL NUMBER of this manual. 101 1 102 2 103 2 104 2 105 2 106 1 107 1 108 1 109 1 Left Fan Grill Extension Leg Extension Cap Incline Warning Decal Console Fan Right Cup Holder Left Cup Holder Book Holder Power Cord Grommet 110 1 111 6 # 1 # 1 # 1 # 1 Frame 3/4" Screw 14" Blue Wire, 2F 4" Blue Wire, M/F 4" Green Wire, M/Ring User's Manual # These parts are not illustrated ORDERING REPLACEMENT PARTS To order replacement parts, see...
English Manual
Page 30
... COVERED-ICON Health & Fitness, Inc. ("ICON"), warrants the drive motor for service where your Product (save the original shipping carton if possible); ICON is covered by failure on how long an implied warranty lasts. WHAT IS NOT COVERED-Any failures or damage caused by unauthorized service, misuse, accident, negligence, improper assembly or installation, alterations, modifications without charge, any replacement part or component, providing the repairs are authorized by ICON...
... COVERED-ICON Health & Fitness, Inc. ("ICON"), warrants the drive motor for service where your Product (save the original shipping carton if possible); ICON is covered by failure on how long an implied warranty lasts. WHAT IS NOT COVERED-Any failures or damage caused by unauthorized service, misuse, accident, negligence, improper assembly or installation, alterations, modifications without charge, any replacement part or component, providing the repairs are authorized by ICON...


