
User Manual - RP5030
Page 2
... for additional suggestions. For instructions on different branch circuits. RCA If this equipment does cause interference to the warranty included in appropriate servicing techniques. CAUTION RISK OF ELECTRIC SHOCK DO NOT OPEN T H E L I G H T N I S A ( O R B A C K ) . REFER SERVICING I M P O R T A N T " D A N G E R O U S TO QUALIFIED SERVICE I N S T R U C T I G N SERVICEABLE PARTS IN- could void the user's authority to operate this device of purchase: must accept any interference received, Date of the FCC In the...
... for additional suggestions. For instructions on different branch circuits. RCA If this equipment does cause interference to the warranty included in appropriate servicing techniques. CAUTION RISK OF ELECTRIC SHOCK DO NOT OPEN T H E L I G H T N I S A ( O R B A C K ) . REFER SERVICING I M P O R T A N T " D A N G E R O U S TO QUALIFIED SERVICE I N S T R U C T I G N SERVICEABLE PARTS IN- could void the user's authority to operate this device of purchase: must accept any interference received, Date of the FCC In the...

User Manual - RP5030
Page 3
... to remove the batteries to be sure that you do not use the unit for the Unit • Do not use solvents. EN Help protect the environment - condensation problem may be resulted. • Avoid shock to resume normal operation. Never use solvents. • If you dispose of the power source may be required) to the unit especially during recording. Leaking batteries...
... to remove the batteries to be sure that you do not use the unit for the Unit • Do not use solvents. EN Help protect the environment - condensation problem may be resulted. • Avoid shock to resume normal operation. Never use solvents. • If you dispose of the power source may be required) to the unit especially during recording. Leaking batteries...
User Manual - RP5030
Page 4
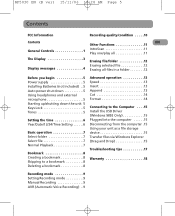
... Erasing all files in a folder 12 Before you begin 5 Power supply 5 Installing Batteries (not included) . .5 Auto power shut down 5 Using headphones and external microphone 5 Starting up/shutting down the unit 5 Keys Lock 5 Tones 5 Setting the time 6 Year/Date/12/24/Time Setting . . . . . .6 Basic operation 7 Select folder 7 Select file 7 Normal Playback 7 Bookmark 8 Creating a bookmark 8 Skipping to a bookmark 8 Deleting a bookmark 8 Advanced operation 13 Speed 13 Insert 13 Append 13 Cut 14 Format 14 Connecting to the Computer . . . .15 Install the USB Driver (Windows...
... Erasing all files in a folder 12 Before you begin 5 Power supply 5 Installing Batteries (not included) . .5 Auto power shut down 5 Using headphones and external microphone 5 Starting up/shutting down the unit 5 Keys Lock 5 Tones 5 Setting the time 6 Year/Date/12/24/Time Setting . . . . . .6 Basic operation 7 Select folder 7 Select file 7 Normal Playback 7 Bookmark 8 Creating a bookmark 8 Skipping to a bookmark 8 Deleting a bookmark 8 Advanced operation 13 Speed 13 Insert 13 Append 13 Cut 14 Format 14 Connecting to the Computer . . . .15 Install the USB Driver (Windows...
User Manual - RP5030
Page 5
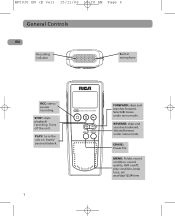
Selects/Browses under menu mode. STOP: stops playback/ recording. PLAY: turns the unit on /off the unit. REVERSE: skips and searches backward. Selects/Browses under menu mode. Turns off , play condition, beep tone, set year/day/12/24/time Starts/ pauses playback. 1 64M DIGITAL VOICE RECORDER ERASE MENU FORWARD: skips and searches forward. ERASE: Erases file MENU: Folder, record condition, record quality, AVR on . RP5030 EN (B ver) 15/11/06 10:28 AM Page 6 General Controls EN Recording indicator Built-in microphone REC: starts / pauses recording.
Selects/Browses under menu mode. STOP: stops playback/ recording. PLAY: turns the unit on /off the unit. REVERSE: skips and searches backward. Selects/Browses under menu mode. Turns off , play condition, beep tone, set year/day/12/24/time Starts/ pauses playback. 1 64M DIGITAL VOICE RECORDER ERASE MENU FORWARD: skips and searches forward. ERASE: Erases file MENU: Folder, record condition, record quality, AVR on . RP5030 EN (B ver) 15/11/06 10:28 AM Page 6 General Controls EN Recording indicator Built-in microphone REC: starts / pauses recording.
User Manual - RP5030
Page 7
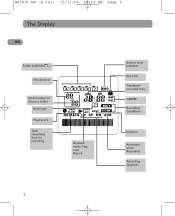
RP5030 EN (B ver) 15/11/06 10:28 AM Page 8 The Display EN Folder (A/B/C/D/ ) File selected Total number of files in a folder Bookmark Play/record Total remaining time for recording ABCD MM DD AM PM DICT FAST SLOW ONE ALL BEEP CONF REMAIN LP SP HQ AVR Playback mode: Play one/ Play all Battery level indicator Key Lock Time/date/ recorded time AM/PM Recording Conditions Keytone Automatic Voice Recording Recording Qualities 3
RP5030 EN (B ver) 15/11/06 10:28 AM Page 8 The Display EN Folder (A/B/C/D/ ) File selected Total number of files in a folder Bookmark Play/record Total remaining time for recording ABCD MM DD AM PM DICT FAST SLOW ONE ALL BEEP CONF REMAIN LP SP HQ AVR Playback mode: Play one/ Play all Battery level indicator Key Lock Time/date/ recorded time AM/PM Recording Conditions Keytone Automatic Voice Recording Recording Qualities 3
User Manual - RP5030
Page 8
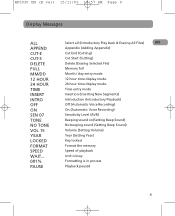
... Playback paused 4 RP5030 EN (B ver) 15/11/06 10:57 AM Page 9 Display Messages ALL APPEND CUT-E CUT-S DELETE FULL MM/DD 12 HOUR 24 HOUR TIME INSERT INTRO OFF ON SEN 07 TONE NO TONE VOL 15 YEAR LOCKED FORMAT SPEED WAIT... 001% PAUSE Select all (Introductory Play back & Erasing All Files) EN Appendix (Adding Appendix) Cut End (Cutting) Cut Start (Cutting) Delete (Erasing Selected File) Memory full Month / day entry mode. 12 hour time display mode...
... Playback paused 4 RP5030 EN (B ver) 15/11/06 10:57 AM Page 9 Display Messages ALL APPEND CUT-E CUT-S DELETE FULL MM/DD 12 HOUR 24 HOUR TIME INSERT INTRO OFF ON SEN 07 TONE NO TONE VOL 15 YEAR LOCKED FORMAT SPEED WAIT... 001% PAUSE Select all (Introductory Play back & Erasing All Files) EN Appendix (Adding Appendix) Cut End (Cutting) Cut Start (Cutting) Delete (Erasing Selected File) Memory full Month / day entry mode. 12 hour time display mode...
User Manual - RP5030
Page 9
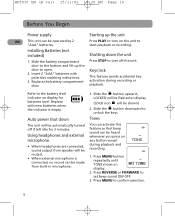
Replace with polarities matching indications. 3. Press PLAY to turn off if left idle for batteries level. Installing Batteries (not included) 1. Auto power shut down the unit Press STOP to turn on the unit to the battery level indicator on display for 3 minutes. Using headphones and external microphone • When headphones are connected, sound output from speaker will be operated by 2 "AAA" batteries. Slide the button downward to confirm selection. 5 Tones You can activate this feature...
Replace with polarities matching indications. 3. Press PLAY to turn off if left idle for batteries level. Installing Batteries (not included) 1. Auto power shut down the unit Press STOP to turn on the unit to the battery level indicator on display for 3 minutes. Using headphones and external microphone • When headphones are connected, sound output from speaker will be operated by 2 "AAA" batteries. Slide the button downward to confirm selection. 5 Tones You can activate this feature...
User Manual - RP5030
Page 10
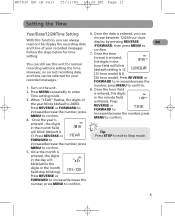
... is 2006). FORWARD to increase/decrease the number, press MENU to Stop mode. Once the year is entered, you can choose between 12/24 hour clock With this unit for time 7. Press REVERSE or recorded messages. Press MENU repeatedly to confirm. 8. Once the date is number, press MENU to enter Time setting mode. 3. format is entered, AM the digits in the You can still use this function, you can always...
... is 2006). FORWARD to increase/decrease the number, press MENU to Stop mode. Once the year is entered, you can choose between 12/24 hour clock With this unit for time 7. Press REVERSE or recorded messages. Press MENU repeatedly to confirm. 8. Once the date is number, press MENU to enter Time setting mode. 3. format is entered, AM the digits in the You can still use this function, you can always...
User Manual - RP5030
Page 11
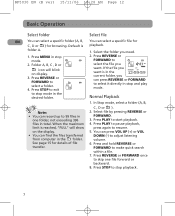
... hold REVERSE or FORWARD to start playback. 4. Press MENU in stop playback. 7 Press PLAY to make quick search within a file. 7. Normal Playback 1. See page 15 for browsing. Press STOP to stop and play mode. RP5030 EN (B ver) 15/11/06 10:28 AM Page 12 Basic Operation Select folder Select file EN You can select a specific folder (A, B, You can select a specific file for C , D or ) for details of file transfer. Press REVERSE or FORWARD to resume. 5. to stop mode. In Stop mode...
... hold REVERSE or FORWARD to start playback. 4. Press MENU in stop playback. 7 Press PLAY to make quick search within a file. 7. Normal Playback 1. See page 15 for browsing. Press STOP to stop and play mode. RP5030 EN (B ver) 15/11/06 10:28 AM Page 12 Basic Operation Select folder Select file EN You can select a specific folder (A, B, You can select a specific file for C , D or ) for details of file transfer. Press REVERSE or FORWARD to resume. 5. to stop mode. In Stop mode...
User Manual - RP5030
Page 12
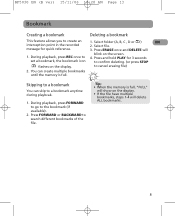
... interception point in the recorded message for 3 seconds to confirm deleting. (or press STOP flashes on the display. Select file. 3. Press and hold PLAY for quick reference. 1. You can skip to a bookmark anytime during playbcak. 1. Press FORWARD or BACKWARD to cancel erasing file) 2. Select folder (A, B, C , D or ) EN 2. During playback, press FORWARD to go to set a bookmark, the bookmark icon blink on the screen. 4. During playback, press REC once to the...
... interception point in the recorded message for 3 seconds to confirm deleting. (or press STOP flashes on the display. Select file. 3. Press and hold PLAY for quick reference. 1. You can skip to a bookmark anytime during playbcak. 1. Press FORWARD or BACKWARD to cancel erasing file) 2. Select folder (A, B, C , D or ) EN 2. During playback, press FORWARD to go to set a bookmark, the bookmark icon blink on the screen. 4. During playback, press REC once to the...
User Manual - RP5030
Page 13
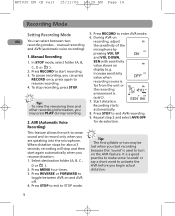
... to make some 'sounds' or say a short word to activate the AVR before you can select between AVR on the AVR feature. Recording starts automatically. 8. AVR (Automatic Voice for about 3 seconds, recording will stop recording, press STOP. It is quiet.). Manual Recording and VOL DOWN, 1. display (e.g. 3. To stop and then start recording. Press STOP to enter AVR mode. 6. Press RECORD to turn on and AVR off. 4. Start dictation. Press REVERSE or FORWARD to record only...
... to make some 'sounds' or say a short word to activate the AVR before you can select between AVR on the AVR feature. Recording starts automatically. 8. AVR (Automatic Voice for about 3 seconds, recording will stop recording, press STOP. It is quiet.). Manual Recording and VOL DOWN, 1. display (e.g. 3. To stop and then start recording. Press STOP to enter AVR mode. 6. Press RECORD to turn on and AVR off. 4. Start dictation. Press REVERSE or FORWARD to record only...
User Manual - RP5030
Page 14
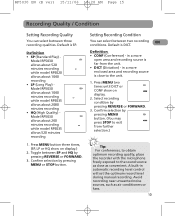
... MENU button three times, (SP, LP or HQ show on display.) 2. Press MENU two times until DICT or CONF show on DICT display. 2. A built-in a more open area and recording source is close to the sound source as close as air conditioners or fans. 10 Default is SP. Confirm selection by pressing REVERSE or FORWARD. 3. in automatic recording level control will set the optimum record level during manual recording. Model RP5030...
... MENU button three times, (SP, LP or HQ show on display.) 2. Press MENU two times until DICT or CONF show on DICT display. 2. A built-in a more open area and recording source is close to the sound source as close as air conditioners or fans. 10 Default is SP. Confirm selection by pressing REVERSE or FORWARD. 3. in automatic recording level control will set the optimum record level during manual recording. Model RP5030...
User Manual - RP5030
Page 15
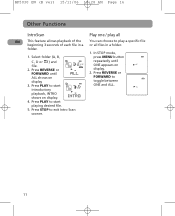
... folder (A, B, press MENU button C , D or ) and A repeatedly until 2. AM ONE appears on FORWARD to display toggle between A 3. Press REVERSE or ALL shows on ONE 2. Press PLAY to start MM DD ONE and ALL. Press STOP to play all EN This feature allows playback of the You can choose to exit Intro Scan sooner. 11 FORWARD until MM DD file. Press PLAY to start playing desired file. 5. In STOP mode, 1. RP5030...
... folder (A, B, press MENU button C , D or ) and A repeatedly until 2. AM ONE appears on FORWARD to display toggle between A 3. Press REVERSE or ALL shows on ONE 2. Press PLAY to start MM DD ONE and ALL. Press STOP to play all EN This feature allows playback of the You can choose to exit Intro Scan sooner. 11 FORWARD until MM DD file. Press PLAY to start playing desired file. 5. In STOP mode, 1. RP5030...

User Manual - RP5030
Page 16
... a specific EN steps: folder by one automatically. 1. Press ERASE once and DELETE will be moved forward by the following steps: 1. Turn on the display. 4. Select file. 3. Select folder (A, B, C , D or ) 2. In Stop mode, press FORWARD continuously until "ALL" appears on the unit. 2. Select a folder (A, B, C , D or ). 3. Press ERASE and "DELETE" will be erased completely (or press STOP to cancel erasing file) Tip: File numbers that come after erased one will blink on the screen. 4. Press and hold ERASE...
... a specific EN steps: folder by one automatically. 1. Press ERASE once and DELETE will be moved forward by the following steps: 1. Turn on the display. 4. Select file. 3. Select folder (A, B, C , D or ) 2. In Stop mode, press FORWARD continuously until "ALL" appears on the unit. 2. Select a folder (A, B, C , D or ). 3. Press ERASE and "DELETE" will be erased completely (or press STOP to cancel erasing file) Tip: File numbers that come after erased one will blink on the screen. 4. Press and hold ERASE...

User Manual - RP5030
Page 17
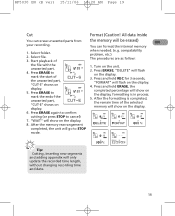
... toggle between FAST and SLOW. 7. recorded content. • After editing a message, "WAIT" will be shown on display. 6. Select folder. 2. Select file for adjusting playback FAST speed. 3. Start playback. Speed You can insert new segments into a when battery power is too low or file without erasing previously the Introduction Mode is in used. Start playback. 4. During playback, shown on the display. 7. Press STOP to start playback. 5. Press REVERSE or FORWARD to start recording ONE new segment, SP "INSERT" will be shown on display. 6. RP5030 EN...
... toggle between FAST and SLOW. 7. recorded content. • After editing a message, "WAIT" will be shown on display. 6. Select folder. 2. Select file for adjusting playback FAST speed. 3. Start playback. Speed You can insert new segments into a when battery power is too low or file without erasing previously the Introduction Mode is in used. Start playback. 4. During playback, shown on the display. 7. Press STOP to start playback. 5. Press REVERSE or FORWARD to start recording ONE new segment, SP "INSERT" will be shown on display. 6. RP5030 EN...
User Manual - RP5030
Page 18
... erase unwanted parts from the memory will flash on the display. 6. Start playback of the selected memory will only update the recorded time length, without changing recording time and date. 14 Press ERASE to mark the endof the unwanted part, "CUT-E" shows on the unit. 2. A 5. All data inside You can format the internal memory 1. Press and hold ERASE, the completed percentage will flash on the display. Select file. 3. Press ERASE, "DELETE" will show on the display. 3. Press and hold REC...
... erase unwanted parts from the memory will flash on the display. 6. Start playback of the selected memory will only update the recorded time length, without changing recording time and date. 14 Press ERASE to mark the endof the unwanted part, "CUT-E" shows on the unit. 2. A 5. All data inside You can format the internal memory 1. Press and hold ERASE, the completed percentage will flash on the display. Select file. 3. Press ERASE, "DELETE" will show on the display. 3. Press and hold REC...

User Manual - RP5030
Page 19
... -screen instruction. 3. Use the USB cable supplied to connect the unit to be a removable drive in the unit. • On some operating system, a 1. Tip: • Data transfer is completed, reboot your model from the Model RP5035: computer http://www.rcaaudiovideo.com/en- US/Downloads.html?ProductID=RP5 Unplug the USB cable after you need to install a USB driver before your player. Plugged into the computer You can recognize your computer can transfer files...
... -screen instruction. 3. Use the USB cable supplied to connect the unit to be a removable drive in the unit. • On some operating system, a 1. Tip: • Data transfer is completed, reboot your model from the Model RP5035: computer http://www.rcaaudiovideo.com/en- US/Downloads.html?ProductID=RP5 Unplug the USB cable after you need to install a USB driver before your player. Plugged into the computer You can recognize your computer can transfer files...

User Manual - RP5030
Page 20
... function as a detachable Your player is disconnected from it via Windows device Explorer (Drag and Drop) EN The unit can take along letter. From Windows Explorer, your favorite images and documents highlight all the files/folders you wherever you go. RP5030 EN (B ver) 15/11/06 10:28 AM Page 21 Using your unit as a file storage Transfer Files via USB connection, the unit "MUSIC...
... function as a detachable Your player is disconnected from it via Windows device Explorer (Drag and Drop) EN The unit can take along letter. From Windows Explorer, your favorite images and documents highlight all the files/folders you wherever you go. RP5030 EN (B ver) 15/11/06 10:28 AM Page 21 Using your unit as a file storage Transfer Files via USB connection, the unit "MUSIC...

User Manual - RP5030
Page 21
... 'Time Setting'. under section "Erasing Selected File" carefully. Try record in a new folder. is not set to section on Time Setting. • You may not have not set the date and Cannot erase recorded file(s) time before recording. RP5030 EN (B ver) 15/11/06 10:28 AM Page 22 Troubleshooting Tips Unit doesn't turn on Cannot edit • Check that batteries are removed, saved settings may not be stopped in noisy environment. activated. • Make sure memory is...
... 'Time Setting'. under section "Erasing Selected File" carefully. Try record in a new folder. is not set to section on Time Setting. • You may not have not set the date and Cannot erase recorded file(s) time before recording. RP5030 EN (B ver) 15/11/06 10:28 AM Page 22 Troubleshooting Tips Unit doesn't turn on Cannot edit • Check that batteries are removed, saved settings may not be stopped in noisy environment. activated. • Make sure memory is...
User Manual - RP5030
Page 22
... units begins with a new, or at our option, a refurbished unit. RP5030 EN (B ver) 15/11/06 10:28 AM Page 23 U.S. Include any charges billed to you freight prepaid. Product Exchange Center 11721 B Alameda Avenue Socorro, Texas 79927 • Insure your dealer.) • Installation and set-up service adjustments. • Batteries. • Damage from date of shipment to you...
... units begins with a new, or at our option, a refurbished unit. RP5030 EN (B ver) 15/11/06 10:28 AM Page 23 U.S. Include any charges billed to you freight prepaid. Product Exchange Center 11721 B Alameda Avenue Socorro, Texas 79927 • Insure your dealer.) • Installation and set-up service adjustments. • Batteries. • Damage from date of shipment to you...


