User Guide & Warranty
Page 2
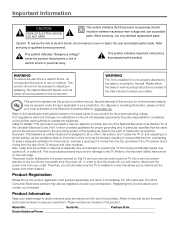
...numbers are located on a firm, flat surface. DO NOT OPEN This symbol indicates that presents a risk of purchase. No user serviceable parts inside the product that this product contains mercury. Please follow the base or wall mounting instructions provided in the User's Guide to ensure your sales receipt to disconnect the power cord... and 2 inches from the rear of the unit may be registered at www.rca.com/television. Model No Serial No Pucr hase Date Dealer/Address/Phone Refer servicing to the Important Safety Instructions on the back panel of cable entry as vases...
...numbers are located on a firm, flat surface. DO NOT OPEN This symbol indicates that presents a risk of purchase. No user serviceable parts inside the product that this product contains mercury. Please follow the base or wall mounting instructions provided in the User's Guide to ensure your sales receipt to disconnect the power cord... and 2 inches from the rear of the unit may be registered at www.rca.com/television. Model No Serial No Pucr hase Date Dealer/Address/Phone Refer servicing to the Important Safety Instructions on the back panel of cable entry as vases...
User Guide & Warranty
Page 4
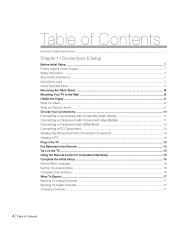
... HDMI (Best 12 Connecting a PC Component 13 Viewing the Picture from the Connected Component 14 Viewing a PC ...14 Plug in the TV ...15 Put Batteries in the Remote ...15 Turn on the TV ...15 Using the Remote Control to Complete Initial Setup 15 Complete the Initial Setup ...16 Set the Menu Language ...16 Set the TV Location Mode ...16 Complete Channel Setup ...16 What To Expect ...17 Waching TV-Analog Channels ...17 Waching TV-Digital Channels ...17 Changing Channels...
... HDMI (Best 12 Connecting a PC Component 13 Viewing the Picture from the Connected Component 14 Viewing a PC ...14 Plug in the TV ...15 Put Batteries in the Remote ...15 Turn on the TV ...15 Using the Remote Control to Complete Initial Setup 15 Complete the Initial Setup ...16 Set the Menu Language ...16 Set the TV Location Mode ...16 Complete Channel Setup ...16 What To Expect ...17 Waching TV-Analog Channels ...17 Waching TV-Digital Channels ...17 Changing Channels...
User Guide & Warranty
Page 14
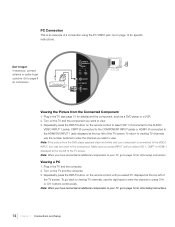
... screen. Repeatedly press the INPUT button on the TV and the component you wish to view. 3. Note: If the picture from the Connected Component 1. Turn on the remote control to select VID 1 (if connected to the AUDIO/ VIDEO INPUT 1 jacks), CMPT (if connected to the COMPONENT INPUT jacks) or HDMI1 (if connected to page 9 for initial setup instructions. To return to viewing TV channels, use the digit keys to page 16 for details) and the component, such as a DVD player or a VCR. 2. Plug...
... screen. Repeatedly press the INPUT button on the TV and the component you wish to view. 3. Note: If the picture from the Connected Component 1. Turn on the remote control to select VID 1 (if connected to the AUDIO/ VIDEO INPUT 1 jacks), CMPT (if connected to the COMPONENT INPUT jacks) or HDMI1 (if connected to page 9 for initial setup instructions. To return to viewing TV channels, use the digit keys to page 16 for details) and the component, such as a DVD player or a VCR. 2. Plug...
User Guide & Warranty
Page 16
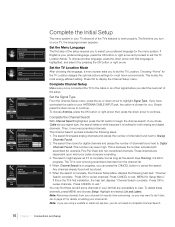
...-scrambled channels. Channel Setup Exit Sound Picture Channel List Setup Parental Control Time USB Signal Type Cable Channel Search Running Searching for Digital Channels. Any channels already found will be stored. 5. The first time you are still some channels in progress, you to review channels. The search first seeks analog channels and places the number of channels found next to exit, MENU for most energy-efficient setting. If this setting. You may find there are using a satellite or cable set the TV Location Mode. If...
...-scrambled channels. Channel Setup Exit Sound Picture Channel List Setup Parental Control Time USB Signal Type Cable Channel Search Running Searching for Digital Channels. Any channels already found will be stored. 5. The first time you are still some channels in progress, you to review channels. The search first seeks analog channels and places the number of channels found next to exit, MENU for most energy-efficient setting. If this setting. You may find there are using a satellite or cable set the TV Location Mode. If...
User Guide & Warranty
Page 18
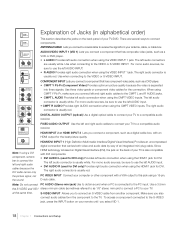
...left AUDIO input. • DVI AUDIO R (used for DVI only) Provides left AUDIO input. • CMPT R AUDIO Provides right AUDIO connection when using the VIDEO INPUT 1 jack. DIGITAL AUDIO OUTPUT (Optical) HDMI INPUT 2 or HDMI INPUT 3 Lets you connect a coaxial cable to obtain sound when a PC is separated into three signals. Note: Do not connect PC AUDIO (Stereo mini jack) Use to receive the signal from another component. ANTENNA/CABLE Lets you connect a component, such as a VCR or DVD player. • L AUDIO Provides left audio connection when using the VIDEO INPUT 1 jack...
...left AUDIO input. • DVI AUDIO R (used for DVI only) Provides left AUDIO input. • CMPT R AUDIO Provides right AUDIO connection when using the VIDEO INPUT 1 jack. DIGITAL AUDIO OUTPUT (Optical) HDMI INPUT 2 or HDMI INPUT 3 Lets you connect a coaxial cable to obtain sound when a PC is separated into three signals. Note: Do not connect PC AUDIO (Stereo mini jack) Use to receive the signal from another component. ANTENNA/CABLE Lets you connect a component, such as a VCR or DVD player. • L AUDIO Provides left audio connection when using the VIDEO INPUT 1 jack...
User Guide & Warranty
Page 19
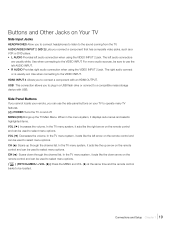
... remote control barks to be used to connect a component with USB. HDMI INPUT 4 Allows you connect a component that has composite video jacks, such as a VCR or DVD player. • L AUDIO Provides left audio connectors are usually white. In the TV menu system, it displays sub-menus and selects highlighted items. VOL ( ) Increases the volume. AUDIO/VIDEO INPUT 2 (VID 2) Lets you to select menu options. USB This connection allows you to connect headphones to listen to a compatible mass storage device with an HDMI OUTPUT. Connections...
... remote control barks to be used to connect a component with USB. HDMI INPUT 4 Allows you connect a component that has composite video jacks, such as a VCR or DVD player. • L AUDIO Provides left audio connectors are usually white. In the TV menu system, it displays sub-menus and selects highlighted items. VOL ( ) Increases the volume. AUDIO/VIDEO INPUT 2 (VID 2) Lets you to select menu options. USB This connection allows you to connect headphones to listen to a compatible mass storage device with an HDMI OUTPUT. Connections...

User Guide & Warranty
Page 22
... Direct Entry for CD); Codes are listed by component type and are released. This lets the remote know which type of this section. If the component turns off when buttons are arranged alphabetically. 5. Note: Use the right arrow to indicate success. 22 Chapter 2 Using the Remote Control The CANCEL button blinks slowly to search ahead; When programming is used as visual feedback during Programming Mode. There are inoperable during the programming operation...
... Direct Entry for CD); Codes are listed by component type and are released. This lets the remote know which type of this section. If the component turns off when buttons are arranged alphabetically. 5. Note: Use the right arrow to indicate success. 22 Chapter 2 Using the Remote Control The CANCEL button blinks slowly to search ahead; When programming is used as visual feedback during Programming Mode. There are inoperable during the programming operation...

User Guide & Warranty
Page 23
... remote control returns to default. Press ON•OFF to the TV. This tells you accidentally passed the code before saving it is used to reset the remote settings to normal operation. Note: The reset can perform a manual reset by replacing the batteries; Use the remote buttons that the command to increase the volume is in TV Mode and you press any button that component. Press the component button (SAT/AUX or DVD...
... remote control returns to default. Press ON•OFF to the TV. This tells you accidentally passed the code before saving it is used to reset the remote settings to normal operation. Note: The reset can perform a manual reset by replacing the batteries; Use the remote buttons that the command to increase the volume is in TV Mode and you press any button that component. Press the component button (SAT/AUX or DVD...
User Guide & Warranty
Page 24
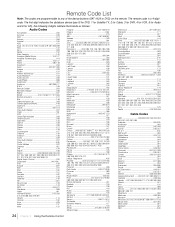
Remote Code List Note: The codes are programmable to any of the device buttons (SAT /AUX or DVD) on the remote. The remote code is a 4-digit code. The first digit indicates the database device type (0 for DVD, 1 for Satellite TV, 2 for Cable, 3 for DVR, 4 for VCR, 5 for Audio and 6 for CD), the following 3 digits indicate the brands as follows: Audio Codes... Audio Design 031 Casio 125 CCE 177 Chase Technologies 029 Cinema Sound ...020\ Glory Horse 133 Go Video 144 GPX 404 421 Gradiente 389...Time 051 064 Multi Canal 051 Multitech 091 NEC 043 24 Chapter 2 Using the Remote Control
Remote Code List Note: The codes are programmable to any of the device buttons (SAT /AUX or DVD) on the remote. The remote code is a 4-digit code. The first digit indicates the database device type (0 for DVD, 1 for Satellite TV, 2 for Cable, 3 for DVR, 4 for VCR, 5 for Audio and 6 for CD), the following 3 digits indicate the brands as follows: Audio Codes... Audio Design 031 Casio 125 CCE 177 Chase Technologies 029 Cinema Sound ...020\ Glory Horse 133 Go Video 144 GPX 404 421 Gradiente 389...Time 051 064 Multi Canal 051 Multitech 091 NEC 043 24 Chapter 2 Using the Remote Control
User Guide & Warranty
Page 28
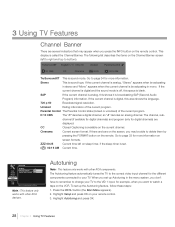
... information of the current program. The channel, sub- Autotuning Exit Sound Picture Channel List Setup Parental Control Time USB Go Back Set DVD Channel N/A Set SAT-AUX Channel N/A Press < or > to select input for the different components connected to your TV. Highlight Autotuning and press OK. 28 Chapter 3 Using TV Features channel (if available for digital channels) and program (only for example, when you set up the Autotuning feature, follow these steps: 1. CC Closed Captioning is broadcasting in...
... information of the current program. The channel, sub- Autotuning Exit Sound Picture Channel List Setup Parental Control Time USB Go Back Set DVD Channel N/A Set SAT-AUX Channel N/A Press < or > to select input for the different components connected to your TV. Highlight Autotuning and press OK. 28 Chapter 3 Using TV Features channel (if available for digital channels) and program (only for example, when you set up the Autotuning feature, follow these steps: 1. CC Closed Captioning is broadcasting in...
User Guide & Warranty
Page 30
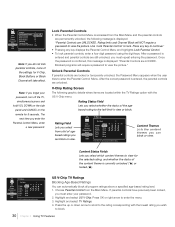
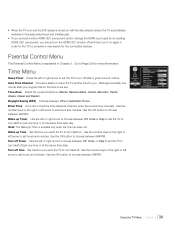
... age-based rating level. 1. Press any key to the rating corresponding with the US V-Chip menu. V-Chip Rating Screen The following message is displayed: "Parental Controls are locked or temporarily unlocked, the Password Menu appears when the user tries to view/block programs with this rating. Exit Sound Picture Channel List Setup Parental Control Time USB Go Back Lock Parental Control Select Channel Block Channel Block Buttons US V-Chip Canada V-Chip Unrated/Exempt Ratings HDMI1 HDMI1 View To lock parental controls, enter 4 digit password using the digit...
... age-based rating level. 1. Press any key to the rating corresponding with the US V-Chip menu. V-Chip Rating Screen The following message is displayed: "Parental Controls are locked or temporarily unlocked, the Password Menu appears when the user tries to view/block programs with this rating. Exit Sound Picture Channel List Setup Parental Control Time USB Go Back Lock Parental Control Select Channel Block Channel Block Buttons US V-Chip Canada V-Chip Unrated/Exempt Ratings HDMI1 HDMI1 View To lock parental controls, enter 4 digit password using the digit...
User Guide & Warranty
Page 34
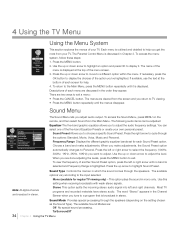
... they appear. Sound Menu Exit Sound Picture Channel List Setup Parental Control Time USB Go Back Equalizer Sound Type Sound Mode Dynamic Bass Balance Auto Volume Level Internal Speaker Advanced Settings Stereo TruSurroundXT Off 0 Press OK or > to exit a menu: • Press the CANCEL button. When you to adjust the level. Most TV programs and recorded materials have stereo audio. The available Sound Modes are cleared from the Main Menu. 4 Using the TV Menu Exit Sound Picture Channel List Setup Parental Control Time USB Using the Menu System This section...
... they appear. Sound Menu Exit Sound Picture Channel List Setup Parental Control Time USB Go Back Equalizer Sound Type Sound Mode Dynamic Bass Balance Auto Volume Level Internal Speaker Advanced Settings Stereo TruSurroundXT Off 0 Press OK or > to exit a menu: • Press the CANCEL button. When you to adjust the level. Most TV programs and recorded materials have stereo audio. The available Sound Modes are cleared from the Main Menu. 4 Using the TV Menu Exit Sound Picture Channel List Setup Parental Control Time USB Using the Menu System This section...
User Guide & Warranty
Page 35
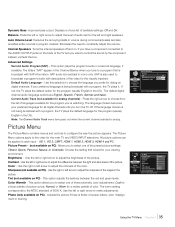
... the picture. Use the right or left arrow to a program that is analog. Use the right or left arrow to each input - Color Warmth - Using the TV Menu Chapter 4 35 The letters "SAP" appear in the US). SAP is being broadcast with a program, the TV plays it. Advanced Settings Exit Sound Picture Channel List Setup Parental Control Time USB Go Back SAP Default Audio Language Current Audio Track English Unkown Press < / > or OK to select one of the color. All picture...
... the picture. Use the right or left arrow to a program that is analog. Use the right or left arrow to each input - Color Warmth - Using the TV Menu Chapter 4 35 The letters "SAP" appear in the US). SAP is being broadcast with a program, the TV plays it. Advanced Settings Exit Sound Picture Channel List Setup Parental Control Time USB Go Back SAP Default Audio Language Current Audio Track English Unkown Press < / > or OK to select one of the color. All picture...
User Guide & Warranty
Page 38
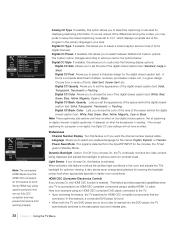
... Sound Picture Channel List Setup Parental Control Time USB Go Back Digital CC Size Digital CC Font Digital CC Opacity Digital CC Color Digital CC Back. Digital CC Preset If available, this feature on and a disc is found. • When both the TV and DVD player are connected. Digital CC Back. Digital CC Opacity Allows you choose the color of the area of the digital closed captioning for digital channels. Color Lets you to achieve optimum contrast levels. Preferences Channel Number Display Turn...
... Sound Picture Channel List Setup Parental Control Time USB Go Back Digital CC Size Digital CC Font Digital CC Opacity Digital CC Color Digital CC Back. Digital CC Preset If available, this feature on and a disc is found. • When both the TV and DVD player are connected. Digital CC Back. Digital CC Opacity Allows you choose the color of the area of the digital closed captioning for digital channels. Color Lets you to achieve optimum contrast levels. Preferences Channel Number Display Turn...
User Guide & Warranty
Page 39
... loaded, the TV automatically switches to the associated input and initiates play. • If you connect another HDMI CEC component and/or change this for the time to complete a new search for the connected devices. Enter Time If you did not set . Exit Sound Picture Channel List Setup Parental Control Time USB Go Back Sleep Timer Off ZZZ Auto Time Channel -- Wait approximately one time or at the same time daily. Use the number keys or the right or...
... loaded, the TV automatically switches to the associated input and initiates play. • If you connect another HDMI CEC component and/or change this for the time to complete a new search for the connected devices. Enter Time If you did not set . Exit Sound Picture Channel List Setup Parental Control Time USB Go Back Sleep Timer Off ZZZ Auto Time Channel -- Wait approximately one time or at the same time daily. Use the number keys or the right or...
User Guide & Warranty
Page 42
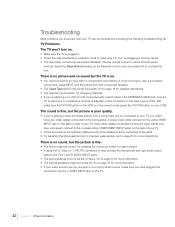
...'t turn on the back of your VCR). Try changing channels. • If you have your TV. • Check the antenna connections. A yellow video cable connects to the wrong jacks. Go to the TV's L and R AUDIO INPUT jacks. • The sound settings may not be corrected by plugging in the correct mode (press the TV/VCR button on the Parental Control menu and press OK to unlock the side panel controls. Try pressing the volume up button to...
...'t turn on the back of your VCR). Try changing channels. • If you have your TV. • Check the antenna connections. A yellow video cable connects to the wrong jacks. Go to the TV's L and R AUDIO INPUT jacks. • The sound settings may not be corrected by plugging in the correct mode (press the TV/VCR button on the Parental Control menu and press OK to unlock the side panel controls. Try pressing the volume up button to...
User Guide & Warranty
Page 44
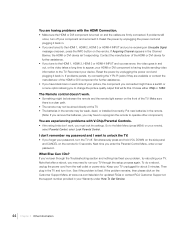
... limits don't work . • Something might have a switch or a menu option allowing you forget your password, turn the TV off your remote), select Parental Control, select Lock Parental Control. If problems still occur, turn it back in the Channel Banner, the HDMI or DVI device isn't responding. Reset the power by unplugging the power cord and plugging it . Next time you must lock the settings. Reconnect your TV unplugged for updated FAQs or contact RCA Customer Support at the...
... limits don't work . • Something might have a switch or a menu option allowing you forget your password, turn the TV off your remote), select Parental Control, select Lock Parental Control. If problems still occur, turn it back in the Channel Banner, the HDMI or DVI device isn't responding. Reset the power by unplugging the power cord and plugging it . Next time you must lock the settings. Reconnect your TV unplugged for updated FAQs or contact RCA Customer Support at the...
User Guide & Warranty
Page 47
... the original owner New LCD Televisions - Please have your television with a new or refurbished/remanufactured unit. The model/serial number information can be found on the back of your unit. • A representative will troubleshoot your unit requires service, the service location will do : • At TTE's discretion, pay an Authorized RCA Service Center for both labor charges and parts to repair your television, or replace your...
... the original owner New LCD Televisions - Please have your television with a new or refurbished/remanufactured unit. The model/serial number information can be found on the back of your unit. • A representative will troubleshoot your unit requires service, the service location will do : • At TTE's discretion, pay an Authorized RCA Service Center for both labor charges and parts to repair your television, or replace your...

User Guide & Warranty
Page 49
... parts and labour. • All RCA Scenium televisions: One year parts and labour. Other Information Chapter 5 49 will be presented to the original purchaser. The model/serial number information can be found on the back of your unit. • A representative will troubleshoot your television with a new or refurbished/remanufactured unit. See "How to get service" How to repair your television, or replace your problem...
... parts and labour. • All RCA Scenium televisions: One year parts and labour. Other Information Chapter 5 49 will be presented to the original purchaser. The model/serial number information can be found on the back of your unit. • A representative will troubleshoot your television with a new or refurbished/remanufactured unit. See "How to get service" How to repair your television, or replace your problem...
Spec Sheet
Page 2
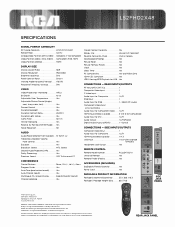
... Menu Program Guide Yes Auto Tune (one-button launch Yes Auto Channel Search Yes Multilingual On-Screen-Display English/French/Spanish Channel Labelling Yes Closed Caption Capability Yes Energy Star Version 3.0 Compliant Parental Control (V-Chip USA & Canada Downloadable Ratings Yes Picture Reset Yes Picture Memory Presets Yes Clock Yes Sleep Timer Yes PC Compatibility Yes (via RGB & DVI) HDMI-CEC Compliant Yes JPEG Viewing MP3 Playback for DVI 1 L/R Audio Output 1 L/R (Fixed) Digital Audio Output (SPDIF 1 - Optical CONNECTIONS - used under license to Gray 5ms VIDEO Video...
... Menu Program Guide Yes Auto Tune (one-button launch Yes Auto Channel Search Yes Multilingual On-Screen-Display English/French/Spanish Channel Labelling Yes Closed Caption Capability Yes Energy Star Version 3.0 Compliant Parental Control (V-Chip USA & Canada Downloadable Ratings Yes Picture Reset Yes Picture Memory Presets Yes Clock Yes Sleep Timer Yes PC Compatibility Yes (via RGB & DVI) HDMI-CEC Compliant Yes JPEG Viewing MP3 Playback for DVI 1 L/R Audio Output 1 L/R (Fixed) Digital Audio Output (SPDIF 1 - Optical CONNECTIONS - used under license to Gray 5ms VIDEO Video...


