User Guide & Warranty
Page 2
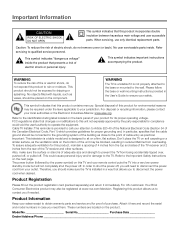
... you if needed. Please follow the base or wall mounting instructions provided in a way that the cable ground should be connected to the grounding system of the building as close to the identification/rating label located on the bottom of the unit may also be exposed to operate the equipment. Important: This television is a table model and is provided to disconnect the power cord when...
... you if needed. Please follow the base or wall mounting instructions provided in a way that the cable ground should be connected to the grounding system of the building as close to the identification/rating label located on the bottom of the unit may also be exposed to operate the equipment. Important: This television is a table model and is provided to disconnect the power cord when...
User Guide & Warranty
Page 4
... Avoid Direct Light ...6 Check Supplied Parts ...6 Removing the Table Stand ...7 Mounting Your TV to the Wall ...7 Obtain the Signal ...8 What You Need ...8 What You Need to Know ...8 Choose Your Connections ...9 Connecting a Component with Composite Video (Good 10 Connecting a Component with Component Video (Better 10 Connecting a Component with HDMI (Best 11 Connecting a PC Component ...12 Viewing the Picture from the Connected Component 13 Viewing a PC...13 Plug in the TV ...14 Put Batteries in the Remote ...14 Turn on the TV ...14 Using the Remote Control to Complete Initial Setup 14...
... Avoid Direct Light ...6 Check Supplied Parts ...6 Removing the Table Stand ...7 Mounting Your TV to the Wall ...7 Obtain the Signal ...8 What You Need ...8 What You Need to Know ...8 Choose Your Connections ...9 Connecting a Component with Composite Video (Good 10 Connecting a Component with Component Video (Better 10 Connecting a Component with HDMI (Best 11 Connecting a PC Component ...12 Viewing the Picture from the Connected Component 13 Viewing a PC...13 Plug in the TV ...14 Put Batteries in the Remote ...14 Turn on the TV ...14 Using the Remote Control to Complete Initial Setup 14...
User Guide & Warranty
Page 7
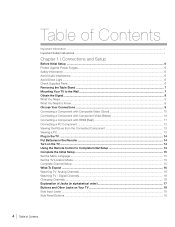
... wall, purchase a VESA wall Caution: Your wall Models L40FHD41/L42FHD37R/L46FHD37R Purchase a VESA 600 x400, Size M6 screw mount must be able to the wall, remove the table stand by following the instructions below. Mounting Your TV to the Wall To mount your TV to bear a minimum of five times the TV's net The VESA number is the horizontal and vertical measurement of the mounting holes. Connections and Setup Chapter 1 7 Step 2 Remove the table stand from the TV cabinet. Removing the Table Stand Your TV...
... wall, purchase a VESA wall Caution: Your wall Models L40FHD41/L42FHD37R/L46FHD37R Purchase a VESA 600 x400, Size M6 screw mount must be able to the wall, remove the table stand by following the instructions below. Mounting Your TV to the Wall To mount your TV to bear a minimum of five times the TV's net The VESA number is the horizontal and vertical measurement of the mounting holes. Connections and Setup Chapter 1 7 Step 2 Remove the table stand from the TV cabinet. Removing the Table Stand Your TV...
User Guide & Warranty
Page 8
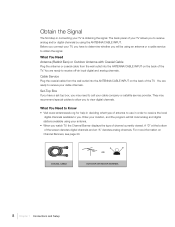
... of the TV. Cable Service Plug the coaxial cable from the wall outlet into the ANTENNA/CABLE INPUT on Channel Banners, see page 20. A "D" at the bottom of your TV, you have a set-top box, you to view digital channels. What You Need to Know • Visit www.antennaweb.org for help in deciding what type of antenna to use in connecting your cable channels. Enter your location, and the program will be using the ANTENNA/CABLE INPUT. COAXIAL CABLE OR...
... of the TV. Cable Service Plug the coaxial cable from the wall outlet into the ANTENNA/CABLE INPUT on Channel Banners, see page 20. A "D" at the bottom of your TV, you have a set-top box, you to view digital channels. What You Need to Know • Visit www.antennaweb.org for help in deciding what type of antenna to use in connecting your cable channels. Enter your location, and the program will be using the ANTENNA/CABLE INPUT. COAXIAL CABLE OR...
User Guide & Warranty
Page 11
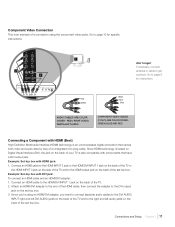
... component video jacks. Red White Green Red Blue AUDIO CABLES ARE COLOR CODED - Connect an HDMI cable to the HDMI INPUT 2 jack or the HDMI/DVI INPUT 1 jack on the back of the TV or the HDMI INPUT 3 jack on the side of the TV and to the DVI output jack on the back of the set -top box. 3. Attach an HDMI/DVI adapter to page 8 for specific instructions. Example: Set-top box with HDMI jack: 1. Connections and Setup Chapter 1 11 RED= RIGHT AUDIO, WHITE=LEFT AUDIO COMPONENT VIDEO CABLES...
... component video jacks. Red White Green Red Blue AUDIO CABLES ARE COLOR CODED - Connect an HDMI cable to the HDMI INPUT 2 jack or the HDMI/DVI INPUT 1 jack on the back of the TV or the HDMI INPUT 3 jack on the side of the TV and to the DVI output jack on the back of the set -top box. 3. Attach an HDMI/DVI adapter to page 8 for specific instructions. Example: Set-top box with HDMI jack: 1. Connections and Setup Chapter 1 11 RED= RIGHT AUDIO, WHITE=LEFT AUDIO COMPONENT VIDEO CABLES...
User Guide & Warranty
Page 12
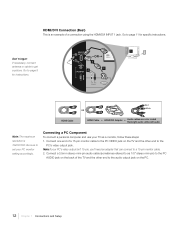
... necessary, connect antenna or cable to a 15-pin monitor cable. 2. Go to page 8 for specific instructions. Connect a 3.5mm stereo mini-pin audio cable (sometimes referred to as a monitor, follow these steps: 1. HDMI/DVI Connection (Best) This is 1920X1080. Be sure to set your PC's video output isn't 15-pin, you'll need an adapter that can connect to get a picture. Connect one end of a connection using the HDMI/DVI INPUT 1 jack. Note: If your PC monitor setting accordingly.
... necessary, connect antenna or cable to a 15-pin monitor cable. 2. Go to page 8 for specific instructions. Connect a 3.5mm stereo mini-pin audio cable (sometimes referred to as a monitor, follow these steps: 1. HDMI/DVI Connection (Best) This is 1920X1080. Be sure to set your PC's video output isn't 15-pin, you'll need an adapter that can connect to get a picture. Connect one end of a connection using the HDMI/DVI INPUT 1 jack. Note: If your PC monitor setting accordingly.
User Guide & Warranty
Page 15
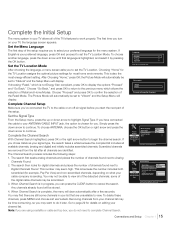
... your ANTENNA/CABLE INPUT jack, the option is because the number includes both scrambled (for analog channels. You may seem high. Simply press the down arrow until that are identified. The Channel Search process includes the following steps: 1. Picture Sound Setup List & Labels Parental Control Exit Menu Language Signal Type Channel Search Closed Caption Time English Cable Start Press OK or > to continue. Connections and Setup Chapter 1 15 This is chosen for digital channels. the Picture Mode...
... your ANTENNA/CABLE INPUT jack, the option is because the number includes both scrambled (for analog channels. You may seem high. Simply press the down arrow until that are identified. The Channel Search process includes the following steps: 1. Picture Sound Setup List & Labels Parental Control Exit Menu Language Signal Type Channel Search Closed Caption Time English Cable Start Press OK or > to continue. Connections and Setup Chapter 1 15 This is chosen for digital channels. the Picture Mode...

User Guide & Warranty
Page 17
...a compatible audio receiver. VARIABLE AUDIO OUTPUT Use left AUDIO INPUT. • R AUDIO Provides right audio connection when using the VIDEO INPUT 1 or the S-VIDEO INPUT jack. S-VIDEO INPUT Allows you to the S-Video jack, press the INPUT button on your TV to use the left and right audio cables to connect your remote; To access a component connected to connect an S-Video cable from another component. Use three video-grade or component video cables for the best picture quality. When using the HDMI 1 jack for DVI. For mono audio sources, be sure to receive the signal from...
...a compatible audio receiver. VARIABLE AUDIO OUTPUT Use left AUDIO INPUT. • R AUDIO Provides right audio connection when using the VIDEO INPUT 1 or the S-VIDEO INPUT jack. S-VIDEO INPUT Allows you to the S-Video jack, press the INPUT button on your TV to use the left and right audio cables to connect your remote; To access a component connected to connect an S-Video cable from another component. Use three video-grade or component video cables for the best picture quality. When using the HDMI 1 jack for DVI. For mono audio sources, be sure to receive the signal from...
User Guide & Warranty
Page 19
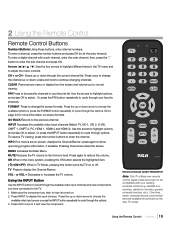
... items in TV Mode, pressing this button turns the TV on . 2. INPUT Accesses the available video input channels (Watch TV, VID 1, VID 2, S-VID, CMPT 1, CMPT 2, PC, HDMI 1, HDMI 2 and HDMI 3). Or press the INPUT button repeatedly to scroll through the options. Pressing three times clears the screen. MENU Accesses the Main Menu. Using the INPUT Button Use the INPUT button to cycle through the current channel list. Press INPUT to display the Channel Banner. satellite box remotes, cable box remotes, generic universal remotes, etc.). Over time, newer universal remote controls that...
... items in TV Mode, pressing this button turns the TV on . 2. INPUT Accesses the available video input channels (Watch TV, VID 1, VID 2, S-VID, CMPT 1, CMPT 2, PC, HDMI 1, HDMI 2 and HDMI 3). Or press the INPUT button repeatedly to scroll through the options. Pressing three times clears the screen. MENU Accesses the Main Menu. Using the INPUT Button Use the INPUT button to cycle through the current channel list. Press INPUT to display the Channel Banner. satellite box remotes, cable box remotes, generic universal remotes, etc.). Over time, newer universal remote controls that...
User Guide & Warranty
Page 20
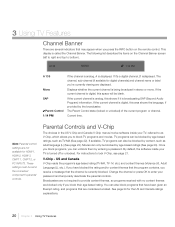
If the current channel is digital, this space will be set in the connected component's parental controls. Note: Parental control settings are not available for the US and Canada ratings explanations. 20 Chapter 3 Using TV Features By default, the software inside your TV, referred to bottom). Broadcasters are not required to enter your TV is broadcasting SAP (Second Audio Program) information. If the current channel is analog, this area shows the...
If the current channel is digital, this space will be set in the connected component's parental controls. Note: Parental control settings are not available for the US and Canada ratings explanations. 20 Chapter 3 Using TV Features By default, the software inside your TV, referred to bottom). Broadcasters are not required to enter your TV is broadcasting SAP (Second Audio Program) information. If the current channel is analog, this area shows the...
User Guide & Warranty
Page 23
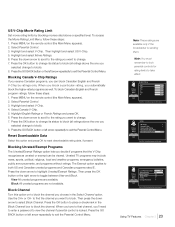
... view/block programs with this option and press OK to select Block Channel. Unrated TV programs may include news, sports, political, religious, local and weather programs, emergency bulletins, public announcements, and programs without ratings. Block Channel Turn this rating. Select Parental Control. 3. Highlight English Ratings or French Ratings and press OK. 6. Reset Downloadable Data Select this rating. Picture Sound Setup List & Labels Parental Control Exit Lock Parental Control Select Channel Block Channel Button Block V-Chip Change Password...
... view/block programs with this option and press OK to select Block Channel. Unrated TV programs may include news, sports, political, religious, local and weather programs, emergency bulletins, public announcements, and programs without ratings. Block Channel Turn this rating. Select Parental Control. 3. Highlight English Ratings or French Ratings and press OK. 6. Reset Downloadable Data Select this rating. Picture Sound Setup List & Labels Parental Control Exit Lock Parental Control Select Channel Block Channel Button Block V-Chip Change Password...
User Guide & Warranty
Page 26
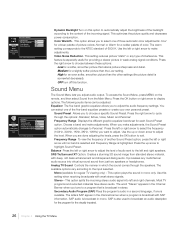
... Color Warmth Noise Reduction Off On Cool Off Press > or OK to change this menu. This optimizes the picture quality and decreases power consumption. OFF turn off this setting when receiving broadcasts with SAP information. Sound Preset Allows you adjust audio output. Analog TV Sound Controls the manner in weak analog signal conditions. Use this function. Secondary Audio Program (SAP) Plays the program's audio in mono. Sound Menu The Sound Menu lets you to choose a specific Sound Preset. Frequency Range Displays...
... Color Warmth Noise Reduction Off On Cool Off Press > or OK to change this menu. This optimizes the picture quality and decreases power consumption. OFF turn off this setting when receiving broadcasts with SAP information. Sound Preset Allows you adjust audio output. Analog TV Sound Controls the manner in weak analog signal conditions. Use this function. Secondary Audio Program (SAP) Plays the program's audio in mono. Sound Menu The Sound Menu lets you to choose a specific Sound Preset. Frequency Range Displays...
User Guide & Warranty
Page 27
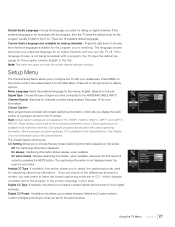
... signal you have connected to change this option allows you display the audio portion of the program in the primary language in the US). Note: Closed caption settings are 16 available default languages. Only specific programs are : CC Setting Allows you to CC1, which lets you to select a closed captioning information appears on the remote control; Picture Sound Setup List & Labels Parental Control Exit Menu Language Signal Type Channel Search Closed Caption Time English Cable Start Press > or OK to the ANTENNA/CABLE INPUT. Closed captioning...
... signal you have connected to change this option allows you display the audio portion of the program in the primary language in the US). Note: Closed caption settings are 16 available default languages. Only specific programs are : CC Setting Allows you to CC1, which lets you to select a closed captioning information appears on the remote control; Picture Sound Setup List & Labels Parental Control Exit Menu Language Signal Type Channel Search Closed Caption Time English Cable Start Press > or OK to the ANTENNA/CABLE INPUT. Closed captioning...

User Guide & Warranty
Page 28
... true digital closed caption text: White, Red, Green, Blue, Yellow, Magenta, Cyan or Black. If the closed captioning for the digital closed caption text. Digital CC Font Allows you to change this allows you to customize the following display options: Digital CC Size Allows you to set the appearance of time. 28 Chapter 4 Using the TV Menu Sleep Timer Use the left or right arrows to set the TV to set the size of the digital closed captions. TIME Picture Sound Setup List & Labels Parental Control Exit Enter Time 1:42PM...
... true digital closed caption text: White, Red, Green, Blue, Yellow, Magenta, Cyan or Black. If the closed captioning for the digital closed caption text. Digital CC Font Allows you to change this allows you to customize the following display options: Digital CC Size Allows you to set the appearance of time. 28 Chapter 4 Using the TV Menu Sleep Timer Use the left or right arrows to set the TV to set the size of the digital closed captions. TIME Picture Sound Setup List & Labels Parental Control Exit Enter Time 1:42PM...
User Guide & Warranty
Page 31
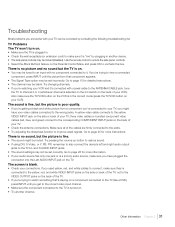
... input with your VCR). Use the remote control to unlock the side panel controls. • Select the Block Buttons feature on . • Try another device. • The side panel controls may be locked (disabled). There is no picture and no sound but the TV is turned on the Parental Control Menu and press OK to uncheck the box. Other Information Chapter 5 31 three video cables or bundled component video cables (red, blue, and green) connect to the corresponding COMPONENT INPUT...
... input with your VCR). Use the remote control to unlock the side panel controls. • Select the Block Buttons feature on . • Try another device. • The side panel controls may be locked (disabled). There is no picture and no sound but the TV is turned on the Parental Control Menu and press OK to uncheck the box. Other Information Chapter 5 31 three video cables or bundled component video cables (red, blue, and green) connect to the corresponding COMPONENT INPUT...
User Guide & Warranty
Page 32
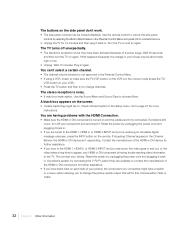
... problems still occur, turn the TV on again. Reset the power by unplugging the power cord and plugging it . The buttons on the side panel don't work. • The side panel controls may be blocked or not approved in the Parental Control Menu. • If using a VCR, check to make sure the TV/VCR button on the VCR is turned on and the cables are firmly connected. Use the remote control to unlock the side panel controls by...
... problems still occur, turn the TV on again. Reset the power by unplugging the power cord and plugging it . The buttons on the side panel don't work. • The side panel controls may be blocked or not approved in the Parental Control Menu. • If using a VCR, check to make sure the TV/VCR button on the VCR is turned on and the cables are firmly connected. Use the remote control to unlock the side panel controls by...
User Guide & Warranty
Page 33
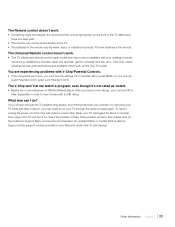
... has fixed your problem, try rebooting your existing universal remote (e.g. satellite box remotes, cable box remotes, generic universal remotes, etc.). Note that become available should pick up the new TV codes. Keep your Warranty under How To Get Service. The Universal Remote control doesn't work. • This TV utilizes new remote control signal codes and may not be weak, dead, or installed incorrectly. Go to the Main Menu (press MENU on the Customer Support Menu at www.rca.com/television for...
... has fixed your problem, try rebooting your existing universal remote (e.g. satellite box remotes, cable box remotes, generic universal remotes, etc.). Note that become available should pick up the new TV codes. Keep your Warranty under How To Get Service. The Universal Remote control doesn't work. • This TV utilizes new remote control signal codes and may not be weak, dead, or installed incorrectly. Go to the Main Menu (press MENU on the Customer Support Menu at www.rca.com/television for...
User Guide & Warranty
Page 36
... get service" New LCD Televisions - After ninety (90) days, labor charges will do : • At TTE's discretion, pay an Authorized RCA Service Center for parts. What we will be found on the back of purchase in materials or workmanship to repair your television, or replace your television with a new or refurbished/remanufactured unit. screen sizes 33" through 47" is within the warranty period...
... get service" New LCD Televisions - After ninety (90) days, labor charges will do : • At TTE's discretion, pay an Authorized RCA Service Center for parts. What we will be found on the back of purchase in materials or workmanship to repair your television, or replace your television with a new or refurbished/remanufactured unit. screen sizes 33" through 47" is within the warranty period...
User Guide & Warranty
Page 38
.../or other acts of God; • Faulty installation, set-up adjustments, improper antenna, inadequate signal reception, adjustment of purchase and model/serial number ready. For how long after purchase: • All RCA televisions: One year parts and labour. • All RCA Scenium televisions: Two years parts and labour. See "How to get service" How to the original purchaser. Your warranty does not cover damages which is evidence...
.../or other acts of God; • Faulty installation, set-up adjustments, improper antenna, inadequate signal reception, adjustment of purchase and model/serial number ready. For how long after purchase: • All RCA televisions: One year parts and labour. • All RCA Scenium televisions: Two years parts and labour. See "How to get service" How to the original purchaser. Your warranty does not cover damages which is evidence...
Spec Sheet
Page 2
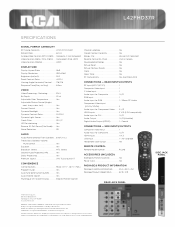
... 2 Audio Input for Component Video. . . . . 2 L/R HDMI Inputs 2 V1.3 (1 DVI compatible) Audio Input for Composite 1 L/R HDMI Inputs 1 V1.3 USB Input 1 - Yes Noise Reduction 3D AUDIO Audio Power (Watts) Front Speakers. . . 8 W/CH x 2 Treble, Bass, Balance, Volume, Mute Control Yes Equalizer Yes Broadcast Stereo MTS Stereo Second Audio Program (SAP Yes Dolby Processing Yes Premium Sound SRS TruSurround XT CONVENIENCE Control Buttons Power, CH +/-, Vol +/-, Menu Program Guide Yes Auto Tune (one-button launch Yes Auto Channel Search Yes Multilingual On-Screen-Display English...
... 2 Audio Input for Component Video. . . . . 2 L/R HDMI Inputs 2 V1.3 (1 DVI compatible) Audio Input for Composite 1 L/R HDMI Inputs 1 V1.3 USB Input 1 - Yes Noise Reduction 3D AUDIO Audio Power (Watts) Front Speakers. . . 8 W/CH x 2 Treble, Bass, Balance, Volume, Mute Control Yes Equalizer Yes Broadcast Stereo MTS Stereo Second Audio Program (SAP Yes Dolby Processing Yes Premium Sound SRS TruSurround XT CONVENIENCE Control Buttons Power, CH +/-, Vol +/-, Menu Program Guide Yes Auto Tune (one-button launch Yes Auto Channel Search Yes Multilingual On-Screen-Display English...


