User Guide & Warranty
Page 2
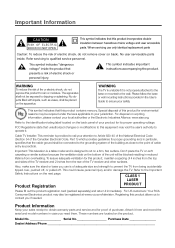
...shall not be placed on the bottom of adequate size and strength to the Important Safety Instructions on the back panel of the TV receiver and other surfaces. CLASS 1 LASER Product Registration PRODUCT Please fill out the product registration card (packed separately) and return ...that this equipment may void the user's authority to this product contains mercury. For US customers: Your RCA Consumer Electronics product may be registered at www.rca.com/television. Product Information Keep your sales receipt to obtain warranty parts and service and for environmental reasons...
...shall not be placed on the bottom of adequate size and strength to the Important Safety Instructions on the back panel of the TV receiver and other surfaces. CLASS 1 LASER Product Registration PRODUCT Please fill out the product registration card (packed separately) and return ...that this equipment may void the user's authority to this product contains mercury. For US customers: Your RCA Consumer Electronics product may be registered at www.rca.com/television. Product Information Keep your sales receipt to obtain warranty parts and service and for environmental reasons...

User Guide & Warranty
Page 4
...Beginning of User's Guide 6 Position Cables Properly to Avoid Audio Interference 6 Use Indirect Light ...6 Check Supplied Parts ...6 Attaching TV/DVD to Table Stand 7 Mounting TV/DVD to Wall ...11 Get the Picture ...12 Getting Channels ...12 Choose Your Connections ...13 Composite Video Connection ...14 Component Video ...Connection ...14 HDMI/DVI Connection ...15 PC Connection ...16 Plug in TV/DVD ...18 Put Batteries in Remote ...18 Turn on TV/DVD ...18 How to Use Remote Control to Complete Initial Setup 18 Complete Initial Setup ...19 Set Menu ...
...Beginning of User's Guide 6 Position Cables Properly to Avoid Audio Interference 6 Use Indirect Light ...6 Check Supplied Parts ...6 Attaching TV/DVD to Table Stand 7 Mounting TV/DVD to Wall ...11 Get the Picture ...12 Getting Channels ...12 Choose Your Connections ...13 Composite Video Connection ...14 Component Video ...Connection ...14 HDMI/DVI Connection ...15 PC Connection ...16 Plug in TV/DVD ...18 Put Batteries in Remote ...18 Turn on TV/DVD ...18 How to Use Remote Control to Complete Initial Setup 18 Complete Initial Setup ...19 Set Menu ...

User Guide & Warranty
Page 5
...Exempt Programs 36 Block Channel ...36 Button Block ...36 Change Password ...37 Additional Features ...37 Screen Formats ...37 Chapter 4 I Using TV Menu Using Menu System ...38 Picture Menu ...38 Sound Menu ...39 Channel Menu ...40 Parental Control Menu ...40 Setup Menu ...40 Time... Menu ...41 Chapter 5 I DVD Functions-Playing Discs Basic playback operations ...42 Chapter 6 I DVD Functions-Menus Display the DVD Main Menu ...45 TV Menu ...45 DVD Disc Menu ...45 DVD Player Menu ...45 System Setup ...45 Language Setup ...47 Auido Setup ...47 Chapter...
...Exempt Programs 36 Block Channel ...36 Button Block ...36 Change Password ...37 Additional Features ...37 Screen Formats ...37 Chapter 4 I Using TV Menu Using Menu System ...38 Picture Menu ...38 Sound Menu ...39 Channel Menu ...40 Parental Control Menu ...40 Setup Menu ...40 Time... Menu ...41 Chapter 5 I DVD Functions-Playing Discs Basic playback operations ...42 Chapter 6 I DVD Functions-Menus Display the DVD Main Menu ...45 TV Menu ...45 DVD Disc Menu ...45 DVD Player Menu ...45 System Setup ...45 Language Setup ...47 Auido Setup ...47 Chapter...

User Guide & Warranty
Page 6
... upon ordering. Also, keep the twin lead cables away from it on any of the devices. Use Indirect Light Don't place the TV/DVD where sunlight or room lighting will be directed toward the screen. Instructions at the beginning of straight down the middle. • If your...Avoid Audio Interference • Insert each cable firmly into an outlet that the following parts were packed with your TV/DVD into the designated jack. • If you place devices above the TV, route all antennas and cables are presentation only. REMOTE CONTROL PART # RC2254702/01 6 Chapter 1 Connections and...
... upon ordering. Also, keep the twin lead cables away from it on any of the devices. Use Indirect Light Don't place the TV/DVD where sunlight or room lighting will be directed toward the screen. Instructions at the beginning of straight down the middle. • If your...Avoid Audio Interference • Insert each cable firmly into an outlet that the following parts were packed with your TV/DVD into the designated jack. • If you place devices above the TV, route all antennas and cables are presentation only. REMOTE CONTROL PART # RC2254702/01 6 Chapter 1 Connections and...
User Guide & Warranty
Page 7
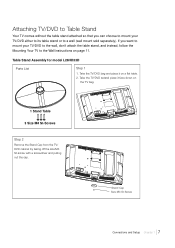
...a wall (wall mount sold separately). Stand Cap Size M3 St-Screw Connections and Setup Chapter 1 7 Attaching TV/DVD to Table Stand Your TV comes without the table stand attached so that you want to mount your TV/DVD either to its table stand or to the Wall instructions on page 11. Table Stand Assembly for... model L26HD33D Parts List Step 1 1. Take the TV/DVD setand place it on the TV bag. 1 Stand Table 3 Size M4 St-Screws Step 2 Remove the Stand Cap from the TV/ DVD cabinet by taking off the size M3 St-screw with a screwdriver and pulling out the cap...
...a wall (wall mount sold separately). Stand Cap Size M3 St-Screw Connections and Setup Chapter 1 7 Attaching TV/DVD to Table Stand Your TV comes without the table stand attached so that you want to mount your TV/DVD either to its table stand or to the Wall instructions on page 11. Table Stand Assembly for... model L26HD33D Parts List Step 1 1. Take the TV/DVD setand place it on the TV bag. 1 Stand Table 3 Size M4 St-Screws Step 2 Remove the Stand Cap from the TV/ DVD cabinet by taking off the size M3 St-screw with a screwdriver and pulling out the cap...

User Guide & Warranty
Page 8
Stand Connector Support 3 size M4 St-screws Swivel Table Stand Assembly for models L32HD33D and L40HD33D Parts List 1 Stand Table 1 Hinge for model L40HD33D 1 Hinge for model L32HD33D 1 Hinge Cover for model L40HD33D 1 Size M8 Screw 1 Hinge Cover for model L32HD33D 4 Size M5 Screws 8 Chapter 1 Connections and Setup Step 3 Attach the table stand to the TV cabinet by inserting the stand into the stand connector support, and aligning the three screw holes, from the bottom, tightening three M4 St-screws with a screwdriver.
Stand Connector Support 3 size M4 St-screws Swivel Table Stand Assembly for models L32HD33D and L40HD33D Parts List 1 Stand Table 1 Hinge for model L40HD33D 1 Hinge for model L32HD33D 1 Hinge Cover for model L40HD33D 1 Size M8 Screw 1 Hinge Cover for model L32HD33D 4 Size M5 Screws 8 Chapter 1 Connections and Setup Step 3 Attach the table stand to the TV cabinet by inserting the stand into the stand connector support, and aligning the three screw holes, from the bottom, tightening three M4 St-screws with a screwdriver.

User Guide & Warranty
Page 9
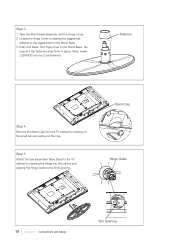
Take the TV set and place it on a flat table. 2. Position the Hinge by aligning the slot on the Hinge and the notch on the TV bag. Step 2 1. Take the TV bag and place it face down on the Stand Base. 3. Hinge Slot Notch x4 Connections and Setup Chapter 1 9 Take the Stand Base and the Hinge. 2. Step 1 1. Attach the Hinge to the Stand Base with four Size M5 screws, from the bottom, with a Philips head #2 screwdriver.
Take the TV set and place it on a flat table. 2. Position the Hinge by aligning the slot on the Hinge and the notch on the TV bag. Step 2 1. Take the TV bag and place it face down on the Stand Base. 3. Hinge Slot Notch x4 Connections and Setup Chapter 1 9 Take the Stand Base and the Hinge. 2. Step 1 1. Attach the Hinge to the Stand Base with four Size M5 screws, from the bottom, with a Philips head #2 screwdriver.
User Guide & Warranty
Page 10
... in place. (Note: model L32HD33D only has 2 tab fasteners) Fastener Step 4 Remove the Stand Cap from the TV cabinet by inserting the Hinge into the cabinet and aligning the Hinge Guide to the TV cabinet by pushing on the Stand Base. 3. Take the Stand Base Assembly and the Hinge Cover. 2. Locate the...
... in place. (Note: model L32HD33D only has 2 tab fasteners) Fastener Step 4 Remove the Stand Cap from the TV cabinet by inserting the Hinge into the cabinet and aligning the Hinge Guide to the TV cabinet by pushing on the Stand Base. 3. Take the Stand Base Assembly and the Hinge Cover. 2. Locate the...
User Guide & Warranty
Page 11
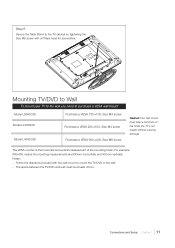
... by tightening the Size M8 screw with the wall mount to mount the TV/DVD to purchase a VESA wall mount Model L26HD33D Purchase a VESA 100 x100, Size M4 screw Model L32HD33D Purchase a VESA 200 x100, Size M4 screw Model L40HD33D Purchase a VESA 600 x400, Size M6 screw Caution:Your wall mount must ...be at least 40mm. Mounting TV/DVD to Wall To mount your TV to the wall you need to the wall; • The space between the...
... by tightening the Size M8 screw with the wall mount to mount the TV/DVD to purchase a VESA wall mount Model L26HD33D Purchase a VESA 100 x100, Size M4 screw Model L32HD33D Purchase a VESA 200 x100, Size M4 screw Model L40HD33D Purchase a VESA 600 x400, Size M6 screw Caution:Your wall mount must ...be at least 40mm. Mounting TV/DVD to Wall To mount your TV to the wall you need to the wall; • The space between the...

User Guide & Warranty
Page 12
... of connecting your cable channels. If so, plug the antenna or coaxial cable from the wall outlet into the ANTENNA/CABLE INPUT to call your TV/DVD allows you . If so, plug the coaxial cable from the wall outlet into the ANTENNA/ CABLE INPUT to receive your...
... of connecting your cable channels. If so, plug the antenna or coaxial cable from the wall outlet into the ANTENNA/CABLE INPUT to call your TV/DVD allows you . If so, plug the coaxial cable from the wall outlet into the ANTENNA/ CABLE INPUT to receive your...
User Guide & Warranty
Page 13
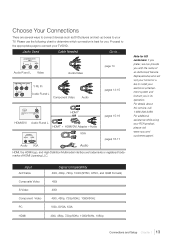
...Audio VGA VGA Audio pages 16-17 HDMI, the HDMI logo, and High-Definition Multimedia Interface are several ways to connect devices such as DVD players and set-up boxes to connect your electronic entertainment system and instruct you . Input Ant/Cable Composite Video S-Video Component Video PC HDMI... who will visit your home for you in its operation. Proceed to the appropriate page to your RCA product, please visit www.rca.com/ customersupport. Jacks Used Cable Needed Go to install your TV/DVD. Note for US customers: If you prefer, we can provide you with the name of HDMI ...
...Audio VGA VGA Audio pages 16-17 HDMI, the HDMI logo, and High-Definition Multimedia Interface are several ways to connect devices such as DVD players and set-up boxes to connect your electronic entertainment system and instruct you . Input Ant/Cable Composite Video S-Video Component Video PC HDMI... who will visit your home for you in its operation. Proceed to the appropriate page to your RCA product, please visit www.rca.com/ customersupport. Jacks Used Cable Needed Go to install your TV/DVD. Note for US customers: If you prefer, we can provide you with the name of HDMI ...
User Guide & Warranty
Page 14
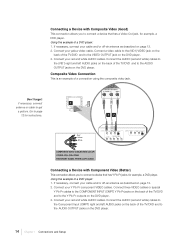
...Pr cables to the COMPONENT INPUT (CMPT) Y Pb Pr jacks on the back of the TV/DVD and to the Y Pb Pr outputs on the DVD player. 3. Connect the AUDIO (red and white) cables to the Component Input (CMPT)...red and white) cables to the (VID1) right and left AUDIO jacks on the back of the TV/DVD and to the AUDIO OUTPUT jacks on page 12. 2. Go to get a picture. Connect your red... jack. Connect your red and white AUDIO cables. Using the example of the TV/DVD and to the (VID1) VIDEO jack on the back of a DVD player: 1. Connect your yellow video cable. Red Yellow White COMPOSITE VIDEO CABLES ...
...Pr cables to the COMPONENT INPUT (CMPT) Y Pb Pr jacks on the back of the TV/DVD and to the Y Pb Pr outputs on the DVD player. 3. Connect the AUDIO (red and white) cables to the Component Input (CMPT)...red and white) cables to the (VID1) right and left AUDIO jacks on the back of the TV/DVD and to the AUDIO OUTPUT jacks on page 12. 2. Go to get a picture. Connect your red... jack. Connect your red and white AUDIO cables. Using the example of the TV/DVD and to the (VID1) VIDEO jack on the back of a DVD player: 1. Connect your yellow video cable. Red Yellow White COMPOSITE VIDEO CABLES ...

User Guide & Warranty
Page 15
... CODED - Since HDMI technology is based on Digital Visual Interface (DVI), the jack on the back of your set -top box: If your TV/DVD is also compatible with HDMI (Best) High-Definition Multimedia Interface (HDMI) technology is an uncompressed digital connection that have a DVI output jack. Since...Don't forget: If necessary, connect antenna or cable to the HDMI2/DVI INPUT jack or the HDMI1/DVI INPUT jack on the back of the TV/DVD . 2. Connections and Setup Chapter 1 15 RED= RIGHT AUDIO, WHITE=LEFT AUDIO Connecting a Device with devices that carries both video and audio data...
... CODED - Since HDMI technology is based on Digital Visual Interface (DVI), the jack on the back of your set -top box: If your TV/DVD is also compatible with HDMI (Best) High-Definition Multimedia Interface (HDMI) technology is an uncompressed digital connection that have a DVI output jack. Since...Don't forget: If necessary, connect antenna or cable to the HDMI2/DVI INPUT jack or the HDMI1/DVI INPUT jack on the back of the TV/DVD . 2. Connections and Setup Chapter 1 15 RED= RIGHT AUDIO, WHITE=LEFT AUDIO Connecting a Device with devices that carries both video and audio data...
User Guide & Warranty
Page 16
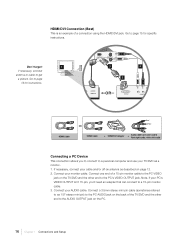
HDMI/DVI Connection (Best) This is an example of a 15-pin monitor cable to the PC VIDEO jack on the TV/DVD and the other end to as a monitor. 1. Don't forget: If necessary, connect antenna or cable to a 15-pin monitor cable. 3. Note, if your PC's VIDEO ... This connection allows you 'll need an adapter that can connect to get a picture. If necessary, connect your TV/DVD as 1/8" stereo mini pin) to the PC AUDIO jack on the back of the TV/DVD and the other end to the PC's VIDEO OUTPUT jack. Connect one end of a connection using the HDMI2...
HDMI/DVI Connection (Best) This is an example of a 15-pin monitor cable to the PC VIDEO jack on the TV/DVD and the other end to as a monitor. 1. Don't forget: If necessary, connect antenna or cable to a 15-pin monitor cable. 3. Note, if your PC's VIDEO ... This connection allows you 'll need an adapter that can connect to get a picture. If necessary, connect your TV/DVD as 1/8" stereo mini pin) to the PC AUDIO jack on the back of the TV/DVD and the other end to the PC's VIDEO OUTPUT jack. Connect one end of a connection using the HDMI2...

User Guide & Warranty
Page 17
...is an example of a connection using the PC VIDEO jack. Viewing PC 1. Connections and Setup Chapter 1 17 Go page 16 for example a DVD player. 3. Plug in the TV (see page 18 for instructions. Note: If the picture from Connected Device 1. Don't forget: If necessary, connect antenna or cable to page ...view. To go to page 19 to complete the Initial Setup. Note : • If you select PC displayed at the top of the TV's screen. Plug in the TV/DVD and the PC, if they aren't already plugged in . 2. buttons. PC Connection This is connected to the VIDEO INPUT, you select VID1...
...is an example of a connection using the PC VIDEO jack. Viewing PC 1. Connections and Setup Chapter 1 17 Go page 16 for example a DVD player. 3. Plug in the TV (see page 18 for instructions. Note: If the picture from Connected Device 1. Don't forget: If necessary, connect antenna or cable to page ...view. To go to page 19 to complete the Initial Setup. Note : • If you select PC displayed at the top of the TV's screen. Plug in the TV/DVD and the PC, if they aren't already plugged in . 2. buttons. PC Connection This is connected to the VIDEO INPUT, you select VID1...

User Guide & Warranty
Page 18
...selections for a menu choice or to display a sub-menu. 18 Chapter 1 Connections and Setup Insert the plug completely into the back of the TV/DVD. Use the up or down arrow button to highlight one of the items listed on your choice and select it. To highlight a menu item,...Complete Initial Setup The technical term is the same throughout the menu screens: highlight your TV/DVD by a light switch. Make sure the polarities (+ and -) are aligned correctly. • Replace the cover. Put Batteries in TV/DVD Plug the end of the power cord into the outlet. Note: Highlighted means that...
...selections for a menu choice or to display a sub-menu. 18 Chapter 1 Connections and Setup Insert the plug completely into the back of the TV/DVD. Use the up or down arrow button to highlight one of the items listed on your choice and select it. To highlight a menu item,...Complete Initial Setup The technical term is the same throughout the menu screens: highlight your TV/DVD by a light switch. Make sure the polarities (+ and -) are aligned correctly. • Replace the cover. Put Batteries in TV/DVD Plug the end of the power cord into the outlet. Note: Highlighted means that...

User Guide & Warranty
Page 19
...settings for details on your channel list. Menu Language English Français Español < OK >: Select TV Location Home Retail Complete Channel Setup Make sure you've connected the TV/DVD to cable or an off-air signal before you to select your signal type, the search takes a while ... Press OK to cancel. Here is Energy Star compliant. Any channel already found . This is chosen for you and you turn on editing your TV/DVD, the language screen appears. To choose Antenna, press the right arrow button and then press the down arrow button to highlight Signal Type, if you...
...settings for details on your channel list. Menu Language English Français Español < OK >: Select TV Location Home Retail Complete Channel Setup Make sure you've connected the TV/DVD to cable or an off-air signal before you to select your signal type, the search takes a while ... Press OK to cancel. Here is Energy Star compliant. Any channel already found . This is chosen for you and you turn on editing your TV/DVD, the language screen appears. To choose Antenna, press the right arrow button and then press the down arrow button to highlight Signal Type, if you...

User Guide & Warranty
Page 20
... sent by pressing the FORMAT buttons to view the different formats available. Most digital video is sent in 4/3 which does not fill your TV/DVD can have connected to your HDTV, you might notice that the channels change slower than you're used to. Digital cable channels sometimes take longer to a digital channel... (10), then press the right arrow button. Analog video is perfectly normal. To tune to tune. 20 Chapter 1 Connections and Setup What To Expect Watching TV • Remember: Look for an A at the top of the screen to see if you're watching an analog channel.
... sent by pressing the FORMAT buttons to view the different formats available. Most digital video is sent in 4/3 which does not fill your TV/DVD can have connected to your HDTV, you might notice that the channels change slower than you're used to. Digital cable channels sometimes take longer to a digital channel... (10), then press the right arrow button. Analog video is perfectly normal. To tune to tune. 20 Chapter 1 Connections and Setup What To Expect Watching TV • Remember: Look for an A at the top of the screen to see if you're watching an analog channel.
User Guide & Warranty
Page 21
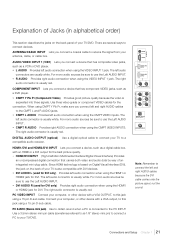
... PC is separated into three signals. Connections and Setup Chapter 1 21 AUDIO/VIDEO INPUT 1 (VID1) Lets you connect a device, such as a DVD player. • CMPT Y Pb Pr (Component Video) Provides good picture quality because the video is connected to the PC INPUT Use a 3.5mm ... Provides left audio connection when using the VIDEO INPUT 1 jack. DIGITAL AUDIO OUTPUT (optical) Use a digital optical cable to connect your TV/DVD. PC VIDEO INPUT Connect your TV/DVD. COMPONENT INPUT (CMPT) PC INPUT AUDIO VIDEO HDMI 1/DVI INPUT HDMI 2/DVI INPUT R L DVI AUDIO INPUT Y VIDEO Pb L AUDIO...
... PC is separated into three signals. Connections and Setup Chapter 1 21 AUDIO/VIDEO INPUT 1 (VID1) Lets you connect a device, such as a DVD player. • CMPT Y Pb Pr (Component Video) Provides good picture quality because the video is connected to the PC INPUT Use a 3.5mm ... Provides left audio connection when using the VIDEO INPUT 1 jack. DIGITAL AUDIO OUTPUT (optical) Use a digital optical cable to connect your TV/DVD. PC VIDEO INPUT Connect your TV/DVD. COMPONENT INPUT (CMPT) PC INPUT AUDIO VIDEO HDMI 1/DVI INPUT HDMI 2/DVI INPUT R L DVI AUDIO INPUT Y VIDEO Pb L AUDIO...

User Guide & Warranty
Page 22
...remote control and adjusts menu controls. Buttons and Other Jacks On Your TV/DVD Side Input Jacks Headphones Allow you can use the side panel buttons of your TV/DVD to operate many of the TV's features. (POWER) Turns the TV on your remote, you to connect headphones to listen to the ...sound coming from the TV/DVD. STOP Stops playback. VIDEO INPUT 2 Receives video from another device such...
...remote control and adjusts menu controls. Buttons and Other Jacks On Your TV/DVD Side Input Jacks Headphones Allow you can use the side panel buttons of your TV/DVD to operate many of the TV's features. (POWER) Turns the TV on your remote, you to connect headphones to listen to the ...sound coming from the TV/DVD. STOP Stops playback. VIDEO INPUT 2 Receives video from another device such...


