User Guide & Warranty
Page 2
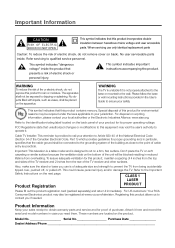
... reduce the risk of the TV receiver and 2 inches from overheating. WARNING The TV is unstable if it is of adequate size and strength to operate it. Please follow the base or wall mounting instructions provided in particular, specifies that unauthorized changes or modifications to this equipment may void the user's authority to prevent the TV from being accidentally...
... reduce the risk of the TV receiver and 2 inches from overheating. WARNING The TV is unstable if it is of adequate size and strength to operate it. Please follow the base or wall mounting instructions provided in particular, specifies that unauthorized changes or modifications to this equipment may void the user's authority to prevent the TV from being accidentally...

User Guide & Warranty
Page 4
... Connect 6 Protect Against Power Surges ...6 Instructions at the Beginning of User's Guide 6 Position Cables Properly to Avoid Audio Interference 6 Use Indirect Light ...6 Check Supplied Parts ...6 Attaching TV/DVD to Table Stand 7 Mounting TV/DVD to Wall ...11 Get the Picture ...12 Getting Channels ...12 Choose Your Connections ...13 Composite Video Connection ...14 Component Video Connection ...14 HDMI/DVI Connection ...15 PC Connection ...16 Plug in TV/DVD ...18 Put Batteries in Remote ...18 Turn on TV/DVD ...18 How to Use Remote Control to Complete Initial Setup...
... Connect 6 Protect Against Power Surges ...6 Instructions at the Beginning of User's Guide 6 Position Cables Properly to Avoid Audio Interference 6 Use Indirect Light ...6 Check Supplied Parts ...6 Attaching TV/DVD to Table Stand 7 Mounting TV/DVD to Wall ...11 Get the Picture ...12 Getting Channels ...12 Choose Your Connections ...13 Composite Video Connection ...14 Component Video Connection ...14 HDMI/DVI Connection ...15 PC Connection ...16 Plug in TV/DVD ...18 Put Batteries in Remote ...18 Turn on TV/DVD ...18 How to Use Remote Control to Complete Initial Setup...

User Guide & Warranty
Page 5
... ...36 Reset Downloadable Data ...36 Blocking Unrated/Exempt Programs 36 Block Channel ...36 Button Block ...36 Change Password ...37 Additional Features ...37 Screen Formats ...37 Chapter 4 I Using TV Menu Using Menu System ...38 Picture Menu ...38 Sound Menu ...39 Channel Menu ...40 Parental Control Menu ...40 Setup Menu ...40 Time Menu ...41 Chapter 5 I DVD Functions-Playing Discs Basic playback operations ...42 Chapter 6 I DVD Functions-Menus Display the DVD Main Menu ...45 TV Menu ...45 DVD Disc Menu ...45 DVD Player Menu ...45 System Setup ...45 Language Setup ...47 Auido Setup ...47...
... ...36 Reset Downloadable Data ...36 Blocking Unrated/Exempt Programs 36 Block Channel ...36 Button Block ...36 Change Password ...37 Additional Features ...37 Screen Formats ...37 Chapter 4 I Using TV Menu Using Menu System ...38 Picture Menu ...38 Sound Menu ...39 Channel Menu ...40 Parental Control Menu ...40 Setup Menu ...40 Time Menu ...41 Chapter 5 I DVD Functions-Playing Discs Basic playback operations ...42 Chapter 6 I DVD Functions-Menus Display the DVD Main Menu ...45 TV Menu ...45 DVD Disc Menu ...45 DVD Player Menu ...45 System Setup ...45 Language Setup ...47 Auido Setup ...47...

User Guide & Warranty
Page 12
... receive analog and/or digital channels by using the ANTENNA/CABLE INPUT. The back panel of the screen for a D at the bottom of your TV/DVD is to get the picture, also known as the signal. Getting Channels What You Need Antenna ("rabbit ears") or outdoor antenna with coaxial cable OR Coaxial cable with cable service A. Do you have cable? Do you have a set-top box? Look for digital channels; If so, plug the antenna or coaxial cable...
... receive analog and/or digital channels by using the ANTENNA/CABLE INPUT. The back panel of the screen for a D at the bottom of your TV/DVD is to get the picture, also known as the signal. Getting Channels What You Need Antenna ("rabbit ears") or outdoor antenna with coaxial cable OR Coaxial cable with cable service A. Do you have cable? Do you have a set-top box? Look for digital channels; If so, plug the antenna or coaxial cable...

User Guide & Warranty
Page 15
... component video jacks. Connections and Setup Chapter 1 15 Go to get a picture. Don't forget: If necessary, connect antenna or cable to page 14 for instructions. Green Red Blue Red White COMPONENT VIDEO CABLES (Y Pb Pr) ARE COLOR CODEDGREEN, BLUE AND RED AUDIO CABLES ARE COLOR CODED - Connect an HDMI cable to the HDMI2/DVI INPUT jack or the HDMI1/DVI INPUT jack on the set -top box has an HDMI jack, connect an HDMI cable. Go to the HDMI Out jack on the back of an integrated mini-plug cable. RED= RIGHT AUDIO...
... component video jacks. Connections and Setup Chapter 1 15 Go to get a picture. Don't forget: If necessary, connect antenna or cable to page 14 for instructions. Green Red Blue Red White COMPONENT VIDEO CABLES (Y Pb Pr) ARE COLOR CODEDGREEN, BLUE AND RED AUDIO CABLES ARE COLOR CODED - Connect an HDMI cable to the HDMI2/DVI INPUT jack or the HDMI1/DVI INPUT jack on the set -top box has an HDMI jack, connect an HDMI cable. Go to the HDMI Out jack on the back of an integrated mini-plug cable. RED= RIGHT AUDIO...
User Guide & Warranty
Page 16
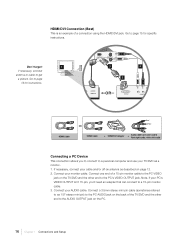
... a picture. HDMI Cable Red White OR HDMI Cable + HDMI/DVI Adapter + Audio cables are color coded Red=right audio; white=left audio Connecting a PC Device This connection allows you 'll need an adapter that can connect to a personal computer and use your cable and/or off-air antenna as 1/8" stereo mini pin) to the PC AUDIO jack on the PC. 16 Chapter 1 Connections and Setup If necessary, connect your TV/DVD as a monitor. 1. Connect your AUDIO cable. Note, if your PC's VIDEO OUTPUT isn...
... a picture. HDMI Cable Red White OR HDMI Cable + HDMI/DVI Adapter + Audio cables are color coded Red=right audio; white=left audio Connecting a PC Device This connection allows you 'll need an adapter that can connect to a personal computer and use your cable and/or off-air antenna as 1/8" stereo mini pin) to the PC AUDIO jack on the PC. 16 Chapter 1 Connections and Setup If necessary, connect your TV/DVD as a monitor. 1. Connect your AUDIO cable. Note, if your PC's VIDEO OUTPUT isn...
User Guide & Warranty
Page 21
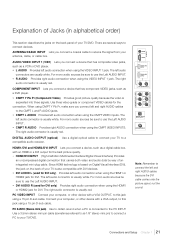
... the signal from your antenna, cable, or cable box. The right audio connector is usually red. Connections and Setup Chapter 1 21 There are usually white. ANTENNA/CABLE INPUT Lets you connect a coaxial cable to a compatible audio receiver. Since HDMI technology is based on Digital Visual Interface (DVI), the jack on the back panel of your TV/DVD. AUDIO/VIDEO INPUT 1 (VID1) Lets you connect a device that has component VIDEO jacks, such as a digital cable box, with an HDMI or a DVI output for the best picture quality. • HDMI/DVI INPUT (High...
... the signal from your antenna, cable, or cable box. The right audio connector is usually red. Connections and Setup Chapter 1 21 There are usually white. ANTENNA/CABLE INPUT Lets you connect a coaxial cable to a compatible audio receiver. Since HDMI technology is based on Digital Visual Interface (DVI), the jack on the back panel of your TV/DVD. AUDIO/VIDEO INPUT 1 (VID1) Lets you connect a device that has component VIDEO jacks, such as a digital cable box, with an HDMI or a DVI output for the best picture quality. • HDMI/DVI INPUT (High...

User Guide & Warranty
Page 22
... selects highlighted items. VOL Increases the volume. DVD Panel Buttons Following buttons used in the menu system, it acts like the right arrow button on and off. VIDEO INPUT 2 Receives video from another device such as a camcorder, video game console, VCR, or DVD player. Use when connecting to operate many of the TV's features. (POWER) Turns the TV on the remote control and adjusts menu controls. AUDIO L and R Receives audio from another device such as a camcorder, video game console, VCR, or DVD player. Side Panel Buttons...
... selects highlighted items. VOL Increases the volume. DVD Panel Buttons Following buttons used in the menu system, it acts like the right arrow button on and off. VIDEO INPUT 2 Receives video from another device such as a camcorder, video game console, VCR, or DVD player. Use when connecting to operate many of the TV's features. (POWER) Turns the TV on the remote control and adjusts menu controls. AUDIO L and R Receives audio from another device such as a camcorder, video game console, VCR, or DVD player. Side Panel Buttons...

User Guide & Warranty
Page 23
Current Audio Track. CANCEL Removes any menu or display from channel list. buttons. OK When in the menu system, selects highlighted items. Remote control part number RC2254702/01 Note: If you to normal viewing. Go to page 37 for more information on screen formats. • Right arrow/GUIDE Press this button to enter the PRESET menu. Display Picture preset; Scans up or down through the current channel list. F1-F4 Favorite channel buttons. To resume TV viewing, press...
Current Audio Track. CANCEL Removes any menu or display from channel list. buttons. OK When in the menu system, selects highlighted items. Remote control part number RC2254702/01 Note: If you to normal viewing. Go to page 37 for more information on screen formats. • Right arrow/GUIDE Press this button to enter the PRESET menu. Display Picture preset; Scans up or down through the current channel list. F1-F4 Favorite channel buttons. To resume TV viewing, press...

User Guide & Warranty
Page 26
.../AUX or DVD) to set the remote to control the device, for the device to control your remote control, simultaneously press and hold the ON•OFF and MUTE (approximately 3 seconds) buttons until the CANCEL button lights up . Press ON•OFF to turn off , quickly press the OK button to Auto Code Search mode. This tells you can press the ON/ OFF button to switch to save...
.../AUX or DVD) to set the remote to control the device, for the device to control your remote control, simultaneously press and hold the ON•OFF and MUTE (approximately 3 seconds) buttons until the CANCEL button lights up . Press ON•OFF to turn off , quickly press the OK button to Auto Code Search mode. This tells you can press the ON/ OFF button to switch to save...

User Guide & Warranty
Page 28
...remote code is a 4-digit code. Remote Code List Note: The codes are programmable to any of the device buttons (SAT /AUX or DVD) on the remote. The first digit indicates the database device type (0 for DVD, 1 for Satellite TV, 2 for Cable, 3 for DVR, 4 for VCR, 5 for Audio and 6 for CD), the following 3 digits indicate the brands as follows: Audio Codes...Cary Audio Design 031 Casio 125 CCE 177 Chase Technologies 029 Cinema Sound ... 020\ Glory Horse 133 Go Video 144 GPX 404 421 Gradiente 389...Time 051 064 Multi Canal 051 Multitech 091 NEC 043 28 Chapter 2 Using the remote control
...remote code is a 4-digit code. Remote Code List Note: The codes are programmable to any of the device buttons (SAT /AUX or DVD) on the remote. The first digit indicates the database device type (0 for DVD, 1 for Satellite TV, 2 for Cable, 3 for DVR, 4 for VCR, 5 for Audio and 6 for CD), the following 3 digits indicate the brands as follows: Audio Codes...Cary Audio Design 031 Casio 125 CCE 177 Chase Technologies 029 Cinema Sound ... 020\ Glory Horse 133 Go Video 144 GPX 404 421 Gradiente 389...Time 051 064 Multi Canal 051 Multitech 091 NEC 043 28 Chapter 2 Using the remote control
User Guide & Warranty
Page 39
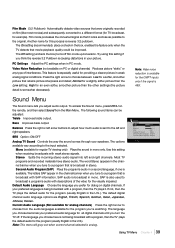
... select Sound from the audio languages available for the program (usually English in PC mode. Balance Press the right or left arrow buttons to adjust how much audio is available. If not, then the TV plays the default audio for the program you choose becomes your speakers. The language you 're watching. This feature is especially useful for example). To access the Sound menu, press MENU on digital channels. Second Audio Program (SAP) Plays the program's audio...
... select Sound from the audio languages available for the program (usually English in PC mode. Balance Press the right or left arrow buttons to adjust how much audio is available. If not, then the TV plays the default audio for the program you choose becomes your speakers. The language you 're watching. This feature is especially useful for example). To access the Sound menu, press MENU on digital channels. Second Audio Program (SAP) Plays the program's audio...
User Guide & Warranty
Page 41
... displays complete text of the digital closed captioned mode set the time for optimum viewing. Digital CC Edge Color Lets you choose the edge color of the program in the primary language in the room and adjusts the TV's backlight for you. Sleep Timer Use the left for the various conditions of the backlight power level and LED colors when the light sensor is a complete assortment of the screen behind the digital closed captions...
... displays complete text of the digital closed captioned mode set the time for optimum viewing. Digital CC Edge Color Lets you choose the edge color of the program in the primary language in the room and adjusts the TV's backlight for you. Sleep Timer Use the left for the various conditions of the backlight power level and LED colors when the light sensor is a complete assortment of the screen behind the digital closed captions...
User Guide & Warranty
Page 42
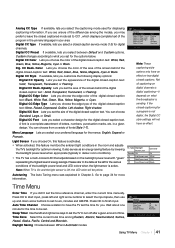
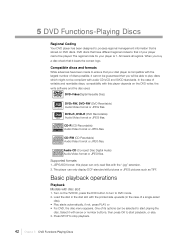
...-R (CD-Recordable) Audio/Video format or JPEG files. DVD+R, DVD-R (DVD Recordable) Audio/Video format or JPEG files. Turn on the DVD writer, the write software and the disc used. When you will be able to play discs which might not be compliant with audio CD,VCD and SVCD standards. This player can only read files with the ".jpg" extension. 2. Basic playback operations Playback Models with arrow or number buttons, then press OK...
...-R (CD-Recordable) Audio/Video format or JPEG files. DVD+R, DVD-R (DVD Recordable) Audio/Video format or JPEG files. Turn on the DVD writer, the write software and the disc used. When you will be able to play discs which might not be compliant with audio CD,VCD and SVCD standards. This player can only read files with the ".jpg" extension. 2. Basic playback operations Playback Models with arrow or number buttons, then press OK...
User Guide & Warranty
Page 44
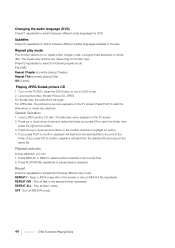
... TV screen. Press PLAY/PAUSE repeatedly to switch between different subtitle languages available in the current foler. 2. REPEAT DIR - Turn off REPEAT mode. 44 Chapter 5 DVD Functions-Playing Discs Changing the audio language (DVD) Press F1 repeatedly to pause/resume playback. For JPEG disc, the picture/movie menu appears on the TV screen. 2. Repeat Press F2 repeatedly to confirm, playback will start from the selected file...
... TV screen. Press PLAY/PAUSE repeatedly to switch between different subtitle languages available in the current foler. 2. REPEAT DIR - Turn off REPEAT mode. 44 Chapter 5 DVD Functions-Playing Discs Changing the audio language (DVD) Press F1 repeatedly to pause/resume playback. For JPEG disc, the picture/movie menu appears on the TV screen. 2. Repeat Press F2 repeatedly to confirm, playback will start from the selected file...
User Guide & Warranty
Page 45
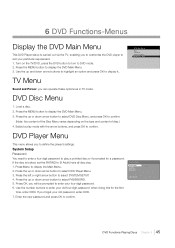
... arrow button to select DVD Player Menu. System Setup Password You need to enter a four-digit password to play a prohited disc or if prompted for the first time, enter 0000. Press Menu to display the DVD Main Menu. 3. SYSTEM SETUP PASSWORD RATING DEFAULT SHORTCUT _ _ _ _ 3. Use the up or down arrow button to select PASSWORD. EXIT SETUP 5. DVD Player Menu This menu allows you can operate these options as in TV mode. Press the up and down arrow button to select DVD Disc Menu, and...
... arrow button to select DVD Player Menu. System Setup Password You need to enter a four-digit password to play a prohited disc or if prompted for the first time, enter 0000. Press Menu to display the DVD Main Menu. 3. SYSTEM SETUP PASSWORD RATING DEFAULT SHORTCUT _ _ _ _ 3. Use the up or down arrow button to select PASSWORD. EXIT SETUP 5. DVD Player Menu This menu allows you can operate these options as in TV mode. Press the up and down arrow button to select DVD Disc Menu, and...

User Guide & Warranty
Page 49
... wall receptacle (or extension cord) to make sure you have your video cable connected to the TV's L and R AUDIO INPUT jacks. • The sound settings may be locked (disabled). Try pressing the volume up button to restore sound. • If using DVI, or Y, PB, PR, remember to also connect the device's left and right AUDIO OUTPUT jacks to the VIDEO OUTPUT jack on . • Try another channel. Go to page 39 for more instructions. Troubleshooting Most problems...
... wall receptacle (or extension cord) to make sure you have your video cable connected to the TV's L and R AUDIO INPUT jacks. • The sound settings may be locked (disabled). Try pressing the volume up button to restore sound. • If using DVI, or Y, PB, PR, remember to also connect the device's left and right AUDIO OUTPUT jacks to the VIDEO OUTPUT jack on . • Try another channel. Go to page 39 for more instructions. Troubleshooting Most problems...

User Guide & Warranty
Page 50
... channel banner, the HDMI or DVI device isn't responding. Contact the manufacturer of a power surge. Choose either 720p or 1080i. • 480i signals aren't supported by selecting the Button Block feature in . Buttons don't work • The side panel controls may be a weak station. Turn the TV on . TV turns off your picture, the device you connected might have been activated. Wait ten minutes. Black box appears on screen Closed-captioning...
... channel banner, the HDMI or DVI device isn't responding. Contact the manufacturer of a power surge. Choose either 720p or 1080i. • 480i signals aren't supported by selecting the Button Block feature in . Buttons don't work • The side panel controls may be a weak station. Turn the TV on . TV turns off your picture, the device you connected might have been activated. Wait ten minutes. Black box appears on screen Closed-captioning...
User Guide & Warranty
Page 54
... troubleshoot your problem over the phone. • If it is determined that your television with a refurbished/remanufactured unit. See "How to get service" How to the original owner New LCD Televisions - Please have your unit. See "How to repair your television, or replace your unit requires service, the service location will do : • At TTE's discretion, pay an Authorized RCA Service Center for parts. The model/serial number...
... troubleshoot your problem over the phone. • If it is determined that your television with a refurbished/remanufactured unit. See "How to get service" How to the original owner New LCD Televisions - Please have your unit. See "How to repair your television, or replace your unit requires service, the service location will do : • At TTE's discretion, pay an Authorized RCA Service Center for parts. The model/serial number...
Spec Sheet
Page 2
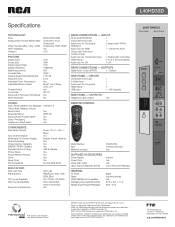
... SOUND Audio Power (Watts) Front Speakers Treble, Bass, Balance, Volume, Mute Control Broadcast Stereo Second Audio Program (SAP) Dolby* Processing Headphone Adjustments CONVENIENCE Side Panel Controls Auto Channel Search Multilingual On-Screen-Display Channel Labelling Closed Caption Capability ENERGY STAR® Qualified Parental Control (V-Chip) Picture Reset Picture Memory Presets Clock Sleep Timer PC Compatibility BUILT-IN DVD Disc Load Type Panel Buttons CD Format Capability DVD Format Capability Screen Format Selection REAR CONNECTIONS - SW Upgrade Y Y VIDEO INPUT S-VIDEO INPUT...
... SOUND Audio Power (Watts) Front Speakers Treble, Bass, Balance, Volume, Mute Control Broadcast Stereo Second Audio Program (SAP) Dolby* Processing Headphone Adjustments CONVENIENCE Side Panel Controls Auto Channel Search Multilingual On-Screen-Display Channel Labelling Closed Caption Capability ENERGY STAR® Qualified Parental Control (V-Chip) Picture Reset Picture Memory Presets Clock Sleep Timer PC Compatibility BUILT-IN DVD Disc Load Type Panel Buttons CD Format Capability DVD Format Capability Screen Format Selection REAR CONNECTIONS - SW Upgrade Y Y VIDEO INPUT S-VIDEO INPUT...


