
User Guide & Warranty
Page 4
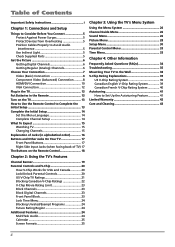
... 7 Video (Basic) Connection 8 Component Video (Advanced) Connection .......... 8 HDMI/DVI Connection 10 VGA Connection 12 Plug in the TV 13 Put Batteries in the Remote 13 Turn on the TV 13 How to Use the Remote Control to Complete the Initial Setup 13 Complete the Initial Setup 14 Set the Menu Language...
... 7 Video (Basic) Connection 8 Component Video (Advanced) Connection .......... 8 HDMI/DVI Connection 10 VGA Connection 12 Plug in the TV 13 Put Batteries in the Remote 13 Turn on the TV 13 How to Use the Remote Control to Complete the Initial Setup 13 Complete the Initial Setup 14 Set the Menu Language...
User Guide & Warranty
Page 5
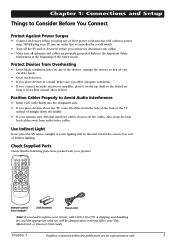
... outlet that the following parts were packed with your remote, call 1-800-338-0376. Check Supplied Parts Check that is controlled by a wall switch. • Turn off the TV and/or device(s) before you plug any cables. • Make sure all cables down the side of the back of the TV...
... outlet that the following parts were packed with your remote, call 1-800-338-0376. Check Supplied Parts Check that is controlled by a wall switch. • Turn off the TV and/or device(s) before you plug any cables. • Make sure all cables down the side of the back of the TV...
User Guide & Warranty
Page 9
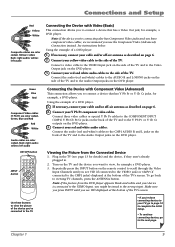
...+ GO BACK MENU ZOOM- Using the example of the TV and to the CMP1 jacks) displayed at the bottom of the TV's screen. Plug in . 2. Turn on the side of a DVD player: 1. Note: If the picture from the Connected Device 1. Chapter 1 9 white= left audio ON•OFF button INPUT button 1 4 7 INPUT...
...+ GO BACK MENU ZOOM- Using the example of the TV and to the CMP1 jacks) displayed at the bottom of the TV's screen. Plug in . 2. Turn on the side of a DVD player: 1. Note: If the picture from the Connected Device 1. Chapter 1 9 white= left audio ON•OFF button INPUT button 1 4 7 INPUT...
User Guide & Warranty
Page 11
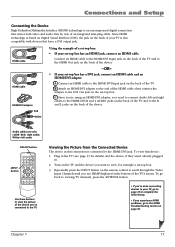
... aren't already plugged in. 2. Viewing the Picture from the Connected Device The device in the TV (see HDMI displayed at the bottom of the TV. Turn on the TV and the device you want to the HDMI/DVI Input jack on the back of the device.
... aren't already plugged in. 2. Viewing the Picture from the Connected Device The device in the TV (see HDMI displayed at the bottom of the TV. Turn on the TV and the device you want to the HDMI/DVI Input jack on the back of the device.

User Guide & Warranty
Page 12
... the VGA VIDEO jack on page 6. 2. Notes: The maximum panel resolution is connected. Note, if your monitor cable. Viewing the PC 1. Go to a personal computer. 1. Turn on the remote control to scroll through the Video Input Channels until you to connect to page 24 for details) and the PC, if they...
... the VGA VIDEO jack on page 6. 2. Notes: The maximum panel resolution is connected. Note, if your monitor cable. Viewing the PC 1. Go to a personal computer. 1. Turn on the remote control to scroll through the Video Input Channels until you to connect to page 24 for details) and the PC, if they...
User Guide & Warranty
Page 13
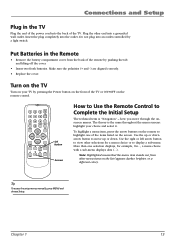
... the plug completely into the back of the remote by a light switch. Make sure the polarities (+ and -) are aligned correctly. • Replace the cover. Turn on the TV Turn on the remote control. 1 4 7 INPUT ON•OFF 2 3 SLEEP 5 6 CC 8 9 ANTENNA PRESETS SOUND VOL- Use the right or left arrow button to display...
... the plug completely into the back of the remote by a light switch. Make sure the polarities (+ and -) are aligned correctly. • Replace the cover. Turn on the TV Turn on the remote control. 1 4 7 INPUT ON•OFF 2 3 SLEEP 5 6 CC 8 9 ANTENNA PRESETS SOUND VOL- Use the right or left arrow button to display...
User Guide & Warranty
Page 14
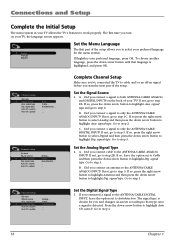
... properly. search Auto Ch. Cable... Complete Channel Setup Make sure you've connected the TV to cable and/or an off-air signal before you turn on your TV allows the TV's features to highlight Auto Ch. Did you connect cable to only the ANTENNA/CABLE DIGITAL INPUT? Go to step...
... properly. search Auto Ch. Cable... Complete Channel Setup Make sure you've connected the TV to cable and/or an off-air signal before you turn on your TV allows the TV's features to highlight Auto Ch. Did you connect cable to only the ANTENNA/CABLE DIGITAL INPUT? Go to step...
User Guide & Warranty
Page 16
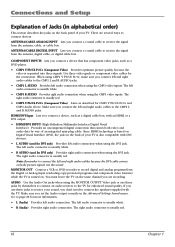
... only the picture signal, not the sound. Use three video-grade or component video cables for more information. • L (Audio) Provides left audio connector is turned on the back panel of your TV. The right audio connector is usually red. • CMP2 Y Pb/Cb Pr/Cr (Component Video) Same as a DVD...
... only the picture signal, not the sound. Use three video-grade or component video cables for more information. • L (Audio) Provides left audio connector is turned on the back panel of your TV. The right audio connector is usually red. • CMP2 Y Pb/Cb Pr/Cr (Component Video) Same as a DVD...
User Guide & Warranty
Page 17
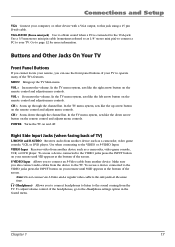
VOL < Decreases the volume. POWER Turns the TV on the remote control and adjusts menu controls. Use when connecting to the VGA jack. S-VIDEO Input Allows you can use the front ...
VOL < Decreases the volume. POWER Turns the TV on the remote control and adjusts menu controls. Use when connecting to the VGA jack. S-VIDEO Input Allows you can use the front ...

User Guide & Warranty
Page 18
... and then press 2 and 3. SLEEP Sets the TV to change the channel up or down ; and CH+/CH- or ZOOM + Press left or right to turn off . Scan up or down through the remote control. FAV (Favorite) Press to the previous channel. GO BACK Returns you back to the TV's audio..., CMP2, VGA, and HDMI). If in a sub-menu, takes you to browse the channels set in the menu system, displays sub-menus. ON•OFF Turns the TV on -screen. Each time you need to page 31 for the Digital input, displays the CC setting, Digital CC type, and Digital CC...
... and then press 2 and 3. SLEEP Sets the TV to change the channel up or down ; and CH+/CH- or ZOOM + Press left or right to turn off . Scan up or down through the remote control. FAV (Favorite) Press to the previous channel. GO BACK Returns you back to the TV's audio..., CMP2, VGA, and HDMI). If in a sub-menu, takes you to browse the channels set in the menu system, displays sub-menus. ON•OFF Turns the TV on -screen. Each time you need to page 31 for the Digital input, displays the CC setting, Digital CC type, and Digital CC...

User Guide & Warranty
Page 20
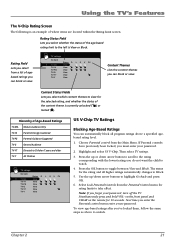
...TIME menu US V-Chip Canada V-Chip Unrated/Exempt - - - 51 MTV ... ... Lock/Unlock Parental Controls Selecting this option lets you forget your password, turn off or unlocked. Broadcasters are not required to page 38 for 10 seconds. on the front panel and CLEAR on page 23. If you can...Using the TV's Features Parental Controls and V-Chip The choices in the US V-Chip and Canada V-Chip menus involve software inside your TV is turned off the TV. Control Select channel Block channel Block all dig. This is explained on the remote for the US and Canada ratings explanations. ...
...TIME menu US V-Chip Canada V-Chip Unrated/Exempt - - - 51 MTV ... ... Lock/Unlock Parental Controls Selecting this option lets you forget your password, turn off or unlocked. Broadcasters are not required to page 38 for 10 seconds. on the front panel and CLEAR on page 23. If you can...Using the TV's Features Parental Controls and V-Chip The choices in the US V-Chip and Canada V-Chip menus involve software inside your TV is turned off the TV. Control Select channel Block channel Block all dig. This is explained on the remote for the US and Canada ratings explanations. ...
User Guide & Warranty
Page 21
... TV-PG TV-G TV-Y7 TV-Y Status D L S V FV View View View View View View Content Themes Lists the content themes you must enter your password, turn off the TV. If Parental controls have previously been locked, you can block or view. Highlight and select US V-Chip. Select Lock Parental Controls from...
... TV-PG TV-G TV-Y7 TV-Y Status D L S V FV View View View View View View Content Themes Lists the content themes you must enter your password, turn off the TV. If Parental controls have previously been locked, you can block or view. Highlight and select US V-Chip. Select Lock Parental Controls from...

User Guide & Warranty
Page 23
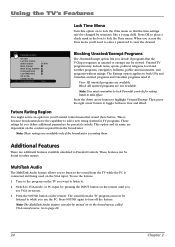
...Go back Lock Par. Using the TV's Features V-Chip Movie Rating Limit Set movie rating limits by someone, like a young child. Block Channels Turn this to keep children from changing channels, remove access to a digital channel you change the status. When you tune to any channel. Don't ...2 23 channels Front panel block Lock TIME menu US V-Chip Canada V-Chip Unrated/Exempt - - - 51 MTV ... ... Select US V-Chip. 4. Block Digital Channels Turn this option to block all dig. Movie ratings Go back NR X NC-17 R PG-13 PG G Status Block Block Block View View View View Parental...
...Go back Lock Par. Using the TV's Features V-Chip Movie Rating Limit Set movie rating limits by someone, like a young child. Block Channels Turn this to keep children from changing channels, remove access to a digital channel you change the status. When you tune to any channel. Don't ...2 23 channels Front panel block Lock TIME menu US V-Chip Canada V-Chip Unrated/Exempt - - - 51 MTV ... ... Select US V-Chip. 4. Block Digital Channels Turn this option to block all dig. Movie ratings Go back NR X NC-17 R PG-13 PG G Status Block Block Block View View View View Parental...
User Guide & Warranty
Page 24
...Audio The MultiTask Audio feature allows you use the feature: 1. Note: The MultiTask Audio feature can be turned on in the box to lock the Time menu so that the time settings can now be changed by... pressing the INPUT button on the remote until you 'll need to enter a password to turn off the feature. Press the SOUND button on the TV you want to listen to add a new ... These ratings let you decide if programs that wasn't there before. Using the TV's Features Lock Time Menu Turn this option on to lock the Time menu. Press OK to place a check mark in the Sound menu,...
...Audio The MultiTask Audio feature allows you use the feature: 1. Note: The MultiTask Audio feature can be turned on in the box to lock the Time menu so that the time settings can now be changed by... pressing the INPUT button on the remote until you 'll need to enter a password to turn off the feature. Press the SOUND button on the TV you want to listen to add a new ... These ratings let you decide if programs that wasn't there before. Using the TV's Features Lock Time Menu Turn this option on to lock the Time menu. Press OK to place a check mark in the Sound menu,...
User Guide & Warranty
Page 28
... a program's audio with SAP information. Advanced settings Second Audio Program (SAP) Plays the program's audio in the channel banner when you turn the TV off the internal speakers. This output is available. Dig. Preset Choose the language you choose a setting for the visually impaired.... off . Picture Menu The Picture menu contains menus and controls to a receiver or amplifier. High... ... 28 Internal speakers Turn on the digital tuner until you tune to choose Stereo, Mono or Auto. SAP audio is controlled by the device instead, uncheck the...
... a program's audio with SAP information. Advanced settings Second Audio Program (SAP) Plays the program's audio in the channel banner when you turn the TV off the internal speakers. This output is available. Dig. Preset Choose the language you choose a setting for the visually impaired.... off . Picture Menu The Picture menu contains menus and controls to a receiver or amplifier. High... ... 28 Internal speakers Turn on the digital tuner until you tune to choose Stereo, Mono or Auto. SAP audio is controlled by the device instead, uncheck the...
User Guide & Warranty
Page 29
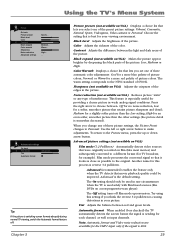
... input channels. Press the right arrow to make adjustments. When you select one of three automatic color adjustments: Cool for your picture. The Off setting turns off . Try using this process is best for a more red palette of interference. Note: Automatic format and Video noise reduction are available for a softer, smoother...
... input channels. Press the right arrow to make adjustments. When you select one of three automatic color adjustments: Cool for your picture. The Off setting turns off . Try using this process is best for a more red palette of interference. Note: Automatic format and Video noise reduction are available for a softer, smoother...

User Guide & Warranty
Page 32
... Digital CC style Go back Digital CC size Standard... Dig. color Black... Digital CC Back. opacity Solid... You can choose from being turned up too loudly. color Lets you choose the color of the area of fonts (Ashley, Floridian, etc.). Note: These captioning style options... maximum volume you set . "Floridian", "Plate Gothic", and "Screen" are trademarks of Monotype Imaging, Inc. Digital CC color White... Display Turn this feature on what the broadcaster is detected from the VGA input jack for a program is intended to stop volume from a variety of the...
... Digital CC style Go back Digital CC size Standard... Dig. color Black... Digital CC Back. opacity Solid... You can choose from being turned up too loudly. color Lets you choose the color of the area of fonts (Ashley, Floridian, etc.). Note: These captioning style options... maximum volume you set . "Floridian", "Plate Gothic", and "Screen" are trademarks of Monotype Imaging, Inc. Digital CC color White... Display Turn this feature on what the broadcaster is detected from the VGA input jack for a program is intended to stop volume from a variety of the...

User Guide & Warranty
Page 33
...channel Lets you set . Start time Set the time you 've entered. Line 1-Line 4 Enter up timer is turned back on . Wake up channel Turn off timer Turn off . If Display is turned on, the message appears when the TV is available only when the time has been set for a line. Recurrence...30min... ... Time If you must first enter the number zero, then number eight. Wake up and down arrow buttons to clear the message. Turn off time Lets you set the current day, month, and year. channel Choose your remote. Daily... 08:00AM 12 Once... 10:00PM Using the...
...channel Lets you set . Start time Set the time you 've entered. Line 1-Line 4 Enter up timer is turned back on . Wake up channel Turn off timer Turn off . If Display is turned on, the message appears when the TV is available only when the time has been set for a line. Recurrence...30min... ... Time If you must first enter the number zero, then number eight. Wake up and down arrow buttons to clear the message. Turn off time Lets you set the current day, month, and year. channel Choose your remote. Daily... 08:00AM 12 Once... 10:00PM Using the...

User Guide & Warranty
Page 35
...the TV is "live" by consulting the following troubleshooting list. A yellow Video cable connects to page 26 for detailed instructions. • The channel might be turned off. Go to the yellow VIDEO input jack on the side of your TV; Chapter 4 35 A yellow Video cable connects to the TV's L and R... mode (press the TV/VCR button on . • Try another channel. change channels. • If you're watching your VCR and it is turned on your VCR). If you used to watch something else. • The front panel controls may not be corrected by plugging in the Parental control...
...the TV is "live" by consulting the following troubleshooting list. A yellow Video cable connects to page 26 for detailed instructions. • The channel might be turned off. Go to the yellow VIDEO input jack on the side of your TV; Chapter 4 35 A yellow Video cable connects to the TV's L and R... mode (press the TV/VCR button on . • Try another channel. change channels. • If you're watching your VCR and it is turned on your VCR). If you used to watch something else. • The front panel controls may not be corrected by plugging in the Parental control...
User Guide & Warranty
Page 36
... Automatic format feature off your HDMI or DVI device is having trouble sending video information to the TV. If Acquiring Channel appears in again. TV turns off unexpectedly • Sleep timer may have been activated because of your picture, the device you connected might have a switch or a menu option allowing...Reset the power by unplugging the power cord and plugging it back in the correct mode (press the TV/VCR button on the remote. TV turns on again. Go to appear, your device. See page 29 for more information. Use Sound menu to make sure the TV/VCR button on ...
... Automatic format feature off your HDMI or DVI device is having trouble sending video information to the TV. If Acquiring Channel appears in again. TV turns off unexpectedly • Sleep timer may have been activated because of your picture, the device you connected might have a switch or a menu option allowing...Reset the power by unplugging the power cord and plugging it back in the correct mode (press the TV/VCR button on the remote. TV turns on again. Go to appear, your device. See page 29 for more information. Use Sound menu to make sure the TV/VCR button on ...


