User Guide & Warranty
Page 1
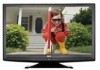
visit our website at www.rca.com/tv or call 1-877-794-7977 Table of contents 1 contents connections 6 remote 19 features 20 menus 25 FAQs 30 warranty 36 user's guide | LCD FLAT PANEL HDTV For use with models: L32HD41/L32HD31R Need assistance?
visit our website at www.rca.com/tv or call 1-877-794-7977 Table of contents 1 contents connections 6 remote 19 features 20 menus 25 FAQs 30 warranty 36 user's guide | LCD FLAT PANEL HDTV For use with models: L32HD41/L32HD31R Need assistance?

User Guide & Warranty
Page 2
No user serviceable parts inside the product that the cable ground should not be required under the laws applicable to your remote control puts the TV into a very low-power standby mode but will need them. This symbol indicates "dangerous voltage" inside . This product should be blocked, ...This television is a table model and is designed to the point of purchase. Therefore, you should be registered at www.rca.com/television. For US customers: Your RCA Consumer Electronics product may also be placed on the bottom of electric shock, do not expose this product allows us to ...
No user serviceable parts inside the product that the cable ground should not be required under the laws applicable to your remote control puts the TV into a very low-power standby mode but will need them. This symbol indicates "dangerous voltage" inside . This product should be blocked, ...This television is a table model and is designed to the point of purchase. Therefore, you should be registered at www.rca.com/television. For US customers: Your RCA Consumer Electronics product may also be placed on the bottom of electric shock, do not expose this product allows us to ...

User Guide & Warranty
Page 3
... is placed on or objects falling onto the component, rain or moisture exposure, abnormal operation, or if the component has been dropped. 12. When the TV is provided for your outlet, consult an electrician for replacement of Canadian Electrical Code, Part 1) provides information with the manufacturer's instructions. 3. Use only with the...
... is placed on or objects falling onto the component, rain or moisture exposure, abnormal operation, or if the component has been dropped. 12. When the TV is provided for your outlet, consult an electrician for replacement of Canadian Electrical Code, Part 1) provides information with the manufacturer's instructions. 3. Use only with the...
User Guide & Warranty
Page 4
... Setup ...6 Protect Against Power Surges ...6 Safety Information ...6 Avoid Audio Interference ...6 Avoid Direct Light ...6 Check Supplied Parts ...6 Attaching Your TV to the Table Stand 7 Mounting Your TV to the Wall ...7 Obtain the Signal ...8 What You Need ...8 What You Need to Know ...8 Choose Your Connections ...9 Connecting a ... PC Component ...12 Viewing the Picture from the Connected Component 13 Viewing a PC...13 Plug in the TV ...14 Put Batteries in the Remote ...14 Turn on Your TV 18 Side Input Jacks ...18 Side Panel Buttons ...18 4 Table of Jacks (in alphabetical order 17 ...
... Setup ...6 Protect Against Power Surges ...6 Safety Information ...6 Avoid Audio Interference ...6 Avoid Direct Light ...6 Check Supplied Parts ...6 Attaching Your TV to the Table Stand 7 Mounting Your TV to the Wall ...7 Obtain the Signal ...8 What You Need ...8 What You Need to Know ...8 Choose Your Connections ...9 Connecting a ... PC Component ...12 Viewing the Picture from the Connected Component 13 Viewing a PC...13 Plug in the TV ...14 Put Batteries in the Remote ...14 Turn on Your TV 18 Side Input Jacks ...18 Side Panel Buttons ...18 4 Table of Jacks (in alphabetical order 17 ...
User Guide & Warranty
Page 5
... Unrated/Exempt Programs 23 Block Channel ...23 Block Buttons ...24 Change Password ...24 Additional Features ...24 Screen Formats ...24 Chapter 4 I Using the TV Menu Using the Menu System ...25 Picture Menu ...25 Sound Menu ...26 Setup Menu ...27 List & Labels Menu ...29 Parental Control Menu ...29... Chapter 5 I Using TV Features Channel Banner ...20 Parental Controls and V-Chip ...20 V-Chip - Chapter 2 I Using the Remote Control Remote Control Buttons ...19 Chapter 3 I ...
... Unrated/Exempt Programs 23 Block Channel ...23 Block Buttons ...24 Change Password ...24 Additional Features ...24 Screen Formats ...24 Chapter 4 I Using the TV Menu Using the Menu System ...25 Picture Menu ...25 Sound Menu ...26 Setup Menu ...27 List & Labels Menu ...29 Parental Control Menu ...29... Chapter 5 I Using TV Features Channel Banner ...20 Parental Controls and V-Chip ...20 V-Chip - Chapter 2 I Using the Remote Control Remote Control Buttons ...19 Chapter 3 I ...
User Guide & Warranty
Page 6
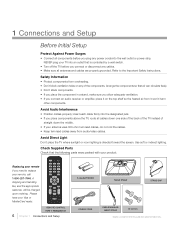
... ordering. 1 Connections and Setup Before Initial Setup Protect Against Power Surges • Connect all cables down one side of the back of the TV instead of the components. Use soft or indirect lighting. Refer to replace your remote, call 1-800-257-7946. Arrange the components so that... Protect components from overheating. • Don't block ventilation holes on the top shelf so the heated air from audio/video cables. Replacing your TV into the wall outlet or power strip. NEVER plug your remote If you connect an audio receiver or amplifier, place it won't harm other ...
... ordering. 1 Connections and Setup Before Initial Setup Protect Against Power Surges • Connect all cables down one side of the back of the TV instead of the components. Use soft or indirect lighting. Refer to replace your remote, call 1-800-257-7946. Arrange the components so that... Protect components from overheating. • Don't block ventilation holes on the top shelf so the heated air from audio/video cables. Replacing your TV into the wall outlet or power strip. NEVER plug your remote If you connect an audio receiver or amplifier, place it won't harm other ...
User Guide & Warranty
Page 7
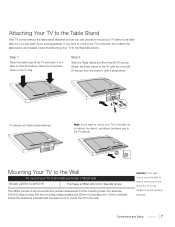
.... Caution: Your wall mount must be able to bear a minimum of the mounting holes. Note: If you want to mount your TV to the wall, purchase a VESA wall Models L32HD41/L32HD31R Purchase a VESA 200 x100, Size M4 screw The VESA number is the horizontal and vertical measurement of five times the... TV's net weight to fact that you want to mount your TV either to its table stand or to a wall (wall mount sold separately...
.... Caution: Your wall mount must be able to bear a minimum of the mounting holes. Note: If you want to mount your TV to the wall, purchase a VESA wall Models L32HD41/L32HD31R Purchase a VESA 200 x100, Size M4 screw The VESA number is the horizontal and vertical measurement of five times the... TV's net weight to fact that you want to mount your TV either to its table stand or to a wall (wall mount sold separately...
User Guide & Warranty
Page 8
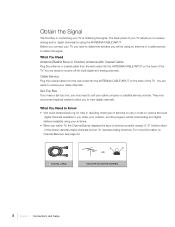
... off-air local digital and analog channels. What You Need to Know • Visit www.antennaweb.org for help in deciding what type of the TV. A "D" at the bottom of channel currently viewed. COAXIAL CABLE OR OUTDOOR OR INDOOR ANTENNA 8 Chapter 1 Connections and Setup Obtain the Signal The first ...step in order to receive the local digital channels available to you. Set-Top Box If you watch TV, the Channel Banner displays the type of the screen denotes digital channels and an "A" denotes analog channels. Enter your cable company or satellite ...
... off-air local digital and analog channels. What You Need to Know • Visit www.antennaweb.org for help in deciding what type of the TV. A "D" at the bottom of channel currently viewed. COAXIAL CABLE OR OUTDOOR OR INDOOR ANTENNA 8 Chapter 1 Connections and Setup Obtain the Signal The first ...step in order to receive the local digital channels available to you. Set-Top Box If you watch TV, the Channel Banner displays the type of the screen denotes digital channels and an "A" denotes analog channels. Enter your cable company or satellite ...

User Guide & Warranty
Page 9
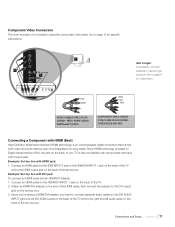
...Audio R and L Y Pb Pr Component Video Audio page 10 pages 10-11 Customer Support For additional assistance in using your RCA product, please visit the support page at www.rca.com/tv. 1 INPUT HDMITM OR pages 11-12 Audio R and L HDMI/DVI PC INPUT HDMITM + HDMI/DVI Adapter + Audio...components, such as DVD players and setup boxes, to determine which connections are best for you. Jacks Used Cable Needed Go to connect your TV. Choose Your Connections There are trademarks or registered trademarks of HDMI Licensing LLC. Input Signal Compatability Ant/Cable 480i, 480p, 720p, 1080i (...
...Audio R and L Y Pb Pr Component Video Audio page 10 pages 10-11 Customer Support For additional assistance in using your RCA product, please visit the support page at www.rca.com/tv. 1 INPUT HDMITM OR pages 11-12 Audio R and L HDMI/DVI PC INPUT HDMITM + HDMI/DVI Adapter + Audio...components, such as DVD players and setup boxes, to determine which connections are best for you. Jacks Used Cable Needed Go to connect your TV. Choose Your Connections There are trademarks or registered trademarks of HDMI Licensing LLC. Input Signal Compatability Ant/Cable 480i, 480p, 720p, 1080i (...
User Guide & Warranty
Page 10
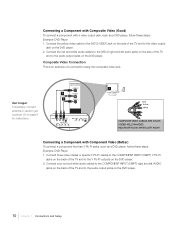
...'t forget: If necessary, connect antenna or cable to the Y Pb Pr outputs on the back of the TV and to get a picture. Connect your red and white audio cables to the COMPONENT INPUT (CMPT) right ...and left audio jacks on the side of the TV and to the audio output jacks on the DVD player. 10 Chapter 1 Connections and Setup Connect the... red and white audio cables to the (VID 2) right and left AUDIO jacks on the back of the TV and to the audio output jacks on the DVD player. WHITE=LEFT AUDIO Connecting a Component with a video ...
...'t forget: If necessary, connect antenna or cable to the Y Pb Pr outputs on the back of the TV and to get a picture. Connect your red and white audio cables to the COMPONENT INPUT (CMPT) right ...and left audio jacks on the side of the TV and to the audio output jacks on the DVD player. 10 Chapter 1 Connections and Setup Connect the... red and white audio cables to the (VID 2) right and left AUDIO jacks on the back of the TV and to the audio output jacks on the DVD player. WHITE=LEFT AUDIO Connecting a Component with a video ...
User Guide & Warranty
Page 11
... separate audio cables to the DVI AUDIO INPUT right and left DVI AUDIO jacks on the back of the TV and to the right and left audio jacks on the back of the TV. 2. Example: Set-top box with DVI jack: To connect an HDMI cable and an HDMI/DVI adapter: 1. Since... an HDMI cable to the HDMI INPUT 2 jack or the HDMI/DVI INPUT 1 jack on the back of the TV and to the HDMI output jack on the back of your TV is based on Digital Visual Interface (DVI), the jack on the back of the set-top box. then connect the...
... separate audio cables to the DVI AUDIO INPUT right and left DVI AUDIO jacks on the back of the TV and to the right and left audio jacks on the back of the TV. 2. Example: Set-top box with DVI jack: To connect an HDMI cable and an HDMI/DVI adapter: 1. Since... an HDMI cable to the HDMI INPUT 2 jack or the HDMI/DVI INPUT 1 jack on the back of the TV and to the HDMI output jack on the back of your TV is based on Digital Visual Interface (DVI), the jack on the back of the set-top box. then connect the...
User Guide & Warranty
Page 12
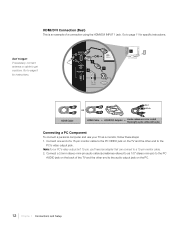
HDMI/DVI Connection (Best) This is an example of a 15-pin monitor cable to the PC VIDEO jack on the TV and the other end to as a monitor, follow these steps: 1. HDMI/DVI INPUT 1 AUDIO PC INPUT VIDEO HDMI Cable Red White OR HDMI Cable + HDMI/.... Connect a 3.5mm stereo mini-pin audio cable (sometimes referred to the audio output jack on the back of the TV and the other end to the PC's video output jack. Note: If your TV as 1/8" stereo mini-pin) to the PC AUDIO jack on the PC. 12 Chapter 1 Connections and Setup Go...
HDMI/DVI Connection (Best) This is an example of a 15-pin monitor cable to the PC VIDEO jack on the TV and the other end to as a monitor, follow these steps: 1. HDMI/DVI INPUT 1 AUDIO PC INPUT VIDEO HDMI Cable Red White OR HDMI Cable + HDMI/.... Connect a 3.5mm stereo mini-pin audio cable (sometimes referred to the audio output jack on the back of the TV and the other end to the PC's video output jack. Note: If your TV as 1/8" stereo mini-pin) to the PC AUDIO jack on the PC. 12 Chapter 1 Connections and Setup Go...

User Guide & Warranty
Page 13
...OK to the HDMI/DVI INPUT 1 jack). Note: When you have connected all additional components to your component is an example of the TV screen. Turn on the TV and the component you want to display the signal source. Press the INPUT button on the remote control to confirm. Turn on the... arrow to view. Note: When you have connected all additional components to your selection. To go to page 15 for instructions. To return to viewing TV channels, use the number buttons to enter the channel you see page 14 for details) and the component, such as a DVD player or a VCR. 2. HDMI...
...OK to the HDMI/DVI INPUT 1 jack). Note: When you have connected all additional components to your component is an example of the TV screen. Turn on the TV and the component you want to display the signal source. Press the INPUT button on the remote control to confirm. Turn on the... arrow to view. Note: When you have connected all additional components to your selection. To go to page 15 for instructions. To return to viewing TV channels, use the number buttons to enter the channel you see page 14 for details) and the component, such as a DVD player or a VCR. 2. HDMI...

User Guide & Warranty
Page 14
... into the back of the power cord into an outlet, inserting the plug completely. The process works the same on all menu screens: highlight your TV. Plug in the Remote • Remove the battery compartment cover from other selections for a menu choice or to complete the setup of the remote control... up or down arrow to the previous menu, press the GO BACK key or left arrow. 14 Chapter 1 Connections and Setup Turn on the TV Turn on your TV by pressing the Power button ( ) on the side of the items listed on -screen menus. Note: Highlighted items stand out from the back...
... into the back of the power cord into an outlet, inserting the plug completely. The process works the same on all menu screens: highlight your TV. Plug in the Remote • Remove the battery compartment cover from other selections for a menu choice or to complete the setup of the remote control... up or down arrow to the previous menu, press the GO BACK key or left arrow. 14 Chapter 1 Connections and Setup Turn on the TV Turn on your TV by pressing the Power button ( ) on the side of the items listed on -screen menus. Note: Highlighted items stand out from the back...
User Guide & Warranty
Page 15
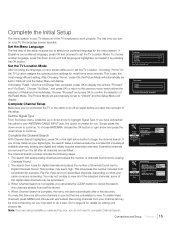
...and Labels. Searching for example, Pay Per View) and non-scrambled channels, depending on what your cable company is your TV, the language screen appears. Progress Analog Channels Found Digital Channels Found Antenna 0 0 Channel Search in progress. Complete the ...Initial Setup The menu system in your TV allows all of the TV's features to begin the channel search. To choose another language, press the down arrow to confirm the selection...
...and Labels. Searching for example, Pay Per View) and non-scrambled channels, depending on what your cable company is your TV, the language screen appears. Progress Analog Channels Found Digital Channels Found Antenna 0 0 Channel Search in progress. Complete the ...Initial Setup The menu system in your TV allows all of the TV's features to begin the channel search. To choose another language, press the down arrow to confirm the selection...
User Guide & Warranty
Page 16
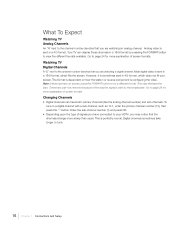
... that the channels change more slowly than usual. However, it is sent in a 4/3 format. To tune to tune. 16 Chapter 1 Connections and Setup button. Your TV can 't be removed because of signals you have both primary channels (like the analog channel number) and sub-channels. Watching... TV Digital Channels A "D" next to page 24 for more explanation of screen formats. Note: If there are bars on how the station or source component is ...
... that the channels change more slowly than usual. However, it is sent in a 4/3 format. To tune to tune. 16 Chapter 1 Connections and Setup button. Your TV can 't be removed because of signals you have both primary channels (like the analog channel number) and sub-channels. Watching... TV Digital Channels A "D" next to page 24 for more explanation of screen formats. Note: If there are bars on how the station or source component is ...
User Guide & Warranty
Page 17
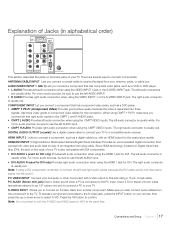
...Pr, make sure you connect left audio connection when using the CMPT VIDEO inputs. DIGITAL AUDIO OUTPUT (coaxial) Use a digital coaxial cable to connect your TV to the CMPT L and R AUDIO jacks. • CMPT L AUDIO Provides left and right audio cables to a compatible audio receiver. Since HDMI ...AUDIO AUDIO OUT S-VIDEO COMPONENT AUDIO/VIDEO INPUT (CMPT) INPUT (VID1) PC INPUT ANTENNA/CABLE This section describes the jacks on the back of your TV is also compatible with DVI components. • DVI AUDIO L (used for DVI only) Provides right audio connection when using the HDMI 1 jack for...
...Pr, make sure you connect left audio connection when using the CMPT VIDEO inputs. DIGITAL AUDIO OUTPUT (coaxial) Use a digital coaxial cable to connect your TV to the CMPT L and R AUDIO jacks. • CMPT L AUDIO Provides left and right audio cables to a compatible audio receiver. Since HDMI ...AUDIO AUDIO OUT S-VIDEO COMPONENT AUDIO/VIDEO INPUT (CMPT) INPUT (VID1) PC INPUT ANTENNA/CABLE This section describes the jacks on the back of your TV is also compatible with DVI components. • DVI AUDIO L (used for DVI only) Provides right audio connection when using the HDMI 1 jack for...
User Guide & Warranty
Page 18
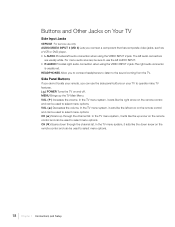
... used to use the left audio connectors are usually white. VOL ( ) Increases the volume. VOL ( ) Decreases the volume. CH ( ) Scans up the TV Main Menu. The left AUDIO INPUT. • R AUDIO Provides right audio connection when using the VIDEO INPUT 2 jack. MENU Brings up through the channel list... Panel Buttons If you cannot locate your remote, you to connect headphones to listen to operate many TV features. ( ) POWER Turns the TV on your TV to the sound coming from the TV. In the TV menu system, it acts like the right arrow on the remote control and can use only. In...
... used to use the left audio connectors are usually white. VOL ( ) Increases the volume. VOL ( ) Decreases the volume. CH ( ) Scans up the TV Main Menu. The left AUDIO INPUT. • R AUDIO Provides right audio connection when using the VIDEO INPUT 2 jack. MENU Brings up through the channel list... Panel Buttons If you cannot locate your remote, you to connect headphones to listen to operate many TV features. ( ) POWER Turns the TV on your TV to the sound coming from the TV. In the TV menu system, it acts like the right arrow on the remote control and can use only. In...
User Guide & Warranty
Page 19
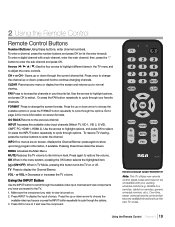
... Banner; GO BACK Returns to display the Channel Banner. Or press the INPUT button repeatedly to view is turned on screen formats. TV Press to the previous channel. Make sure the component you wish to cycle through the options. 3. RC246 Remote control part number RC2463001...off. 2 Using the Remote Control Remote Control Buttons Number Buttons Using these buttons, enter channel numbers. INPUT Accesses the available video input channels (Watch TV, VID 1, VID 2, S-VID, CMPT, PC, HDMI 1, HDMI 2). Use the arrows to highlight options, and press OK to continue changing channels....
... Banner; GO BACK Returns to display the Channel Banner. Or press the INPUT button repeatedly to view is turned on screen formats. TV Press to the previous channel. Make sure the component you wish to cycle through the options. 3. RC246 Remote control part number RC2463001...off. 2 Using the Remote Control Remote Control Buttons Number Buttons Using these buttons, enter channel numbers. INPUT Accesses the available video input channels (Watch TV, VID 1, VID 2, S-VID, CMPT, PC, HDMI 1, HDMI 2). Use the arrows to highlight options, and press OK to continue changing channels....
User Guide & Warranty
Page 20
...must be blocked by entering a password. Parental Controls and V-Chip The choices in the US V-Chip and Canada V-Chip menus involve software inside your TV is broadcasting SAP (Second Audio Program) information. Movies can only be set in stereo or mono. By default, the software inside your password and... deactivate the parental controls. See page 34 for HDMI 1, HDMI 2, CMPT, or PC INPUTS. If it is turned off or unlocked. Current time. TV programs can also be blocked by content, such as adult language (L) (See page 22). Broadcasters are not required to lock V-Chip, see page 21....
...must be blocked by entering a password. Parental Controls and V-Chip The choices in the US V-Chip and Canada V-Chip menus involve software inside your TV is broadcasting SAP (Second Audio Program) information. Movies can only be set in stereo or mono. By default, the software inside your password and... deactivate the parental controls. See page 34 for HDMI 1, HDMI 2, CMPT, or PC INPUTS. If it is turned off or unlocked. Current time. TV programs can also be blocked by content, such as adult language (L) (See page 22). Broadcasters are not required to lock V-Chip, see page 21....


