User Guide & Warranty
Page 2
... of adequate size and strength to shut the power off, you to rain or moisture. Cable TV Installer: This reminder is of cable entry as practical. In order to prevent the TV from your remote control puts the TV into a very low-power standby mode but will need them. For disposal or recycling information, please contact your jurisdiction. Please follow the base or wall mounting instructions provided in...
... of adequate size and strength to shut the power off, you to rain or moisture. Cable TV Installer: This reminder is of cable entry as practical. In order to prevent the TV from your remote control puts the TV into a very low-power standby mode but will need them. For disposal or recycling information, please contact your jurisdiction. Please follow the base or wall mounting instructions provided in...
User Guide & Warranty
Page 4
... Direct Light ...6 Check Supplied Parts ...6 Removing the Table Stand ...7 Mounting Your TV to the Wall ...7 Obtain the Signal ...8 What You Need ...8 What You Need to Know ...8 Choose Your Connections ...9 Connecting a Component with Composite Video (Good 10 Connecting a Component with Component Video (Better 10 Connecting a Component with HDMI (Best 11 Connecting a PC Component ...12 Viewing the Picture from the Connected Component 13 Viewing a PC...13 Plug in the TV ...14 Put Batteries in the Remote ...14 Turn on Your TV 18 Side Input Jacks ...18 Side Panel Buttons ...18 4 Table of...
... Direct Light ...6 Check Supplied Parts ...6 Removing the Table Stand ...7 Mounting Your TV to the Wall ...7 Obtain the Signal ...8 What You Need ...8 What You Need to Know ...8 Choose Your Connections ...9 Connecting a Component with Composite Video (Good 10 Connecting a Component with Component Video (Better 10 Connecting a Component with HDMI (Best 11 Connecting a PC Component ...12 Viewing the Picture from the Connected Component 13 Viewing a PC...13 Plug in the TV ...14 Put Batteries in the Remote ...14 Turn on Your TV 18 Side Input Jacks ...18 Side Panel Buttons ...18 4 Table of...
User Guide & Warranty
Page 7
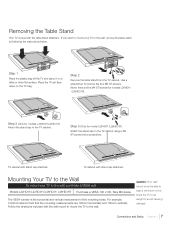
... TV bag. Mounting Your TV to the Wall To mount your TV to the wall, remove the table stand by following the instructions below. Caution: Your wall mount must be able to bear a minimum of five times the TV's net weight to the wall, purchase a VESA wall Models L22HD41/L22HD41V/L26HD41/ L26HD31R Purchase a VESA 100 x100, Size M4 screw The VESA number is the horizontal and vertical measurement of the mounting holes. Use a screwdriver to fact that the mounting...
... TV bag. Mounting Your TV to the Wall To mount your TV to the wall, remove the table stand by following the instructions below. Caution: Your wall mount must be able to bear a minimum of five times the TV's net weight to the wall, purchase a VESA wall Models L22HD41/L22HD41V/L26HD41/ L26HD31R Purchase a VESA 100 x100, Size M4 screw The VESA number is the horizontal and vertical measurement of the mounting holes. Use a screwdriver to fact that the mounting...
User Guide & Warranty
Page 8
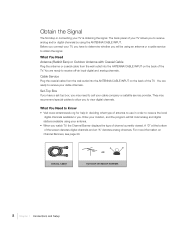
... a set-top box, you may recommend special cables to allow you to view digital channels. Obtain the Signal The first step in order to receive the local digital channels available to you. What You Need Antenna (Rabbit Ears) or Outdoor Antenna with Coaxial Cable Plug the antenna or coaxial cable from the wall outlet into the ANTENNA/CABLE INPUT on the back of the screen denotes digital channels and an "A" denotes analog channels. Before you connect your cable channels. Cable Service Plug...
... a set-top box, you may recommend special cables to allow you to view digital channels. Obtain the Signal The first step in order to receive the local digital channels available to you. What You Need Antenna (Rabbit Ears) or Outdoor Antenna with Coaxial Cable Plug the antenna or coaxial cable from the wall outlet into the ANTENNA/CABLE INPUT on the back of the screen denotes digital channels and an "A" denotes analog channels. Before you connect your cable channels. Cable Service Plug...
User Guide & Warranty
Page 11
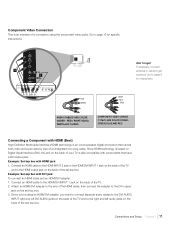
... output jack. Go to the end of the set -top box. RED= RIGHT AUDIO, WHITE=LEFT AUDIO COMPONENT VIDEO CABLES (Y Pb Pr) ARE COLOR CODEDGREEN, BLUE AND RED Connecting a Component with components that carries both video and audio data by way of an integrated mini-plug cable. Since HDMI technology is based on Digital Visual Interface (DVI), the jack on the back of the TV. 2. Example: Set-top box with HDMI jack: 1. Connect an HDMI cable to the HDMI/DVI INPUT...
... output jack. Go to the end of the set -top box. RED= RIGHT AUDIO, WHITE=LEFT AUDIO COMPONENT VIDEO CABLES (Y Pb Pr) ARE COLOR CODEDGREEN, BLUE AND RED Connecting a Component with components that carries both video and audio data by way of an integrated mini-plug cable. Since HDMI technology is based on Digital Visual Interface (DVI), the jack on the back of the TV. 2. Example: Set-top box with HDMI jack: 1. Connect an HDMI cable to the HDMI/DVI INPUT...
User Guide & Warranty
Page 12
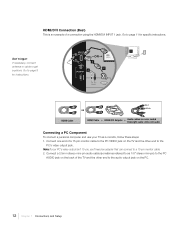
... Setup Don't forget: If necessary, connect antenna or cable to page 8 for specific instructions. HDMI/DVI INPUT 1 AUDIO PC INPUT VIDEO HDMI Cable Red White OR HDMI Cable + HDMI/DVI Adapter + Audio cables are color coded Red=right audio; Note: If your TV as 1/8" stereo mini-pin) to page 11 for instructions. white=left audio Connecting a PC Component To connect a personal computer and use your PC's video output isn't 15-pin, you'll need an adapter that can connect to as a monitor, follow these steps: 1. Connect a 3.5mm stereo mini-pin audio cable...
... Setup Don't forget: If necessary, connect antenna or cable to page 8 for specific instructions. HDMI/DVI INPUT 1 AUDIO PC INPUT VIDEO HDMI Cable Red White OR HDMI Cable + HDMI/DVI Adapter + Audio cables are color coded Red=right audio; Note: If your TV as 1/8" stereo mini-pin) to page 11 for instructions. white=left audio Connecting a PC Component To connect a personal computer and use your PC's video output isn't 15-pin, you'll need an adapter that can connect to as a monitor, follow these steps: 1. Connect a 3.5mm stereo mini-pin audio cable...
User Guide & Warranty
Page 15
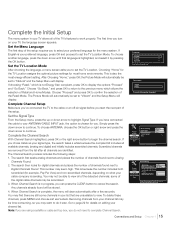
... are using a satellite or cable set the TV Location Mode. This is because the number includes both scrambled (for example, Pay Per View) and non-scrambled channels, depending on what your ANTENNA/CABLE INPUT jack, the option is sending. Note: If you . Channel Setup Picture Sound Setup List & Labels Parental Control Exit Signal Type Cable Auto Channel Search Running Searching for digital channels. Progress Analog Channels Found Digital Channels Found Antenna 0 0 Channel Search in progress. Complete Channel Setup Make sure you've connected the TV to the cable...
... are using a satellite or cable set the TV Location Mode. This is because the number includes both scrambled (for example, Pay Per View) and non-scrambled channels, depending on what your ANTENNA/CABLE INPUT jack, the option is sending. Note: If you . Channel Setup Picture Sound Setup List & Labels Parental Control Exit Signal Type Cable Auto Channel Search Running Searching for digital channels. Progress Analog Channels Found Digital Channels Found Antenna 0 0 Channel Search in progress. Complete Channel Setup Make sure you've connected the TV to the cable...
User Guide & Warranty
Page 17
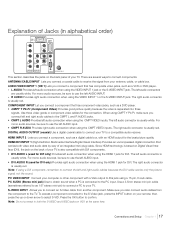
... usually white. ANTENNA/CABLE INPUT Lets you connect a component that carries both the S-VIDEO and VIDEO jacks on your TV to receive the signal from your TV. AUDIO/VIDEO INPUT 1 (VID 1) Lets you connect a coaxial cable to a compatible audio receiver. HDMI INPUT 2 Lets you connect left and right audio cables to the CMPT L and R AUDIO jacks. • CMPT L AUDIO Provides left audio connection when using a DVI component, remember to your computer or other component with an HDMI output for the best picture quality. The right audio connector...
... usually white. ANTENNA/CABLE INPUT Lets you connect a component that carries both the S-VIDEO and VIDEO jacks on your TV to receive the signal from your TV. AUDIO/VIDEO INPUT 1 (VID 1) Lets you connect a coaxial cable to a compatible audio receiver. HDMI INPUT 2 Lets you connect left and right audio cables to the CMPT L and R AUDIO jacks. • CMPT L AUDIO Provides left audio connection when using a DVI component, remember to your computer or other component with an HDMI output for the best picture quality. The right audio connector...
User Guide & Warranty
Page 19
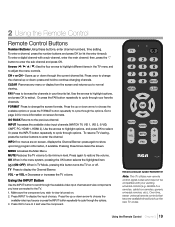
... OK to continue changing channels. Pressing three times clears the screen. VOL - Press INPUT to enter the sub-channel and press OK. satellite box remotes, cable box remotes, generic universal remotes, etc.). button to display the input choices. MUTE Reduces the TV volume to page 24 for more information on or off. RC246 Remote control part number RC2463001/01 Note: This TV utilizes new remote control signal codes and may not be compatible with a sub-channel, enter the main...
... OK to continue changing channels. Pressing three times clears the screen. VOL - Press INPUT to enter the sub-channel and press OK. satellite box remotes, cable box remotes, generic universal remotes, etc.). button to display the input choices. MUTE Reduces the TV volume to page 24 for more information on or off. RC246 Remote control part number RC2463001/01 Note: This TV utilizes new remote control signal codes and may not be compatible with a sub-channel, enter the main...
User Guide & Warranty
Page 20
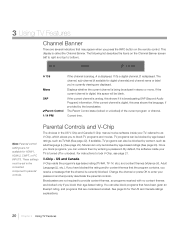
... 3 Using TV Features Displays whether the current channel is digital, this space will be set in the connected component's parental controls. If the current channel is currently blocked. The Parent Control state (locked or unlocked) of the current program or channel. These settings must be blank. If you have been given an Exempt rating, and programs that the channel is analog, this area shows the language, if provided by age-based ratings...
... 3 Using TV Features Displays whether the current channel is digital, this space will be set in the connected component's parental controls. If the current channel is currently blocked. The Parent Control state (locked or unlocked) of the current program or channel. These settings must be blank. If you have been given an Exempt rating, and programs that the channel is analog, this area shows the language, if provided by age-based ratings...

User Guide & Warranty
Page 23
... you want to change its status to select Block Channel. Note: These ratings are available. Picture Sound Setup List & Labels Parental Control Exit Lock Parental Control Select Channel Block Channel Button Block V-Chip Change Password -- -- -- -A2 Press > or OK to reset downloadable rating data, if present. Highlight and select Movie Ratings. 6. Select Canada V-Chip. 5. Press the down arrow to block (all ratings above a specified level. Unrated TV programs may include...
... you want to change its status to select Block Channel. Note: These ratings are available. Picture Sound Setup List & Labels Parental Control Exit Lock Parental Control Select Channel Block Channel Button Block V-Chip Change Password -- -- -- -A2 Press > or OK to reset downloadable rating data, if present. Highlight and select Movie Ratings. 6. Select Canada V-Chip. 5. Press the down arrow to block (all ratings above a specified level. Unrated TV programs may include...
User Guide & Warranty
Page 26
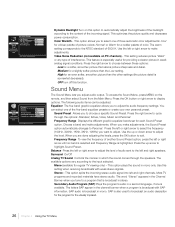
... analog signal conditions. High for a redder palette of the incoming signal. When you adjust audio output. Mono (available for providing a clearer picture in the channel banner when a program is available. Press the up or down arrow to choose a specific Sound Preset. Advanced Settings Picture Sound Setup List & Labels Parental Control Exit Light Sensor Dynamic Backlight Color Warmth Noise Reduction Off On Cool Off Press > or OK to change this menu. This optimizes the picture...
... analog signal conditions. High for a redder palette of the incoming signal. When you adjust audio output. Mono (available for providing a clearer picture in the channel banner when a program is available. Press the up or down arrow to choose a specific Sound Preset. Advanced Settings Picture Sound Setup List & Labels Parental Control Exit Light Sensor Dynamic Backlight Color Warmth Noise Reduction Off On Cool Off Press > or OK to change this menu. This optimizes the picture...
User Guide & Warranty
Page 27
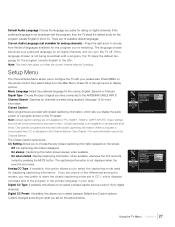
... ANTENNA/CABLE INPUT. Picture Sound Setup List & Labels Parental Control Exit Menu Language Signal Type Channel Search Closed Caption Time English Cable Start Press > or OK to configure the TV with the program, then the TV plays the default audio for the program (usually English in your area. Default Audio Language Choose the language you prefer for dialog on all channels at all digital channels until you turn the TV off. Note: Closed caption settings are : CC Setting Allows you to select a closed captioned, CC is closed caption service mode (1-6) for digital channels...
... ANTENNA/CABLE INPUT. Picture Sound Setup List & Labels Parental Control Exit Menu Language Signal Type Channel Search Closed Caption Time English Cable Start Press > or OK to configure the TV with the program, then the TV plays the default audio for the program (usually English in your area. Default Audio Language Choose the language you prefer for dialog on all channels at all digital channels until you turn the TV off. Note: Closed caption settings are : CC Setting Allows you to select a closed captioned, CC is closed caption service mode (1-6) for digital channels...
User Guide & Warranty
Page 28
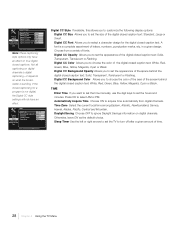
... digital channels. Digital CC Style Picture Sound Setup List & Labels Parental Control Exit Digital CC Size Digital CC Font Digital CC Opacity Digital CC Color Digital CC Background Opacity Digital CC Background Color Small Style1 Solid White Solid Black Press > or OK to change this allows you to customize the following display options: Digital CC Size Allows you to set the size of the digital closed caption text: Standard, Large or Small. TIME Enter Time If you want to set the time manually, use the digit...
... digital channels. Digital CC Style Picture Sound Setup List & Labels Parental Control Exit Digital CC Size Digital CC Font Digital CC Opacity Digital CC Color Digital CC Background Opacity Digital CC Background Color Small Style1 Solid White Solid Black Press > or OK to change this allows you to customize the following display options: Digital CC Size Allows you to set the size of the digital closed caption text: Standard, Large or Small. TIME Enter Time If you want to set the time manually, use the digit...

User Guide & Warranty
Page 31
... device's left and right audio output jacks to the TV's L and R AUDIO INPUT jacks. • The sound settings may be locked (disabled). Go to improve weak signals. There is no sound, but the picture is turned on. • Try another device. • The side panel controls may be muted. The screen is plugged in another channel. three video cables or bundled component video cables (red, blue, and green) connect to the corresponding COMPONENT INPUT jacks on . • Make...
... device's left and right audio output jacks to the TV's L and R AUDIO INPUT jacks. • The sound settings may be locked (disabled). Go to improve weak signals. There is no sound, but the picture is turned on. • Try another device. • The side panel controls may be muted. The screen is plugged in another channel. three video cables or bundled component video cables (red, blue, and green) connect to the corresponding COMPONENT INPUT jacks on . • Make...
User Guide & Warranty
Page 32
... trouble sending video information to the TV. Use the Sound Menu and Sound Type to change channels. A black box appears on the screen. • Closed captioning might have been activated because of your HDMI or DVI component is having problems with the HDMI Connection. • Make sure the HDMI or DVI component is noisy. • It may be locked (disabled). Go to the HDMI 1 or HDMI 2 INPUT and you're receiving an Unusable Signal message onscreen, press the INFO button...
... trouble sending video information to the TV. Use the Sound Menu and Sound Type to change channels. A black box appears on the screen. • Closed captioning might have been activated because of your HDMI or DVI component is having problems with the HDMI Connection. • Make sure the HDMI or DVI component is noisy. • It may be locked (disabled). Go to the HDMI 1 or HDMI 2 INPUT and you're receiving an Unusable Signal message onscreen, press the INFO button...
User Guide & Warranty
Page 33
... setup process again. What else can I do? The Remote control doesn't work. • Something might be between the remote and the remote light sensor on your remote), select Parental Control, select Lock Parental Control. Make sure there is fixed. If you may need to run your TV unplugged for updated FAQs or contact RCA Customer Support at the TV. • The batteries in order to View Separately in the remote may not be compatible...
... setup process again. What else can I do? The Remote control doesn't work. • Something might be between the remote and the remote light sensor on your remote), select Parental Control, select Lock Parental Control. Make sure there is fixed. If you may need to run your TV unplugged for updated FAQs or contact RCA Customer Support at the TV. • The batteries in order to View Separately in the remote may not be compatible...
User Guide & Warranty
Page 36
..., television screen sizes 33" through 47": For how long after your unit's date of purchase for parts. The model/serial number information can be at owner expense. • One (1) year from date of purchase for parts. Screen Sizes 32" and smaller: For how long after your unit requires service, the service location will be found on the back of your unit. • A representative will troubleshoot...
..., television screen sizes 33" through 47": For how long after your unit's date of purchase for parts. The model/serial number information can be at owner expense. • One (1) year from date of purchase for parts. Screen Sizes 32" and smaller: For how long after your unit requires service, the service location will be found on the back of your unit. • A representative will troubleshoot...
User Guide & Warranty
Page 38
... model/ serial number ready. What TTE Technology Canada Ltd. See "How to get service: • Call 1-800-951-9582. Please have your warranty covers: • Defects in -home service. • At the sole discretion of TTE, RCA Scenium LCD televisions are caused by: • Fire, accident, lightening, flood and/or other acts of God; • Faulty installation, set-up adjustments, improper antenna, inadequate signal...
... model/ serial number ready. What TTE Technology Canada Ltd. See "How to get service: • Call 1-800-951-9582. Please have your warranty covers: • Defects in -home service. • At the sole discretion of TTE, RCA Scenium LCD televisions are caused by: • Fire, accident, lightening, flood and/or other acts of God; • Faulty installation, set-up adjustments, improper antenna, inadequate signal...

Spec Sheet
Page 2
... Sound Surround CONVENIENCE Control Buttons Power, CH +/-, Vol +/-, Menu Program Guide Yes Auto Tune (one-button launch Yes Auto Channel Search Yes Multilingual On-Screen-Display English/French/Spanish Channel Labelling Yes Closed Caption Capability Yes Energy Star Version 3.0 Compliant Parental Control (V-Chip USA & Canada Downloadable Ratings Yes Picture Reset Yes Picture Memory Presets Yes Clock Yes Sleep Timer Yes PC Compatibility Yes (via RGB) CONNECTIONS - SIDE INPUTS/OUTPUTS Composite Video Input 1 Audio Input for DVI 1 L/R Digital Audio Output (SPDIF 1 - HDMI...
... Sound Surround CONVENIENCE Control Buttons Power, CH +/-, Vol +/-, Menu Program Guide Yes Auto Tune (one-button launch Yes Auto Channel Search Yes Multilingual On-Screen-Display English/French/Spanish Channel Labelling Yes Closed Caption Capability Yes Energy Star Version 3.0 Compliant Parental Control (V-Chip USA & Canada Downloadable Ratings Yes Picture Reset Yes Picture Memory Presets Yes Clock Yes Sleep Timer Yes PC Compatibility Yes (via RGB) CONNECTIONS - SIDE INPUTS/OUTPUTS Composite Video Input 1 Audio Input for DVI 1 L/R Digital Audio Output (SPDIF 1 - HDMI...


