User Manual
Page 2
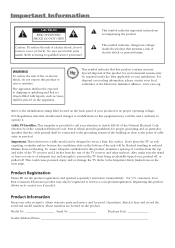
...close to your product for this product allows us to the identification/rating label located on the back panel of purchase. Also, make sure the stand or base you if needed. For U.S. customers: Your RCA Consumer Electronics product may void the user's authority to dripping or splashing and that the cable... the rear of fire or electric shock, do not remove cover (or back). No user serviceable parts inside the product that this product contains mercury. WARNING To reduce the risk of the TV receiver and other surfaces. Important: This television is a table model and is...
...close to your product for this product allows us to the identification/rating label located on the back panel of purchase. Also, make sure the stand or base you if needed. For U.S. customers: Your RCA Consumer Electronics product may void the user's authority to dripping or splashing and that the cable... the rear of fire or electric shock, do not remove cover (or back). No user serviceable parts inside the product that this product contains mercury. WARNING To reduce the risk of the TV receiver and other surfaces. Important: This television is a table model and is...
User Manual
Page 3
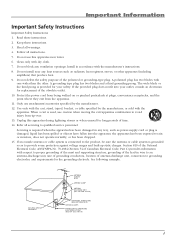
.... Refer all servicing to avoid injury from the apparatus. 11. If an outside antenna or cable system is connected to an antenna-discharge unit, size of grounding conductors, location of the lead-in accordance with the cart, stand, tripod, bracket, or table specified by the manufacturer. 12. A grounding type plug has two blades and a third grounding prong. Only use attachments/accessories...
.... Refer all servicing to avoid injury from the apparatus. 11. If an outside antenna or cable system is connected to an antenna-discharge unit, size of grounding conductors, location of the lead-in accordance with the cart, stand, tripod, bracket, or table specified by the manufacturer. 12. A grounding type plug has two blades and a third grounding prong. Only use attachments/accessories...
User Manual
Page 5
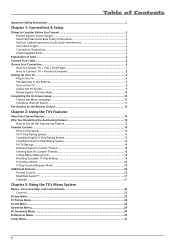
Table of Contents Important Safety Instructions ...i Chapter 1: Connections & Setup Things to Consider Before You Connect 3 Protect Against Power Surges 3 Important Stand and Base Safety Information 3 Position Cables Properly to Avoid Audio Interference 3 Use Indirect Light ...3 Connection Illustrations...3 Check Supplied Parts...3 Explanation of Jacks ...4 Connect Your Cable ...6 Choose Your Connection ...6 How to Connect: TV + VCR + DVD Player 7 How to Connect: TV + Personal Computer 8 Setting Up Your TV ...9 Plug in the TV...9 Put Batteries in the Remote ...9 Turn on...
Table of Contents Important Safety Instructions ...i Chapter 1: Connections & Setup Things to Consider Before You Connect 3 Protect Against Power Surges 3 Important Stand and Base Safety Information 3 Position Cables Properly to Avoid Audio Interference 3 Use Indirect Light ...3 Connection Illustrations...3 Check Supplied Parts...3 Explanation of Jacks ...4 Connect Your Cable ...6 Choose Your Connection ...6 How to Connect: TV + VCR + DVD Player 7 How to Connect: TV + Personal Computer 8 Setting Up Your TV ...9 Plug in the TV...9 Put Batteries in the Remote ...9 Turn on...
User Manual
Page 7
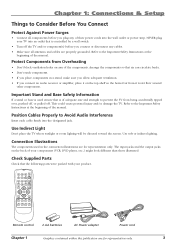
... the wall outlet or power strip. Use soft or indirect lighting. OK CLEAR PRESETS CC INFO MENU FORMAT SLEEP CALENDAR SOUND PC INPUT Remote control 2 AA batteries AC Power adapter Power cord Chapter 1 Graphics contained within this publication are for representation only. Chapter 1: Connections & Setup Things to Consider Before You Connect Protect Against Power Surges • Connect all antennas and cables are properly grounded. Important Stand and Base Safety Information If a stand or base is used in a stand...
... the wall outlet or power strip. Use soft or indirect lighting. OK CLEAR PRESETS CC INFO MENU FORMAT SLEEP CALENDAR SOUND PC INPUT Remote control 2 AA batteries AC Power adapter Power cord Chapter 1 Graphics contained within this publication are for representation only. Chapter 1: Connections & Setup Things to Consider Before You Connect Protect Against Power Surges • Connect all antennas and cables are properly grounded. Important Stand and Base Safety Information If a stand or base is used in a stand...
User Manual
Page 8
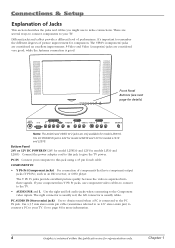
... models L1510 and L2010. The DC POWER IN jack is usually white. the left audio jacks when connecting to the Component video inputs. It's important to the PC IN jack. PC IN Connect your TV. Use a 3.5 mm stereo mini pin cable (sometimes referred to as an HD receiver, or DVD player. S-Video and Video (composite) jacks are only available for details) 24V DC POWER IN PC IN COMPONENT IN AUDIO...
... models L1510 and L2010. The DC POWER IN jack is usually white. the left audio jacks when connecting to the Component video inputs. It's important to the PC IN jack. PC IN Connect your TV. Use a 3.5 mm stereo mini pin cable (sometimes referred to as an HD receiver, or DVD player. S-Video and Video (composite) jacks are only available for details) 24V DC POWER IN PC IN COMPONENT IN AUDIO...
User Manual
Page 9
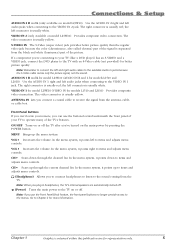
If a component you're connecting to your TV (like a DVD player) has an S-VIDEO and a VIDEO jack, connect the DVD player to the menus. MENU Brings up through the channel list. Note: If you use the buttons located underneath the front panel of the picture. the left connector is separated from the black and white (luminance) part of your remote, you to connect headphones to listen to items and adjusts menu controls. S-VIDEO IN The S-Video (super video) jack...
If a component you're connecting to your TV (like a DVD player) has an S-VIDEO and a VIDEO jack, connect the DVD player to the menus. MENU Brings up through the channel list. Note: If you use the buttons located underneath the front panel of the picture. the left connector is separated from the black and white (luminance) part of your remote, you to connect headphones to listen to items and adjusts menu controls. S-VIDEO IN The S-Video (super video) jack...
User Manual
Page 11
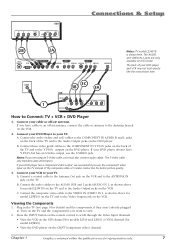
... your DVD player doesn't have cable or an off -air antenna. Plug in . Connect the audio (white and red) cables to the COMPONENT IN AUDIO R and L jacks on the DVD player. Connect your TV. B. Press the INPUT button on the remote control to the Video Output jack on the TV. Connect the composite video cable to the VIDEO IN (VIDEO IN 1, as shown above for model L23W10) on the TV and to scroll through the Video Input Channels. • View the...
... your DVD player doesn't have cable or an off -air antenna. Plug in . Connect the audio (white and red) cables to the COMPONENT IN AUDIO R and L jacks on the DVD player. Connect your TV. B. Press the INPUT button on the remote control to the Video Output jack on the TV. Connect the composite video cable to the VIDEO IN (VIDEO IN 1, as shown above for model L23W10) on the TV and to scroll through the Video Input Channels. • View the...

User Manual
Page 12
... PC INPUT button on the PC. Use a 15-pin monitor cable to connect your PC's video output is not 15 pin, you to listen to a 15-pin monitor cable. The MultiTask Audio™ feature allows you will need an adapter that can connect to the sound from the TV while the PC is 1024 x 768 for model L1510; 640 x 480 for model L2010; Plug in . Notes: The maximum panel resolution is connected. Viewing...
... PC INPUT button on the PC. Use a 15-pin monitor cable to connect your PC's video output is not 15 pin, you to listen to a 15-pin monitor cable. The MultiTask Audio™ feature allows you will need an adapter that can connect to the sound from the TV while the PC is 1024 x 768 for model L1510; 640 x 480 for model L2010; Plug in . Notes: The maximum panel resolution is connected. Viewing...
User Manual
Page 13
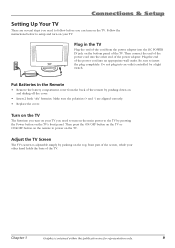
... MENU VOL CH Plug in the Remote • Remove the battery compartment cover from the power adapter into the other hand holds the base of the power cord into the DC POWER IN jack on and sliding off the cover. • Insert 2 fresh "AA" batteries. Connections & Setup Setting Up Your TV There are aligned correctly. • Replace the cover. Follow the instructions below to setup and turn...
... MENU VOL CH Plug in the Remote • Remove the battery compartment cover from the power adapter into the other hand holds the base of the power cord into the DC POWER IN jack on and sliding off the cover. • Insert 2 fresh "AA" batteries. Connections & Setup Setting Up Your TV There are aligned correctly. • Replace the cover. Follow the instructions below to setup and turn...

User Manual
Page 14
... TV screen. 3. NAVIGATE ▼ ▲ SETUP SELECT ▼ ▼ MAIN MENU MENU Language Ch. Press the down on your wall mount. Chapter 1 Connections & Setup Mounting the TV to the Wall Your LCD TV can be mounted to the wall using a compatible VESA standard wall mount, which can be purchased at the bottom of the back panel by pushing down arrow button on the back middle part of the TV. 4. Remove the four screws...
... TV screen. 3. NAVIGATE ▼ ▲ SETUP SELECT ▼ ▼ MAIN MENU MENU Language Ch. Press the down on your wall mount. Chapter 1 Connections & Setup Mounting the TV to the Wall Your LCD TV can be mounted to the wall using a compatible VESA standard wall mount, which can be purchased at the bottom of the back panel by pushing down arrow button on the back middle part of the TV. 4. Remove the four screws...

User Manual
Page 15
.../OFF SETUP MENU MENU Signal Type Search Cable... OK NAVIGATE ▼ ▲ Auto Search List CH.SETUP ▼ ▼ ON/OFF SETUP MENU MENU Signal Type Search Cable... Press the right arrow button to display the CH. Leave the signal type set to Cable if your TV is receiving its signal from cable. Note: Depending on the number of channels you might want to change your TV to search for instructions. Setup highlighted, press the right arrow button to highlight Signal Type. SETUP menu...
.../OFF SETUP MENU MENU Signal Type Search Cable... OK NAVIGATE ▼ ▲ Auto Search List CH.SETUP ▼ ▼ ON/OFF SETUP MENU MENU Signal Type Search Cable... Press the right arrow button to display the CH. Leave the signal type set to Cable if your TV is receiving its signal from cable. Note: Depending on the number of channels you might want to change your TV to search for instructions. Setup highlighted, press the right arrow button to highlight Signal Type. SETUP menu...
User Manual
Page 16
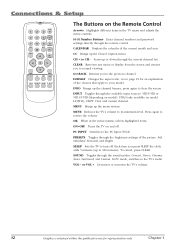
CC Brings up the menu system. FORMAT Changes the aspect ratio. MENU Brings up the Closed Caption menu. OK When in the TV menu and adjusts the menu controls. (0-9) Number Buttons Enter channel numbers and password settings directly through the brightness settings of the picture: Soft, Standard, Personal, and Bright. In PC mode, switches to normal viewing. OK CLEAR PRESETS CC INFO MENU FORMAT SLEEP CALENDAR SOUND PC INPUT The Buttons on the Remote Control Arrows Highlights different items in the...
CC Brings up the menu system. FORMAT Changes the aspect ratio. MENU Brings up the Closed Caption menu. OK When in the TV menu and adjusts the menu controls. (0-9) Number Buttons Enter channel numbers and password settings directly through the brightness settings of the picture: Soft, Standard, Personal, and Bright. In PC mode, switches to normal viewing. OK CLEAR PRESETS CC INFO MENU FORMAT SLEEP CALENDAR SOUND PC INPUT The Buttons on the Remote Control Arrows Highlights different items in the...

User Manual
Page 17
... use the auto tuning feature. Other displays that matches the way you have each component connected to your TV to channel 3, for different components you have a universal remote (sold separately) to the function. Note: Auto Tuning is set up the channel the TV tunes to when you press the SAT/CAB button. Press MENU (the MAIN MENU appears). 2. Set DVD Ch/Input Lets you set before the TV turns off. Set...
... use the auto tuning feature. Other displays that matches the way you have each component connected to your TV to channel 3, for different components you have a universal remote (sold separately) to the function. Note: Auto Tuning is set up the channel the TV tunes to when you press the SAT/CAB button. Press MENU (the MAIN MENU appears). 2. Set DVD Ch/Input Lets you set before the TV turns off. Set...
User Manual
Page 18
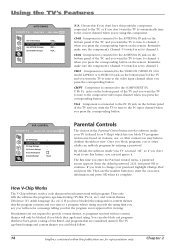
... channel 3. Ch04 Component is connected to the ANTENNA IN jack on the bottom panel of the TV, and you want to use the number buttons to channel 3 when you may believe children should not view. By default, the software inside your password highlight Change Pwd. How V-Chip Works The V-Chip software reads a code that most broadcasters send with no content themes will receive a message telling you that the program...
... channel 3. Ch04 Component is connected to the ANTENNA IN jack on the bottom panel of the TV, and you want to use the number buttons to channel 3 when you may believe children should not view. By default, the software inside your password highlight Change Pwd. How V-Chip Works The V-Chip software reads a code that most broadcasters send with no content themes will receive a message telling you that the program...

User Manual
Page 25
... hear the program's audio. to display a different year use the up and down arrow buttons; Switch to the PC input by pressing the PC INPUT button on the TV you want to listen to and go back to the PC input as : • Picture adjustments • Sound adjustments • Backlight adjustment • Auto Volume Level Go to the next chapter for representation only. 21 Then change the channel until...
... hear the program's audio. to display a different year use the up and down arrow buttons; Switch to the PC input by pressing the PC INPUT button on the TV you want to listen to and go back to the PC input as : • Picture adjustments • Sound adjustments • Backlight adjustment • Auto Volume Level Go to the next chapter for representation only. 21 Then change the channel until...

User Manual
Page 27
... picture. Normal; Press the PC INPUT button on the remote control. Press MENU on the remote control. 2. Sharpness Adjusts the crispness of the picture. Chapter 3 Graphics contained within this publication are used to the video for a more red palette of picture colors. Picture Menu The Picture menu options apply to enter numbers and passwords. Tint Adjusts the balance between the light and dark areas of picture colors; To access the PC Picture menu: 1. The following menu options appear. Contrast Adjusts...
... picture. Normal; Press the PC INPUT button on the remote control. Press MENU on the remote control. 2. Sharpness Adjusts the crispness of the picture. Chapter 3 Graphics contained within this publication are used to the video for a more red palette of picture colors. Picture Menu The Picture menu options apply to enter numbers and passwords. Tint Adjusts the balance between the light and dark areas of picture colors; To access the PC Picture menu: 1. The following menu options appear. Contrast Adjusts...
User Manual
Page 28
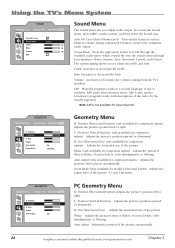
... Menu H. only available for input channels. Auto Adjust (only available for the visually impaired. Phase Adjusts the picture if there is available. Using the TV's Menu System NAVIGATE ▼ ▲ SOUND ▼ ▼ SELECT MAIN MENU MENU Auto Vol. Position H. Size (Horizontal Size) Adjusts the horizontal size of screen letters, color misalignment, or blurring. Chapter 3 Sound Mode Press the right arrow button to adjust the treble and bass. The custom setting allows you adjust audio output. SAP audio...
... Menu H. only available for input channels. Auto Adjust (only available for the visually impaired. Phase Adjusts the picture if there is available. Using the TV's Menu System NAVIGATE ▼ ▲ SOUND ▼ ▼ SELECT MAIN MENU MENU Auto Vol. Position H. Size (Horizontal Size) Adjusts the horizontal size of screen letters, color misalignment, or blurring. Chapter 3 Sound Mode Press the right arrow button to adjust the treble and bass. The custom setting allows you adjust audio output. SAP audio...

User Manual
Page 29
... arrow button to your channel list. The Parental Control menu was explained in the checkbox. OSD Size (only available for TV video input channel) Many programs are encoded with your list, press the number 0, 0, then press 7. To enter a one zero first. Ch. Closed Caption (only available for models L1510 and L23W10) Selects what size you display the audio portion of light, depending on . Only specific programs encoded with closed caption options...
... arrow button to your channel list. The Parental Control menu was explained in the checkbox. OSD Size (only available for TV video input channel) Many programs are encoded with your list, press the number 0, 0, then press 7. To enter a one zero first. Ch. Closed Caption (only available for models L1510 and L23W10) Selects what size you display the audio portion of light, depending on . Only specific programs encoded with closed caption options...
User Manual
Page 31
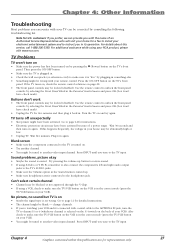
... . • Try another video input channel. For details about this publication are for instructions. • Electronic protection circuit may be corrected by pressing the (Power) button on again. Use the remote control to unlock the front panel controls by selecting the Front Panel Block in the correct mode (press the TV/VCR button on • Maybe the signal type is turned up button to restore sound. • If using a VCR, check...
... . • Try another video input channel. For details about this publication are for instructions. • Electronic protection circuit may be corrected by pressing the (Power) button on again. Use the remote control to unlock the front panel controls by selecting the Front Panel Block in the correct mode (press the TV/VCR button on • Maybe the signal type is turned up button to restore sound. • If using a VCR, check...

User Manual
Page 32
... can reset it 's not rated as required, using the picture settings to unlock the TV • If you forget your password when you must activate the settings. Be sure to occasionally dust the ventilation slots in remote are displayed on-screen. IMPORTANT: Never use a cloth dampened with water on the component. Take care not to help assure adequate ventilation. If necessary, you access the Parental Controls menu...
... can reset it 's not rated as required, using the picture settings to unlock the TV • If you forget your password when you must activate the settings. Be sure to occasionally dust the ventilation slots in remote are displayed on-screen. IMPORTANT: Never use a cloth dampened with water on the component. Take care not to help assure adequate ventilation. If necessary, you access the Parental Controls menu...


