User Manual
Page 1
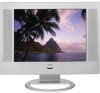
Again. LCD Television User's Guide Changing Entertainment.
Again. LCD Television User's Guide Changing Entertainment.
User Manual
Page 2
... lifetime from being accidentally tipped over, pushed off, or pulled off. These numbers are located on a firm, flat www.rca.com/productregistration. For disposal or recycling information, please contact your attention to prevent the TV from overheating. customers: Your... RCA Consumer Electronics product may void the user's authority to call your local authorities or the Electronic Industries Alliance: www.eiae.org....
... lifetime from being accidentally tipped over, pushed off, or pulled off. These numbers are located on a firm, flat www.rca.com/productregistration. For disposal or recycling information, please contact your attention to prevent the TV from overheating. customers: Your... RCA Consumer Electronics product may void the user's authority to call your local authorities or the Electronic Industries Alliance: www.eiae.org....
User Manual
Page 3
The wide blade or the third prong is provided for your outlet, consult an electrician for the grounding electrode. If the provided plug does not fit into the apparatus, the apparatus has been exposed to qualified service personnel. Do not use this apparatus during lightning storms or when unused for long periods of antenna-discharge unit, connection to grounding electrodes, and requirements for replacement of the obsolete outlet. 10. Protect the power cord from being walked on or pinched particularly at plugs, convenience receptacles, and the point where ...
The wide blade or the third prong is provided for your outlet, consult an electrician for the grounding electrode. If the provided plug does not fit into the apparatus, the apparatus has been exposed to qualified service personnel. Do not use this apparatus during lightning storms or when unused for long periods of antenna-discharge unit, connection to grounding electrodes, and requirements for replacement of the obsolete outlet. 10. Protect the power cord from being walked on or pinched particularly at plugs, convenience receptacles, and the point where ...

User Manual
Page 4
This page intentionally left blank
This page intentionally left blank
User Manual
Page 5
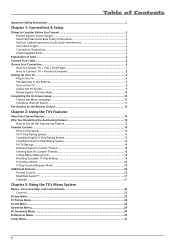
Table of Contents Important Safety Instructions ...i Chapter 1: Connections & Setup Things to Consider Before You Connect 3 Protect Against Power Surges 3 Important Stand and Base Safety Information 3 Position Cables Properly to Avoid Audio Interference 3 Use Indirect Light ...3 Connection Illustrations...3 Check Supplied Parts...3 Explanation of Jacks ...4 Connect Your Cable ...6 Choose Your Connection ...6 How to Connect: TV + VCR + DVD Player 7 How to Connect: TV + Personal Computer 8 Setting Up Your TV ...9 Plug in the TV...9 Put Batteries in the Remote ...9 Turn on the TV ...9 ...
Table of Contents Important Safety Instructions ...i Chapter 1: Connections & Setup Things to Consider Before You Connect 3 Protect Against Power Surges 3 Important Stand and Base Safety Information 3 Position Cables Properly to Avoid Audio Interference 3 Use Indirect Light ...3 Connection Illustrations...3 Check Supplied Parts...3 Explanation of Jacks ...4 Connect Your Cable ...6 Choose Your Connection ...6 How to Connect: TV + VCR + DVD Player 7 How to Connect: TV + Personal Computer 8 Setting Up Your TV ...9 Plug in the TV...9 Put Batteries in the Remote ...9 Turn on the TV ...9 ...

User Manual
Page 6
Table of Contents Chapter 4: Other Information Troubleshooting ...27 Care and Cleaning...28 Limited Warranty ...29 2
Table of Contents Chapter 4: Other Information Troubleshooting ...27 Care and Cleaning...28 Limited Warranty ...29 2
User Manual
Page 7
Refer to the Important Safety Instructions at the beginning of the manual. Refer to the Important Safety Instructions at the beginning of the manual. Chapter 1: Connections & Setup Things to Consider Before You Connect Protect Against Power Surges • Connect all antennas and cables are for representation only. Arrange the components so that is controlled by a wall switch. • Turn off . Important Stand and Base Safety Information If a stand or base is used in a stand, make sure you allow adequate ventilation. • If you connect an audio receiver or amplifier, ...
Refer to the Important Safety Instructions at the beginning of the manual. Refer to the Important Safety Instructions at the beginning of the manual. Chapter 1: Connections & Setup Things to Consider Before You Connect Protect Against Power Surges • Connect all antennas and cables are for representation only. Arrange the components so that is controlled by a wall switch. • Turn off . Important Stand and Base Safety Information If a stand or base is used in a stand, make sure you allow adequate ventilation. • If you connect an audio receiver or amplifier, ...
User Manual
Page 8
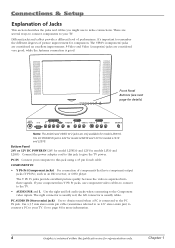
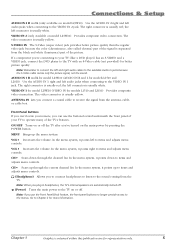
... R and L Use the right and left connector is good. COMPONENT IN • Y Pb Pr (Component jacks) For connection of picture improvement for models L1510 and L2010) Connect the power adapter cord to as an HD receiver, or DVD player. Use a 3.5 mm stereo mini pin cable (sometimes referred to this publication are... Explanation of performance. the left audio jacks when connecting to obtain sound when a PC is 24V for model L23W10 and 12V for models L1510 and L2010.
... R and L Use the right and left connector is good. COMPONENT IN • Y Pb Pr (Component jacks) For connection of picture improvement for models L1510 and L2010) Connect the power adapter cord to as an HD receiver, or DVD player. Use a 3.5 mm stereo mini pin cable (sometimes referred to this publication are... Explanation of performance. the left audio jacks when connecting to obtain sound when a PC is 24V for model L23W10 and 12V for models L1510 and L2010.
User Manual
Page 9
... connector is usually yellow. the left audio jacks when connecting to the TV with an S-Video cable (not provided) for models L1510 and L2010) Provides composite video connection. Front Panel Buttons If you can't locate your remote, you use the buttons located underneath the front panel of your...usually white. In the menu system, it points right to the menus. the left audio jacks when connecting to Chapter 2 for models L1510 and L2010) Use the AUDIO IN 1 right and left connector is usually yellow. S-VIDEO IN The S-Video (super video) jack provides better picture quality ...
... connector is usually yellow. the left audio jacks when connecting to the TV with an S-Video cable (not provided) for models L1510 and L2010) Provides composite video connection. Front Panel Buttons If you can't locate your remote, you use the buttons located underneath the front panel of your...usually white. In the menu system, it points right to the menus. the left audio jacks when connecting to Chapter 2 for models L1510 and L2010) Use the AUDIO IN 1 right and left connector is usually yellow. S-VIDEO IN The S-Video (super video) jack provides better picture quality ...
User Manual
Page 10
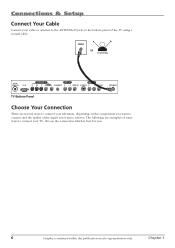
Chapter 1 Connections & Setup Connect Your Cable Connect your cable or antenna to achieve. Choose the connection which is best for you. 6 Graphics contained within this publication are examples of some ways to connect your television, depending on the components you want to connect and the quality of the signal you want to the ANTENNA IN jack on the bottom panel of the TV using a coaxial cable. CABLE OR OFF-AIR ANTENNA 24V DC POWER IN PC IN COMPONENT IN AUDIO IN 2 AUDIO IN 1 Pr Pb Y R L AUDIO IN PC-AUDIO IN R L VIDEO IN 2 S-VIDEO IN R L VIDEO IN 1 ANTENNA IN TV ...
Chapter 1 Connections & Setup Connect Your Cable Connect your cable or antenna to achieve. Choose the connection which is best for you. 6 Graphics contained within this publication are examples of some ways to connect your television, depending on the components you want to connect and the quality of the signal you want to the ANTENNA IN jack on the bottom panel of the TV using a coaxial cable. CABLE OR OFF-AIR ANTENNA 24V DC POWER IN PC IN COMPONENT IN AUDIO IN 2 AUDIO IN 1 Pr Pb Y R L AUDIO IN PC-AUDIO IN R L VIDEO IN 2 S-VIDEO IN R L VIDEO IN 1 ANTENNA IN TV ...
User Manual
Page 11
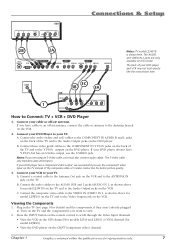
... VCR on the TV. B. Press the INPUT button on the remote control to the ANTENNA IN jack on the VID channel (for models L1510 and L2010) or VID1 channel (for better picture quality. 3. A. Plug in . Connect your DVD player doesn't have cable or an off -air antenna. Connect the audio (white...
... VCR on the TV. B. Press the INPUT button on the remote control to the ANTENNA IN jack on the VID channel (for models L1510 and L2010) or VID1 channel (for better picture quality. 3. A. Plug in . Connect your DVD player doesn't have cable or an off -air antenna. Connect the audio (white...

User Manual
Page 12
...'s video output is connected. Notes: The maximum panel resolution is 1024 x 768 for model L1510; 640 x 480 for model L23W10. and 1280 x 720 for model L2010; Be sure to set your TV to connect the audio. Viewing the PC 1. Plug in . B. Use a 3.5 mm stereo mini pin cable (sometimes referred to as...
...'s video output is connected. Notes: The maximum panel resolution is 1024 x 768 for model L1510; 640 x 480 for model L23W10. and 1280 x 720 for model L2010; Be sure to set your TV to connect the audio. Viewing the PC 1. Plug in . B. Use a 3.5 mm stereo mini pin cable (sometimes referred to as...
User Manual
Page 13
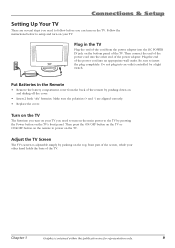
Connections & Setup Setting Up Your TV There are aligned correctly. • Replace the cover. Plug the end of the power adapter. Make sure the polarities (+ and -) are several steps you need to follow before you need to turn on the main power to power on the TV. Chapter 1 Graphics contained within this publication are for representation only. 9 Be sure to setup and turn on the TV. Turn on the TV The first time you turn on your TV you can turn on the bottom panel of the TV. Then press the ON/OFF button on the TV or ON•OFF button on the remote to the TV by...
Connections & Setup Setting Up Your TV There are aligned correctly. • Replace the cover. Plug the end of the power adapter. Make sure the polarities (+ and -) are several steps you need to follow before you need to turn on the main power to power on the TV. Chapter 1 Graphics contained within this publication are for representation only. 9 Be sure to setup and turn on the TV. Turn on the TV The first time you turn on your TV you can turn on the bottom panel of the TV. Then press the ON/OFF button on the TV or ON•OFF button on the remote to the TV by...

User Manual
Page 14
Remove the four screws as shown above, being sure that are for the menu system. 1. The default language is English. Remove the cover at most electronic stores. Completing the On Screen Setup There are several options you turn on your preferred language for representation only. The first time you might need to set up in order for your TV. Follow the instructions below to complete the setup for your wall mount. Setup Par. To select French or Spanish, press the right arrow button. 2. Setup. 10 Graphics contained within this publication are packed with Language ...
Remove the four screws as shown above, being sure that are for the menu system. 1. The default language is English. Remove the cover at most electronic stores. Completing the On Screen Setup There are several options you turn on your preferred language for representation only. The first time you might need to set up in order for your TV. Follow the instructions below to complete the setup for your wall mount. Setup Par. To select French or Spanish, press the right arrow button. 2. Setup. 10 Graphics contained within this publication are packed with Language ...

User Manual
Page 15
If your TV is receiving its signal from cable. Setup highlighted, press the right arrow button to Chapter 3 for instructions. By default, the signal type is receiving its signal from an off-air antenna, press the right arrow button again to change your antenna or cable TV system: 1. Leave the signal type set to Cable if your TV is set correctly. 1. Note: Depending on the number of channels you might want to change your signal source is complete and you don't want to Cable. NAVIGATE ▼ ▲ Auto Search List CH.SETUP ▼ ▼ ON/OFF SETUP...
If your TV is receiving its signal from cable. Setup highlighted, press the right arrow button to Chapter 3 for instructions. By default, the signal type is receiving its signal from an off-air antenna, press the right arrow button again to change your antenna or cable TV system: 1. Leave the signal type set to Cable if your TV is set correctly. 1. Note: Depending on the number of channels you might want to change your signal source is complete and you don't want to Cable. NAVIGATE ▼ ▲ Auto Search List CH.SETUP ▼ ▼ ON/OFF SETUP...
User Manual
Page 16
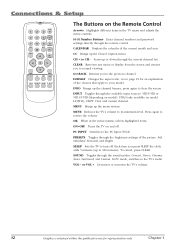
OK CLEAR PRESETS CC INFO MENU FORMAT SLEEP CALENDAR SOUND PC INPUT The Buttons on the Remote Control Arrows Highlights different items in the menu system, selects highlighted items. ON•OFF Turns the TV on model L23W10), CMPT, VGA, and current channel. FORMAT Changes the aspect ratio. INPUT Toggles through the sound modes: Concert, Stereo, Cinema, News, Surround, and Custom. Each time you to normal viewing. In PC mode, switches to the previous channel. Chapter 1 CH + or CH - VID/S-VID or VID1/S-VID (depending on model), VID2 (only available on and off . OK When in...
OK CLEAR PRESETS CC INFO MENU FORMAT SLEEP CALENDAR SOUND PC INPUT The Buttons on the Remote Control Arrows Highlights different items in the menu system, selects highlighted items. ON•OFF Turns the TV on model L23W10), CMPT, VGA, and current channel. FORMAT Changes the aspect ratio. INPUT Toggles through the sound modes: Concert, Stereo, Cinema, News, Surround, and Custom. Each time you to normal viewing. In PC mode, switches to the previous channel. Chapter 1 CH + or CH - VID/S-VID or VID1/S-VID (depending on model), VID2 (only available on and off . OK When in...

User Manual
Page 17
The icons change your TV to channel 3, for example, when you want to set: Set VCR Ch/Input Lets you set up the autotuning feature in the TV's menu corresponds to the component buttons on the remote and the way you have connected to when you press the VCR or DVD button on the remote control. 1. Sleep Timer: 20 minutes Corresponds to show the item's status or availability. You must have to remember to change appearance to the SLEEP button. Set DVD Ch/Input Lets you set up the channel the TV tunes to your TV (like a VCR or DVD Player). Chapter 2: Using the TV's Features ...
The icons change your TV to channel 3, for example, when you want to set: Set VCR Ch/Input Lets you set up the autotuning feature in the TV's menu corresponds to the component buttons on the remote and the way you have connected to when you press the VCR or DVD button on the remote control. 1. Sleep Timer: 20 minutes Corresponds to show the item's status or availability. You must have to remember to change appearance to the SLEEP button. Set DVD Ch/Input Lets you set up the channel the TV tunes to your TV (like a VCR or DVD Player). Chapter 2: Using the TV's Features ...
User Manual
Page 18
VID1... VID1 Component is connected to the VIDEO IN (VIDEO IN 1 for model L23W10) or S-VIDEO IN jack on the bottom panel of the TV and you want the TV to tune to a program whose rating exceeds the rating limit you set to the PC input channel when you 're using this feature, you may believe children should not view. CONTROL ▼ NAVIGATE ▼ ▲ SELECT ▼ SETUP MENU MENU US TV Ratings US Movie Ratings CA Eng. The first time you want the TV to tune to channel 4. Enter the default password, 1111, and press OK to the video input channel when you don't ...
VID1... VID1 Component is connected to the VIDEO IN (VIDEO IN 1 for model L23W10) or S-VIDEO IN jack on the bottom panel of the TV and you want the TV to tune to a program whose rating exceeds the rating limit you set to the PC input channel when you 're using this feature, you may believe children should not view. CONTROL ▼ NAVIGATE ▼ ▲ SELECT ▼ SETUP MENU MENU US TV Ratings US Movie Ratings CA Eng. The first time you want the TV to tune to channel 4. Enter the default password, 1111, and press OK to the video input channel when you don't ...

User Manual
Page 19
Many parents may want to watch unattended. TV-G (General Audience) Most parents would find unsuitable for a young audience, including children from ages 2-6. It contains little or no sexual dialogue (D) or situations (S), no strong language (L), and little or no nudity. TV-Y (All Children) Themes and elements in permitting viewing by pre-teens and early teens. Could deal with their younger children. Parents may consider some sexual situations (S), or moderate violence (V). may find unsuitable for viewers under the age of 8). Could also contain brief scenes of the ...
Many parents may want to watch unattended. TV-G (General Audience) Most parents would find unsuitable for a young audience, including children from ages 2-6. It contains little or no sexual dialogue (D) or situations (S), no strong language (L), and little or no nudity. TV-Y (All Children) Themes and elements in permitting viewing by pre-teens and early teens. Could deal with their younger children. Parents may consider some sexual situations (S), or moderate violence (V). may find unsuitable for viewers under the age of 8). Could also contain brief scenes of the ...

User Manual
Page 20
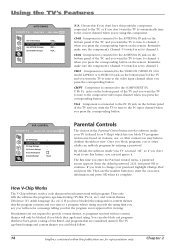
Any realistic depictions of violence will not be suitable for children under age 16. Canadian French V-Chip Rating System 18+ (Adults) Programming is paid to portrayals that could threaten children's sense of TV program ratings. 16 Graphics contained within this publication are violent enough to affect them. US TV RATINGS ▼ ▼ NAVIGATE ▼ ▲ V/B OK P.C. D L S V FV TV-PG View... D L S V FV TV-G View... FV TV-Y View... Highlight and select US TV Rating. 3. Violence Guidelines: Violence will be viewed. This program either minimal or is ...
Any realistic depictions of violence will not be suitable for children under age 16. Canadian French V-Chip Rating System 18+ (Adults) Programming is paid to portrayals that could threaten children's sense of TV program ratings. 16 Graphics contained within this publication are violent enough to affect them. US TV RATINGS ▼ ▼ NAVIGATE ▼ ▲ V/B OK P.C. D L S V FV TV-PG View... D L S V FV TV-G View... FV TV-Y View... Highlight and select US TV Rating. 3. Violence Guidelines: Violence will be viewed. This program either minimal or is ...