DRC69702 Product Manual
Page 2
... disconnecting the AC power cord, grip the plug and not the cord itself. This equipment, used with this unit to 2 hours before turning the power on a circuit different from the wall outlet. If this equipment does cause harmful interference to radio or television reception, which the receiver is connected. • Consult the dealer or an experienced radio/TV technician for help. RCA DRC69702 IB.indd...
... disconnecting the AC power cord, grip the plug and not the cord itself. This equipment, used with this unit to 2 hours before turning the power on a circuit different from the wall outlet. If this equipment does cause harmful interference to radio or television reception, which the receiver is connected. • Consult the dealer or an experienced radio/TV technician for help. RCA DRC69702 IB.indd...
DRC69702 Product Manual
Page 4
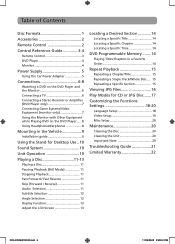
...2 Remote Control 2 Control Reference Guide 3-4 Remote Control 3 DVD Player 4 Monitor 4 Power Supply 5 Using the Car Power Adapter 5 Connections 6-8 Watching a DVD on the DVD Player and the Monitor 6 Connecting a TV 6 Connecting a Stereo Receiver or Amplifier (DVD Player only 7 Connecting Game Systems/Video Equipment (monitor only 7 Using the Monitor with Other Equipment while Playing DVD on the DVD Player...... 8 Using Headphones/Earphones 8 Mounting in the Vehicle 9 Installation guide 9 Using the Stand for Desktop Use...10 Sound System 10 Unit Operation 10 Playing a Disc 11...
...2 Remote Control 2 Control Reference Guide 3-4 Remote Control 3 DVD Player 4 Monitor 4 Power Supply 5 Using the Car Power Adapter 5 Connections 6-8 Watching a DVD on the DVD Player and the Monitor 6 Connecting a TV 6 Connecting a Stereo Receiver or Amplifier (DVD Player only 7 Connecting Game Systems/Video Equipment (monitor only 7 Using the Monitor with Other Equipment while Playing DVD on the DVD Player...... 8 Using Headphones/Earphones 8 Mounting in the Vehicle 9 Installation guide 9 Using the Stand for Desktop Use...10 Sound System 10 Unit Operation 10 Playing a Disc 11...
DRC69702 Product Manual
Page 5
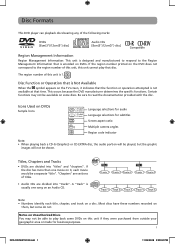
Disc Formats This DVD player can playback discs bearing any of this unit, this unit cannot play back some DVDs on this unit is Not Available When the symbol appears on DVDs Sample lcons Language selections for audio Language selections for business purposes. 1 RCA DRC69702 IB.indd 1 11/25/2008 2:28:52 PM This occurs because the DVD manufacturer determines the specific functions. Titles, Chapters and Tracks • DVDs are...
Disc Formats This DVD player can playback discs bearing any of this unit, this unit cannot play back some DVDs on this unit is Not Available When the symbol appears on DVDs Sample lcons Language selections for audio Language selections for business purposes. 1 RCA DRC69702 IB.indd 1 11/25/2008 2:28:52 PM This occurs because the DVD manufacturer determines the specific functions. Titles, Chapters and Tracks • DVDs are...
DRC69702 Product Manual
Page 7
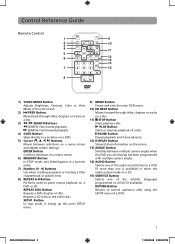
... a menu screen and adjusts certain settings. PAUSE Button Pauses playback and frame advance. 12) DISPLAY Button Shows status information on the screen. 13) ANGLE Button Switches between selections on a DVD (if available). PLAY Button Starts or resumes playback of the LCD screen. 2) PREV Button Moves back through titles, chapters or tracks on a DVD or CD. RCA DRC69702 IB.indd 3 3 11/25/2008 2:28:53 PM Control Reference Guide Remote Control 1) VIDEO MODE Button Adjusts Brightness, Contrast, Color or View Mode...
... a menu screen and adjusts certain settings. PAUSE Button Pauses playback and frame advance. 12) DISPLAY Button Shows status information on the screen. 13) ANGLE Button Switches between selections on a DVD (if available). PLAY Button Starts or resumes playback of the LCD screen. 2) PREV Button Moves back through titles, chapters or tracks on a DVD or CD. RCA DRC69702 IB.indd 3 3 11/25/2008 2:28:53 PM Control Reference Guide Remote Control 1) VIDEO MODE Button Adjusts Brightness, Contrast, Color or View Mode...
DRC69702 Product Manual
Page 8
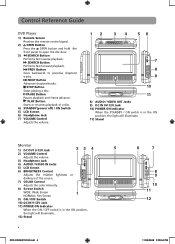
... screen. 7) COLOR Control Adjusts the color intensity. 10 8) Screen Switch WIDE: Wide Screen 1 11 NORMAL: Pan Screen 9) ON / OFF Switch 12 10) DC IN 9-12V Jack 11) POWER ON Indicator When the ON / OFF switch is in the ON position, the light will illuminate. 12) Stand 4 RCA DRC69702 IB.indd 4 11/25/2008 2:28:54 PM NEXT Button Advances chapters/tracks. Control Reference Guide DVD Player 1) Remote Sensor Receives the remote control signal. 2) OPEN Button...
... screen. 7) COLOR Control Adjusts the color intensity. 10 8) Screen Switch WIDE: Wide Screen 1 11 NORMAL: Pan Screen 9) ON / OFF Switch 12 10) DC IN 9-12V Jack 11) POWER ON Indicator When the ON / OFF switch is in the ON position, the light will illuminate. 12) Stand 4 RCA DRC69702 IB.indd 4 11/25/2008 2:28:54 PM NEXT Button Advances chapters/tracks. Control Reference Guide DVD Player 1) Remote Sensor Receives the remote control signal. 2) OPEN Button...

DRC69702 Product Manual
Page 9
... safety, drivers should not operate the unit or view videos while driving. • When the inside of the 12V power outlet is not properly attached to a vehicle, it may become hot due to clean the 12V power outlet before use. • After use of video devices in vehicles. 5 RCA DRC69702 IB.indd 5 11/25/2008 2:28:55 PM Monitor right side Car Power Adapter 2 To 12V power outlet...
... safety, drivers should not operate the unit or view videos while driving. • When the inside of the 12V power outlet is not properly attached to a vehicle, it may become hot due to clean the 12V power outlet before use. • After use of video devices in vehicles. 5 RCA DRC69702 IB.indd 5 11/25/2008 2:28:55 PM Monitor right side Car Power Adapter 2 To 12V power outlet...
DRC69702 Product Manual
Page 10
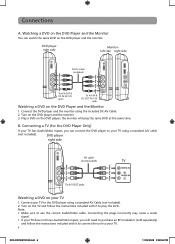
... the instructions included with it to connect the unit to your TV. 6 RCA DRC69702 IB.indd 6 11/25/2008 2:28:56 PM the monitor will need to purchase an RF modulator (sold separately) and follow the instructions included with it to play the same DVD at the same time. Note: • Make sure to the DVD player using a standard AV Cable (not included). 2. Connecting the plugs incorrectly...
... the instructions included with it to connect the unit to your TV. 6 RCA DRC69702 IB.indd 6 11/25/2008 2:28:56 PM the monitor will need to purchase an RF modulator (sold separately) and follow the instructions included with it to play the same DVD at the same time. Note: • Make sure to the DVD player using a standard AV Cable (not included). 2. Connecting the plugs incorrectly...
DRC69702 Product Manual
Page 11
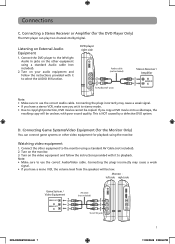
... Audio OUT jacks Note: • Make sure to select the AUDIO IN function. Connecting Game Systems/Video Equipment (for the Monitor Only) You can connect game systems or other video equipment for the DVD Player Only) The DVD player can play two channels Dolby Digital. Connecting the plugs incorrectly may cause a weak signal. • If you have a mono VCR, the volume level from the speakers will be copied. Connecting a Stereo Receiver or Amplifier (for playback using a standard Audio cable...
... Audio OUT jacks Note: • Make sure to select the AUDIO IN function. Connecting Game Systems/Video Equipment (for the Monitor Only) You can connect game systems or other video equipment for the DVD Player Only) The DVD player can play two channels Dolby Digital. Connecting the plugs incorrectly may cause a weak signal. • If you have a mono VCR, the volume level from the speakers will be copied. Connecting a Stereo Receiver or Amplifier (for playback using a standard Audio cable...

DRC69702 Product Manual
Page 12
... volume level from earphones and headphones can use the correct Audio/Video cable. Use the monitor for the other video equipment on the monitor while viewing a DVD on the DVD player. Note: • Make sure to the other equipment. 4. Slowly raise the volume with Other Equipment while Playing DVD on the DVD Player You can cause hearing loss. Using the Monitor with the headphones on the DVD player. 6. Connect the power connector between the DVD player...
... volume level from earphones and headphones can use the correct Audio/Video cable. Use the monitor for the other video equipment on the monitor while viewing a DVD on the DVD player. Note: • Make sure to the other equipment. 4. Slowly raise the volume with Other Equipment while Playing DVD on the DVD Player You can cause hearing loss. Using the Monitor with the headphones on the DVD player. 6. Connect the power connector between the DVD player...
DRC69702 Product Manual
Page 13
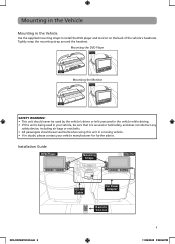
...Mounting the DVD Player Mounting the Monitor SAFETY WARNING! • This unit should never be used by the vehicle's driver or left unsecured in the vehicle while driving. • If this unit is being used in your vehicle, be sure that it is secured or held safely, and does not obstruct any safety device...belts when using this unit in a moving vehicle. • If in the Vehicle Use the supplied mounting straps to install the DVD player and monitor on the back of the vehicle's headrests. Installation Guide RCA DRC69702 IB.indd 9 9 11/25/2008 2:28:58 PM Mounting in the Vehicle Mounting in ...
...Mounting the DVD Player Mounting the Monitor SAFETY WARNING! • This unit should never be used by the vehicle's driver or left unsecured in the vehicle while driving. • If this unit is being used in your vehicle, be sure that it is secured or held safely, and does not obstruct any safety device...belts when using this unit in a moving vehicle. • If in the Vehicle Use the supplied mounting straps to install the DVD player and monitor on the back of the vehicle's headrests. Installation Guide RCA DRC69702 IB.indd 9 9 11/25/2008 2:28:58 PM Mounting in the Vehicle Mounting in ...
DRC69702 Product Manual
Page 14
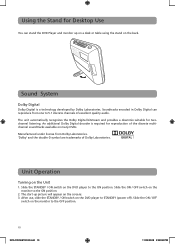
... After use, slide the STANDBY / ON switch on the monitor to STANDBY (power off). The unit automatically recognizes the Dolby Digital bitstream and provides a downmix suitable for twochannel listening. Soundtracks encoded in Dolby Digital can stand the DVD Player and monitor up picture will appear on many DVDs. Unit Operation Turning on the monitor to 5.1 discrete channels of excellent quality audio. Sound System Dolby...
... After use, slide the STANDBY / ON switch on the monitor to STANDBY (power off). The unit automatically recognizes the Dolby Digital bitstream and provides a downmix suitable for twochannel listening. Soundtracks encoded in Dolby Digital can stand the DVD Player and monitor up picture will appear on many DVDs. Unit Operation Turning on the monitor to 5.1 discrete channels of excellent quality audio. Sound System Dolby...
DRC69702 Product Manual
Page 15
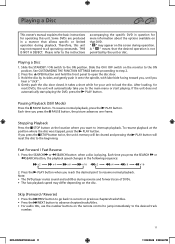
... the specific DVD in a manner that the desired operation is playing. Slide the ON / OFF switch on the remote control to jump immediately to the desired track number. Each time you reach the desired point to resume normal playback. Stopping Playback Press the STOP button at the position where the disc was stopped, press the PLAY button. Playing a Disc This owner's manual explains the basic instructions for operating this unit...
... the specific DVD in a manner that the desired operation is playing. Slide the ON / OFF switch on the remote control to jump immediately to the desired track number. Each time you reach the desired point to resume normal playback. Stopping Playback Press the STOP button at the position where the disc was stopped, press the PLAY button. Playing a Disc This owner's manual explains the basic instructions for operating this unit...
DRC69702 Product Manual
Page 16
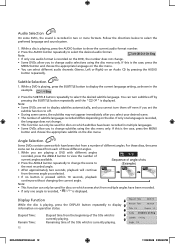
... displayed. Remaining time of the title which is currently playing. Follow the directions below to select the desired audio format. You can turn them off even if you set to display information on the disc. Note: • Some DVDs are playing a DVD with different angles recorded, press the ANGLE button to change subtitles using the disc menu only. While you selected. • If no button is playing, press the DISPLAY button repeatedly to display...
... displayed. Remaining time of the title which is currently playing. Follow the directions below to select the desired audio format. You can turn them off even if you set to display information on the disc. Note: • Some DVDs are playing a DVD with different angles recorded, press the ANGLE button to change subtitles using the disc menu only. While you selected. • If no button is playing, press the DISPLAY button repeatedly to display...
DRC69702 Product Manual
Page 17
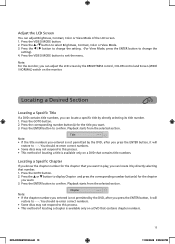
... corresponding number button(s) for the chapter you can locate a specific title by the BRIGHTNESS control, COLOR control and Screen (WIDE / NORMAL) switch on the monitor. Press the GOTO button. 2. Press the GOTO button. 2. Locating a Specific Chapter If you know the chapter number for the title you entered is not permitted by directly selecting that number. 1. Press the ENTER button to select Brightness, Contrast, Color or View Mode. 3. Press the / button to confirm. RCA DRC69702 IB...
... corresponding number button(s) for the chapter you can locate a specific title by the BRIGHTNESS control, COLOR control and Screen (WIDE / NORMAL) switch on the monitor. Press the GOTO button. 2. Press the GOTO button. 2. Locating a Specific Chapter If you know the chapter number for the title you entered is not permitted by directly selecting that number. 1. Press the ENTER button to select Brightness, Contrast, Color or View Mode. 3. Press the / button to confirm. RCA DRC69702 IB...

DRC69702 Product Manual
Page 18
... the MEMORY button while the display appears on the TV screen, the display disappears. • The programmed selections will be cleared when you open the disc tray or turn off the DVD player. 14 RCA DRC69702 IB.indd 14 11/25/2008 2:29:01 PM Press the GOTO button. 2. Press the Cursor buttons ( , , , ) to move the highlighted bar to enter, then press the corresponding number buttons. 3. To...
... the MEMORY button while the display appears on the TV screen, the display disappears. • The programmed selections will be cleared when you open the disc tray or turn off the DVD player. 14 RCA DRC69702 IB.indd 14 11/25/2008 2:29:01 PM Press the GOTO button. 2. Press the Cursor buttons ( , , , ) to move the highlighted bar to enter, then press the corresponding number buttons. 3. To...
DRC69702 Product Manual
Page 22
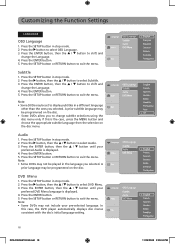
... the disc's initial language setting. 18 RCA DRC69702 IB.indd 18 11/25/2008 2:29:04 PM Audio 1. Press the ENTER button. 5. Press the SETUP button or RETURN button to select Subtitle. 3. DVD Menu 1. Note: • Some DVDs may not include your preferred DVD Menu language is displayed. 4. Press the ENTER button. 5. Press the button, then the / button to exit the menu. Press the ENTER button, then the / button to select DVD Menu. 3. Press the SETUP button...
... the disc's initial language setting. 18 RCA DRC69702 IB.indd 18 11/25/2008 2:29:04 PM Audio 1. Press the ENTER button. 5. Press the SETUP button or RETURN button to select Subtitle. 3. DVD Menu 1. Note: • Some DVDs may not include your preferred DVD Menu language is displayed. 4. Press the ENTER button. 5. Press the button, then the / button to exit the menu. Press the ENTER button, then the / button to select DVD Menu. 3. Press the SETUP button...

DRC69702 Product Manual
Page 23
... conform to the LCD screen on the unit. Press the ENTER button, then the / button to exit the menu. Note: • The displayable picture size is connected. Press the SETUP button or RETURN button to shift and change the View Mode. 5. Sides of some DVDs may not be present on the DVD. Press the SETUP button in the 4:3 picture size regardless of screen. Customizing the Function Settings VIDEO Aspect Ratio 1. Automatically...
... conform to the LCD screen on the unit. Press the ENTER button, then the / button to exit the menu. Note: • The displayable picture size is connected. Press the SETUP button or RETURN button to shift and change the View Mode. 5. Sides of some DVDs may not be present on the DVD. Press the SETUP button in the 4:3 picture size regardless of screen. Customizing the Function Settings VIDEO Aspect Ratio 1. Automatically...
DRC69702 Product Manual
Page 24
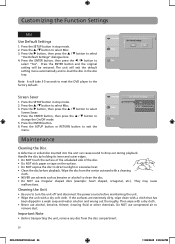
... Function Settings MISC Use Default Settings 1. Screen Saver 1. Then wipe with a cloth that has been dipped in stop mode. 2. Press the button, then press the / button to remove dust. Do NOT use irregular shaped discs (example: heart shaped, octagonal, etc.). Press the button, then press the / button to clean the disc. • Do NOT use compressed air to select Screen Saver. 4. Wipe the disc from the disc compartment. 20 RCA DRC69702...
... Function Settings MISC Use Default Settings 1. Screen Saver 1. Then wipe with a cloth that has been dipped in stop mode. 2. Press the button, then press the / button to remove dust. Do NOT use irregular shaped discs (example: heart shaped, octagonal, etc.). Press the button, then press the / button to clean the disc. • Do NOT use compressed air to select Screen Saver. 4. Wipe the disc from the disc compartment. 20 RCA DRC69702...
DRC69702 Product Manual
Page 25
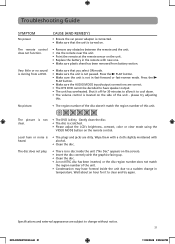
..., contrast, color or view mode using the VIDEO MODE button on the remote control. Gently clean the disc. • The disc is located on the unit. • Replace the battery in the remote with new one. • Make sure plastic sheet has been removed from a DVD. • Make sure that the unit is dirty. Specifications and external appearance are subject to have formed inside the unit due to clear and try adjusting this unit. RCA DRC69702 IB...
..., contrast, color or view mode using the VIDEO MODE button on the remote control. Gently clean the disc. • The disc is located on the unit. • Replace the battery in the remote with new one. • Make sure plastic sheet has been removed from a DVD. • Make sure that the unit is dirty. Specifications and external appearance are subject to have formed inside the unit due to clear and try adjusting this unit. RCA DRC69702 IB...
DRC69702 Product Manual
Page 26
... provide, when needed, service labor to our Product Returns Center. This warranty gives you specific legal rights and you . The determination of service will be commenced to enforce any obligation of set forth above provisions may also have had the serial number removed or changed. Packaging and Shipping Instruction When you send the product to products or parts thereof which...
... provide, when needed, service labor to our Product Returns Center. This warranty gives you specific legal rights and you . The determination of service will be commenced to enforce any obligation of set forth above provisions may also have had the serial number removed or changed. Packaging and Shipping Instruction When you send the product to products or parts thereof which...


