User Guide
Page 5
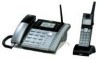
... ringer timing in this product and save them for future reference. Congratulations on your business or home that should have at least one phone in your purchase of the RCA 25450 is calling while you are on electricity, you the flexibility to add remote handset phones anywhere there is ready to satisfy a variety of phone systems connected to either the standard Name/Number Caller ID Service or Call Waiting Caller...
... ringer timing in this product and save them for future reference. Congratulations on your business or home that should have at least one phone in your purchase of the RCA 25450 is calling while you are on electricity, you the flexibility to add remote handset phones anywhere there is ready to satisfy a variety of phone systems connected to either the standard Name/Number Caller ID Service or Call Waiting Caller...
User Guide
Page 6
... Installing the Charging Cradle Wall Mount 17 Registering the Cordless Handset 17 Base Unit Layout 18 Base Unit Features 19 LCD Display...19 Navigation Button 19 Soft Buttons...19 MENU System 19 Redial Button...20 Line Buttons...20 Line Dedicate...20 Pre-Dialing...20 Speaker Button 21 Headset Button 21 Mute Button ...21 Page Button...21 Flash Button ...21 Hold Button ...21 DND (Do Not Disturb) Button 21 Exit Button...22 Memory Buttons 22 Store Button...22 Directory...22 Intercom Button 22 Reset Button ...22 Auto Attendant Button 22 Voice Mail Button...
... Installing the Charging Cradle Wall Mount 17 Registering the Cordless Handset 17 Base Unit Layout 18 Base Unit Features 19 LCD Display...19 Navigation Button 19 Soft Buttons...19 MENU System 19 Redial Button...20 Line Buttons...20 Line Dedicate...20 Pre-Dialing...20 Speaker Button 21 Headset Button 21 Mute Button ...21 Page Button...21 Flash Button ...21 Hold Button ...21 DND (Do Not Disturb) Button 21 Exit Button...22 Memory Buttons 22 Store Button...22 Directory...22 Intercom Button 22 Reset Button ...22 Auto Attendant Button 22 Voice Mail Button...
User Guide
Page 7
... Cordless Handset Charging Cradle Layout 26 End/Power Button 27 Talk Button...27 Soft Buttons...27 MENU System (Adjust Settings and Registration 27 Redial Soft Button 27 Pre-Dialing...27 Navigation Button 27 Speaker Button 28 Headset Jack...28 Mute...28 Hold ...28 Exit Button...28 Voice Mail Button 29 Voice Mail Indicator Light 29 Intercom Button 29 Call Forwarding 29 Conference Calling 29 Second Incoming Call 29 Caller ID...30 Call Waiting...30 Extension Groups 30 Using Your RCA 25450 Phone System 31 Making a Call...31 Making a Call (Base Unit 31 Redial (Base Unit 33 Making...
... Cordless Handset Charging Cradle Layout 26 End/Power Button 27 Talk Button...27 Soft Buttons...27 MENU System (Adjust Settings and Registration 27 Redial Soft Button 27 Pre-Dialing...27 Navigation Button 27 Speaker Button 28 Headset Jack...28 Mute...28 Hold ...28 Exit Button...28 Voice Mail Button 29 Voice Mail Indicator Light 29 Intercom Button 29 Call Forwarding 29 Conference Calling 29 Second Incoming Call 29 Caller ID...30 Call Waiting...30 Extension Groups 30 Using Your RCA 25450 Phone System 31 Making a Call...31 Making a Call (Base Unit 31 Redial (Base Unit 33 Making...
User Guide
Page 8
... Manual Line Selection Settings (Cordless Handset 106 Reset System (Base Unit 108 Headset and Belt Clip Operation 109 Replacing the Batteries 110 Cordless Handset Battery 110 Handset Memory Retention 110 Base Unit Battery 111 Battery Safety Precautions 111 Other Information 112 Display Messages 112 Sound Signals 113 Troubleshooting Tips 113 Caller ID...114 Telephone...114 General Product Care 116 Causes of Poor Reception 116 Interference Information 117 Service Information 118 Limited Warranty 119 Wall Mounting Bracket Template for Cordless Handset 121 Accessory Information...
... Manual Line Selection Settings (Cordless Handset 106 Reset System (Base Unit 108 Headset and Belt Clip Operation 109 Replacing the Batteries 110 Cordless Handset Battery 110 Handset Memory Retention 110 Base Unit Battery 111 Battery Safety Precautions 111 Other Information 112 Display Messages 112 Sound Signals 113 Troubleshooting Tips 113 Caller ID...114 Telephone...114 General Product Care 116 Causes of Poor Reception 116 Interference Information 117 Service Information 118 Limited Warranty 119 Wall Mounting Bracket Template for Cordless Handset 121 Accessory Information...
User Guide
Page 9
... the cordless telephone farther away from the Base Unit before battery installation or replacement. You may use the 900 MHz frequency for communication, and, if not properly set channels to avoid interference. CAUTION: Always disconnect all phone cords from appliances. Certain other communications devices may be placed near a telephone (modular) jack and an electrical outlet. • Avoid sources of noise, such as a window by a busy street, and electrical...
... the cordless telephone farther away from the Base Unit before battery installation or replacement. You may use the 900 MHz frequency for communication, and, if not properly set channels to avoid interference. CAUTION: Always disconnect all phone cords from appliances. Certain other communications devices may be placed near a telephone (modular) jack and an electrical outlet. • Avoid sources of noise, such as a window by a busy street, and electrical...

User Guide
Page 19
... 3 New Calls Date, Time & Number of the phone system. Press 3 and 4 to perform the function shown above it. Press to move the cursor on the display, adjust ringer volume during standby mode (phone idle), and adjust the Handset/Receiver, Speakerphone or Headset voice volume during Standby Mode. MENU System (Adjust Settings and Registration) Use the Menu system by Using Navigation Button Base Unit Features LCD Display The Display shows several functions and menu items of Calls, or Caller...
... 3 New Calls Date, Time & Number of the phone system. Press 3 and 4 to perform the function shown above it. Press to move the cursor on the display, adjust ringer volume during standby mode (phone idle), and adjust the Handset/Receiver, Speakerphone or Headset voice volume during Standby Mode. MENU System (Adjust Settings and Registration) Use the Menu system by Using Navigation Button Base Unit Features LCD Display The Display shows several functions and menu items of Calls, or Caller...
User Guide
Page 20
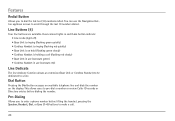
... a call . 20 Features Redial Button Allows you to enter a phone number before dialing the number. You can use the Navigation Button up/down arrows to make a call (flashing red slowly) • Base Unit in use (constant red) Line Dedicate The line dedicate function allows an extension (Base Unit or Cordless Handset) to be dedicated to a line. Line Buttons (4) Four line buttons are available. This allows users to pre-dial a number or review Caller ID records or Directory entries before lifting the handset, pressing the Speaker, Headset, Dial, or Line (1-4) buttons...
... a call . 20 Features Redial Button Allows you to enter a phone number before dialing the number. You can use the Navigation Button up/down arrows to make a call (flashing red slowly) • Base Unit in use (constant red) Line Dedicate The line dedicate function allows an extension (Base Unit or Cordless Handset) to be dedicated to a line. Line Buttons (4) Four line buttons are available. This allows users to pre-dial a number or review Caller ID records or Directory entries before lifting the handset, pressing the Speaker, Headset, Dial, or Line (1-4) buttons...

User Guide
Page 23
... hold. Second Incoming Call Alerts you of a new call from the Base Unit or a Cordless Handset to add a third person to a call. The call must include at least one extension to another. Allows you to record, play, or delete a message for callers placed on the phone. Conference Calling The conference call function allows a caller from a different line by your local phone company to subscribe to this feature. Caller ID Contact your local phone company. Voice Mail Button Features Call Transferring Allows...
... hold. Second Incoming Call Alerts you of a new call from the Base Unit or a Cordless Handset to add a third person to a call. The call must include at least one extension to another. Allows you to record, play, or delete a message for callers placed on the phone. Conference Calling The conference call function allows a caller from a different line by your local phone company to subscribe to this feature. Caller ID Contact your local phone company. Voice Mail Button Features Call Transferring Allows...
User Guide
Page 27
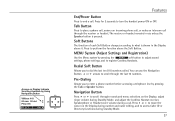
... place a phone call, answer an incoming phone call, or make an intercom call . MENU System (Adjust Settings and Registration) Use the Menu system by pressing the Talk or Speaker button. Pre-Dialing Allows you to end a call. Arrows on the Display, adjust ringer volume during Standby Mode, and adjust the Cordless Handset receiver, Speakerphone or Headset voice volume during Standby Mode. 27 Navigation Button Press 5 or 6 to scroll through records and menu selections on Display Indicate Scrolling Available by Using Navigation Button VM...
... place a phone call, answer an incoming phone call, or make an intercom call . MENU System (Adjust Settings and Registration) Use the Menu system by pressing the Talk or Speaker button. Pre-Dialing Allows you to end a call. Arrows on the Display, adjust ringer volume during Standby Mode, and adjust the Cordless Handset receiver, Speakerphone or Headset voice volume during Standby Mode. 27 Navigation Button Press 5 or 6 to scroll through records and menu selections on Display Indicate Scrolling Available by Using Navigation Button VM...

User Guide
Page 31
... the phone setting menu. A call without choosing a phone line. Making a Call (Base Unit) Auto Line-Selection Dial (Base Unit) The Auto Line-Selection dial function allows the user to redial the last number called, or enter the phone number using the intercom. Press the Dial, Speaker or Headset button (when a Headset is automatically selected. 1. This section details the basic operation of the call on . 4. Making a Call Calls can be turned on hold, muting, call forwarding, transferring a call, and using the keypad (0-9, *, #). 31 NOTE: To cancel dialing at any time, press...
... the phone setting menu. A call without choosing a phone line. Making a Call (Base Unit) Auto Line-Selection Dial (Base Unit) The Auto Line-Selection dial function allows the user to redial the last number called, or enter the phone number using the intercom. Press the Dial, Speaker or Headset button (when a Headset is automatically selected. 1. This section details the basic operation of the call on . 4. Making a Call Calls can be turned on hold, muting, call forwarding, transferring a call, and using the keypad (0-9, *, #). 31 NOTE: To cancel dialing at any time, press...

User Guide
Page 34
... number. Making a Call (Cordless Handset) Press and hold the End button to turn on the Navigation button to scroll to the number to the Base Unit after 15 seconds, it will show "No line is enabled via the phone setting menu. 3. Calls can not establish a connection to be saved. 3. Press the Redial button. 2. Press soft button. 4. You will be made by pressing the Talk or Speaker buttons or plugging in use...
... number. Making a Call (Cordless Handset) Press and hold the End button to turn on the Navigation button to scroll to the number to the Base Unit after 15 seconds, it will show "No line is enabled via the phone setting menu. 3. Calls can not establish a connection to be saved. 3. Press the Redial button. 2. Press soft button. 4. You will be made by pressing the Talk or Speaker buttons or plugging in use...

User Guide
Page 38
... the display if the caller's information has been blocked by the caller or the originating phone company. When you are on the phone and you must subscribe to answer. To end a headset call . 3. Press the Speaker button for the Cordless Handset, only the first one's information will show "Incoming call from the charging cradle and press the Talk button to a Caller ID with a Call Waiting Service. Using Your RCA 25450 Phone System Receiving a Call (Cordless Handset) 1. NOTE...
... the display if the caller's information has been blocked by the caller or the originating phone company. When you are on the phone and you must subscribe to answer. To end a headset call . 3. Press the Speaker button for the Cordless Handset, only the first one's information will show "Incoming call from the charging cradle and press the Talk button to a Caller ID with a Call Waiting Service. Using Your RCA 25450 Phone System Receiving a Call (Cordless Handset) 1. NOTE...

User Guide
Page 39
... the user to temporarily suspend a call up to handset call, pick up a conference call (Please refer to speakerphone call, press Speaker button. To switch to receiver call from speakerphone call . otherwise error tone will be plugged in charging cradle. Base Unit 1. To switch to receiver or headset call from headset call . NOTE: A headset must be heard. Switching Between Audio Modes During a call, you can switch among the following audio modes: handset call (Base Unit only), receiver call (Cordless Handset only), speakerphone call and headset call , unplug the headset. 2.
... the user to temporarily suspend a call up to handset call, pick up a conference call (Please refer to speakerphone call, press Speaker button. To switch to receiver call from speakerphone call . otherwise error tone will be plugged in charging cradle. Base Unit 1. To switch to receiver or headset call from headset call . NOTE: A headset must be heard. Switching Between Audio Modes During a call, you can switch among the following audio modes: handset call (Base Unit only), receiver call (Cordless Handset only), speakerphone call and headset call , unplug the headset. 2.

User Guide
Page 40
... hold and the corresponding Line (1-4) button on Base Unit will remind the user with 3 short beeps every 30 seconds. Using Your RCA 25450 Phone System When a call is on hold, the extension that originally put it will fail and the display will automatically end the call on hold can only be within the Base Unit's coverage area to resume a call . 40 To put a call on hold will flash (slow) red. 4.
... hold and the corresponding Line (1-4) button on Base Unit will remind the user with 3 short beeps every 30 seconds. Using Your RCA 25450 Phone System When a call is on hold, the extension that originally put it will fail and the display will automatically end the call on hold can only be within the Base Unit's coverage area to resume a call . 40 To put a call on hold will flash (slow) red. 4.
User Guide
Page 41
...connection" message. NOTE: Each Cordless Handset that all calls are not forwarded. NOTE: The Cordless Handset must be within the Base Unit's coverage area to set up call forwarding function allows calls directed to a specific extension to be able to another phone number. soft button. Press the soft button. 4. Using Your RCA 25450 Phone System Base Unit 1. Call Forwarding (Cordless Handset Only) The Auto Attendant feature on the Base Unit must be on the Cordless Handset display that has Call Forwarding enabled will automatically replace the previous number. Intercom...
...connection" message. NOTE: Each Cordless Handset that all calls are not forwarded. NOTE: The Cordless Handset must be within the Base Unit's coverage area to set up call forwarding function allows calls directed to a specific extension to be able to another phone number. soft button. Press the soft button. 4. Using Your RCA 25450 Phone System Base Unit 1. Call Forwarding (Cordless Handset Only) The Auto Attendant feature on the Base Unit must be on the Cordless Handset display that has Call Forwarding enabled will automatically replace the previous number. Intercom...

User Guide
Page 47
... call, a headset call or a speakerphone call . Press the soft button. 2. Enter the telephone number and the number dialed will hear the dial tone. 4. Press 5 or 6 on the Navigation button to scroll through the options until "Line call" appears on and you wish to answer the intercom call , put the handset in charging cradle. Ignore and Override an Incoming Line or Intercom Call Base Unit (Making an Outbound Line Call) During an incoming or intercom call ring, the user can be lifted and used or the Headset button...
... call, a headset call or a speakerphone call . Press the soft button. 2. Enter the telephone number and the number dialed will hear the dial tone. 4. Press 5 or 6 on the Navigation button to scroll through the options until "Line call" appears on and you wish to answer the intercom call , put the handset in charging cradle. Ignore and Override an Incoming Line or Intercom Call Base Unit (Making an Outbound Line Call) During an incoming or intercom call ring, the user can be lifted and used or the Headset button...
User Guide
Page 51
... option screen. If the administrator password was changed and the new number is not known, there is useful if an extension password has become unknown. Press the Voice Mail button. 2. Use this feature. 1. The administrator password will return to scroll through the options until "Reset password" appears on changing the administrator password. 5. Press the soft button. See "Settings and Adjustments, Base Unit Setup, Administrator Password" for instructions on the display. 3. To reset an extension password to the default "0000" setting...
... option screen. If the administrator password was changed and the new number is not known, there is useful if an extension password has become unknown. Press the Voice Mail button. 2. Use this feature. 1. The administrator password will return to scroll through the options until "Reset password" appears on changing the administrator password. 5. Press the soft button. See "Settings and Adjustments, Base Unit Setup, Administrator Password" for instructions on the display. 3. To reset an extension password to the default "0000" setting...

User Guide
Page 56
... the voice mailbox number, number of new messages, and number of old messages. Press the soft button. 11. The display will return to scroll through the options until "Delete greeting" appears on the Navigation button to the VM box option screen. Only recorded greetings can not be deleted. The display will return to the voice mail menu after 5 seconds. 7. NOTE: If the password is in use, the display will show "System busy" and...
... the voice mailbox number, number of new messages, and number of old messages. Press the soft button. 11. The display will return to scroll through the options until "Delete greeting" appears on the Navigation button to the VM box option screen. Only recorded greetings can not be deleted. The display will return to the voice mail menu after 5 seconds. 7. NOTE: If the password is in use, the display will show "System busy" and...

User Guide
Page 94
... time, the process will show the key tone (1-4) and the phone will be displayed when the Cordless Handset is not completed in HS menu options." To accept the key tone setting shown on the display. 3. Have the Cordless Handset ready to register the handset. Cordless Handset Setup Register Cordless Handset (Base Unit and Cordless Handset) Cordless handsets must complete registration of the handset within 30 seconds after programming the Base Unit. 1. If the Cordless Handset was purchased with the Base Unit before use. If the registration process is powered...
... time, the process will show the key tone (1-4) and the phone will be displayed when the Cordless Handset is not completed in HS menu options." To accept the key tone setting shown on the display. 3. Have the Cordless Handset ready to register the handset. Cordless Handset Setup Register Cordless Handset (Base Unit and Cordless Handset) Cordless handsets must complete registration of the handset within 30 seconds after programming the Base Unit. 1. If the Cordless Handset was purchased with the Base Unit before use. If the registration process is powered...

User Guide
Page 98
... ringer volume for future phone calls until changed. 1. Using the Menu System 1. There are scrolled through. The displayed volume level will be adjusted to the next Cordless Handset requesting registration. Press 5 or 6 on the Navigation button to on the line by pressing 5 or 6 on the Navigation button. To increase voice volume, press the 5 on the Navigation button. The volume can be assigned to the user's preferences including: Cordless Handset Receiver, Speakerphone, and Headset volumes...
... ringer volume for future phone calls until changed. 1. Using the Menu System 1. There are scrolled through. The displayed volume level will be adjusted to the next Cordless Handset requesting registration. Press 5 or 6 on the Navigation button to on the line by pressing 5 or 6 on the Navigation button. To increase voice volume, press the 5 on the Navigation button. The volume can be assigned to the user's preferences including: Cordless Handset Receiver, Speakerphone, and Headset volumes...


